A Resource Access Management (RAM) user requires permissions to access other cloud resources. This topic describes the procedures for same-account and cross-account authorization.
Prerequisites
An AnalyticDB for MySQL Enterprise Edition, Basic Edition, or Data Lakehouse Edition cluster is created.
Spark job permissions
To submit a Spark job, you need the following three types of permissions:
Permission | Description |
One of the following permissions:
|
For more information, see Grant permissions to a RAM user. |
Read and write permissions on AnalyticDB for MySQL databases and tables | AnalyticDB for MySQL manages database and table permissions using database accounts by default. When you submit a Spark job as a RAM user, if the job needs to read or write data, you must attach a standard database account to the RAM user. For more information, see Attach a database account to or detach a database account from a RAM user. |
| This role is used to authorize AnalyticDB for MySQL Spark to access other cloud resources, such as Object Storage Service (OSS) directories and Tablestore data. For more information, see Same-account authorization. |
Same-account authorization
Prerequisites
You have created a RAM user.
Procedure
Grant permissions in the RAM console (Recommended)
Step 1: Create a RAM role and grant permissions
Create a RAM role.
NoteYou can skip this step if you have already created a RAM role with Trusted Entity Type set to Alibaba Cloud Service and Select Trusted Service set to AnalyticDB For MySQL.
Log on to the RAM console as a RAM user who has administrative rights.
In the left-side navigation pane, choose .
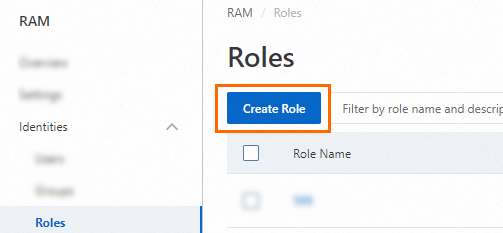
On the Roles page, click Create Role.
On the Create Role page, set Trusted Entity Type to Alibaba Cloud Service and Select Trusted Service to Cloud-native Data Warehouse AnalyticDB For MySQL. Then, click OK.
In the Create Role dialog box, configure the Role Name parameter and click OK.
Grant permissions to the RAM role.
Click Precise Authorization.
In the Precise Authorization panel, set the policy type to System Policy or Custom Policy and provide a policy name.
If you want to access only specific cloud resources, you must create a custom policy. For more information, see Create a custom permission policy.
Click OK.
Step 2: Submit a Spark job
After you create a RAM role and grant permissions in the RAM console, you must specify the spark.adb.roleArn parameter in the Spark job configuration when you submit a job. This allows the job to run. The following example shows a sample configuration:
{
  "comments": [
    "-- Here is just an example of using LakeCache. Modify the content and run your spark program."
  ],
  "args": ["oss://testBucketName/data/readme.txt"],
  "name": "spark-oss-test",
  "file": "oss://testBucketName/data/example.py",
  "conf": {
    "spark.adb.lakecache.enabled": "true";
    "spark.adb.roleArn": "acs:ram::testAccountID:role/adbtest";
  }
}
Quick authorization
When you use quick authorization, the AliyunADBSparkProcessingDataRole role is granted the AliyunADBSparkProcessingDataRolePolicy permission by default. This policy includes permissions to access cloud resources such as OSS, Tablestore, and DMS, which may result in excessive permissions. We recommend that you detach the AliyunADBSparkProcessingDataRolePolicy permission after authorization. Then, grant the AliyunADBSparkProcessingDataRole role only the permissions required by your business. For more information, see Revoke permissions from a RAM role.
Click the quick authorization link.
NoteOnly users with RAM user management permissions can use quick authorization. These permissions must include the ability to create RAM roles, create RAM policies, query RAM roles, and query RAM policies.
In the lower-left corner, click the Agree To Authorize button.
After you grant authorization, the AliyunADBSparkProcessingDataRole service role is automatically created for AnalyticDB for MySQL. AnalyticDB for MySQL then uses this role to access other cloud resources.
Cross-account authorization
Spark jobs in AnalyticDB for MySQL can access cloud resources that belong to other Alibaba Cloud accounts. This section uses an example to describe how to grant cross-account permissions. In this example, an Alibaba Cloud account A (UID: testAccountIDA) needs to access data that belongs to an Alibaba Cloud account B (UID: testAccountIDB).
Step 1: Create a RAM role for Account B and grant permissions
Create a RAM role and allow Account A to assume this role.
NoteIf you have already created a RAM role and allowed Account A to assume it, you can skip this step.
Log on to the RAM console using Alibaba Cloud account B or a RAM administrator of Account B.
In the left navigation pane, choose .
On the Roles page, click Create Role.
On the Create Role page, set Trusted Entity Type to Alibaba Cloud Account, specify the trusted account, and then click OK.
Configure the role information.
Enter a Role Name, such as
admin-oss.Optional: You can enter a Note.
For Trusted Alibaba Cloud Account, select Other Alibaba Cloud Account and enter the UID of Alibaba Cloud account A (
testAccountIDA).
Click Finish.
Grant permissions to the RAM role.
Click Precise Authorization.
In the Precise Authorization panel, set the policy type to System Policy or Custom Policy and enter a policy name.
Access OSS
AliyunOSSReadOnlyAccess: Grants read-only permissions on OSS.
AliyunOSSFullAccess: Grants full control over OSS. You must grant this permission to the RAM role to perform data update operations, such as INSERT, on OSS external tables.
Access resources in a specific VPC
To access resources in a specific VPC, you must create a custom policy. In the `Resource` parameter of the policy, specify the security group and vSwitch to which the resources belong. For more information, see Create a custom permission policy.
This example grants permissions to access an ApsaraDB RDS for MySQL instance in a specific VPC. The name of the custom policy is
eni_policy. The following code shows the policy document:NoteYou must add a security group to the ApsaraDB RDS for MySQL instance. The inbound and outbound rules of the security group must allow access to the port of the ApsaraDB RDS for MySQL instance.
{
    "Version": "1",
    "Statement": [
        {
            "Effect": "Allow",
            "Action": "ecs:*",
            "Resource": "acs:ecs:*:*:securitygroup/<The ID of the security group to which the RDS instance belongs>"
        },
        {
            "Effect": "Allow",
            "Action": "vpc:*",
            "Resource": "acs:vpc:*:*:vswitch/<The ID of the vSwitch to which the RDS instance belongs>"
        }
    ]
}
Click OK.
Click Close.
Modify the trust policy to allow any RAM user of Account A to assume this RAM role.
In the left navigation pane, choose .
On the Roles page, click the target RAM role.
On the Trust Policy tab, click Edit Trust Policy.
In the editor, modify the trust policy and click OK.
{
  "Statement": [
    {
      "Action": "sts:AssumeRole",
      "Effect": "Allow",
      "Principal": {
        "RAM": [
          "acs:ram::testAccountIDA:root"
        ]
      }
    },
    {
      "Action": "sts:AssumeRole",
      "Effect": "Allow",
      "Principal": {
        "Service": [
          "testAccountIDA@ads.aliyuncs.com"
        ]
      }
    }
  ],
  "Version": "1"
}
Step 2: Create a RAM user for Account A and grant it the permissions to assume the RAM role
Create a RAM user.
Log on to the RAM console using Alibaba Cloud account A or a RAM administrator of Account A.
In the left navigation pane, choose .
On the Users page, click Create User.

On the Create User page, you can configure the user's basic information in the User Account Information section.
Logon Name: The name can be up to 64 characters long and can contain letters, digits, periods (.), hyphens (-), and underscores (_).
Display Name: The name can contain up to 128 characters.
Tags: Click
 to enter a tag key and a tag value. You can add tags to the RAM user for tag-based management.
NoteClick Add User to create RAM users in a batch.
In the Access Mode section, select Console Password Logon. You can then configure the logon password, password reset policy, and multi-factor authentication (MFA) policy as needed. For more information, see Console access.
Click OK.
Create a permission policy that allows the RAM user to assume any role.
In the left navigation pane, choose .
On the Policies page, click Create Policy.
On the Create Policy page, click the Script Editor tab.
Enter the policy document and click OK.
{
    "Version": "1",
    "Statement": [
        {
            "Action": "ram:PassRole",
            "Resource": "*",
            "Effect": "Allow"
        }
    ]
}
In the Create Policy dialog box, enter a Policy Name and a Note and click OK.
Grant permissions to the RAM user.
In the Add Permissions panel, grant the permission created in Step 2 to the RAM user.
Click Confirm Authorization.