Knative Pod Autoscaler (KPA) automatically scales pods based on concurrency or requests per second (RPS). By default, pods scale to zero when idle. This topic describes how to configure KPA scaling parameters, including concurrency targets, scaling boundaries, and scale-to-zero behavior.
Prerequisites
Knative is deployed in your cluster. For more information, see Deploy Knative.
How it works
Knative Serving injects a queue proxy container named queue-proxy into each pod. This container reports the application container's concurrency metrics to the autoscaler. The autoscaler then uses these metrics and a corresponding algorithm to adjust the number of pods for the deployment, which enables auto scaling.

KPA configurations
Some configurations can be enabled at the revision level using annotations or applied globally through a ConfigMap. If you configure both, the revision-level configuration takes precedence over the global configuration.
config-autoscaler configurations
To configure KPA, you must configure the config-autoscaler ConfigMap. This ConfigMap is configured by default. The following section describes its key parameters.
Run the following command to view the config-autoscaler ConfigMap.
kubectl -n knative-serving describe cm config-autoscalerThe following is the default config-autoscaler ConfigMap:
apiVersion: v1
kind: ConfigMap
metadata:
 name: config-autoscaler
 namespace: knative-serving
data:
# The default maximum pod concurrency. The default value is 100.
 container-concurrency-target-default: "100"
# The target concurrency utilization. The default value is 70, which represents 70%.
 container-concurrency-target-percentage: "70"
# The default requests per second (RPS). The default value is 200.
 requests-per-second-target-default: "200"
# The target burst capacity parameter handles traffic bursts to prevent application container overload. The default value is 211. This means if the target threshold of the service multiplied by the number of ready pods is less than 211, requests are routed through the Activator.
# The Activator acts as a request buffer. The calculation result of this parameter determines whether requests pass through the Activator component.
# When this value is 0, requests switch to the Activator only when pods scale down to 0.
# When this value is greater than 0 and container-concurrency-target-percentage is set to 100, requests always pass through the Activator.
# When this value is -1, it indicates an infinite request burst capacity. Requests also always pass through the Activator. Other negative values are invalid.
# If (Number of ready pods × Maximum concurrency) - Target burst capacity - Concurrency calculated in Panic mode < 0, the traffic burst exceeds the capacity threshold. The system then switches to the Activator for request buffering.
 target-burst-capacity: "211"
# The stable window. The default value is 60s.
 stable-window: "60s"
# The panic window percentage. The default value is 10, which means the default panic window is 6 seconds (60 × 0.1 = 6).
 panic-window-percentage: "10.0"
# The panic threshold percentage. The default value is 200.
 panic-threshold-percentage: "200.0"
# The maximum scale-up rate. This indicates the maximum number of pods for a single scale-out event. The actual calculation is: math.Ceil(MaxScaleUpRate × readyPodsCount).
 max-scale-up-rate: "1000.0"
# The maximum scale-down rate. The default value is 2, which means half of the pods are removed during each scale-in.
 max-scale-down-rate: "2.0"
# Specifies whether to enable scaling to zero. Enabled by default.
 enable-scale-to-zero: "true"
# The graceful period for scaling to zero. This is the delay before scaling to zero. The default is 30s.
 scale-to-zero-grace-period: "30s"
# The retention period for a pod when scaling to zero. This parameter is useful when pod startup costs are high.
 scale-to-zero-pod-retention-period: "0s"
# The type of autoscaler plugin. Supported plugins include KPA, HPA, and AHPA.
 pod-autoscaler-class: "kpa.autoscaling.knative.dev"
# The request capacity of the activator.
 activator-capacity: "100.0"
# The number of pods to start during initialization when a revision is created. The default is 1.
 initial-scale: "1"
# Specifies whether to allow zero pods to be initialized when a revision is created. The default is false, which means it is not allowed.
 allow-zero-initial-scale: "false"
# The minimum number of pods to retain at the revision level. The default is 0, which means the minimum can be 0.
 min-scale: "0"
# The maximum number of pods for a revision to scale out to. The default is 0, which means there is no upper limit.
 max-scale: "0"
# The delay time for scaling down. The default is 0s, which means scaling down occurs immediately.
 scale-down-delay: "0s"
Metric configurations
You can use the autoscaling.knative.dev/metric annotation to configure metrics for each revision. Different autoscaler plugins support different metric configurations.
Supported metrics:
"concurrency","rps","cpu","memory", and other custom metrics.Default metric:
"concurrency".
Target threshold configurations
Configure a target threshold for each revision using the autoscaling.knative.dev/target annotation. For a global target threshold, use the container-concurrency-target-default annotation in a ConfigMap.
Revision level
apiVersion: serving.knative.dev/v1
kind: Service
metadata:
  name: helloworld-go
  namespace: default
spec:
  template:
    metadata:
      annotations:
        # Set the scaling target threshold to 50 at the revision level.
        autoscaling.knative.dev/target: "50"
    spec:
      containers:
        - image: registry.cn-hangzhou.aliyuncs.com/knative-sample/helloworld-go:73fbdd56
Global level
apiVersion: v1
kind: ConfigMap
metadata:
 name: config-autoscaler
 namespace: knative-serving
data:
 container-concurrency-target-default: "200"
Scale-to-zero configurations
Controlling scale-in to 0 using the global configuration
The enable-scale-to-zero parameter can be set to "false" or "true". It specifies whether a Knative service automatically scales down to zero replicas when idle.
apiVersion: v1
kind: ConfigMap
metadata:
 name: config-autoscaler
 namespace: knative-serving
data:
 enable-scale-to-zero: "false" # When the value is "false", the auto scaling feature is disabled. The Knative service does not automatically scale down to zero replicas when idle.
Configure the global graceful scale-to-zero period
The scale-to-zero-grace-period parameter specifies the waiting time before a Knative service scales down to zero replicas.
apiVersion: v1
kind: ConfigMap
metadata:
 name: config-autoscaler
 namespace: knative-serving
data:
 scale-to-zero-grace-period: "40s"
Pod retention period for scaling to zero
Revision level
The autoscaling.knative.dev/scale-to-zero-pod-retention-period annotation specifies the period to retain a pod after the service has been idle for some time.
apiVersion: serving.knative.dev/v1
kind: Service
metadata:
  name: helloworld-go
  namespace: default
spec:
  template:
    metadata:
      annotations:
        autoscaling.knative.dev/scale-to-zero-pod-retention-period: "1m5s"
    spec:
      containers:
        - image: registry.cn-hangzhou.aliyuncs.com/knative-sample/helloworld-go:73fbdd56
Global level
The scale-to-zero-pod-retention-period key specifies the period to retain a pod before a Knative service scales down to zero replicas.
apiVersion: v1
kind: ConfigMap
metadata:
 name: config-autoscaler
 namespace: knative-serving
data:
 scale-to-zero-pod-retention-period: "42s"
Concurrency configurations
Concurrency is the maximum number of requests that a single pod can process at the same time. You can set the concurrency using soft limit, hard limit, target utilization, and requests per second (RPS) configurations.
Soft limit configuration
A soft limit is a target, not a strict boundary. In some cases, especially during a sudden burst of requests, this value may be exceeded.
Revision level
apiVersion: serving.knative.dev/v1
kind: Service
metadata:
  name: helloworld-go
  namespace: default
spec:
  template:
    metadata:
      annotations:
        autoscaling.knative.dev/target: "200"
Global level
apiVersion: v1
kind: ConfigMap
metadata:
 name: config-autoscaler
 namespace: knative-serving
data:
 container-concurrency-target-default: "200" # Specifies the default container concurrency target for the Knative service.
Hard limit configuration (Revision level)
Use a hard limit configuration only when your application has a clear upper limit for concurrent execution. Specifying a low hard limit can negatively affect your application's throughput and latency.
A hard limit is a mandatory upper bound. If concurrency reaches the hard limit, excess requests are buffered by the queue-proxy or activator until enough resources are available to process them.
apiVersion: serving.knative.dev/v1
kind: Service
metadata:
  name: helloworld-go
  namespace: default
spec:
  template:
    spec:
      containers:
        - image: registry.cn-hangzhou.aliyuncs.com/knative-sample/helloworld-go:73fbdd56
      containerConcurrency: 50
Target utilization
The target utilization value adjusts the concurrency threshold. This value specifies the target utilization percentage of the defined concurrency limit. This feature is also known as resource prefetch. It allows for scaling out before requests reach the defined hard limit.
For example, if containerConcurrency is set to 10 and the target utilization is set to 70%, the autoscaler creates a new pod when the average number of concurrent requests across all existing pods reaches 7. Because a pod needs time to be created and become ready, lowering the target utilization value lets you scale out pods earlier. This can reduce response latency and other issues caused by cold starts.
Revision level
apiVersion: serving.knative.dev/v1
kind: Service
metadata:
  name: helloworld-go
  namespace: default
spec:
  template:
    metadata:
      annotations:
        autoscaling.knative.dev/target-utilization-percentage: "70" # Configures the auto scaling feature of the Knative service and specifies the target resource utilization percentage.
    spec:
      containers:
        - image: registry.cn-hangzhou.aliyuncs.com/knative-sample/helloworld-go:73fbdd56
Global level
apiVersion: v1
kind: ConfigMap
metadata:
 name: config-autoscaler
 namespace: knative-serving
data:
 container-concurrency-target-percentage: "70" # Knative tries to ensure that the concurrency of each pod does not exceed 70% of the current available resources.
Requests per second (RPS) configuration
RPS is the number of requests a single pod can handle per second.
Revision level
apiVersion: serving.knative.dev/v1
kind: Service
metadata:
  name: helloworld-go
  namespace: default
spec:
  template:
    metadata:
      annotations:
        autoscaling.knative.dev/target: "150"
        autoscaling.knative.dev/metric: "rps" # Indicates that the service's auto scaling will adjust the number of replicas based on requests per second (RPS).
    spec:
      containers:
        - image: registry.cn-hangzhou.aliyuncs.com/knative-sample/helloworld-go:73fbdd56
Global level
apiVersion: v1
kind: ConfigMap
metadata:
 name: config-autoscaler
 namespace: knative-serving
data:
 requests-per-second-target-default: "150"
Scenario 1: Set the number of concurrent requests to enable auto scaling
You can set the number of concurrent requests to enable auto scaling with the Knative Pod Autoscaler (KPA).
Create an autoscale-go.yaml file and deploy it to the cluster.
apiVersion: serving.knative.dev/v1
kind: Service
metadata:
  name: autoscale-go
  namespace: default
spec:
  template:
    metadata:
      labels:
        app: autoscale-go
      annotations:
        autoscaling.knative.dev/target: "10" # Set the current maximum number of concurrent requests to 10.
    spec:
      containers:
        - image: registry.cn-hangzhou.aliyuncs.com/knative-sample/autoscale-go:0.1
kubectl apply -f autoscale-go.yamlRetrieve the service access gateway.
ALB
Run the following command to retrieve the service access gateway.
kubectl get albconfig knative-internetExpected output:
NAME               ALBID                    DNSNAME                                              PORT&PROTOCOL   CERTID   AGE
knative-internet   alb-hvd8nngl0lsdra15g0   alb-hvd8nng******.cn-beijing.alb.aliyuncs.com                            2
MSE
Run the following command to retrieve the service access gateway.
kubectl -n knative-serving get ing stats-ingressExpected output:
NAME            CLASS                  HOSTS   ADDRESS                         PORTS   AGE
stats-ingress   knative-ingressclass   *       101.201.XX.XX,192.168.XX.XX   80      15d
ASM
Run the following command to retrieve the service access gateway.
kubectl get svc istio-ingressgateway --namespace istio-system --output jsonpath="{.status.loadBalancer.ingress[*]['ip']}"Expected output:
121.XX.XX.XXKourier
Run the following command to obtain the service access gateway.
kubectl -n knative-serving get svc kourierExpected output:
NAME      TYPE           CLUSTER-IP    EXTERNAL-IP      PORT(S)                      AGE
kourier   LoadBalancer   10.0.XX.XX    39.104.XX.XX     80:31133/TCP,443:32515/TCP   49m
Use the Hey stress testing tool to maintain 50 concurrent requests for 30 s.
NoteFor more information about the Hey stress testing tool, see Hey.
hey -z 30s -c 50 -host "autoscale-go.default.example.com" "http://121.199.XXX.XXX" # 121.199.XXX.XXX is the gateway IP address.Expected output:
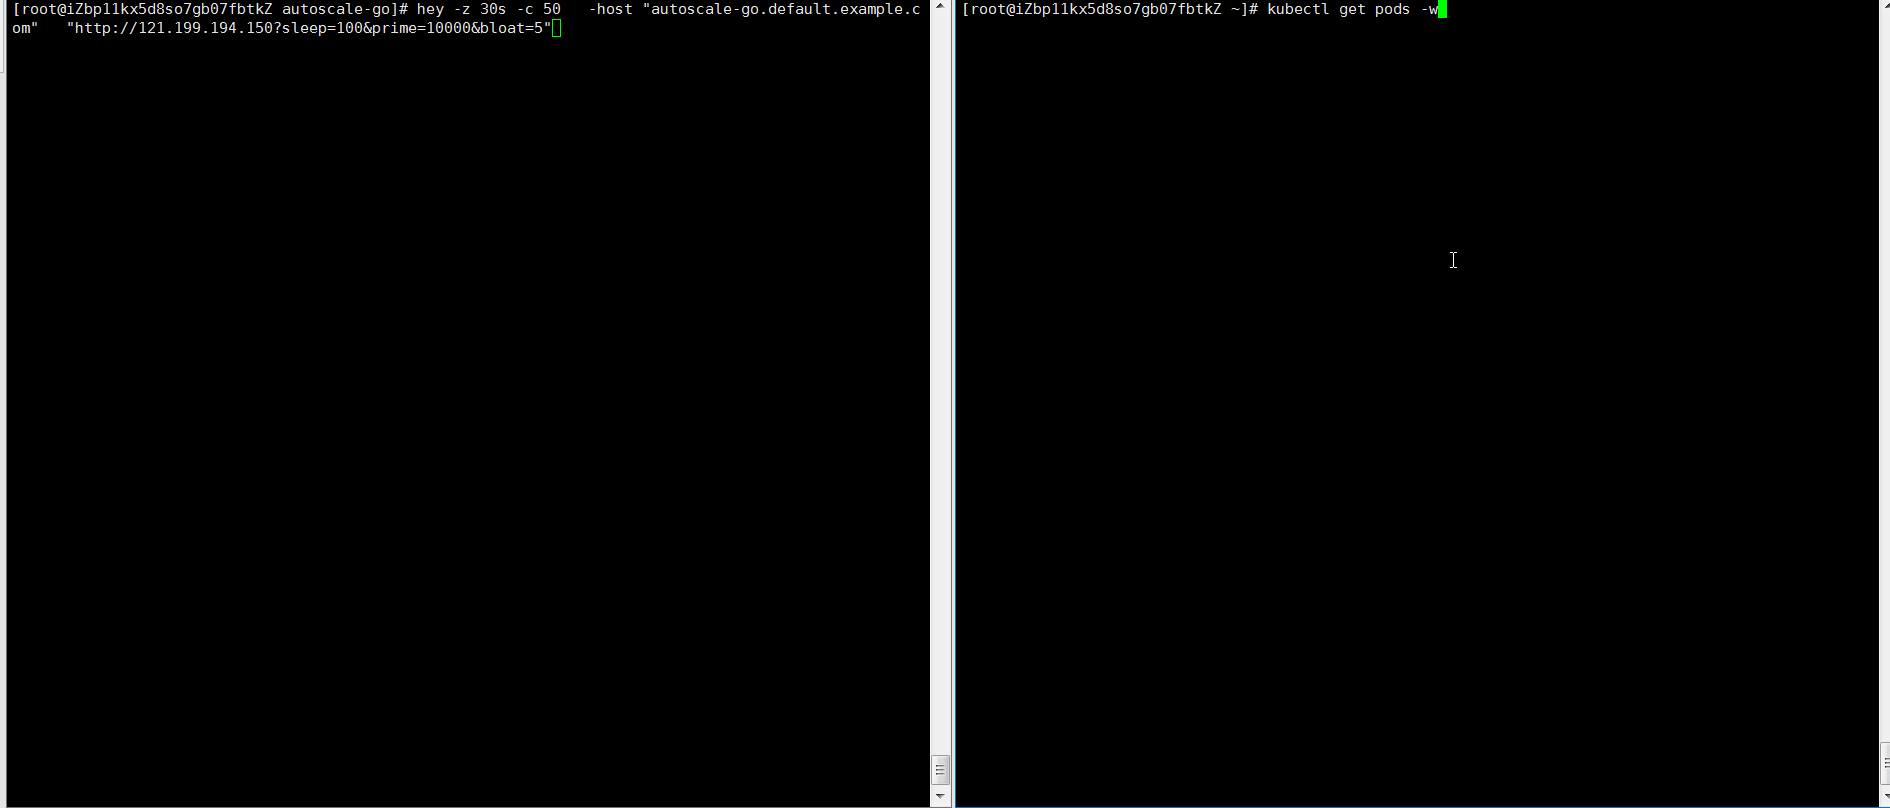
Five pods are scaled out as expected.
Scenario 2: Set scaling boundaries to enable auto scaling
Scaling boundaries define the minimum and maximum number of pods for an application service. Enable auto scaling by setting the minimum and maximum number of pods for the application service.
Create an autoscale-go.yaml file and deploy it to the cluster.
The example YAML sets the maximum number of concurrent requests to 10, the
min-scale(minimum number of pods) to 1, and themax-scale(maximum number of pods) to 3.apiVersion: serving.knative.dev/v1 kind: Service metadata: name: autoscale-go namespace: default spec: template: metadata: labels: app: autoscale-go annotations: autoscaling.knative.dev/target: "10" autoscaling.knative.dev/min-scale: "1" autoscaling.knative.dev/max-scale: "3" spec: containers: - image: registry.cn-hangzhou.aliyuncs.com/knative-sample/autoscale-go:0.1kubectl apply -f autoscale-go.yamlRetrieve the service access gateway.
ALB
Run the following command to retrieve the service access gateway.
kubectl get albconfig knative-internetExpected output:
NAME               ALBID                    DNSNAME                                              PORT&PROTOCOL   CERTID   AGE
knative-internet   alb-hvd8nngl0lsdra15g0   alb-hvd8nng******.cn-beijing.alb.aliyuncs.com                            2
MSE
Run the following command to retrieve the service access gateway.
kubectl -n knative-serving get ing stats-ingressExpected output:
NAME            CLASS                  HOSTS   ADDRESS                         PORTS   AGE
stats-ingress   knative-ingressclass   *       101.201.XX.XX,192.168.XX.XX   80      15d
ASM
Run the following command to retrieve the service access gateway.
kubectl get svc istio-ingressgateway --namespace istio-system --output jsonpath="{.status.loadBalancer.ingress[*]['ip']}"Expected output:
121.XX.XX.XXKourier
Run the following command to obtain the service access gateway.
kubectl -n knative-serving get svc kourierExpected output:
NAME      TYPE           CLUSTER-IP    EXTERNAL-IP      PORT(S)                      AGE
kourier   LoadBalancer   10.0.XX.XX    39.104.XX.XX     80:31133/TCP,443:32515/TCP   49m
Use the Hey stress testing tool to maintain 50 concurrent requests for 30 s.
NoteFor more information about the Hey stress testing tool, see Hey.
hey -z 30s -c 50 -host "autoscale-go.default.example.com" "http://121.199.XXX.XXX" # 121.199.XXX.XXX is the gateway IP address.Expected output:
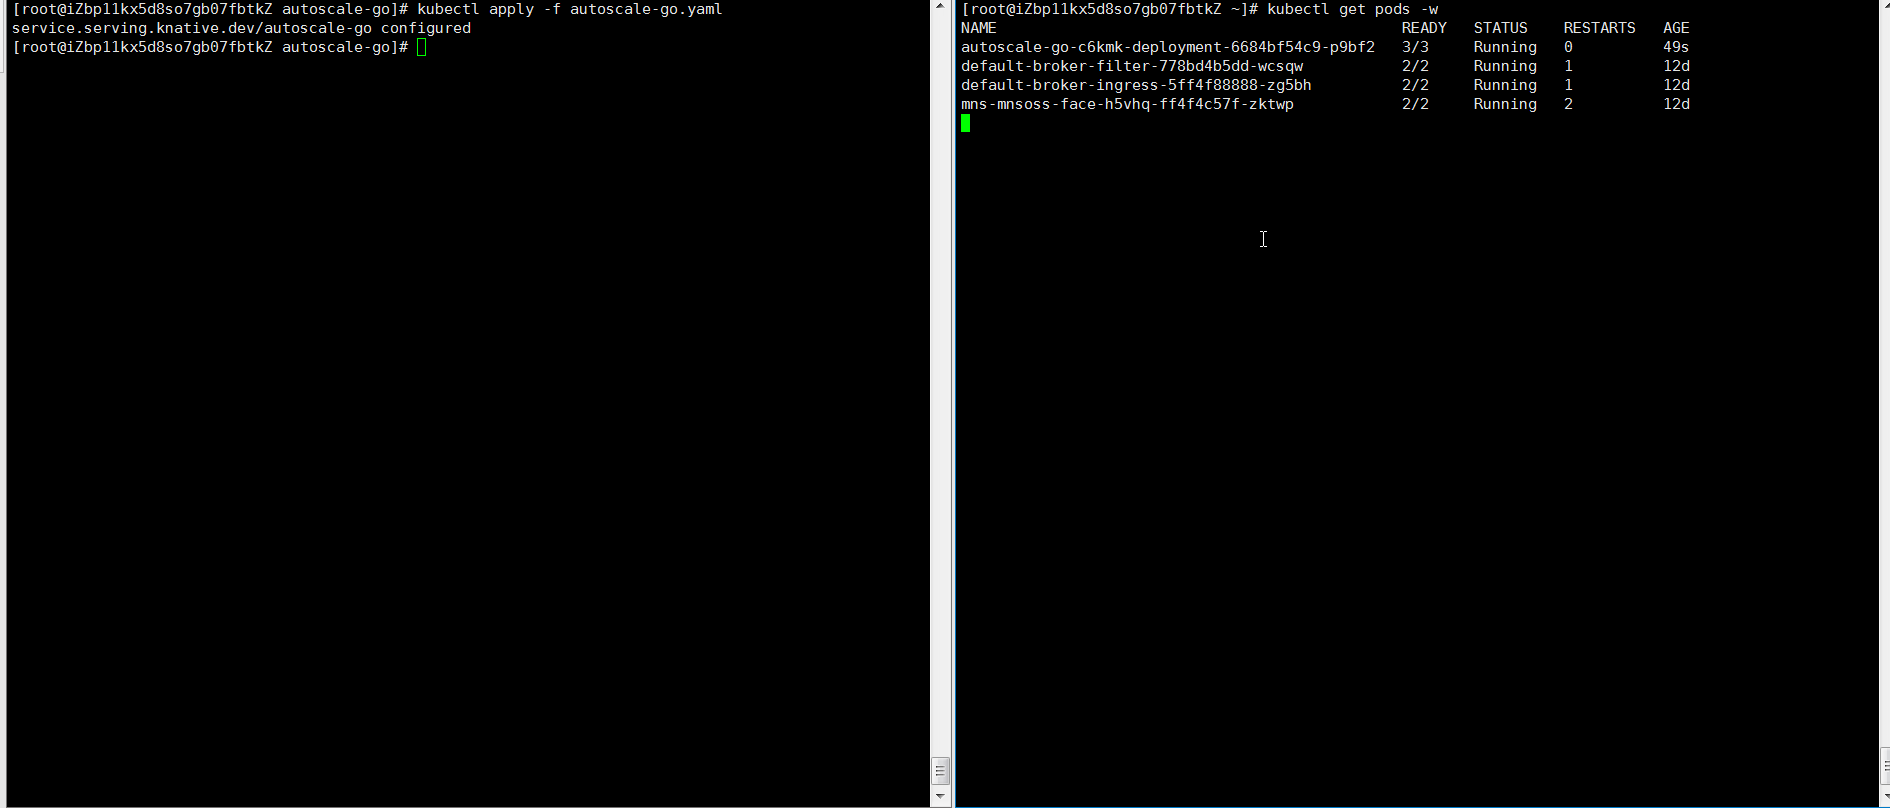
A maximum of 3 pods are scaled out. Even when there is no incoming request traffic, 1 pod remains running. This is the expected behavior.
References
You can use Advanced Horizontal Pod Autoscaler (AHPA) in Knative for proactive scaling planning based on historical resource metrics. This enables scheduled scaling. For more information, see Use Knative and AHPA to implement scheduled auto scaling.