This topic describes how to deploy a Stable Diffusion application in a ACK Serverless cluster. You can deploy an application in the Container Service for Kubernetes (ACK) console or by using kubectl. After the application is deployed, you can access the application through an external endpoint and generate images from prompts.
Prerequisites
An ACK Serverless cluster is created in the China (Beijing), China (Hangzhou), China (Shanghai), or China (Shenzhen) region. For more information, see Create an ACK Serverless cluster.
Introduction to Stable Diffusion
Stable Diffusion WebUI is a popular project on Github that allows you to generate images from prompts. Stable Diffusion consists of a text understanding component and an image generating component. Stable Diffusion encodes prompts by using the CLIP model and generates images by using a diffusion model.
Alibaba Cloud does not guarantee the legitimacy, security, or accuracy of the third-party model Stable Diffusion. Alibaba Cloud shall not be held liable for any damages caused by the use of Stable Diffusion.
You must abide by the user agreements, usage specifications, and relevant laws and regulations of Stable Diffusion. You shall bear all consequences resulting from the legitimacy and compliance requirements of Stable Diffusion.
Step 1: Deploy a Stable Diffusion application
You can deploy a Stable Diffusion application in the ACK console. You can also use kubectl to connect to an ACK Serverless cluster and then create a YAML file to deploy an application.
Deploy the application in the ACK console
Log on to the ACK console. In the left-side navigation pane, click Clusters.
On the Clusters page, click the name of the cluster that you want to manage and choose in the left-side navigation pane.
On the Deployments page, click Create from Image.

On the Basic Information tab, specify a name, such as stable-diffusion, and then click Next.

On the Container tab, specify the parameters in the General, Health Check, and Lifecycle sections, and then click Next.
Category
Parameter
Example
Configuration page
General
Image Name
Public network address :yunqi-registry.cn-shanghai.cr.aliyuncs.com/lab/stable-diffusion: v1.2.0.
To pull the image over an internal network, select an internal network address based on the region of the cluster.
Internal network addresses:
China (Beijing): registry-vpc.cn-beijing.aliyuncs.com/yunqi-lab/stable-diffusion:v1.2.0
China (Shanghai) :registry-vpc.cn-shanghai.aliyuncs.com/yunqi-lab/stable-diffusion:v1.2.0
China (Hangzhou) :registry-vpc.cn-hangzhou.aliyuncs.com/yunqi-lab/stable-diffusion:v1.2.0
China (Shenzhen) :registry-vpc.cn-shenzhen.aliyuncs.com/yunqi-lab/stable-diffusion:v1.2.0

Required Resources
CPU: 8 vCPU
Memory: 16 GB
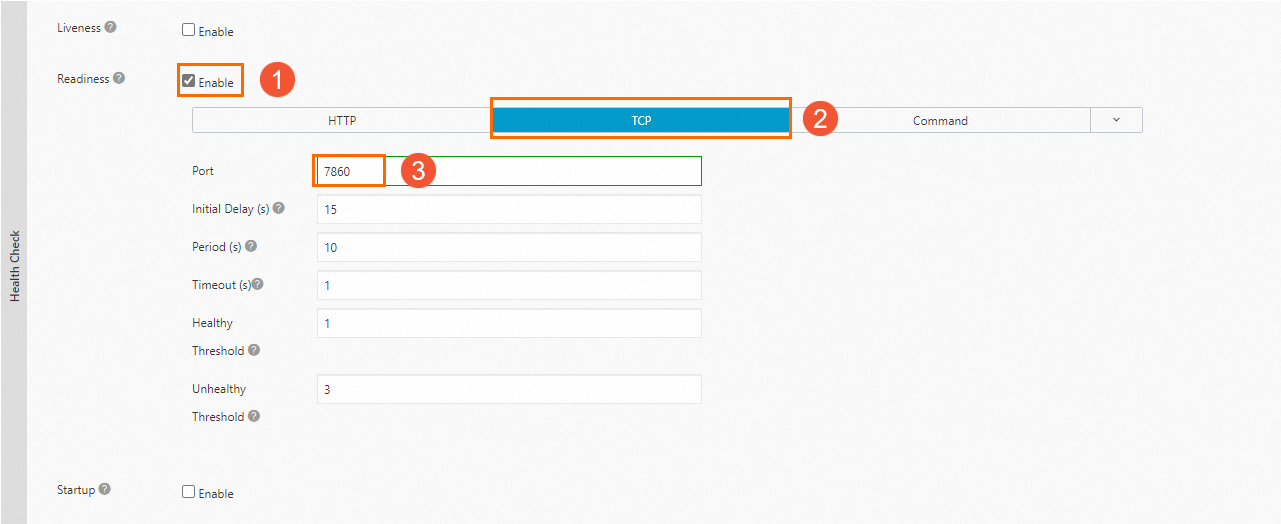
Health Check
Readiness
Readiness: Enable
Select TCP
Port: 7860

Lifecycle
Start
Command: ["python3", "launch.py"]
Parameter: ["--listen", "--skip-torch-cuda-test", "--no-half"]

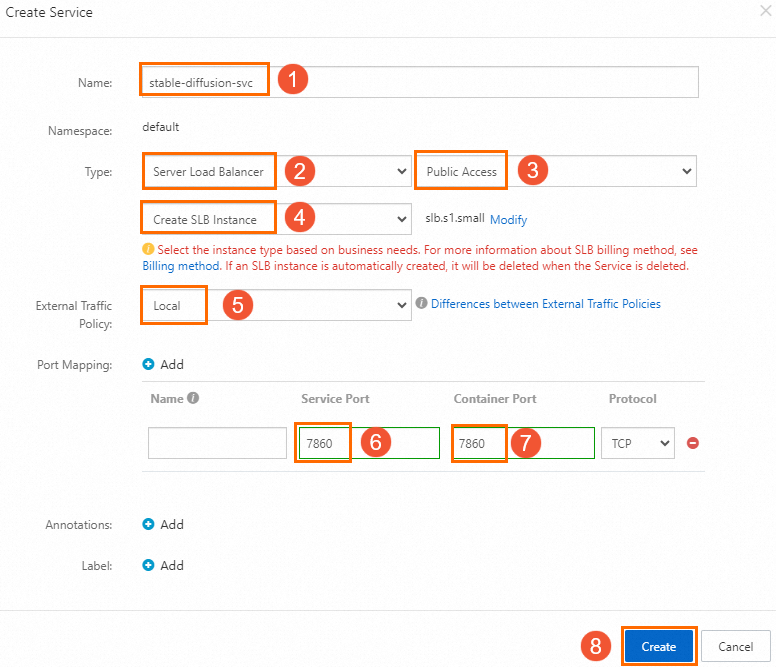
On the Advanced tab, click Create next to Services.

In the Create Service dialog box, set the parameters and click Create.
The Service is used to expose the Stable Diffusion application.

On the Advanced page, click Create.
If the following page is returned, the application is created. You can click View Details to view information about the application on the Pods, Access Method, Events, Pod Scaling, History Versions, Logs, or Triggers tab.

After the status of the pod changes to Running, the Stable Diffusion application is deployed.
Deploy the application by using kubectl
A kubectl client is connected to the cluster. For more information, see Obtain the kubeconfig file of a cluster and use kubectl to connect to the cluster.
Create a YAML file named stable-diffusion.yaml and copy the following content to the file.
In the following sample code,
imageis the public network address. To pull the image over an internal network, replace theimageaddress based on the cluster region.China (Beijing): registry-vpc.cn-beijing.aliyuncs.com/yunqi-lab/stable-diffusion:v1.2.0
China (Shanghai): registry-vpc.cn-shanghai.aliyuncs.com/yunqi-lab/stable-diffusion:v1.2.0
China (Hangzhou): registry-vpc.cn-hangzhou.aliyuncs.com/yunqi-lab/stable-diffusion:v1.2.0
China (Shenzhen): registry-vpc.cn-shenzhen.aliyuncs.com/yunqi-lab/stable-diffusion:v1.2.0
apiVersion: apps/v1
kind: Deployment
metadata:
  labels:
    app: stable-diffusion
  name: stable-diffusion
  namespace: default
spec:
  replicas: 1
  selector:
    matchLabels:
      app: stable-diffusion
  template:
    metadata:
      labels:
        app: stable-diffusion
    spec:
      containers:
      - args:
        - --listen
        - --skip-torch-cuda-test
        - --no-half
        command:
        - python3
        - launch.py
        image: yunqi-registry.cn-shanghai.cr.aliyuncs.com/lab/stable-diffusion:v1.2.0
        imagePullPolicy: IfNotPresent
        name: stable-diffusion
        ports:
        - containerPort: 7860
          protocol: TCP
        readinessProbe:
          tcpSocket:
            port: 7860
        resources:
          limits:
            cpu: "8"
            memory: 16Gi
            ephemeral-storage: 50Gi
---
apiVersion: v1
kind: Service
metadata:
  annotations:
    service.beta.kubernetes.io/alibaba-cloud-loadbalancer-address-type: internet
    service.beta.kubernetes.io/alibaba-cloud-loadbalancer-instance-charge-type: PayByCLCU
  name: stable-diffusion-svc
  namespace: default
spec:
  externalTrafficPolicy: Local
  ports:
  - port: 7860
    protocol: TCP
    targetPort: 7860
  selector:
    app: stable-diffusion
  type: LoadBalancer
Run the following command to deploy the Stable Diffusion application:
kubectl apply -f stable-diffusion.yamlRun the following command to query the status of the application:
kubectl get deployment stable-diffusionExpected output:
NAME              READY   UP-TO-DATE   AVAILABLE    AGE
stable-diffusion   1/1     1            1           103m
Step 2: Access the Service
Log on to the ACK console. In the left-side navigation pane, click Clusters.
On the Clusters page, click the name of the cluster that you want to manage and choose in the left-side navigation pane.
On the Services page, click the Service name that you want to manage. In the Basic Information section, find the External Endpoint parameter, and click the endpoint next to it. Example: 47.111.XX.XX:7860. You can then access and use the Stable Diffusion application.
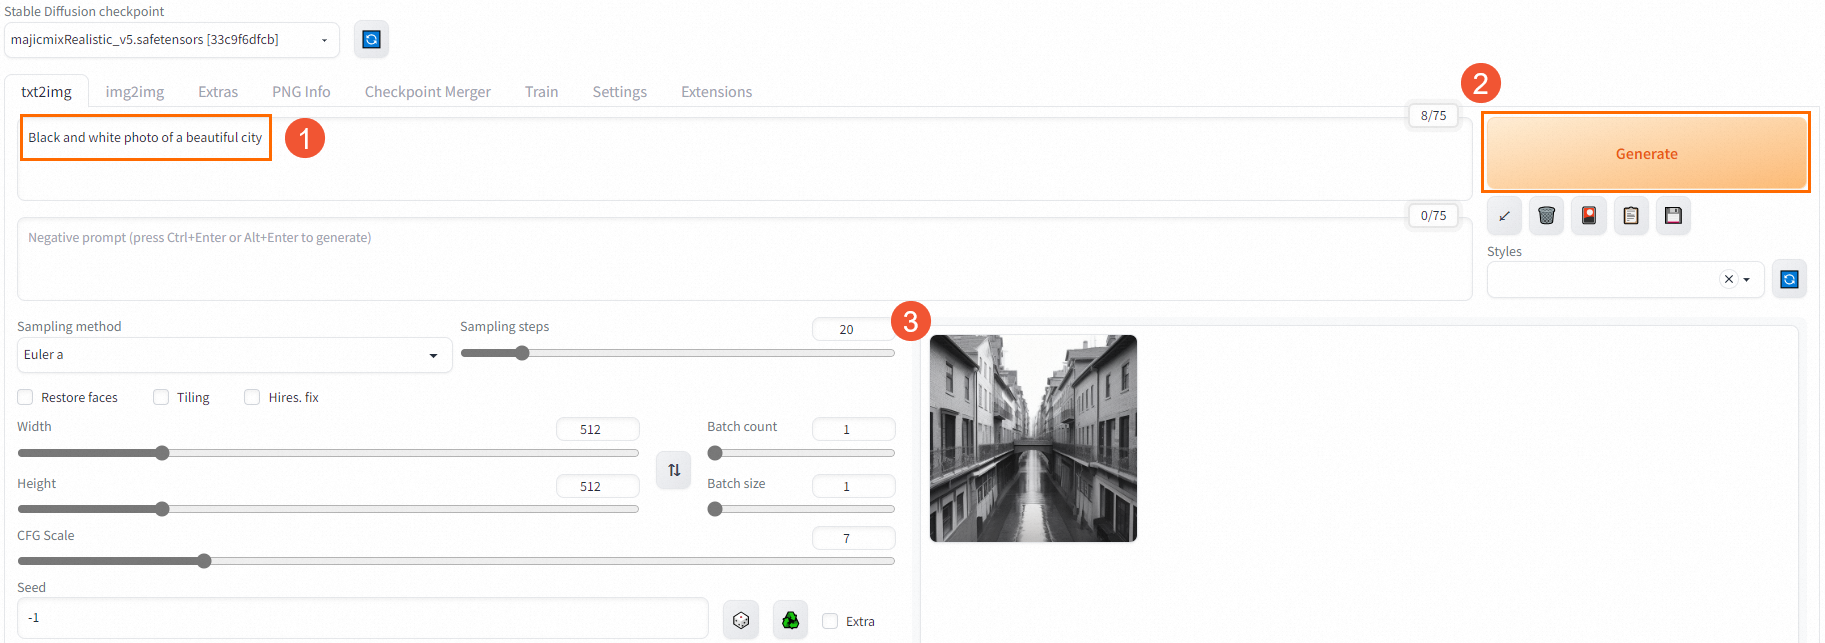
For example, you can enter Black and white photo of a beautiful city and click Generate. An image is generated based on the prompt.

Step 3: Release resources
After you use the application, delete the relevant resources to avoid incurring unnecessary costs.
Delete the application and Service
On the Clusters page of the ACK console, click the name of the cluster that you want to manage. In the left-side navigation pane, choose Workloads > Deployments. Find the Stable-Diffusion application that you created and choose More > Delete in the Actions column.

In the Confirm panel, select Delete Associated Service stable-svc and click OK.
Delete a cluster
ACK Serverless clusters are in public preview and offer a free trial. However, you must pay for other Alibaba Cloud services used by your ACK Serverless clusters based on the billing rules of the services. Fees are charged by these Alibaba Cloud services separately. After you complete the configuration, you can manage the cluster in one of the following ways:
If you no longer need the cluster, log on to the ACK console. On the Clusters page, choose More > Delete in the Actions column of the cluster to delete the cluster. In the Delete Cluster dialog box, select Delete ALB Instances Created by the Cluster, Delete Alibaba Cloud DNS PrivateZone instances Created by the Cluster, and I understand the above information and want to delete the specified cluster, and then click OK. For more information about how to delete an ACK Serverless cluster, see Delete an ACK Serverless cluster.
If you want to continue to use the cluster, recharge your Alibaba Cloud account at least 1 hour before the trial period ends and ensure that your account has a balance of at least CNY 100. For more information about the billing of Alibaba Cloud services used by ACK Serverless Pro clusters, see Cloud service fee.
Contact us
If you have any questions about enabling AIGC services for ACK, join the DingTalk group 31850017754.