You can use elastic quotas in pod scheduling to share resources among tenants while ensuring a guaranteed amount of resources for each tenant. This topic describes how to manage elastic quota groups on AI Dashboard.
Prerequisites
AI Dashboard is installed. For more information, see Install the cloud-native AI suite.
The system administrator permissions are acquired. For more information about how to grant permissions, see Access AI Dashboard.
The cluster runs Kubernetes 1.18 or later. The elastic quota feature is supported by Kubernetes 1.20 and later. For Kubernetes versions earlier than 1.20, the ResourceQuota feature of Kubernetes is enabled.
Add a quota group
- Access AI Dashboard by using the username and password of the Resource Access Management (RAM) user that is configured as the administrator.
- In the left-side navigation pane of AI Dashboard, choose .
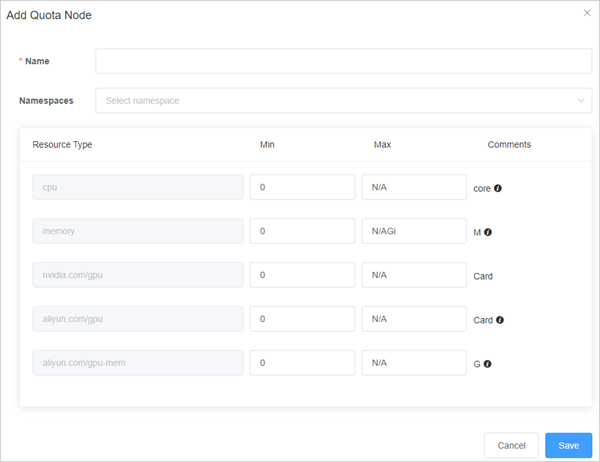
On the Quota Group List page, select a quota node that does not have namespaces (a parent quota node) and click Add. Then, configure the following parameters and click Save.
NoteWhen you add a quota node to the quota tree, take note of the following items:
You can add namespaces only to child quota nodes. You cannot add namespaces to parent quota nodes.
If namespaces are added to a quota node, you cannot create child quota nodes under the quota node.
If a namespace has pods in the Running state, you cannot add the namespace to or remove the namespace from a quota node.
The Min value of a quota node must be equal to or smaller than the Max value of the node.
The Min value of a parent quota node must be equal to or greater than the sum of the Min values of its child quota nodes.
The Max value of a parent quota node must be equal to or greater than the Max value of any child quota node of the parent quota node.
The default Min value is 0. This indicates that the resources that can be used are not guaranteed. However, you can still submit jobs.
The default Max value is NA. This indicates that the maximum amount of resources that can be used by the quota node is unlimited.

Parameter
Description
Volume Name
Enter a name for the quota group. The name must be unique under its parent quota node.
Namespaces
The namespaces that are managed by the quota group. If you leave this parameter empty, you can continue to add child quota nodes.
Resource types
The unique identifier of the resource. This parameter is required.
Min
The amount of resources that are guaranteed for the quota group. If you do not specify this parameter, the default value 0 is used.
Max
The maximum amount of resources that can be used by the quota group. If you leave this parameter empty, the maximum amount of resources that can be used by the quota group is unlimited.
Optional: On the Quota Group List page, you can view, modify, delete, and query quota groups and change the resource type.
NoteTo update a quota group, you need to meet the same conditions for adding a quota group. For more information, see Add a quota group.
You can delete child quota nodes that do not have namespaces in the quota tree. You cannot delete the root node.
You can enter the keyword of a quota group name to perform a fuzzy match. All of the nodes and their parent nodes that match the keyword are displayed.