You can use a single Global Accelerator instance to accelerate access to multiple domain names over HTTP.
Background information
The following scenario is used as an example. An enterprise deployed two servers in the Singapore region for its headquarters. A web application that provides Internet-facing services using two different domain names over HTTP is deployed on both servers. Most employees of the company need to access the web application from the China (Hong Kong) region. The company faces the following issues:
The network connections that are established over the Internet are unstable. Network issues, such as network latency, network jitter, and packet loss, frequently occur.
Multiple servers provide Internet-facing services through two domain names. The company must configure content delivery acceleration for both domain names, which increases costs.
You can deploy Global Accelerator and configure HTTP listeners. Global Accelerator HTTP listeners support domain-based forwarding rules that match different domain names and forward access requests to the corresponding backend servers. This allows a single Global Accelerator instance to accelerate access to multiple HTTP domain names.

The following table describes information about the web servers of the enterprise and the forwarding rules that the HTTP listener uses after the enterprise uses Global Accelerator to accelerate access to its web application.
Domain name | Forwarding rule | Endpoint group | Server | Service protocol | Service port | Server public IP address |
xxxtest.cloud | Default forwarding rule | Default endpoint group | Server 1 | HTTP | 80 | 8.219.XX.XX |
www.xxxtest.cloud | Custom forwarding rule | Virtual endpoint group | Server 2 | HTTP | 80 | 47.245.XX.XX |
Prerequisites
An HTTP service that uses port 80 is deployed on backend servers.
The A records that map backend domain name 1 (
xxxtest.cloud) and backend domain name 2 (www.xxxtest.cloud) to the public IP addresses of the backend servers are created.If the website you want to accelerate is deployed in the Chinese mainland or the acceleration region is in the Chinese mainland, you must complete an ICP filing before you can provide services.
In this example, NGINX is used to deploy the backend HTTP service and Alibaba Cloud DNS is used to configure DNS records. If you use a third-party DNS resolution service, refer to the user guide provided by the service provider.
Procedure

In this topic, a pay-as-you-go standard Global Accelerator instance is used to show how to configure Global Accelerator to accelerate access to multiple domain names over HTTP. Before you create a pay-as-you-go standard Global Accelerator instance, take note of the following information:
Pay-as-you-go GA instances use the Pay-by-data-transfer bandwidth billing method and do not need to be associated with a bandwidth plan. The fees for data transfer over the GA network are settled and billed by Cloud Data Transfer (CDT). For more information, see Data transfer fee.
The first time you use a pay-as-you-go GA instance, you must Activate the Service.
Step 1: Configure basic information about an instance
Log on to the GA console.
On the Instances page, click Create Standard Pay-as-you-go Instance.
In the Basic Instance Configuration step, configure the parameters based on the following table and click Next.
Parameter
Description
GA Instance Name
Enter a name for the GA instance.
Instance Billing Method
Pay-As-You-Go is selected by default.
You are charged instance fees, Capacity Unit (CU) fees, and data transfer fees for pay-as-you-go standard Global Accelerator instances.
For more information about instance fees and CU fees, see Billing of pay-as-you-go GA instances.
For more information about data transfer fees, see Pay-by-data-transfer.
Resource Group
Select the resource group to which the standard Global Accelerator instance belongs.
The resource group must be created by the current Alibaba Cloud account in Resource Management. For more information, see Create a resource group.
Step 2: Configure an acceleration area
Specify acceleration regions and allocate bandwidth to each acceleration region.
In the Configure Acceleration Area step, configure the parameters based on the following table and click Next.
Parameter | Description |
Acceleration Area | Select one or more regions from the drop-down list and click Add. In this example, the China (Hong Kong) region in the Asia Pacific section is selected. |
Assign Bandwidth | |
Maximum Bandwidth | Specify the maximum bandwidth for the acceleration region. Each acceleration region supports a bandwidth range of 2 to 10,000 Mbit/s. The maximum bandwidth is used for bandwidth throttling. The data transfer fees are managed by CDT. In this example, the default value 200 Mbit/s is used. Important If you specify a small value for the maximum bandwidth, throttling may occur and packets may be dropped. Specify a maximum bandwidth based on your business requirements. |
IP Protocol | Select the IP version that is used to connect to Global Accelerator. In this example, the default value IPv4 is selected. |
ISP Line Type | Select an ISP line type for the Global Accelerator instance. BGP (Multi-ISP) is selected in this example. |
Step 3: Configure a listener
A listener listens for connection requests and distributes the requests to endpoints based on the port and the protocol that you specify. Each listener is associated with an endpoint group. You can associate an endpoint group with a listener by specifying the region to which you want to distribute network traffic. After you associate an endpoint group with a listener, network traffic is distributed to the optimal endpoint in the endpoint group.
In the Configure listeners step, configure a listener and click Next.
The following table describes only the parameters that are relevant to this topic. Use the default values for other parameters. For more information, see Add and manage smart routing listeners.
Parameter | Description |
Listener Name | Enter a name for the listener. |
Routing Type | Select a routing type. In this example, Intelligent Routing is selected. |
Protocol | Select a protocol for the listener. In this example, select HTTP. |
Port | Specify the listener port that is used to receive and forward requests to endpoints. The port number must be in the range of 1 to 65499. In this example, port 80 is used. |
Client Affinity | Specify whether to enable client affinity. If client affinity is enabled, requests from the same client are forwarded to the same endpoint when the client connects to a stateful application. In this example, Source IP is selected. |
Custom HTTP Headers | Select the HTTP headers that you want to add. In this example, the default settings are used. |
Step 4: Configure endpoint groups and endpoints
In the Configure an endpoint group step, configure an endpoint group, add endpoints to the endpoint group, and then click Next.
This topic describes only the key parameters. For more information about endpoint configuration, see Add and manage endpoint groups of intelligent routing listeners.
Parameter
Description
Region
Select the region where the endpoint group is deployed.
In this example, Singapore is selected.
Endpoint Configuration
Client requests are routed to endpoints. To add an endpoint, set the following parameters:
Backend Service Type: Select Alibaba Cloud Public IP.
Backend Service: Enter the IP address of the backend service that you want to accelerate. In this example, the public IP address of Server 1 (8.219.XX.XX) is used.
Weight: Enter a weight for the endpoint. Valid values: 0 to 255. Global Accelerator routes network traffic to endpoints based on the weights of the endpoints. In this example, the default value 255 is used.
WarningIf the weight of an endpoint is set to 0, Global Accelerator stops distributing traffic to that endpoint. Proceed with caution.
Preserve Client IP
By default, the source IP address of the client is retained. The backend service can view the source IP address of the client. HTTP listeners can retrieve client IP addresses from the X-Forwarded-For HTTP header. For more information, see Preserve client IP addresses.
Backend Service Protocol
Select the protocol that is used by backend servers.
The default value HTTP is used.
Port Mapping
If the listener port and the port that is used by the endpoint to provide services are different, you must configure this parameter.
Listener Port: Enter the listener port.
Endpoint Port: Enter the port over which the endpoint provides services.
If the listener port and the port that is used by the endpoint to provide services are the same, you do not need to add a port mapping. Global Accelerator automatically forwards client requests to the listener port of the endpoint.
In this example, no port mapping is configured.
Traffic Distribution Ratio
Specify a traffic distribution ratio for the endpoint group.
The valid values are 0 to 100.
In this example, the default value 100% is used.
Health Check
Specify whether to enable the health check feature.
After you enable the feature, you can use health checks to check the status of endpoints. For more information about the health check feature, see Enable and manage health checks.
This topic is disabled by default.
On the Configuration Review wizard page, confirm the information and click Submit.
NoteIt takes 3 to 5 minutes to create a GA instance.
Optional: After you create a GA instance, you can click Go to Instance Details at the bottom of the task details list. On the instance details page, you can click tabs such as Instance Information, Listeners, and Acceleration Areas to view the instance configuration information.
Configure a virtual endpoint group.
On the instance details page, click the Listeners tab.
On the Listeners tab, find the listener that you want to manage and click the endpoint group ID in the Default Endpoint Group column.
On the Endpoint Group tab, click Virtual Endpoint Group in the Add Virtual Endpoint Group section.
On the Add Endpoint Group page, configure the parameters based on the following information and click Create.
The configurations of the virtual endpoint group are the same as those of the default endpoint group that you created in Step 4-1, except for the Backend Service parameter. In this example, set Backend Service to 47.245.XX.XX, which is the public IP address of Server 2.
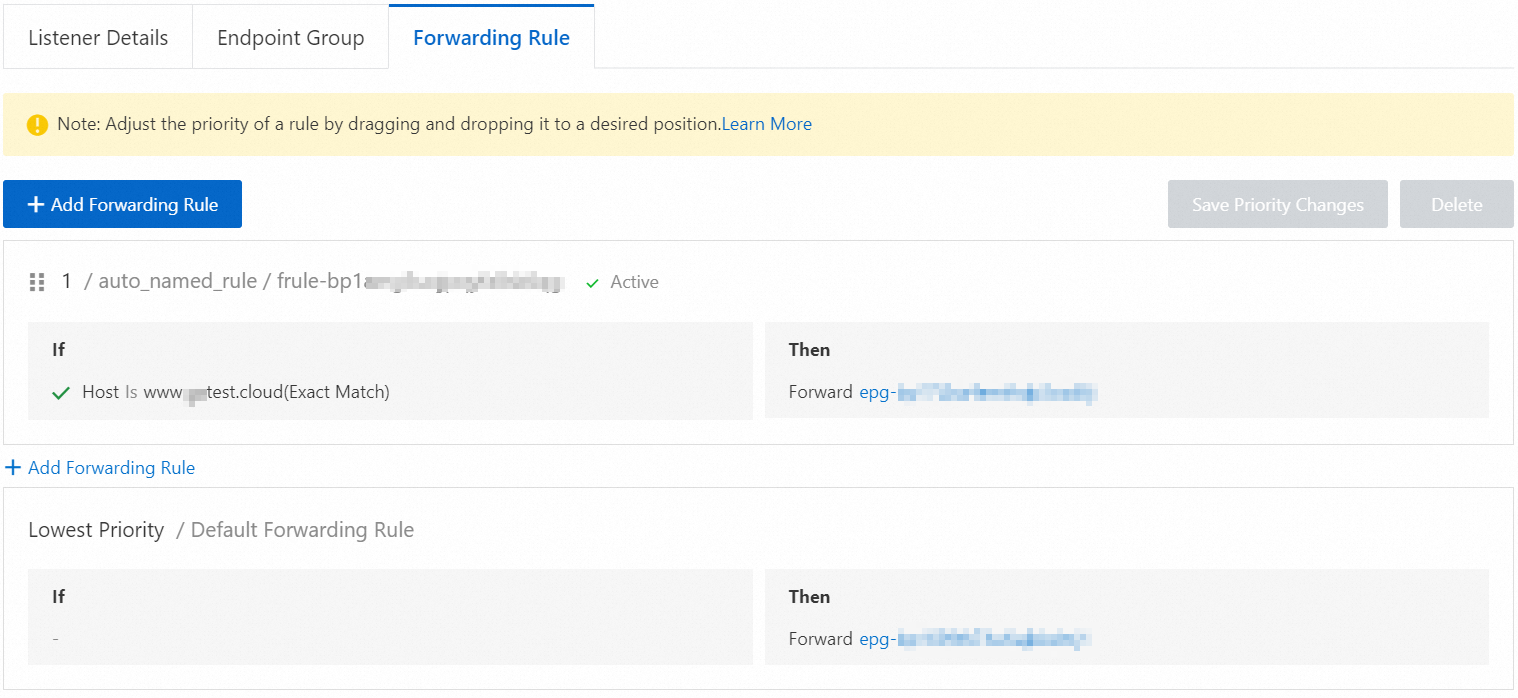
Step 5: Add a forwarding rule
When an HTTP listener receives requests, the HTTP listener forwards the requests that meet the conditions in forwarding rules to the associated endpoint groups. If the requests do not match a custom forwarding rule, the HTTP listener forwards the requests to the default endpoint group in the default forwarding rule.
In this step, create a custom forwarding rule for the virtual endpoint group of Server 2 to forward all requests destined for www.xxxtest.cloud to Server 2.
On the listener details page, click the Forwarding Rule tab.
On the Forwarding Rule tab, click Add Forwarding Rule.
In the Add Forwarding Rule section, configure the following parameters and click OK.
Policy Name: Enter a name for the forwarding rule.
If (Matching All Conditions): Select a match condition for the forwarding rule. In this example, Host is selected and the www.xxxtest.cloud domain name is entered.
Then: Select a forwarding action. In this example, Forward is selected and the virtual endpoint group that you created is selected.
Step 6: Add CNAME records
You must create a DNS record to map the domain name that you want to access to the CNAME of the Global Accelerator instance. This way, requests can be forwarded to Global Accelerator.
On the Public Zone page, find the domain name that you want to manage and click Settings in the Actions column.
NoteFor domain names that are not registered with Alibaba Cloud, you must first add the domain name to the Alibaba Cloud DNS console before you can configure DNS settings.
On the DNS Settings page, find the A record and click Edit in the Actions column.
In this example, the Hostname parameter of domain name 1 is set to @, and the Hostname parameter of domain name 2 is set to www.
In the Edit Record panel, set Record Type to CNAME, set Record Value to the CNAME assigned to the Global Accelerator instance, and then click OK.
You can view the CNAME assigned to the Global Accelerator instance on the Instances page.
If you want to return resolution results based on the region where a client resides, make sure that Alibaba Cloud DNS is upgraded to Enterprise Standard Edition or Enterprise Ultimate Edition. For more information, see Renewal.
After the upgrade is complete, you can change the default resolution line of an existing A record to a specific regional resolution line and add a CNAME record that points to the CNAME address assigned to the Global Accelerator instance.
Step 7: Access test
Perform the following steps to check whether a client can access web services deployed in the Singapore region using different domain names and whether content delivery is accelerated:
In this example, the Alibaba Cloud Linux 3 operating system is used. The command that is used to test the connectivity varies based on the operating system that you use. For more information, see the user guide of your operating system.
Check whether the CNAME record takes effect.
Open the CLI on an on-premises machine in the China (Hong Kong) region.
Run the following command to ping
xxxtest.cloudandwww.xxxtest.cloud:ping <Website domain name>If the CNAME in the output is the same as the CNAME assigned by Global Accelerator, the CNAME record takes effect.
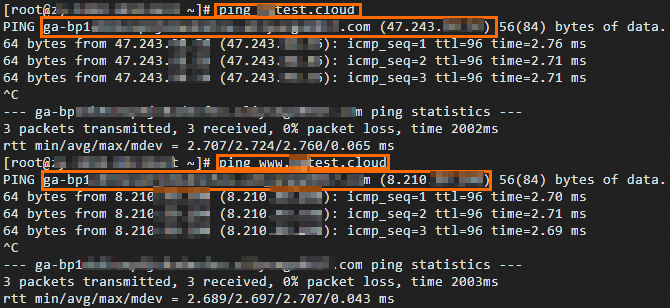
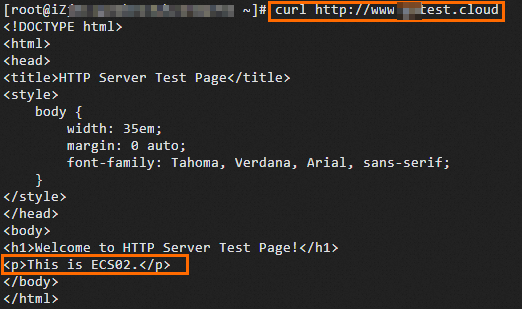
Run the following command for domain name 1 (
xxxtest.cloud) and domain name 2 (www.xxxtest.cloud) to test the network connectivity:curl http://<Website domain name>Figure 1. Access results of domain name 1
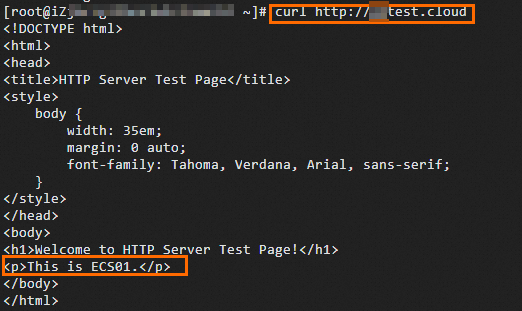
Figure 2. Access results of domain name 2
To test the acceleration effect, see Test the acceleration effect of GA.