When you use a Smart Access Gateway (SAG) device to connect an on-premises network
to Alibaba Cloud, you can configure the device in the SAG console or in the local
SAG web console of the device. SAG version 2.0.3 is used as an example in this topic.
Background information
We recommend that you use the Chrome or Firefox browser in case of browser incompatibility
issues.
Step 1: Configure the SAG client on an on-premises terminal
Before you can configure the SAG-1000 device in the local web console, you must configure
a static IP address for the SAG client.
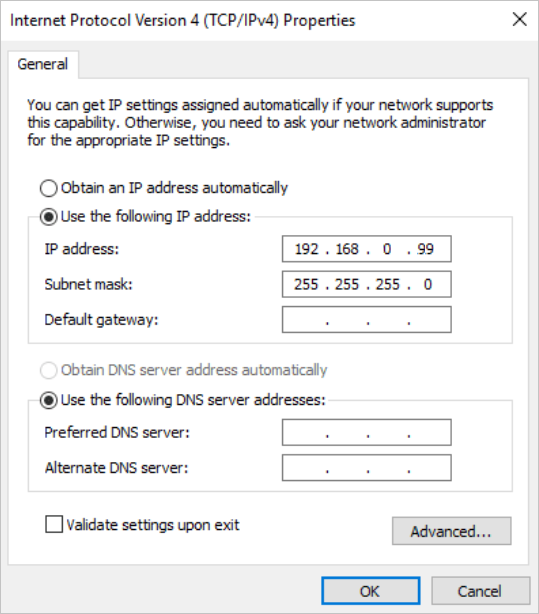
- Windows client: Configure a static IP address for a Windows client. Windows 10 is
used in the following example.
- In the lower-right corner, right-click the Network Connection icon, and then click
Network and Internet.
- In the right-side panel, click Change adapter settings.
- Right-click the connected network, and then click Properties.
- Double-click Internet Protocol Version 4 (TCP/IPv4).
- Select Use the following IP address, and then enter the static IP address and subnet mask.
Important Make sure that the IP address falls into the management CIDR block of the SAG-1000
device (the default CIDR block is 192.168.0.0/24) and does not overlap with other
IP addresses, such as 192.168.0.99. You do not need to configure the gateway or DNS
settings.

- Click OK.
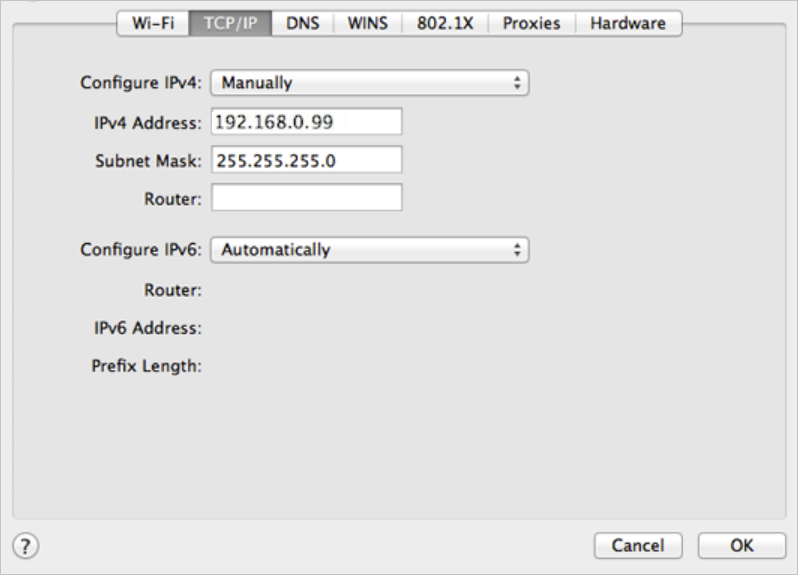
- Mac client: Configure a static IP address for a macOS client.
- On the desktop, click the System Preferences icon, and then click in the Internet & Network section.
- Click the connected network, and then click Advanced.
- On the Ethernet page, click the TCP/IP tab.
- In the Configure IPv4 drop-down list, select Manually and enter the static IP address and subnet mask.
Important Make sure that the IP address falls into the management CIDR block of the SAG-1000
device (the default CIDR block is 192.168.0.0/24) and does not overlap with other
IP addresses, such as 192.168.0.99. You do not need to configure the router or DNS
settings.

Step 2: Set a logon password
The first time you log on to the web console, you must set a logon password.
Note Before you log on to the web console, make sure that the following requirements are
met:
- Port 2 of the SAG-1000 device is connected to the terminal.
- Open the browser on the connected terminal and enter
192.168.0.1 into the address bar.
192.168.0.1 is the default web console address of the SAG-1000 device model.
- The first time you log on to the web console, you must set a logon password.
Keep your password confidential. If you forget your password, press the reset button
on your device to reset the password.
- Log on to the web console.
Step 3: Configure the SAG-1000 device
After you log on to the web console of the SAG-1000 device, you can configure the
device. SAG-1000 provides various features to meet your business requirements in different
deployment scenarios. For more information about how to connect on-premises networks
to Alibaba Cloud through SAG-1000, see Deploy an SAG-1000 device.
- Assign port roles.
- In the top navigation bar of the web console, click Setting.
- To view port roles, click Port Allocation in the left-side navigation pane.
Ports of SAG-1000 devices are assigned default roles. You can modify the port roles
as needed. For more information about port roles, see
Assign a role to a port.
- Click the
 icon next to the port that you want to manage, select the port role that you want
to use, and then click OK to modify the port role.
- Configure the WAN port.
- In the top navigation bar of the web console, click Setting.
- Click WAN to configure a WAN port.
By default, the connection type of the WAN port on the SAG-1000 device is
Dynamic IP. The IP address of a WAN port is automatically recognized by the device that is connected
to the WAN port.
Note You can configure a WAN port as needed. For more information about the parameters
of the WAN port, see
Configure a WAN port.
- Configure a LAN port.
- In the top navigation bar of the web console, click Setting.
- Click LAN to configure a LAN port. You can configure a LAN port as needed. For more information
about the parameters of the LAN port, see Configure a LAN port.
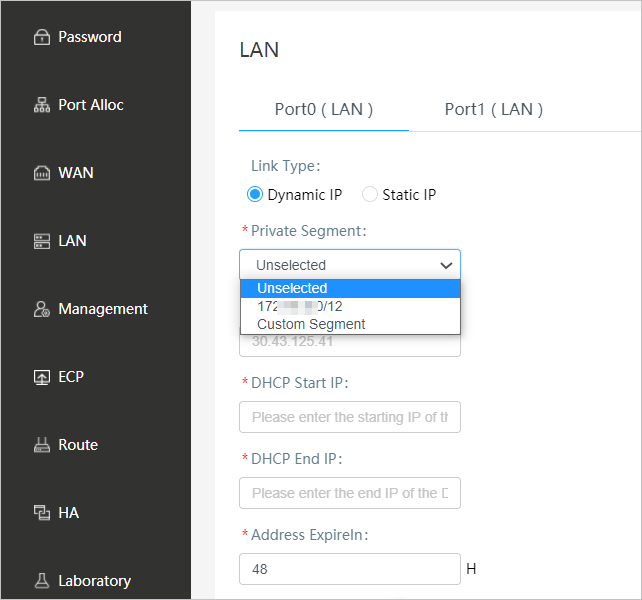
When you configure a LAN port in the web console, if the connection type of the LAN
port is
Dynamic IP, you can enter custom private CIDR blocks.

- Unselected: allows you to enter a custom IP address for the port and set a custom Dynamic Host
Configuration Protocol (DHCP) address pool.
- Custom Segment: allows you to enter custom CIDR blocks. The system automatically allocates an IP
address and a DHCP address pool for the LAN port. You can manually modify the allocated
IP address.
- Available CIDR block: If you have configured routes for the device in the SAG console, the CIDR blocks
are automatically displayed. You can allocate IP addresses as needed. For example,
192.XX.XX.XX is used in the preceding figure.
- Configure the management port.
- In the top navigation bar of the web console, click Setting.
- Click Management to configure the management port.
By default, the management CIDR block of an SAG-1000 device is 192.168.0.0/24 and
the IP address of the management port is 192.168.0.1. You can configure the management
port as needed. For more information about the parameters, see
Configure the management port.
- Configure routes.
- In the top navigation bar of the web console, click Setting.
- Click Route to configure static routes, Border Gateway Protocol (BGP) dynamic routes, or Open
Shortest Path First (OSPF) dynamic routes.
(Optional) Step 4: Configure advanced settings
The SAG-1000 device supports advanced settings such as Express Connect circuit ports
and high availability (HA).
- Configure an Express Connect circuit.
- In the top navigation bar of the web console, click Setting.
- Click ECC to configure an Express Connect circuit.
The SAG-1000 device supports Express Connect circuits. Express Connect circuits and
SAG devices provide standby network connections for each other. For more information
about how to configure an Express Connect circuit, see
Configure a leased line port.
Note If you need to use an Express Connect circuit port, make sure that you have assigned
a role to the Express Connect circuit port. For more information, see
Assign a role to a port.
- Configure HA.
- In the top navigation bar of the web console, click Setting.
- Click HA to configure HA.
The SAG-1000 device supports the HA feature. If an SAG device is down, another SAG
device takes over to ensure service availability. For more information about the parameters,
see
Configure HA for SAG devices.


 icon next to the port that you want to manage, select the port role that you want
to use, and then click