Self-managed ClickHouse instances often present stability risks, operational challenges such as poor cluster extensibility and difficult version updates, and weak disaster recovery capabilities. For these reasons, many customers are choosing to migrate their self-managed ClickHouse clusters to a cloud Platform as a Service (PaaS) solution. This topic describes how to migrate data from a self-managed ClickHouse instance to an ApsaraDB for ClickHouse Community-Compatible Edition cluster.
Prerequisites
Destination cluster:
The cluster is a Community-Compatible Edition cluster.
You have a database account and password. For more information about how to create a ClickHouse account, see Account management for Community-Compatible Edition clusters.
The account must have the highest permissions. For more information about how to grant permissions, see Modify permissions.
Self-managed cluster:
You have a database account and password.
The account must have read permissions on databases and tables, and permissions to execute SYSTEM commands.
The destination cluster and the self-managed cluster can communicate with each other over the network.
If the self-managed cluster and the destination cluster are in the same VPC, add the IP addresses of all nodes in the destination cluster and the IPv4 CIDR Block of its VSwitch ID to the self-managed cluster's whitelist.
For more information about how to configure a whitelist in ApsaraDB for ClickHouse, see Configure an IP address whitelist.
For information about how to add IP addresses to the whitelist of a self-managed cluster, see the relevant product documentation.
To view the IP addresses of all nodes in an ApsaraDB for ClickHouse cluster, run the
SELECT * FROM system.clusters;statement.To obtain the IPv4 CIDR associated with the VSwitch ID of the ApsaraDB for ClickHouse cluster, follow these steps:
In the ApsaraDB for ClickHouse console, navigate to the Cluster Information page of the destination cluster and obtain the VSwitch ID from the Network Information section.
In the vSwitch list, search for the destination vSwitch by its VSwitch ID and view its IPv4 CIDR.
If the self-managed cluster and the cloud cluster are in different VPCs, or if the self-managed cluster is in a local data center or on another cloud platform, you must first resolve the network connectivity issues. For more information, see How do I establish a network connection between a destination cluster and a data source?.
Migration validation
Before you start the data migration, we strongly recommend that you create a test environment. In this environment, you can verify business compatibility and performance, and confirm that the migration can be completed successfully. After you complete the migration validation, you can perform the data migration in your production environment. This is a crucial step that helps you identify and resolve potential issues in advance. This ensures a smooth migration process and prevents unnecessary impacts on your production environment.
Create a migration task to perform the data migration. For detailed instructions, see the Procedure section of this topic.
For information about cloud migration compatibility, performance bottleneck analysis, and how to determine whether the migration can be completed, see Analysis and solutions for compatibility and performance bottlenecks in migrating self-managed ClickHouse to the cloud.
Choose a solution
Migration solution | Pros | Cons | Scenarios |
Provides a visualization interface. You do not need to manually migrate metadata. | Supports only full and incremental migration of the entire cluster's data. You cannot migrate only specific databases, tables, or historical data. | Migrating data from an entire cluster. | |
Lets you control which database and table data to migrate. | The operations are complex. You need to manually migrate metadata. |
|
Procedure
Console migration
Limits
The version of the destination cluster must be 21.8 or later.
Notes
During migration:
The merge process for the databases and tables being migrated in the destination cluster is paused. The merge process in the self-managed cluster is not paused.
NoteIf the data migration takes too long, an excessive amount of metadata accumulates in the destination cluster. We recommend that a migration task does not run for more than 5 days.
The destination cluster must use the default cluster. If your self-managed cluster uses a different name, the cluster definition in the distributed tables is automatically converted to default.
Migration content:
Supported content for migration:
Databases, data dictionaries, and materialized views.
Table schema: All table schemas except for Kafka and RabbitMQ engine tables.
Data: Incremental migration of data from MergeTree family tables.
Unsupported content for migration:
Tables and data of Kafka and RabbitMQ engine tables.
Data from non-MergeTree tables, such as external tables and Log tables.
ImportantDuring the migration process, you must manually handle the unsupported content by following the steps provided.
Data volume for migration:
Cold data: The migration of cold data is relatively slow. We recommend that you clear as much cold data as possible from your self-managed cluster to ensure the total volume does not exceed 1 TB. Otherwise, the long migration time may cause the task to fail.
Hot data: If the volume of hot data exceeds 10 TB, the migration task has a high probability of failure. We do not recommend using this solution for migration in this case.
If your data volume exceeds these limits, use the Manual migration solution instead.
Impact on clusters
Self-managed cluster:
Reading data from the self-managed cluster increases its CPU and memory usage.
DDL operations are not allowed.
Destination cluster:
Writing data to the destination cluster increases its CPU and memory usage.
DDL operations are not allowed.
DDL operations are not allowed on the databases and tables being migrated. This restriction does not apply to other databases and tables.
The merge process is stopped for databases and tables that are being migrated. The merge process is not stopped for other databases and tables.
The cluster restarts before the migration task begins and restarts again after the task ends.
After the migration is complete, the cluster undergoes a period of high-frequency merge operations. This increases I/O usage and the latency of business requests. We recommend that you plan for the potential impact of increased business request latency. You must calculate the specific duration of the merge operations. For more information about this calculation, see Calculate the merge time after migration.
Procedure
Step 1: Check the self-managed cluster and enable system tables
Before you migrate data, you must modify the config.xml file in your self-managed cluster to enable incremental migration. The modifications depend on whether the `system.part_log` and `system.query_log` tables are already enabled.
If system.part_log and system.query_log are not enabled
If you have not enabled system.part_log and system.query_log, add the following configurations to the config.xml file.
system.part_log
<part_log>
    <database>system</database>
    <table>part_log</table>
    <partition_by>event_date</partition_by>
    <order_by>event_time</order_by>
    <ttl>event_date + INTERVAL 15 DAY DELETE</ttl>
    <flush_interval_milliseconds>7500</flush_interval_milliseconds>
</part_log>
system.query_log
<query_log>
    <database>system</database>
    <table>query_log</table>
    <partition_by>event_date</partition_by>
    <order_by>event_time</order_by>
    <ttl>event_date + INTERVAL 15 DAY DELETE</ttl>
    <flush_interval_milliseconds>7500</flush_interval_milliseconds>
</query_log>
Enabled system.part_log and system.query_log
Compare the configurations of
system.part_logandsystem.query_login the config.xml file with the following content. If there are any inconsistencies, modify the configurations to match. Otherwise, the migration may fail or proceed slowly.system.part_log
<part_log>
    <database>system</database>
    <table>part_log</table>
    <partition_by>event_date</partition_by>
    <order_by>event_time</order_by>
    <ttl>event_date + INTERVAL 15 DAY DELETE</ttl>
    <flush_interval_milliseconds>7500</flush_interval_milliseconds>
</part_log>
system.query_log
<query_log>
    <database>system</database>
    <table>query_log</table>
    <partition_by>event_date</partition_by>
    <order_by>event_time</order_by>
    <ttl>event_date + INTERVAL 15 DAY DELETE</ttl>
    <flush_interval_milliseconds>7500</flush_interval_milliseconds>
</query_log>
After you modify the configuration, run the
drop table system.part_loganddrop table system.query_logstatements. Thesystem.part_logandsystem.query_logtables are automatically recreated when you insert data into a business table.
Step 2: Configure the destination cluster to be compatible with the self-managed cluster version.
Configure the destination cluster to be compatible with the self-managed cluster. This minimizes the business modifications required after the migration.
Obtain the version numbers of the destination cluster and the self-managed cluster and compare them.
Log on to the destination cluster and the self-managed cluster and run the following statement to obtain their version numbers. For more information about how to log on to ApsaraDB for ClickHouse, see Connect to a database.
SELECT version();If the versions are different, log on to the destination cluster and modify the compatibility parameter to match the version number of the self-managed cluster. This ensures that their features are as consistent as possible. The following is an example.
SET GLOBAL compatibility = '22.8';
(Optional) Step 3: Enable the MaterializedMySQL engine on the destination cluster.
If your self-managed cluster contains tables that use the MaterializedMySQL engine, run the following statement to enable this engine.
SET GLOBAL allow_experimental_database_materialized_mysql = 1;The ClickHouse community no longer maintains the MaterializedMySQL engine. After you migrate to the cloud, we recommend that you use DTS to synchronize MySQL data.
To address the issue of the unmaintained MaterializedMySQL engine, DTS uses ReplacingMergeTree tables instead of MaterializedMySQL tables when it synchronizes MySQL data to ApsaraDB for ClickHouse. For more information, see MaterializedMySQL compatibility.
For more information about how to use DTS to migrate MySQL data to ApsaraDB for ClickHouse, see the following documents.
Step 4: Create a migration task
Log on to the ApsaraDB for ClickHouse console.
On the Clusters page, select Clusters of Community-compatible Edition and click the ID of the target cluster.
In the navigation pane on the left, click .
On the Migration Tasks page, click Create Migration Task.
Configure the source and destination instances.
Configure the following connection settings and click Test Connection and Proceed.
NoteIf the connection test is successful, proceed to the next step. If the connection test fails, reconfigure the source and destination instances based on the prompts.
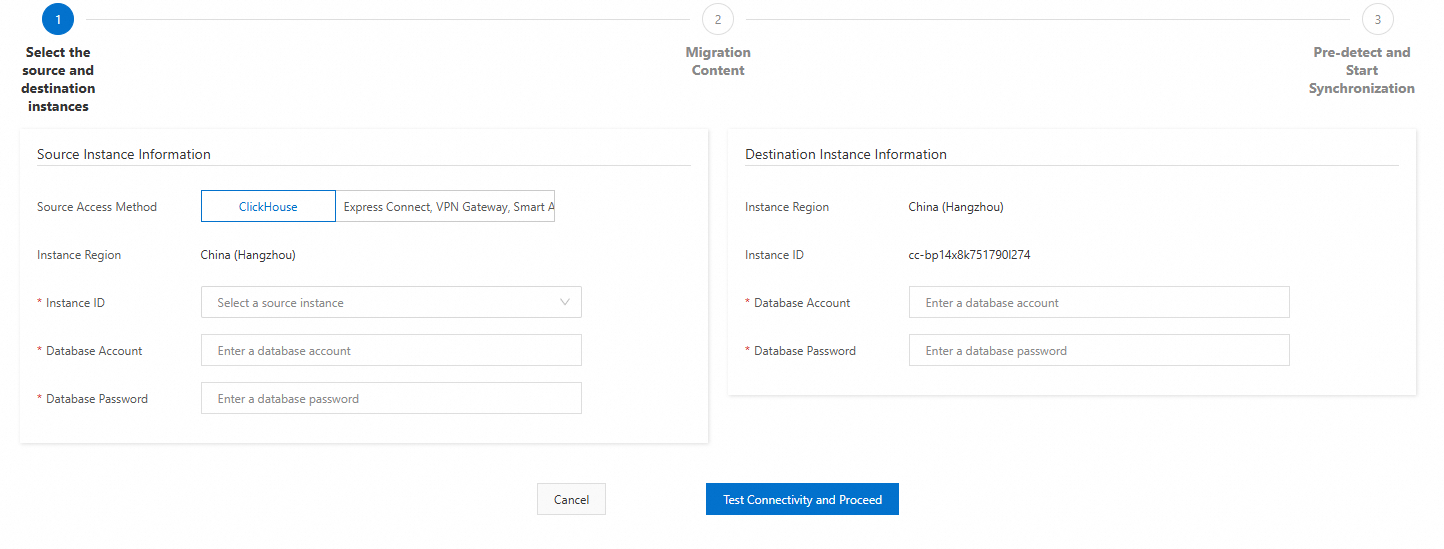
Source cluster configuration items
Configuration item
Description
Example
Source Access Method
Select Express Connect, VPN Gateway, Smart Access Gateway, or Self-managed ClickHouse Clusters on an ECS Instance.
Express Connect, VPN Gateway, Smart Access Gateway, or Self-managed ClickHouse Clusters on an ECS Instance
Cluster Name
The name of the source cluster.
It can only contain digits and lowercase letters.
source
Source Cluster Name
Run
SELECT * FROM system.clusters;to get the Source Instance Name.default
VPC IP Address
The IP address and PORT (TCP address) of each shard in the cluster, separated by commas.
ImportantDo not use the VPC domain name or SLB address of ApsaraDB for ClickHouse.
Format:
IP:PORT,IP:PORT,......The method to obtain the cluster IP address and PORT varies depending on the scenario for migrating a self-managed instance to the cloud.
Cross-account, cross-region migration of an Alibaba Cloud ClickHouse instance
You can use the following SQL statement to get the IP address and PORT of the self-managed cluster.
SELECT shard_num, replica_num, host_address as ip, port FROM system.clusters WHERE cluster = 'default' and replica_num = 1;Here, replica_num=1 means selecting the first replica set. You can also choose other replica sets or select one replica from each shard yourself.
Migration of a non-Alibaba Cloud ClickHouse instance
If the IP address cannot be easily mapped to Alibaba Cloud, you can use the following SQL statement to get the IP address and PORT of the self-managed cluster.
SELECT shard_num, replica_num, host_address as ip, port FROM system.clusters WHERE cluster = '<cluster_name>' and replica_num = 1;Parameter description:
cluster_name: The name of the destination cluster.
replica_num=1 means selecting the first replica set. You can also choose other replica sets or select one replica from each shard yourself.
If the IP address and port are converted and then mapped to Alibaba Cloud, you need to configure the corresponding IP address and PORT based on the network connection.
192.168.0.5:9000,192.168.0.6:9000
Database Account
The database account of the source cluster.
test
Database Password
The password for the source cluster's database account.
test******
Destination cluster configuration items
Configuration item
Description
Example
Database Account
The database account of the destination cluster.
test
Database Password
The password for the destination cluster's database account.
test******
Confirm the migration content.
Carefully review the data migration information, and then click Next: Pre-detect and Start Synchronization.
The system performs a pre-check on the migration link and then starts the task.
The system runs an Instance Status Detection, Storage Space Detection, and Local Table and Distributed Table Detection on the destination and self-managed clusters.
If the check is successful:
The following figure shows the interface after a successful check.
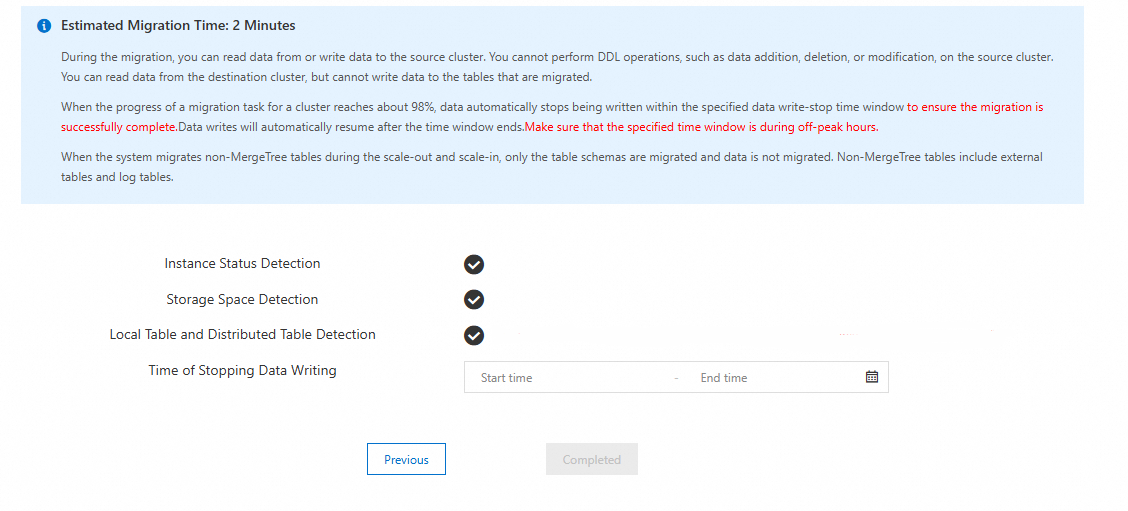
Carefully read the prompts on the page about the impacts on the instances during the migration.
Click Completed.
ImportantAfter you click Complete, the task is created and started, and its status changes to Running. You can view the task in the task list.
After you create the task, you must also monitor it. In the final stage of the migration, you must stop write operations to the self-managed cluster and migrate the remaining database and table schemas. For more information about how to monitor the migration task, see Monitor the migration task and stop writes to the self-managed cluster.
If the check fails: You must follow the prompts and perform the data migration again. The check items and their requirements are as follows. For error messages and solutions, see Error messages and solutions for migration checks.
Check item
Check requirement
Instance Status Detection
When the migration is initiated, there must be no running management tasks (such as scale-out, upgrade or downgrade) on the self-managed cluster and the destination cluster. If there are running management tasks, the migration task cannot be initiated.
Storage Space Detection
Before the migration, a storage space check is performed. Ensure that the storage space of the destination cluster is at least 1.2 times the used space of the self-managed cluster.
Local Table and Distributed Table Detection
If a local table in the self-managed cluster does not have a corresponding distributed table, or if the distributed table is not unique, the check fails. Delete the extra distributed tables or create a unique distributed table.
Step 5: Assess whether the migration can be completed
If the write speed of the source cluster is less than 20 MB/s, you can skip this step.
If the write speed of the source cluster is greater than 20 MB/s, the theoretical write speed of a single node in the destination cluster must also be greater than 20 MB/s. To ensure that the write speed of the destination cluster can keep up with the source cluster's write speed and that the migration can succeed, you must check the actual write speed of the destination cluster to assess the feasibility of the migration. Follow these steps:
You can view the Disk throughput of the destination cluster to determine its actual write speed. For more information about how to view Disk throughput, see View cluster monitoring information.
Determine the relationship between the write speeds of the destination and source clusters.
If the write speed of the destination cluster is greater than the write speed of the source cluster: The migration has a high probability of success. Continue to Step 6.
If the write speed of the destination cluster is less than the write speed of the source cluster: The migration has a high probability of failure. We recommend that you cancel the migration task and use manual migration to migrate the data.
Step 6: Monitor the migration task and estimate when to stop writes to the self-managed cluster
Log on to the ApsaraDB for ClickHouse console.
On the Community Edition Instances list, click the ID of the destination cluster.
In the navigation pane on the left, click .
On the instance migration list page, you can perform the following operations:
View the status and running phase information of the migration task.
ImportantClosely monitor the Running Information of the destination task. Based on the estimated remaining time in the Running Information column, follow Step 7 to stop writes to the self-managed cluster and handle Kafka and RabbitMQ engine tables.
Click View Details in the Actions column to open the task details page. The page includes the following details:
NoteIf the migration task ends (its status is Completed or Canceled), the content on the View Details page in the console is cleared. You can view the list of migrated table schemas in the destination cluster by running the following SQL statement.
SELECT `database`, `name`, `engine_full` FROM `system`.`tables` WHERE `database` NOT IN ('system', 'INFORMATION_SCHEMA', 'information_schema');All migrated table schemas and their migration success status.
All migrated database structures and their migration success status.
All error messages for failed database and table migrations.
The following table describes the migration task statuses and their corresponding functions.
Task Status
Function Description
Running
Preparing the environment and resources for migration.
Initialization
Initializing the migration task.
Configuration Migration
Migrating the cluster configuration.
Schema Migration
Migrating all databases, along with MergeTree family tables and Distributed tables.
Data Migration
Incrementally migrating data from MergeTree family tables.
Other Schema Migration
Migrating materialized views and non-MergeTree table schemas.
Data Check
Checks if the data volume of the completed tables in the destination cluster is consistent with the data volume in the self-managed cluster. If not, the task may not complete. We recommend restarting the migration.
Post-configuration
System configuration of the destination cluster after migration is complete, such as cleaning up the migration site and enabling writes to the source instance.
Completed
The migration task is complete.
Canceled
The migration task has been canceled.
Step 7: Stop writes to the self-managed cluster and handle Kafka and RabbitMQ engine tables
Before you switch your business services to the new cluster, you must ensure that no new data is written to the self-managed instance to guarantee data integrity after the migration. To do this, you must stop business write operations and delete the Kafka and RabbitMQ tables. Follow these steps:
Log on to the self-managed cluster and run the following statement to query the tables that you need to process.
SELECT * FROM system.tables WHERE engine IN ('RabbitMQ', 'Kafka');You can view the table creation statement for the target table.
SHOW CREATE TABLE <target_table_name>;Log on to the destination cluster and execute the table creation statement that you obtained in the previous step. For more information about how to log on to the destination cluster, see Connect to a ClickHouse cluster using DMS.
Log on to the self-managed cluster and delete the migrated Kafka and RabbitMQ engine tables.
ImportantWhen you delete a Kafka table, you must also delete the materialized views that reference it. Otherwise, the materialized view migration cannot be completed, which causes the entire migration task to fail.
Step 8: Complete the migration task
The Complete operation finalizes the migration after you stop writes to the self-managed cluster. This operation completes the remaining data migration, performs a data volume check, and migrates the remaining database and table schemas. You can view the migrated data in the task details.
If the check fails, the migration task remains in the data volume check phase. We recommend that you cancel the migration and create a new migration task. For more information about how to cancel a migration task, see Other operations.
A long data migration can cause an excessive amount of metadata to accumulate in the destination cluster, which can affect the migration speed. We recommend that you complete this operation within 5 days of creating the migration task.
Log on to the ApsaraDB for ClickHouse console.
On the Clusters page, select Clusters of Community-compatible Edition and click the ID of the target cluster.
In the navigation pane on the left, click .
In the Actions column for the destination migration task, click Complete Migration.
In the Complete Migration dialog box, click OK.
Step 9: Migrate business data from non-MergeTree tables
The migration task supports migrating only the table schemas of non-MergeTree tables, such as external tables and Log tables. After the migration task is complete, these tables in the destination cluster contain only a table schema and no business data. You must migrate the business data manually. Follow these steps:
Log on to the self-managed cluster and run the following statement to view the non-MergeTree tables whose data you need to migrate.
SELECT
    `database` AS database_name,
    `name` AS table_name,
    `engine`
FROM `system`.`tables`
WHERE (`engine` NOT LIKE '%MergeTree%') AND (`engine` != 'Distributed') AND (`engine` != 'MaterializedView') AND (`engine` NOT IN ('Kafka', 'RabbitMQ')) AND (`database` NOT IN ('system', 'INFORMATION_SCHEMA', 'information_schema')) AND (`database` NOT IN (
    SELECT `name`
    FROM `system`.`databases`
    WHERE `engine` IN ('MySQL', 'MaterializedMySQL', 'MaterializeMySQL', 'Lazy', 'PostgreSQL', 'MaterializedPostgreSQL', 'SQLite')
))
Log on to the destination cluster and migrate the table data using the
remotefunction. For more information, see Migrate data using the remote function.
Other operations
When a migration task completes, its Migration Status changes to Completed. However, the task list does not update immediately. We recommend that you periodically refresh the page to check the task status.
Operation | Function | Impact | Scenario |
Cancel Migration | Forcibly cancels the task, skips the data volume check, and does not migrate the remaining database and table schemas. |
| The migration task has affected the self-managed cluster, and you want to end the migration and enable writes as soon as possible. |
Stop Migration | Immediately stops data migration, skips the data volume check, and migrates the remaining database and table schemas. | The destination cluster restarts. | You want to test after migrating a portion of the data but do not want to stop writes to the self-managed cluster. |
Stop Migration
Log on to the ApsaraDB for ClickHouse console.
On the Clusters page, select Clusters of Community-compatible Edition and click the ID of the target cluster.
In the navigation pane on the left, click .
In the Actions column for the destination migration task, click Stop Migration.
In the Stop Migration dialog box, click OK.
Cancel Migration
Log on to the ApsaraDB for ClickHouse console.
On the Clusters page, select Clusters of Community-compatible Edition and click the destination cluster ID.
In the navigation pane on the left, click .
For the destination migration task, click Cancel Migration in the Actions column.
In the Cancel Migration dialog box, click OK.
Manual migration
Method 1: Migrate using the BACKUP and RESTORE commands
For more information, see Use the BACKUP and RESTORE commands to back up and restore data.
Method 2: Migrate using the INSERT FROM SELECT statement
Step 1: Migrate metadata (DDL for table creation)
ClickHouse metadata migration mainly refers to migrating the DDL for table creation.
To install clickhouse-client, ensure that the client version matches the version of the destination ApsaraDB for ClickHouse cluster. For download instructions, see clickhouse-client.
View the list of databases in the self-managed cluster.
clickhouse-client --host="<old host>" --port="<old port>" --user="<old user name>" --password="<old password>" --query="SHOW databases" > database.listParameters:
Parameter
Description
old host
The address of the self-managed cluster.
old port
The port of the self-managed cluster.
old user name
The account used to log on to the self-managed cluster. It must have DML read/write and settings permissions, and allow DDL permissions.
old password
The password for the account.
NoteThe `system` database is a system database and does not need to be migrated. You can filter it out during this process.
View the list of tables in the self-managed cluster.
clickhouse-client --host="<old host>" --port="<old port>" --user="<old user name>" --password="<old password>" --query="SHOW tables from <database_name>" > table.listParameters:
Parameter
Description
database_name
The database name.
You can also directly query all database and table names from the system tables.
SELECT DISTINCT database, name FROM system.tables WHERE database != 'system';NoteIf any of the queried table names start with `.inner.`, they are internal representations of materialized views and do not need to be migrated. You can filter them out.
Export the table creation DDL for all tables in a specified database of the self-managed cluster.
clickhouse-client --host="<old host>" --port="<old port>" --user="<old user name>" --password="<old password>" --query="SELECT concat(create_table_query, ';') FROM system.tables WHERE database='<database_name>' FORMAT TabSeparatedRaw" > tables.sqlImport the table creation DDL into the destination ApsaraDB for ClickHouse instance.
NoteBefore you import the table creation DDL, you must create the corresponding database in ApsaraDB for ClickHouse.
clickhouse-client --host="<new host>" --port="<new port>" --user="<new user name>" --password="<new password>" -d '<database_name>' --multiquery < tables.sqlParameters:
Parameter
Description
new host
The address of the destination ApsaraDB for ClickHouse instance.
new port
The port of the destination ApsaraDB for ClickHouse instance.
new user name
The account used to log on to the destination ApsaraDB for ClickHouse instance. It must have DML read/write and settings permissions, and allow DDL permissions.
new password
The password for the account.
Step 2: Data migration
Migrate data using the remote function
In the destination ApsaraDB for ClickHouse instance, migrate data using the following SQL statement.
INSERT INTO <new_database>.<new_table> SELECT * FROM remote('<old_endpoint>', <old_database>.<old_table>, '<username>', '<password>') [WHERE _partition_id = '<partition_id>'] SETTINGS max_execution_time = 0, max_bytes_to_read = 0, log_query_threads = 0, max_result_rows = 0;NoteFor version 20.8, we recommend that you first try to use the `remoteRaw` function for data migration. If the migration fails, you can request a minor version upgrade.
INSERT INTO <new_database>.<new_table>
SELECT *
FROM remoteRaw('<old_endpoint>', <old_database>.<old_table>, '<username>', '<password>')
[WHERE _partition_id = '<partition_id>']
SETTINGS max_execution_time = 0, max_bytes_to_read = 0, log_query_threads = 0, max_result_rows = 0;
Parameters:
ImportantFiltering data by `partition_id` can reduce resource usage. We recommend that you use this parameter.
Parameter
Description
new_database
The database name in the destination ApsaraDB for ClickHouse instance.
new_table
The table name in the destination ApsaraDB for ClickHouse instance.
old_endpoint
The endpoint of the source instance.
Self-managed ClickHouse
Endpoint format:
IP address of source instance node:port.ImportantThe port here is the TCP port.
ApsaraDB for ClickHouse
The endpoint of the source instance is the VPC internal endpoint, not the public endpoint.
ImportantThe following ports, 3306 and 9000, are static fields.
Community Edition instance:
Endpoint format:
VPC internal address:3306.Example:
cc-2zeqhh5v7y6q*****.clickhouse.ads.aliyuncs.com:3306
Enterprise instance:
Endpoint format:
VPC internal address:9000.Example:
cc-bp1anv7jo84ta*****clickhouse.clickhouseserver.rds.aliyuncs.com:9000
old_database
The database name of the self-managed cluster.
old_table
The table name of the self-managed cluster.
username
The account for the self-managed cluster.
password
The password for the self-managed cluster.
max_execution_time
The maximum running time for a query. Set to 0 for no time limit.
max_bytes_to_read
The maximum number of bytes a query can read from the source data. Set to 0 for no limit.
log_query_threads
Whether to record thread information for query execution. Set to 0 to not record thread information.
max_result_rows
The maximum number of rows in the query result. Set to 0 for no limit.
_partition_id
The data partition ID.
Migrate data by exporting and importing files
Export data from the self-managed cluster database and import it into the destination ApsaraDB for ClickHouse instance using files.
Export and import using a CSV file
Export data from the self-managed cluster database to a CSV format file.
clickhouse-client --host="<old host>" --port="<old port>" --user="<old user name>" --password="<old password>" --query="select * from <database_name>.<table_name> FORMAT CSV" > table.csvImport the CSV file into the destination ApsaraDB for ClickHouse instance.
clickhouse-client --host="<new host>" --port="<new port>" --user="<new user name>" --password="<new password>" --query="insert into <database_name>.<table_name> FORMAT CSV" < table.csv
Stream export and import using a Linux pipe
clickhouse-client --host="<old host>" --port="<old port>" --user="<user name>" --password="<password>"  --query="select * from <database_name>.<table_name> FORMAT CSV" |
clickhouse-client --host="<new host>" --port="<new port>" --user="<user name>" --password="<password>"   --query="INSERT INTO <database_name>.<table_name> FORMAT CSV"
Migration check error messages and solutions
Error message | Description | Solution |
Missing unique distributed table or sharding_key not set. | The local table in the self-managed cluster is missing a unique distributed table. | Before migration, create a corresponding distributed table for the local table in the self-managed cluster. |
The corresponding distributed table is not unique. | The local table in the self-managed cluster has multiple corresponding distributed tables. | In the self-managed cluster, delete the extra distributed tables and keep only one. |
MergeTree table on multiple replica cluster. | The self-managed cluster is a multi-replica cluster that contains non-replicated tables. Migration is not supported because the data is inconsistent between replicas. | For more information, see Why are non-replicated tables not allowed when you scale or migrate multi-replica instances? |
Data reserved table on destination cluster. | The corresponding table on the destination cluster already contains data. | Delete the corresponding table from the destination cluster. |
Columns of distributed table and local table conflict | The columns of the distributed table and the local table in the self-managed cluster do not match. | In the self-managed cluster, rebuild the distributed table to match the local table. |
Storage is not enough. | The destination cluster has insufficient storage space. | Upgrade the disk space of the destination cluster. The total space of the destination cluster must be more than 1.2 times the used space of the self-managed cluster. For more information, see Upgrade/Downgrade and scale-out/scale-in of community-compatible clusters. |
Missing system table. | A system table is missing in the self-managed cluster. | Modify the config.xml file of the self-managed cluster to create the required system tables. For more information, see Step 1: Check the self-managed cluster and enable system tables. |
The table is incomplete across different nodes. | The table is missing on some nodes. | Create tables with the same name on different shards. For an inner table of a materialized view, rename the inner table, and then rebuild the materialized view to point to the renamed inner table. For more information, see The inner table of a materialized view is inconsistent across shards. |
Calculate the merge time after migration
After migration, the destination cluster frequently performs merge operations. This increases I/O usage and the latency of service requests. If your business is sensitive to read and write data latency, you can upgrade the instance type and ESSD performance level to shorten the duration of high I/O usage caused by merges. For more information, see Vertical scaling, scale-out, and scale-in of community-compatible clusters.
The formula for the merge time after migration is as follows:
This formula applies to both single-replica edition and master-replica clusters.
Total time for frequent merge operations =
MAX(Hot data merge time, Cold data merge time)Hot data merge time =
Amount of hot data on a single node × 2 / MIN(Instance type bandwidth, Disk bandwidth × n)Cold data merge time =
(Amount of cold data / Number of nodes) / MIN(Instance type bandwidth, OSS read bandwidth) + (Amount of cold data / Number of nodes) / MIN(Instance type bandwidth, OSS write bandwidth)
The parameters are described as follows.
Amount of hot data on a single node: You can view the data in the Disk Usage - Single-Node Statistics row. For more information, see View cluster monitoring information.
Instance type bandwidth
NoteThe instance type bandwidth values are not absolute. This parameter varies if the ApsaraDB for ClickHouse backend uses different machine types. The provided values are the minimum bandwidths and are for reference only.
Specification
Bandwidth (MB/s)
Standard 8-core 32 GB
250
Standard 16-core 64 GB
375
Standard 24-core 96 GB
500
Standard 32-core 128 GB
625
Standard 64-core 256 GB
1250
Standard 80-core 384 GB
2000
Standard 104-core 384 GB
2000
Disk bandwidth: Refer to the Maximum throughput per disk (MB/s) row in the ESSD performance level table.
n: The number of disks on a single node. Run the following command to obtain this value:
SELECT count() FROM system.disks WHERE type = 'local';Cold data amount: You can view the data in the Cold storage usage row. For more information, see View cluster monitoring information.
Number of nodes: The number of nodes in the cluster. Run the following command to obtain this value:
SELECT count() FROM system.clusters WHERE cluster = 'default' and replica_num=1;OSS read bandwidth: Refer to the value in the Total Intranet and Internet Download Bandwidth column of the OSS bandwidth table.
OSS write bandwidth: Refer to the value in the Total Intranet and Internet Upload Bandwidth column of the OSS Bandwidth table.
FAQ
Q: How do I resolve the "Too many partitions for single INSERT block (more than 100)" error?
A: This error occurs because a single INSERT operation exceeds the max_partitions_per_insert_block limit. The default value for this parameter is 100. In ClickHouse, each write operation creates a data part, and a partition can contain one or more data parts. If a single INSERT operation writes data to too many partitions, an excessive number of data parts are created. This can significantly impact merge and query performance. ClickHouse imposes this limit to prevent performance degradation.
Solution: You can resolve this issue by adjusting the number of partitions or modifying the max_partitions_per_insert_block parameter.
Adjust the table schema and partitioning method, or avoid inserting data into many different partitions in a single operation.
If you cannot avoid inserting data into many partitions at once, you can increase the limit by modifying the max_partitions_per_insert_block parameter based on your data volume. The syntax is as follows:
SET GLOBAL ON cluster DEFAULT max_partitions_per_insert_block = XXX;NoteThe ClickHouse community recommends using the default value of 100. Do not set this value too high, because it may negatively affect performance. After you finish the batch data import, change the value back to the default.
Q: Why does the connection from the destination ApsaraDB for ClickHouse instance to my self-managed ClickHouse database fail?
A: This issue can occur if the self-managed ClickHouse cluster is configured with a firewall or a whitelist. To resolve this, you must add the IPv4 CIDR of the VSwitch ID for the ApsaraDB for ClickHouse cluster to the whitelist of your self-managed ClickHouse cluster. For information about how to obtain the IPv4 CIDR of the VSwitch ID for the ApsaraDB for ClickHouse cluster, see View IPv4 CIDR block.
Q: When I scale or migrate a multi-replica instance, why are non-Replicated tables not allowed? If they exist, how can I resolve this issue?
A: The reason for this restriction and the solution are as follows:
Reason: Multi-replica instances require Replicated tables to synchronize data between replicas. Without Replicated tables, the multi-replica setup is ineffective. The migration tool randomly selects one replica as the data source and migrates its data to the destination instance.
If non-Replicated tables exist, data cannot be synchronized between replicas, which means the data exists only on a single replica. Because the migration tool migrates data from only one replica, this process causes data loss. For example, as shown in the following figure, the MergeTree table on replica 0 (r0) contains data 1, 2, and 3. The MergeTree table on replica 1 (r1) contains data 4 and 5. If the migration tool selects r0 as the source, only data 1, 2, and 3 are migrated to the destination instance.

Solution: If you can delete the non-Replicated tables in the source instance, delete them. Otherwise, you must replace the non-Replicated tables with Replicated tables by performing the following steps:
Log on to the source instance.
Create a Replicated table. The table schema must be identical to the non-Replicated table that you want to replace, except for the engine.
Manually migrate data from the non-Replicated table to the new Replicated table. The migration statement is as follows.
ImportantYou must migrate each replica. This means you need to run the statement on both r0 and r1.
You can obtain the node IP address for the statement by running
SELECT * FROM system.clusters;.INSERT INTO <destination_database>.<new_replicated_table> SELECT * FROM remote('<node_IP>:3003', '<source_database>', '<non_replicated_table_to_replace>', '<username>', '<password>') [WHERE _partition_id = '<partition_id>'] SETTINGS max_execution_time = 0, max_bytes_to_read = 0, log_query_threads = 0;Swap the names of the non-Replicated table and the Replicated table.
EXCHANGE TABLES <source_database>.<non_replicated_table_to_replace> AND <destination_database>.<new_replicated_table> ON CLUSTER default;