By Sunny Jovita, Solution Architect Intern
Alibaba Cloud Service Mesh (ASM) is a fully managed service mesh platform that allows you to manage services more easily. ASM is compatible with open source Istio. ASM can be used to route and split inter-service traffic, secure inter-service communication with authentication, and observe service behavior in meshes. This service significantly reduces your workload in development and operations and maintenance (O&M). You will see the use of ASM in this tutorial below.
Now, let’s look at the following figure that shows the architecture of ASM.
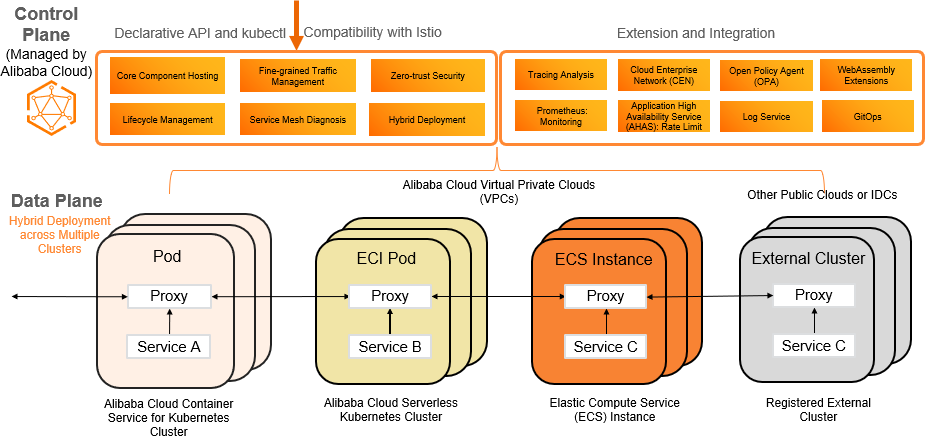
Image source: https://www.alibabacloud.com/help/en/alibaba-cloud-service-mesh/latest/what-is-asm
In this image, we can see that ASM integrates and manages all components on the Istio control plane. By this way, you can focus on application development and deployment.
Alibaba Cloud Service Mesh (ASM) can simplify microservice management in the microservices model. This blog provides a clear tutorial on how to use ASM to manage a BookInfo microservice application.
The following figure shows the procedure for using ASM to manage an application.

Image source: https://www.alibabacloud.com/help/en/alibaba-cloud-service-mesh/latest/quick-start-overview
1) Create an ASM instance.
2) Add an ACK cluster to the ASM instance.
3) Deploy an ingress gateway service in ACK cluster.
4) Deploy an application in the ASM instance.
5) Use Istio resources to route traffic to different versions of a service.
6) Use Mesh topology to view the topology of an application.
To use Alibaba Service Mesh (ASM) you must create an ASM instance. This section describes how to create an ASM instance in the ASM console.
Procedure
1) Log on to the ASM console.
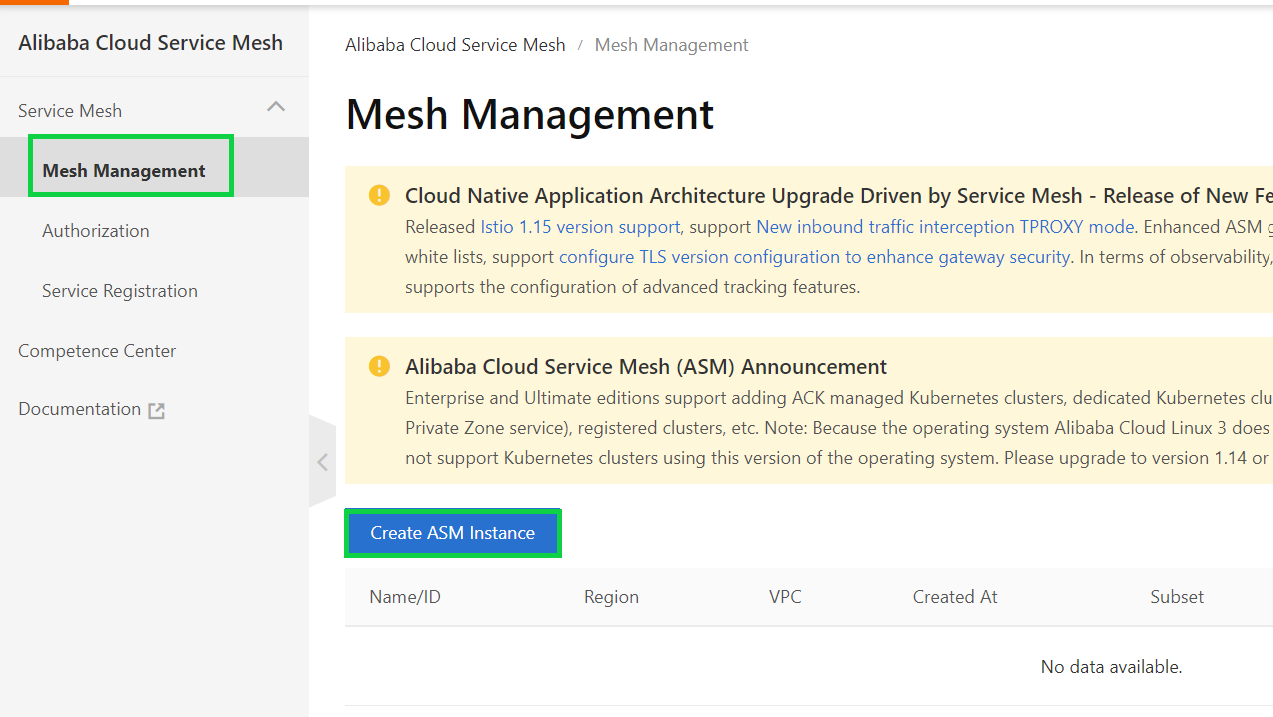
2) In the left-side navigation pane, choose Service Mesh > Mesh Management and click Create ASM Instance.
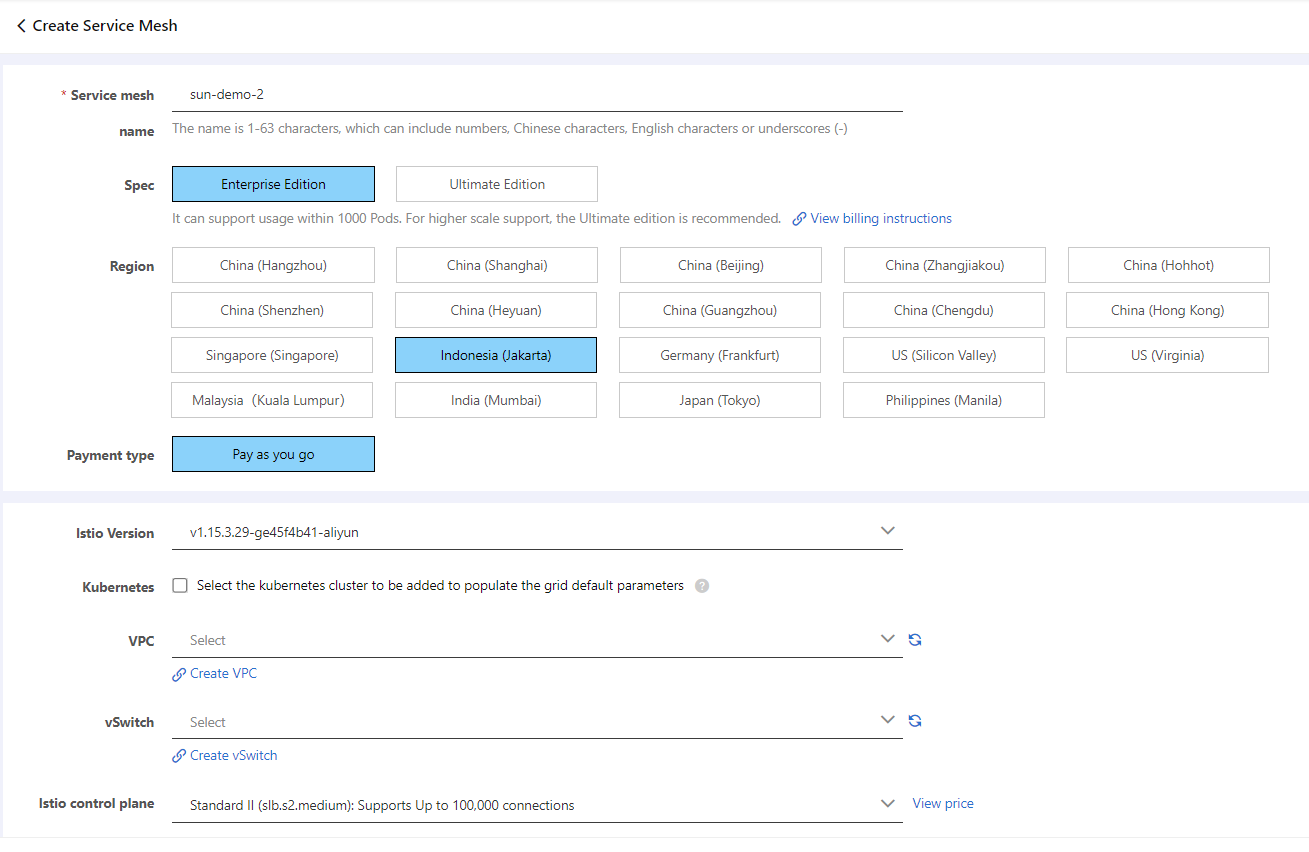
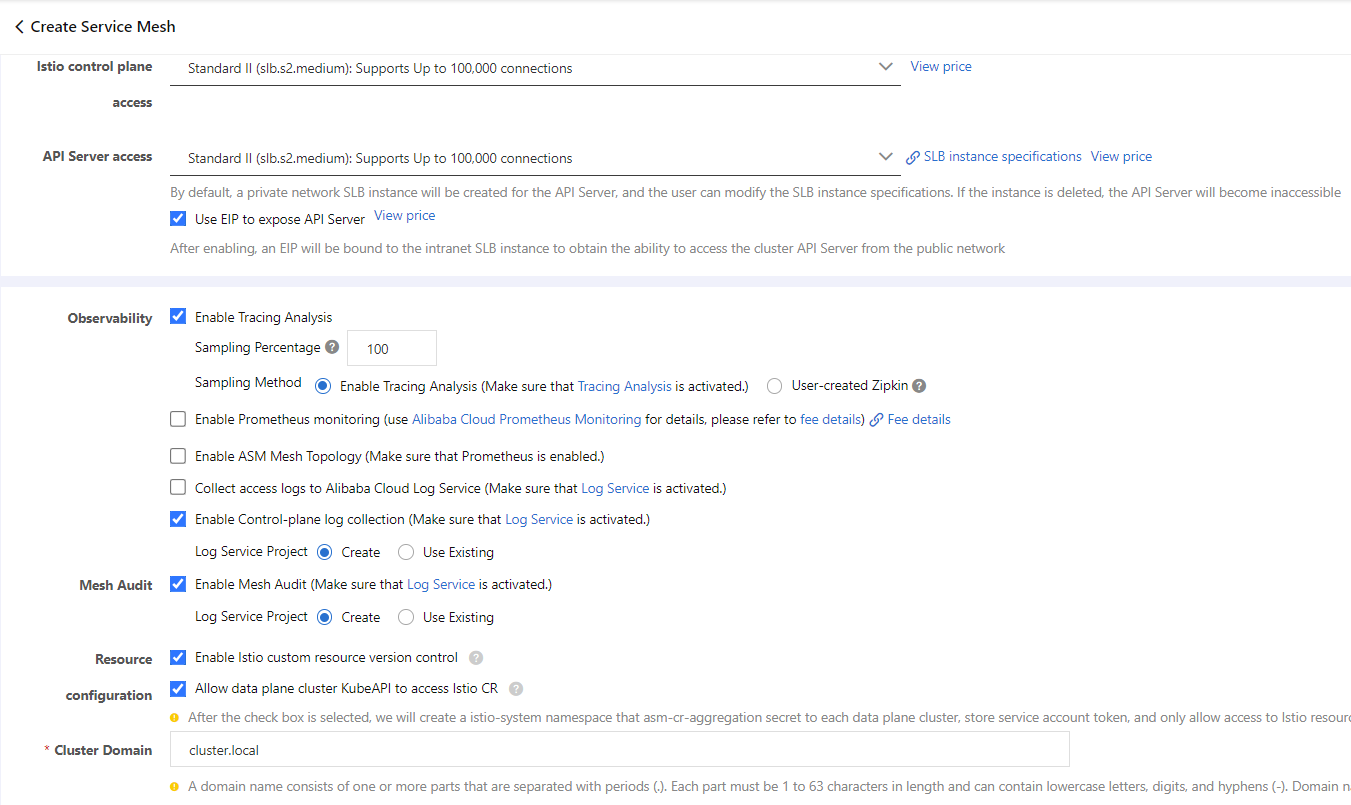
3) On the Create Service Mesh page, set the parameters as required and click Purchase.
Click this link to see the description of each parameter.
Applications that are deployed in Alibaba cloud service mesh (ASM) instance run in clusters. To use an ASM instance to manage applications, you must add a Container Service for Kubernetes (ACK) cluster to the ASM instance.
Prerequisites
(Step 2.1) Procedure to utilize kubectl and configure kubectl to access ACK cluster
Step 1: Install kubectl
After you have already installed Container Service for Kubernetes (ACK), you need to download and install kubectl on the client. For more information, see [Install and configure kubectl
](https://kubernetes.io/docs/tasks/tools/?spm=a2c63.p38356.0.0.2efd577bV0WY3F)
Step 2: Select a type of cluster credentials
Each ACK cluster provides two types of cluster credentials for you to connect to the cluster over the Internet or through a private connection. The cluster credentials are stored in a kubeconfig.
1) Log on to the ACK console.
2) In the left-side navigation pane of the ACK console, click Clusters.
3) On the Cluster page, find the cluster that you want to manage and click the name of the cluster and the details page of the cluster appears.
4) On the Cluster Information page, click the Connection Information tab, Then, select cluster credentials for connecting to the cluster over the internet or through a private connection.
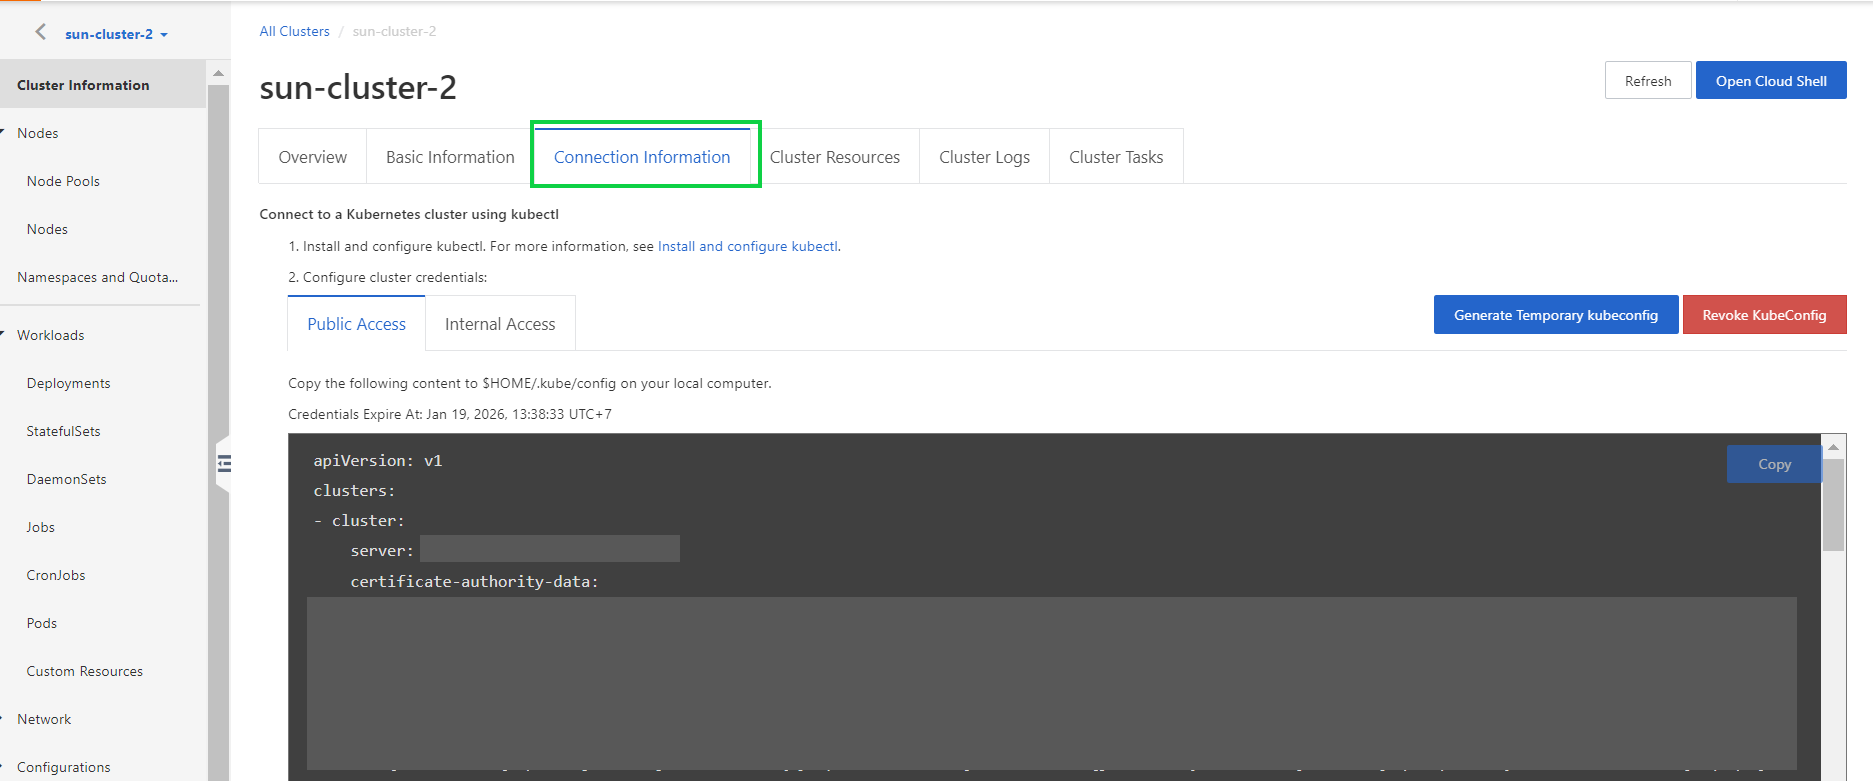
Step 3: Add cluster credentials
By default, kubectl searches for a file named config in the $HOME/.kube directory from the client. The file stores the credentials for authenticating to the cluster that you want to access. Kubectl uses this file to connect to the cluster.
1) Select the Public Access or Internal Access tab and then click Copy.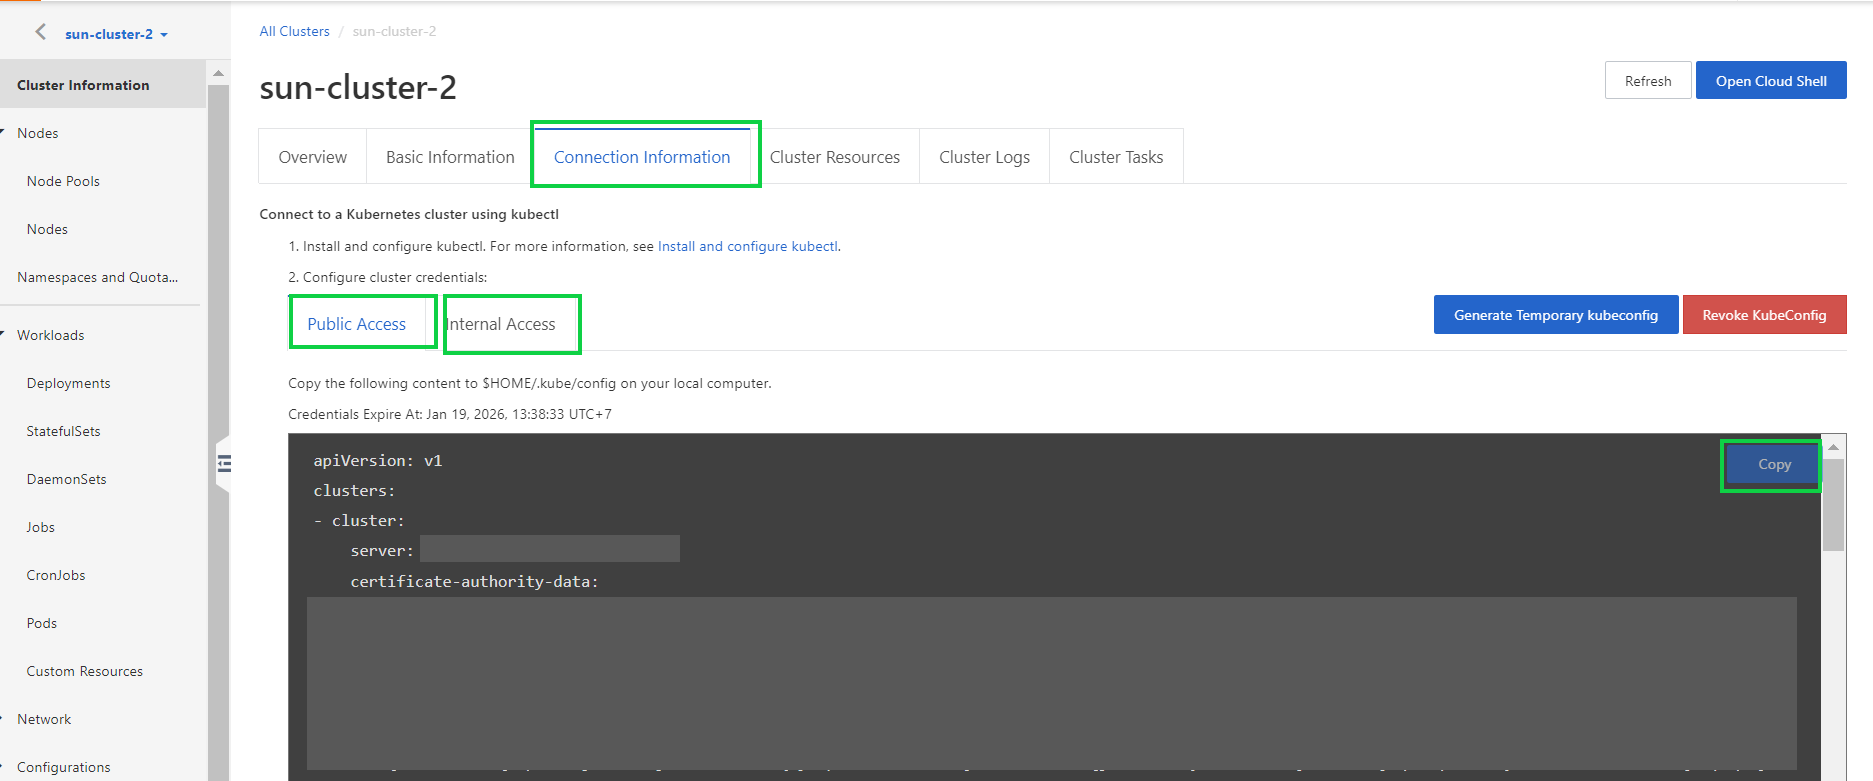
2) Copy the cluster credentials to the config file in the $HOME/.kube directory, save the file, and exit.

Step 4: Verify the connectivity
After you add the cluster credentials, go back to the non-root privilege to run the kubectl command to verify the connectivity to the cluster. Run the following command to query the namespaces of the cluster.
- kubectl get namespace
Expected output:
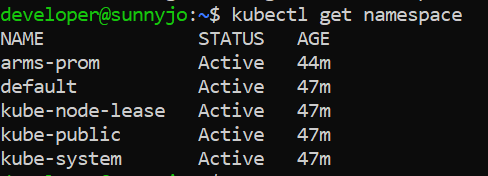
**
(Step 2.2) Procedure to add a cluster to an ASM instance. **
1) Log on to the ASM console.
2) In the left-side navigation pane, choose Service Mesh > Mesh Management.
3) Find the ASM instance that you want to configure. Click the name of the ASM instance.

4) On the details page of the ASM instance, choose Cluster & Workload Management > Kubernetes Clusters in the left-side navigation pane. On the Kubernetes Clusters page, click Add.
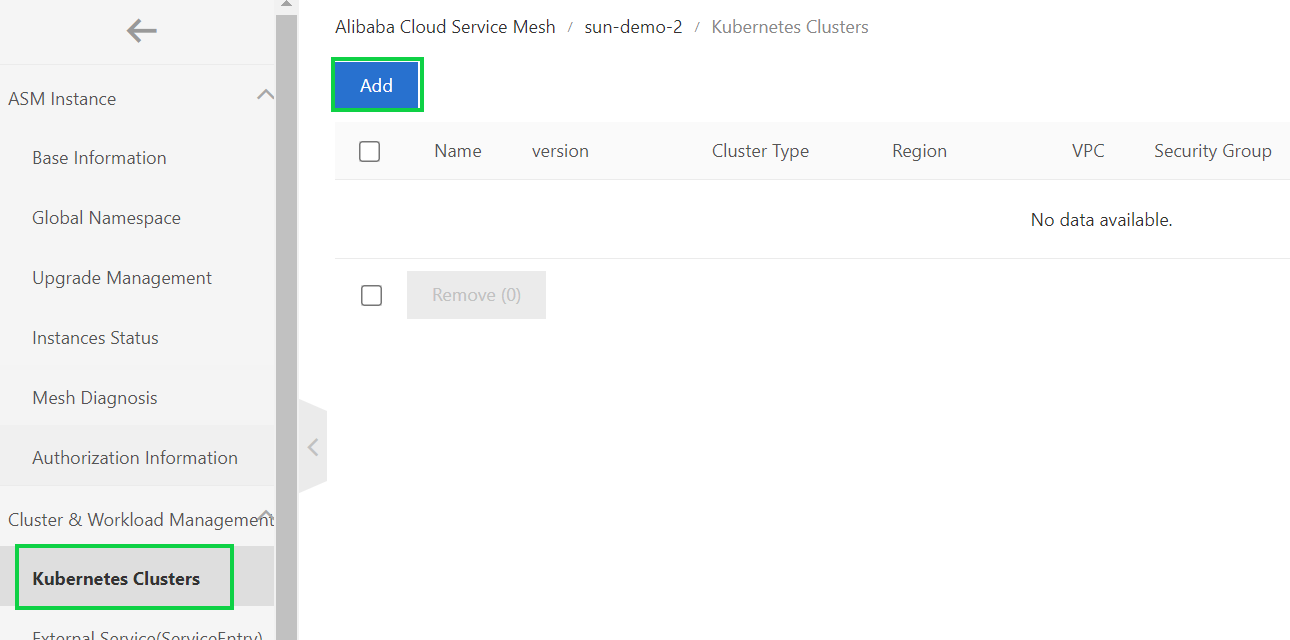
5) In the Add Cluster panel, select the cluster to be added to the ASM instance and click OK.
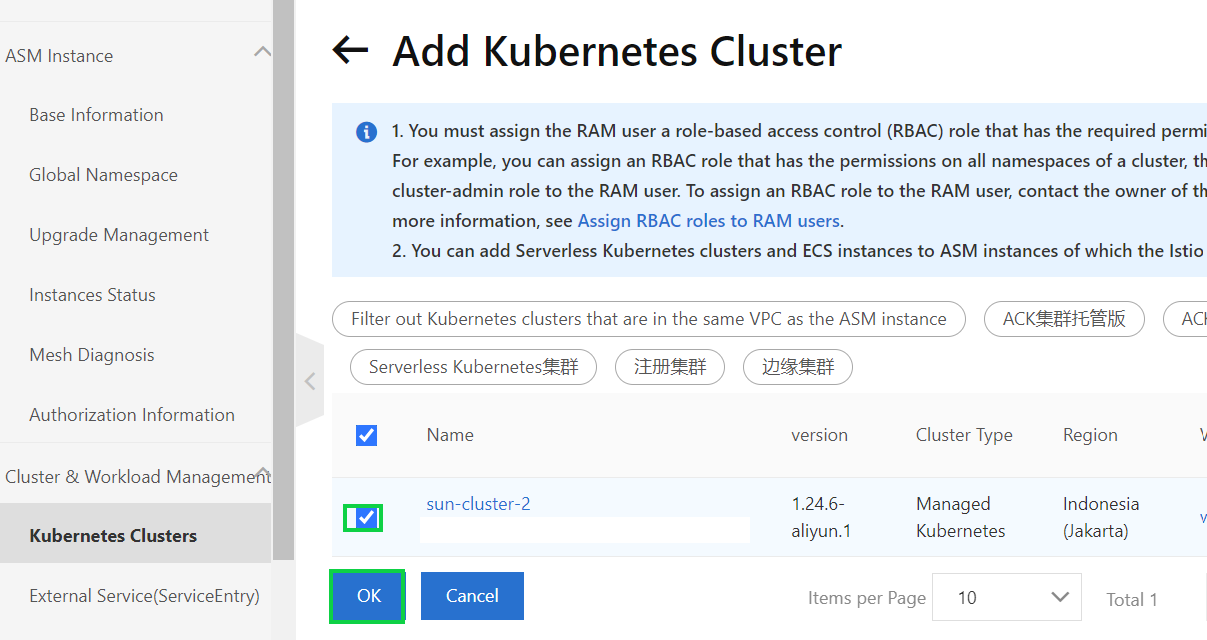
Note:
After you add a cluster to an ASM instance, do not run commands such as the istioctl commands to install Istio components in the cluster. Otherwise, the cluster may be unavailable for the ASM instance. If you install any Istio components in a cluster after the cluster is added to an ASM instance, remove the cluster from the ASM instance and add the cluster to the ASM instance again.
6) After you add a cluster to the ASM instance, the status of the ASM instance changes to Connecting.

7) Wait for a few seconds and click the Refresh icon in the upper-right corner. If the cluster is added to the ASM instance, the status of the cluster becomes Running. You can add multiple clusters to the ASM instance at a time.

To enable internet access for an application in an Alibaba Cloud Service Mesh (ASM) instance, an ingress gateway service must be deployed in the cluster where the application resides. At Layer 7, an ingress gateway service provides a unified entrance for routing inbound traffic. Based on the request content, it routes HTTP requests from the same TCP-based port to different Kubernetes Services.
This section explains how to deploy an ingress gateway service in a Container Service for Kubernetes (ACK) cluster that is added to an ASM instance.
Prerequisites:
Procedure:
1) Log on to the ASM console.
2) Find the ASM instance that you want to configure and click the name of the ASM instance.
3) On the details page of the ASM instance, click ASM Gateways in the left-side navigation pane, and click Create.
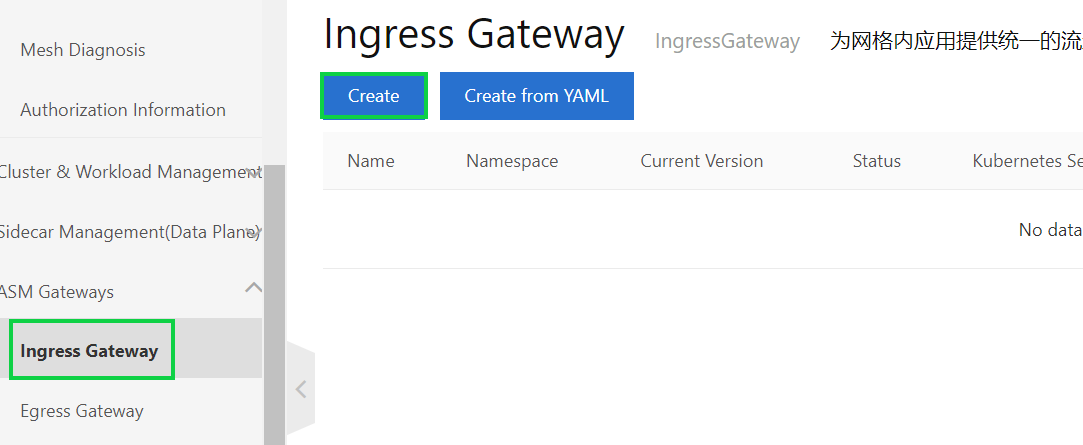
4) On the Create page, configure the basic information about the ingress gateway service.
Note: In order to define a custom ingress gateway service, click Create from YAML.
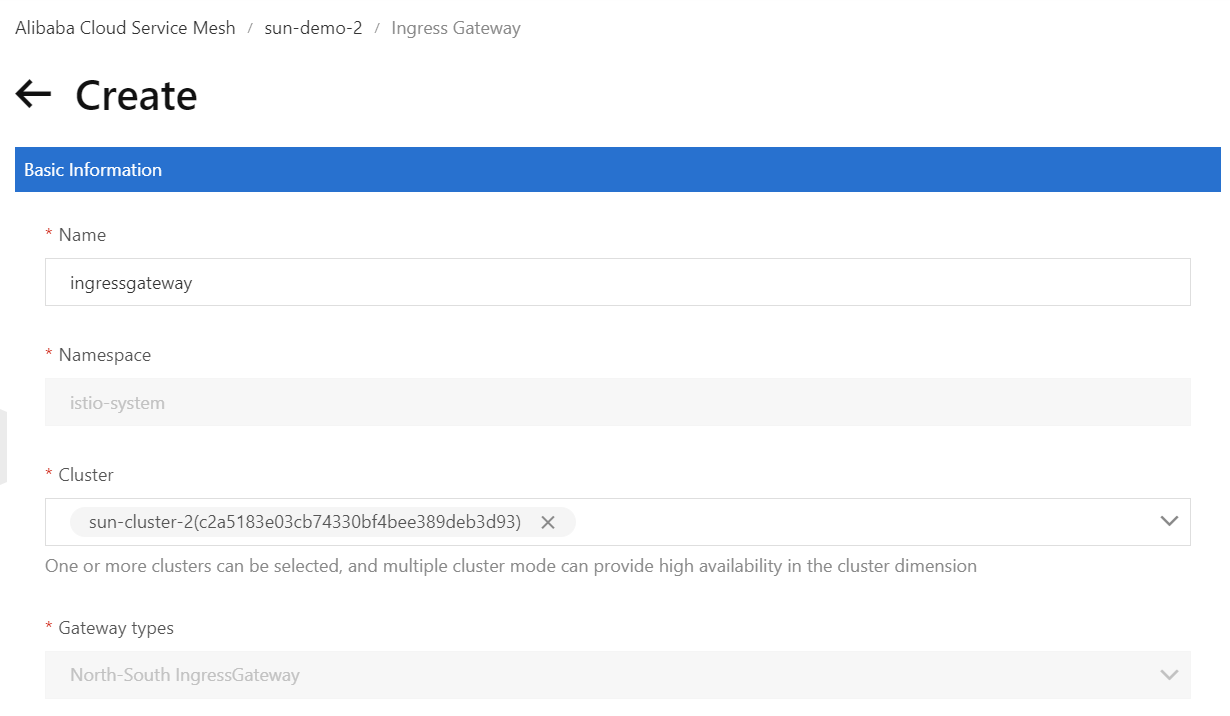
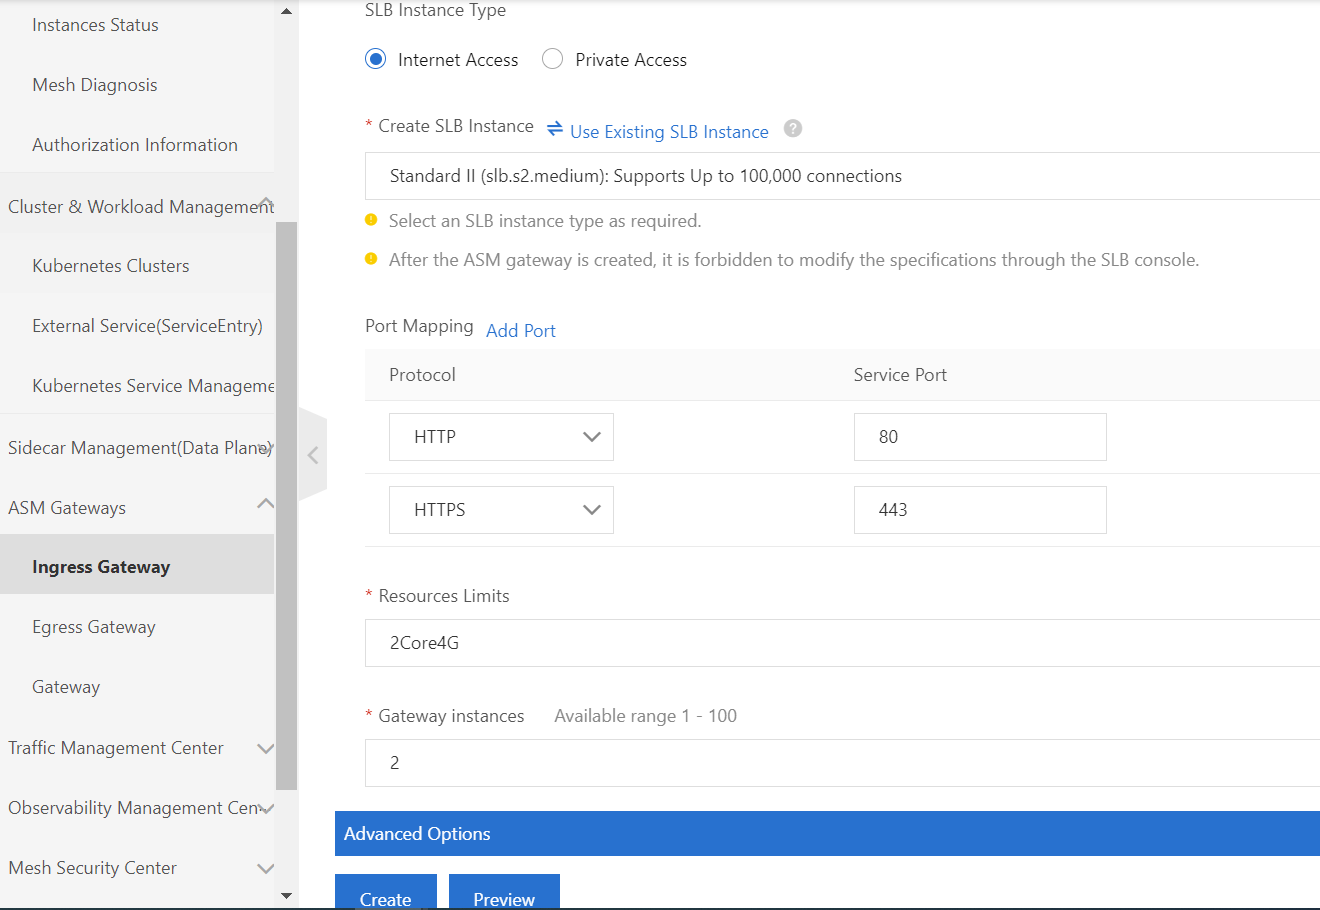
5) Click the Create button.
6) After you deploy the ingress gateway service, you can view the details of the ingress gateway service in the ACK console.

7) After you deploy the ingress gateway service, you can view the details of the ingress service in the ACK console. To view the result, go to the ACK console.
8) In the left-side navigation pane, click Clusters.
9) On the cluster page, click the targeted cluster of its name.
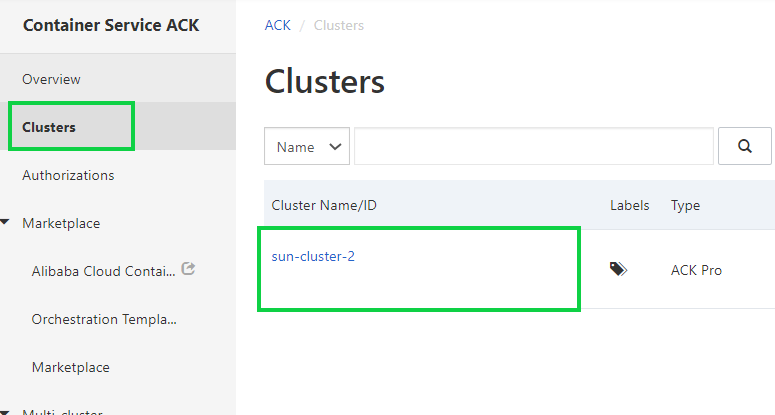
10) In the upper part of the service page, select istio-system from the Namespace drop-down list.
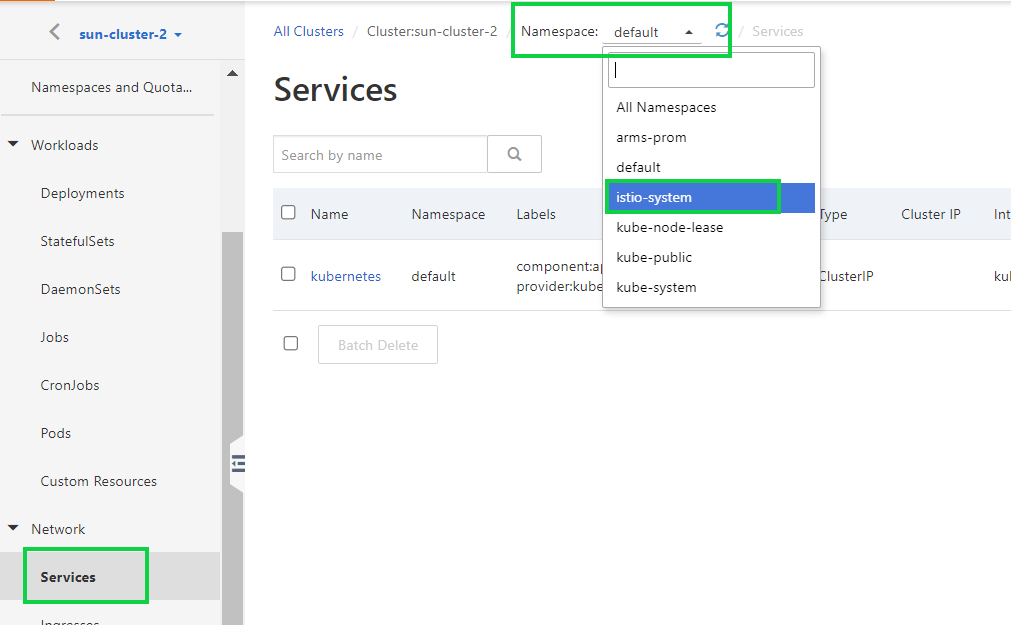
11) Find the ingress gateway service that you want to view and click Details in the Actions column.

After you are done deploying an ingress gateway service in a cluster that is added to an Alibaba Cloud Service Mesh (ASM) instance, you can deploy applications in the ASM instance. This section describes how to deploy an application in an ASM instance.
Prerequisites:
Before we begin, please ensure that the following actions have been completed successfully:
Bookinfo application architecture: Before you begin
In this section, we will be using a book review application named Bookinfo to demonstrate various Istio features and how ASM is able to manage all components on the Istio control plane. This example is taken from the Istio samples on github. Click this link to learn more about the Bookinfo application.
A glimpse of its architecture:
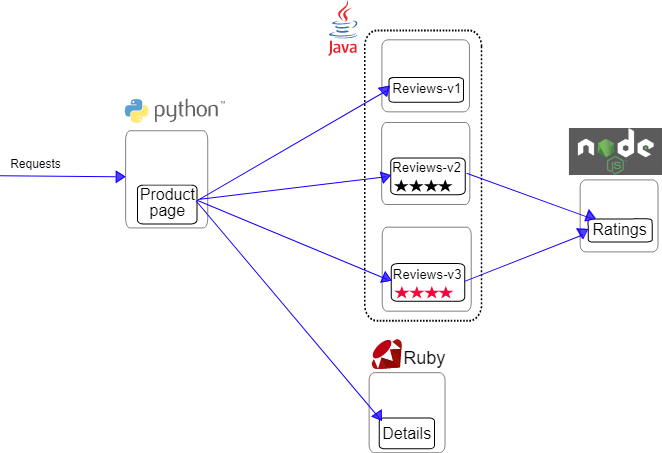
Image source: https://istio.io/latest/docs/examples/bookinfo/
The Bookinfo application consists of the following microservices:
The Reviews microservice has the following versions:
After you are done deploying the application in the ACK cluster, the application could be accessed from the internet.
Procedure
1) Log on to the Container Service ACK console.
2) Click Clusters.
3) Click the targeted name of the clusters.
4) In the left-side navigation pane of the details page, click Namespaces and Quotas.
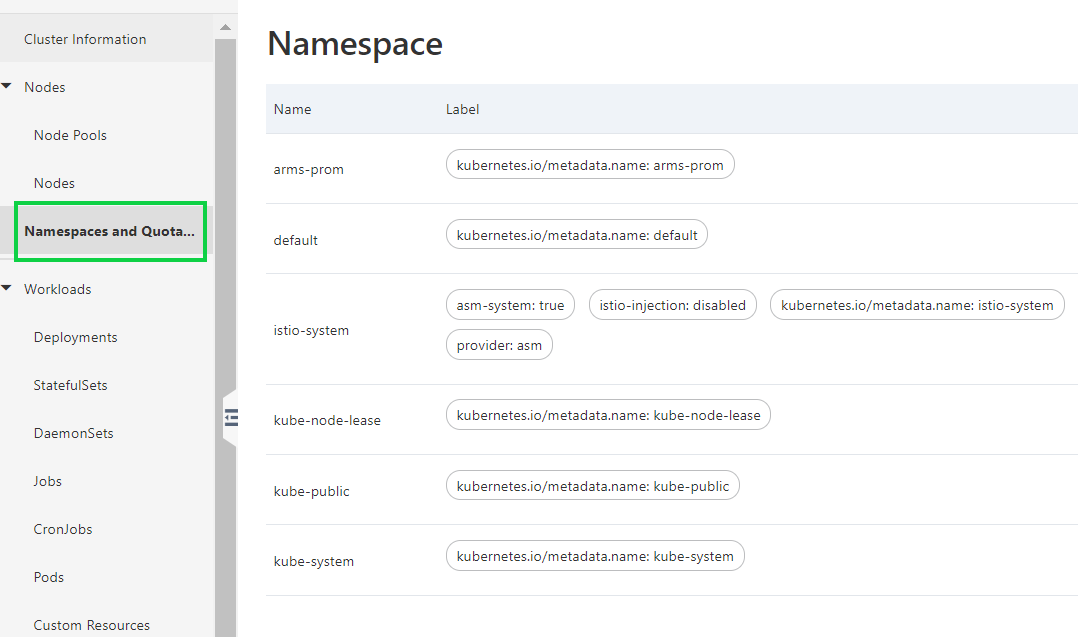
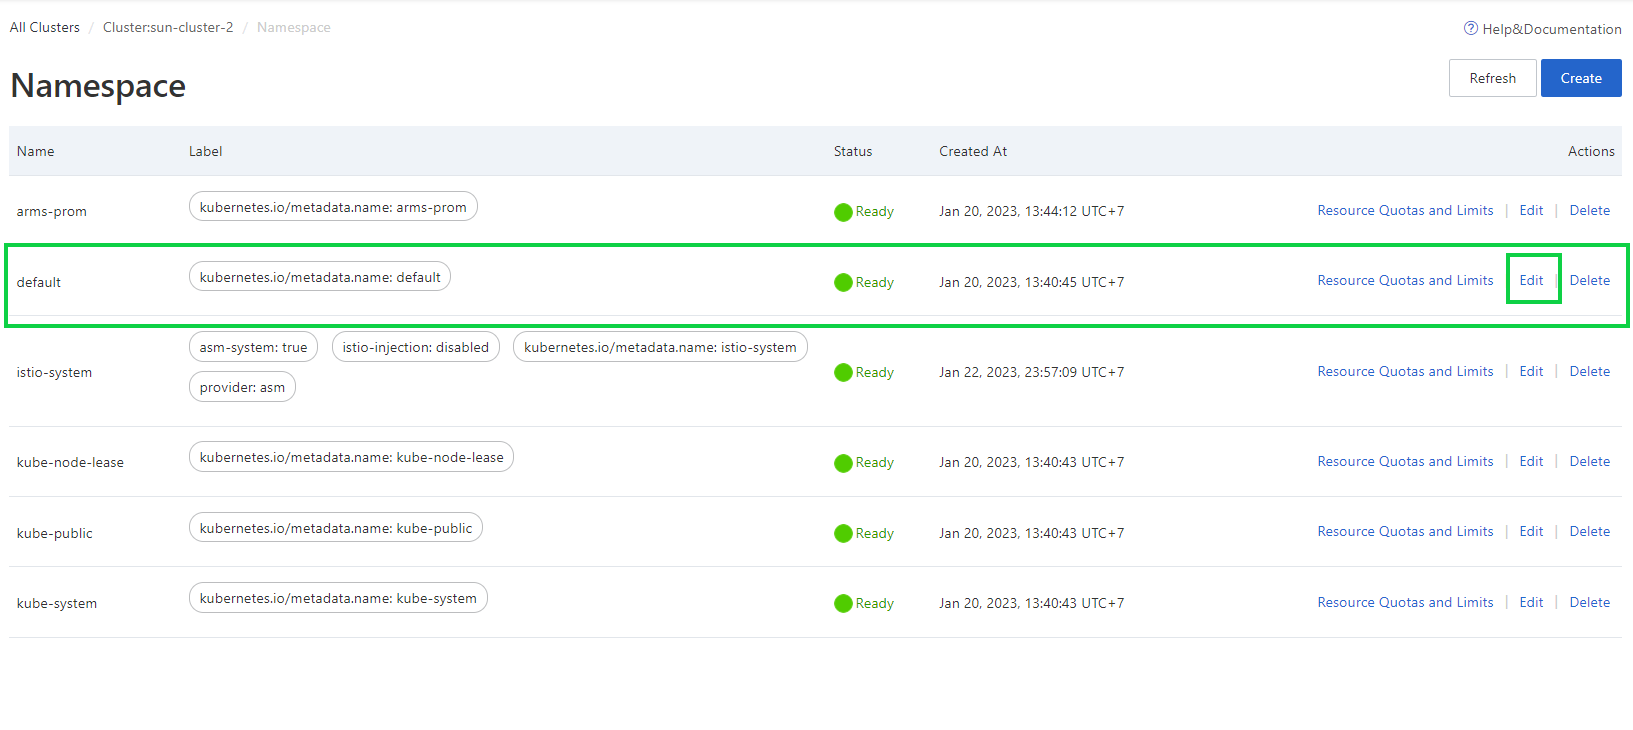
5) On the Namespace page, click Edit in the Actions column of the default namespace.
6) In the Edit Namespace dialog box, create one or more tags for the namespace.
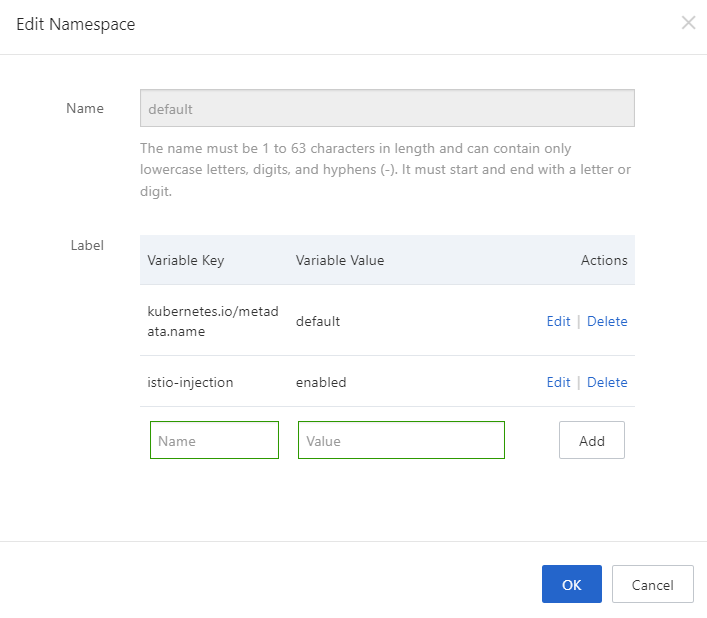
Note: Alternatively, another way to deploy the application, is to run the following command on the kubectl client to tag a namespace. This command will enable the sidecar injection. No need to rewrite the application. To enable injection, execute the command:

This means that we deploy the Bookinfo application under the namespace “default”
7) Download the YAML file of the Bookinfo application from the Istio repository of GitHub.
8) Run the following command on the kubectl client to deploy the Bookinfo application in the ACK cluster that is added to the ASM instance.
Kubectl apply -f bookinfo.yaml
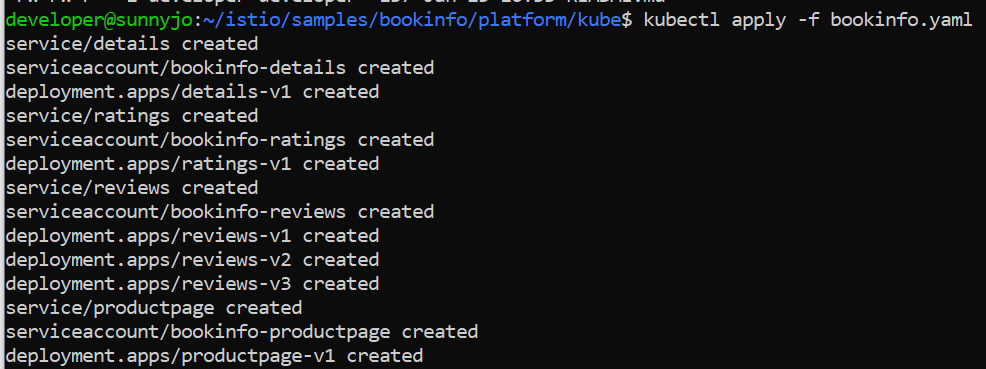
We have successfully deployed all the services. The Following diagram will demonstrate how the application looks after deploying it.
Note: To verify, you can check for the services and pods. It will take a while to run the pods.
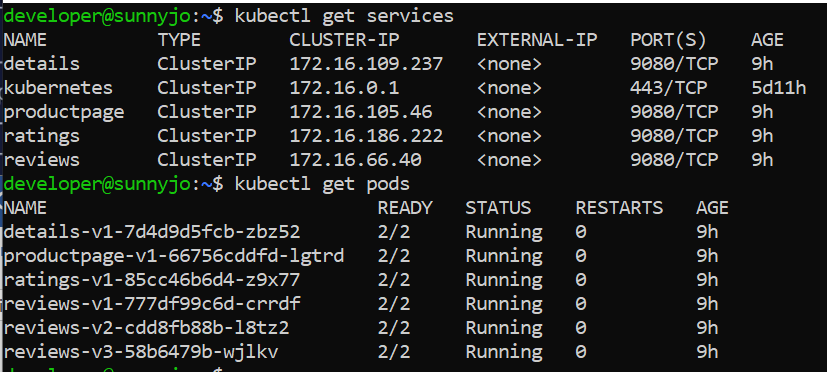
Note: To describe each of the pod information
Kubectl descrive pod – n <namespace> <podname>

Note: To verify the application is up and running, you can execute the command:
kubectl exec -it $(kubectl get pod -l app=ratings -o jsonpath=’{.items[0].metadata.name}’) -c ratings -- curl productpage:9080/productpage | grep -o “<title>.*</title>”

9) In order to view the deployment information about the Bookinfo application, perform the following steps.
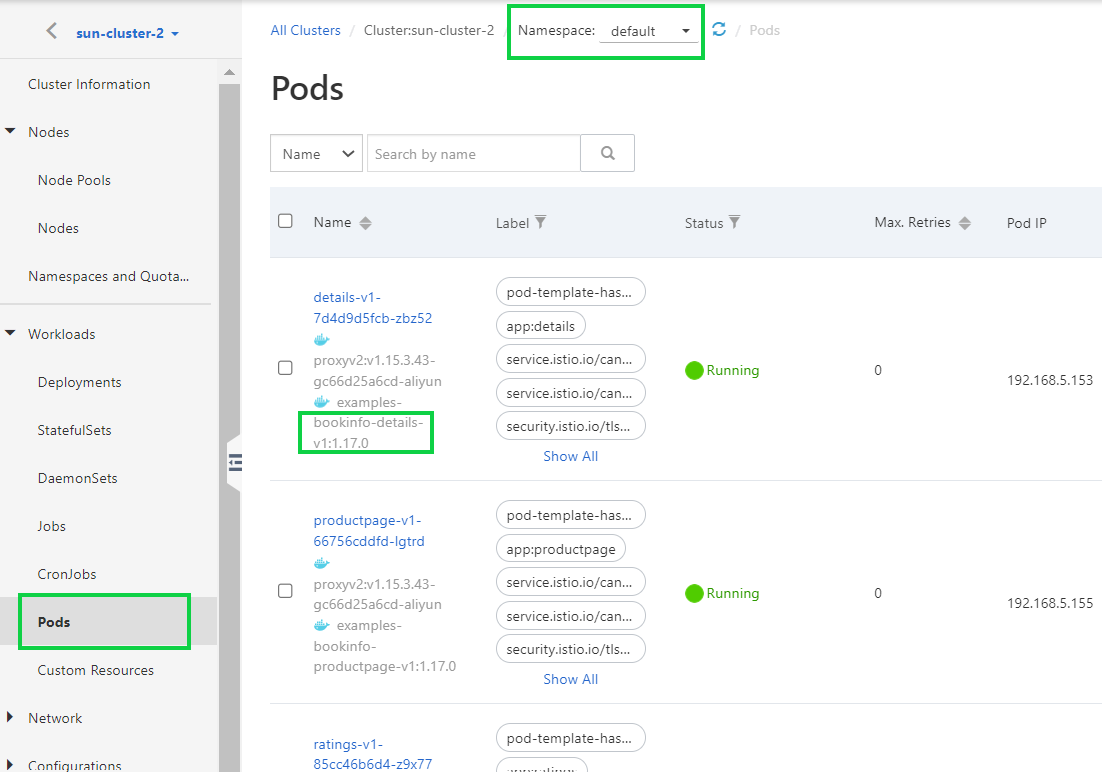
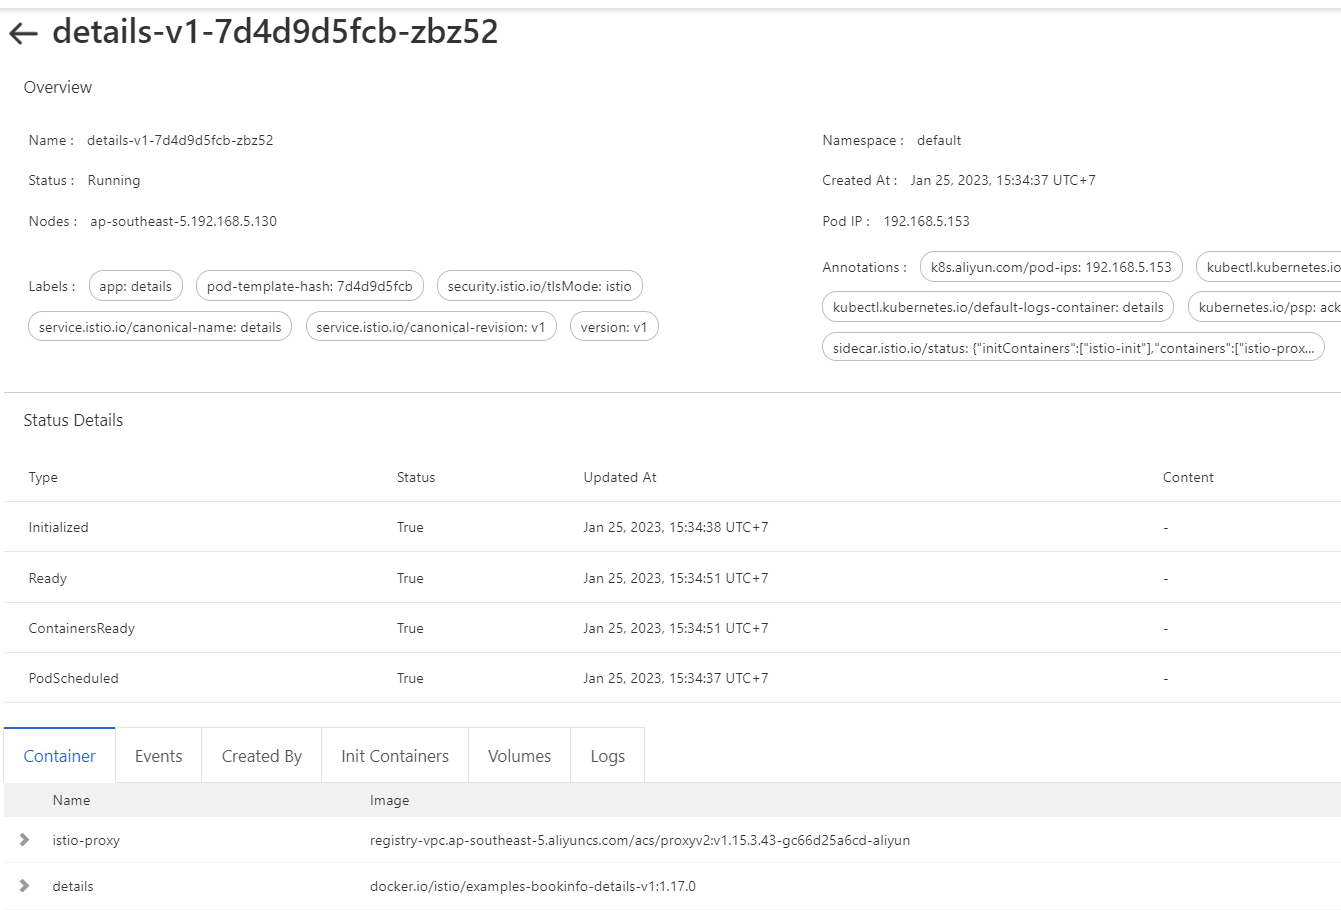
ASM allows you to route traffic to different versions of a service based on the specified ratio. This feature is applicable to many scenarios such as A/B testing. In this section, we will describe how to use Istio resources to route traffic to different versions of a service.
As a short description, Istio services need “gateway” and “virtual service” to be invoked from outside. You can apply the gateway to the application with the command or by following these steps and verify the gateway by the commands.
**Step 1: Create an Istio gateway
**
Here, you need to create an Istio gateway and associate it with an ingress gateway.
1) Log on to ASM console.
2) In the left-side navigation pane, choose Service Mesh -> Mesh Management.
3) On the Mesh Management page, find the ASM instance that you want to configure.
4) On the details page of the ASM instance, choose ASM Gateways > Gateway in the left-side navigation pane. On the Gateway page, click Create.
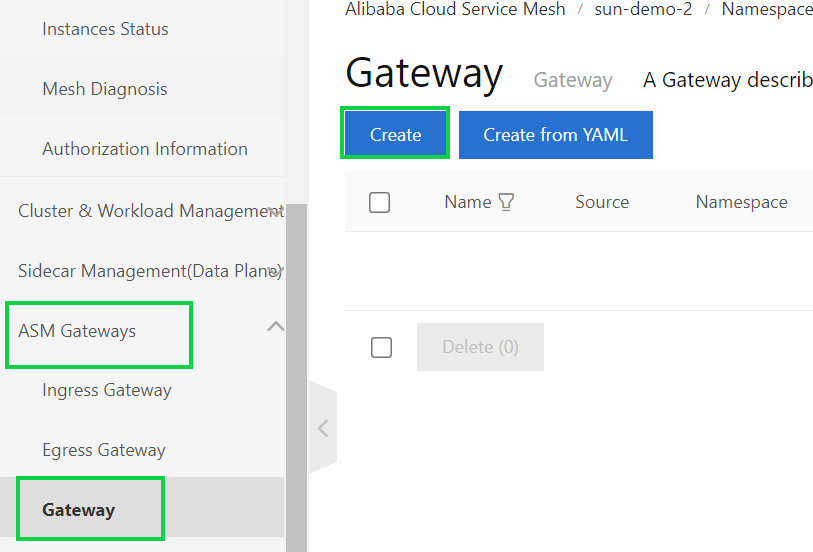
5) On the Create page, select default from the Namespace drop-down list and set the Name parameter to “bookinfo-gateway”. Click Gateway Pod Selector, click Add Label for Selecting, and then set the Name parameter to “istio” nd the Value parameter to “ingressgateway”.
6) Click Exposed Service, click Add Service, and then set the Name parameter to “http”, the Port parameter to “80”, the Protocol parameter to HTTP, and the Hosts parameter to
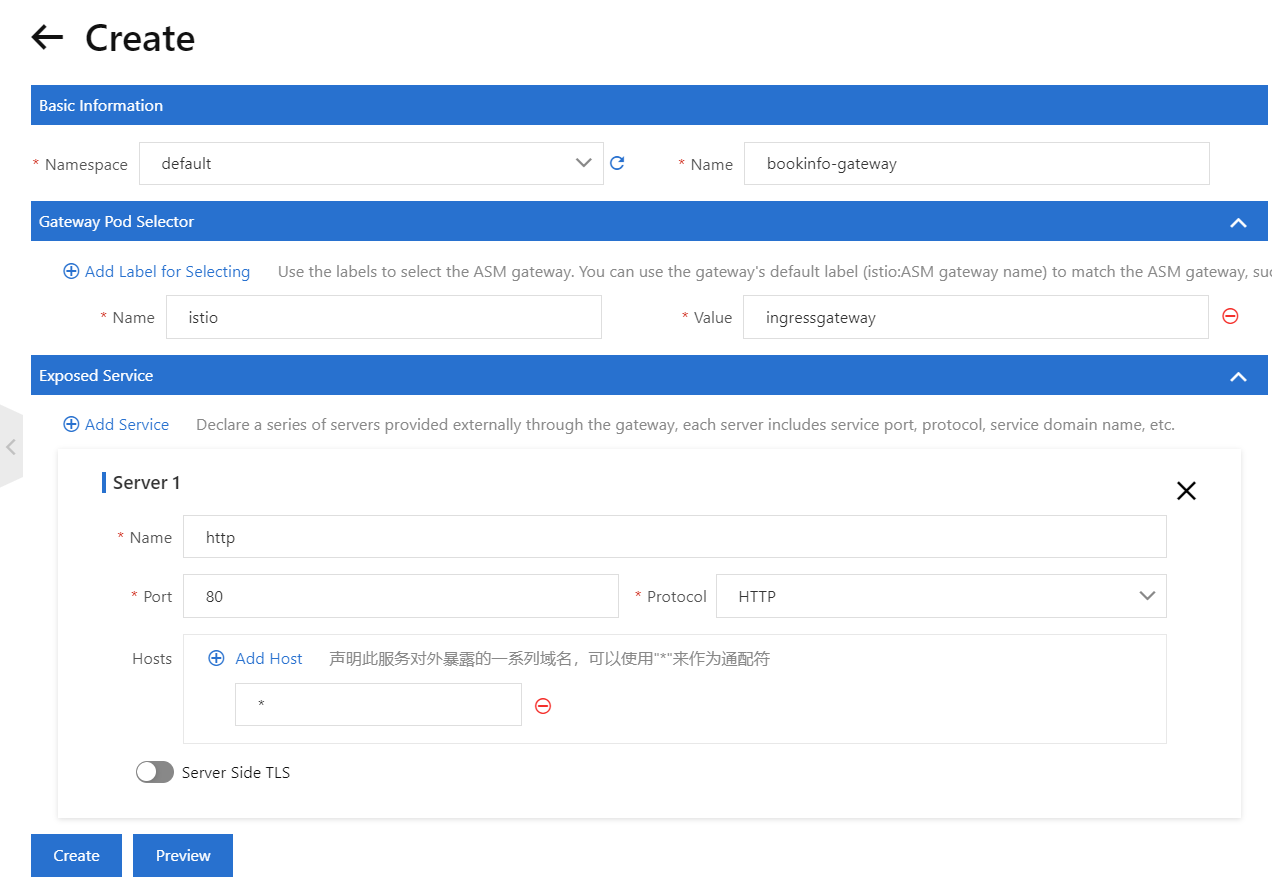
7) You can click Preview to view the YAML file of the Istio gateway. After you confirm the information, click Create.
Note: another way to apply gateway by using commands.

Note: to verify the gateway

Step 2: Create a virtual service
You can create a virtual scene that allows request to the Bookinfo application by using the /productpage, /static, /login, /logout, or /api/v1/products path.
1) Log on to the ASM console.
2) In the left-side navigation pane, choose Service Mesh > Mesh Management.
3) On the Mesh Management page, find the ASM instance that you want to configure. Click the name of the ASM instance or click Manage in the Actions column.
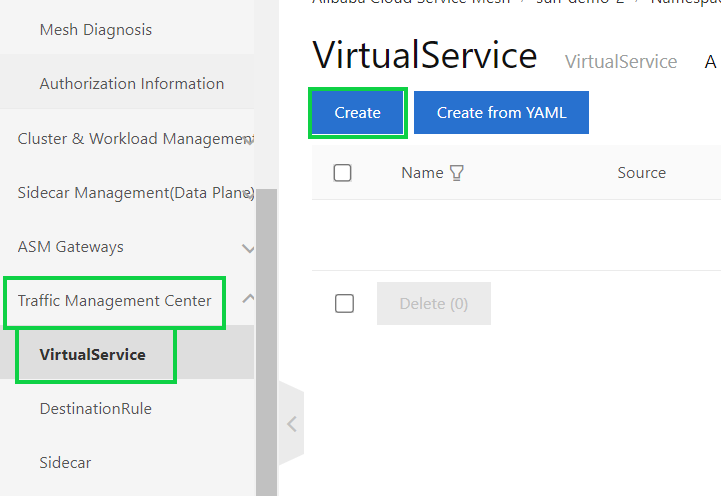
4) On the details page of the ASM instance, choose Traffic Management Center > VirtualService in the left-side navigation pane. On the VirtualService page, click Create.
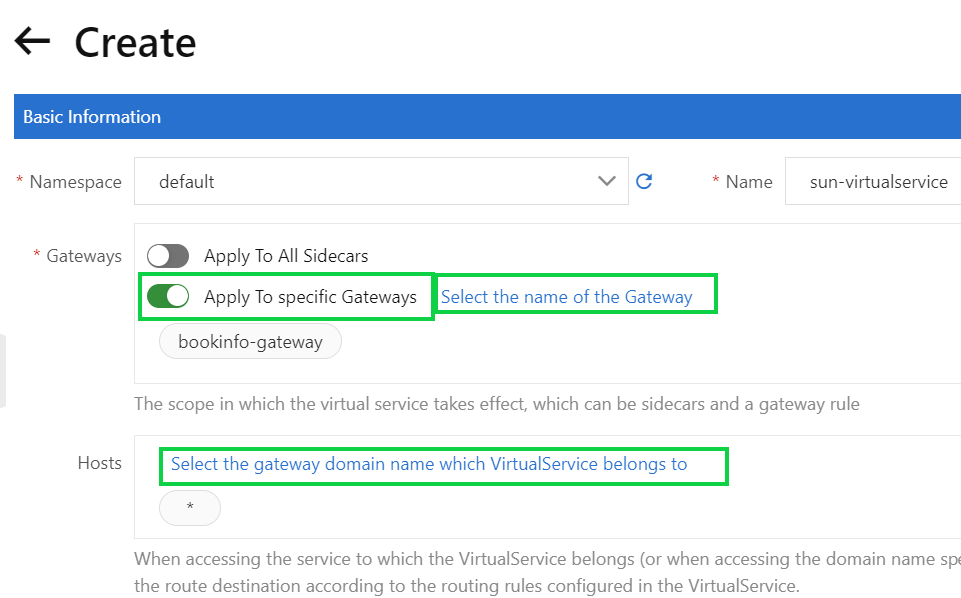
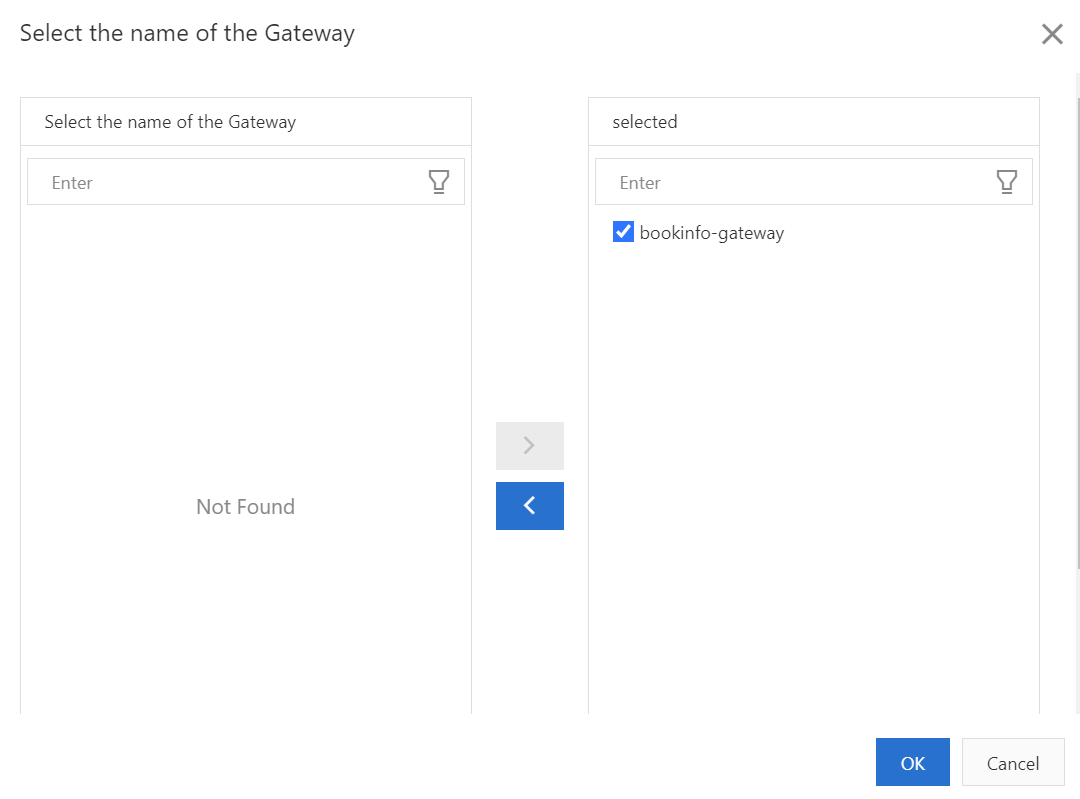
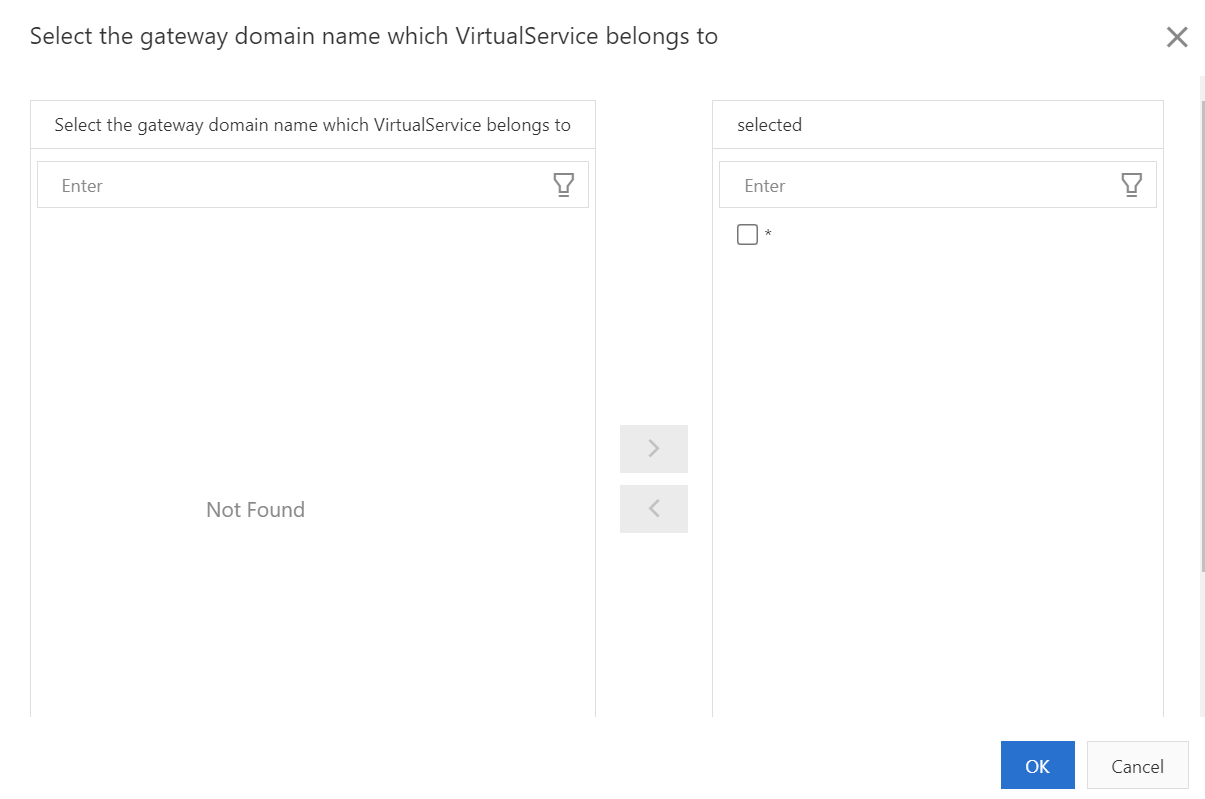
5) On the Create page, select default from the Namespace drop-down list and set the Name parameter to the name of the virtual service that you want to create. Enable Apply To specific Gateways, enter the “bookinfo-gateway”, and then set the Hosts parameter to “*”.
6) Click HTTP Route, click Add Route, and then set the Name parameter to a custom name. Click Add Request Matching Rule five times to create five matching rules and turn on Matching URI for each matching rule. Set the Method parameter to Exact and the Content parameter to “/productpage” for the first matching rule.
7) Set the Method parameter to Prefix and the Content parameter to “/static” for the second matching rule. Set the Method parameter to Exact and the Content parameter to “/login” for the third matching rule. Set the Method parameter to Exact parameter and the Content parameter to “/logout” for the fourth matching rule. Then, set the Method parameter to Prefix and the Content parameter to “/api/v1/products” for the fifth matching rule.
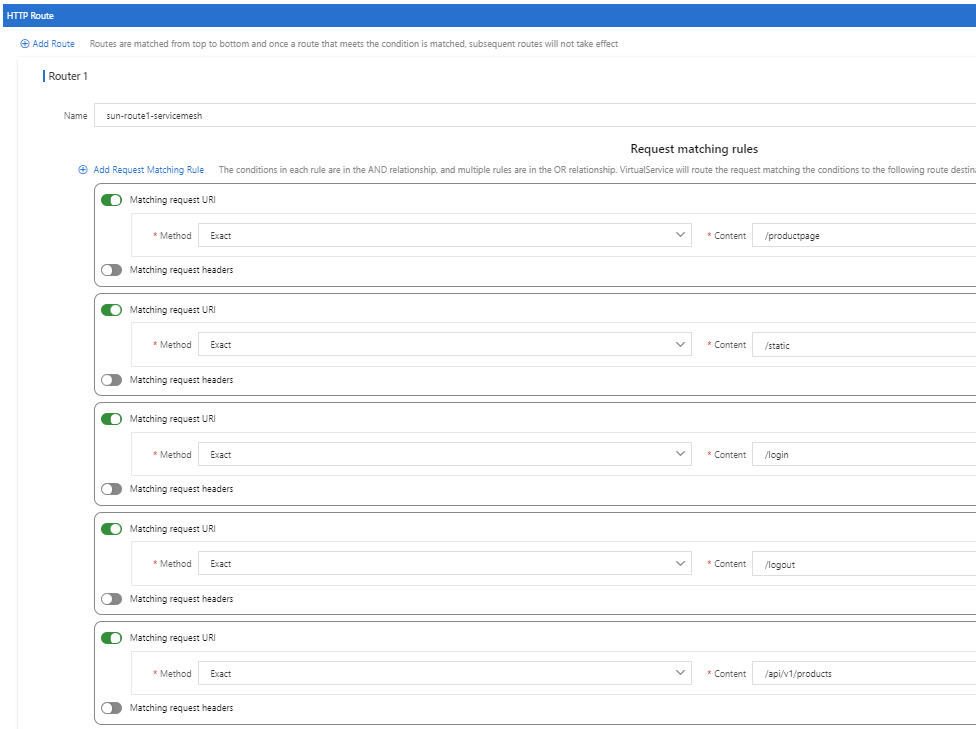
8) Click Add Route Destination. Set the Host parameter to “productpage” and the Port parameter to “9080”.

9) Click Preview to view the YAML file of the virtual service. After you confirm the information, click Create.

Step 3: Access the Bookinfo application
1) Obtain the IP address of the ingress gateway service.
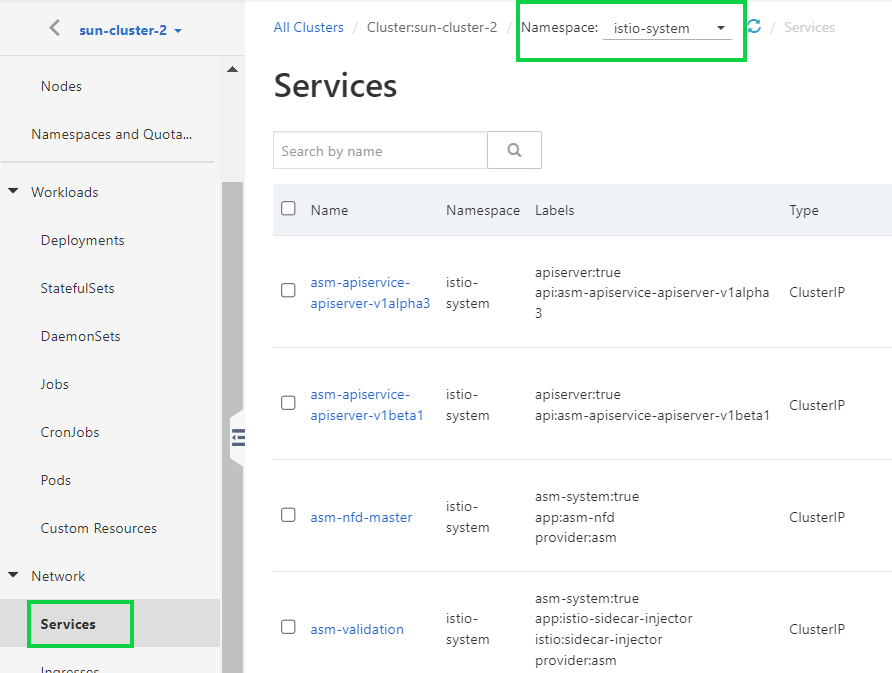

Another way to determine or view the ingress port, first, you need to find whether the application has a load balancer.
Kubectl get svc istio-ingressgateway -n istio-system

If the EXTERNAL-IP is set, that means your Bookinfo application has an external load balancer. But, if the IP is in “pending” or “none” status, that means your application does not have an external load balancer. In that case, you can access the application with a node port.
export INGRESS_HOST=$(kubectl -n istio-system get service istio-ingressgateway -o jsonpath=’{.status.loadBalancer.ingress[0].ip}’)
export INGRESS_PORT=$(kubectl -n istio-system get service istio-ingressgateway -o jsonpath=’{.spec.ports[?(@.name==”http2")].port}’)
export SECURE_INGRESS_PORT=$(kubectl -n istio-system get service istio-ingressgateway -o jsonpath=’{.spec.ports[?(@.name==”https”)].port}’)
Now, let’s set the “GATEWAY_URL”
Export GATEWAY_URL=$INGRESS_HOST:$INGRESS_PORT
Step 3: Access the Bookinfo application.
In the address bar of your browser, enter an address in the following format: "http://{IP address of the ingress gateway service}/productpage”. Refresh the page ten times.
During this process, the Bookinfo application alternately accesses the v1, v2, and v3 versions of the reviews service. You can the “reviews served by” changes every time you refresh it.


ERROR WARNING

If you happen to face this issue, this means that your ingress gateway name should be the same with “gateway pod selector” in the Istio gateway.
For until these steps we have completed a major part of the application. As we saw, when we refresh the page we get the reviews different version. So, we need to specify the real destination for our application. We need to define the available versions, called “subsets” in destination rules. Destination rules to configure what happens to traffic for that destination rules. These are applied after “virtual service”.
Step 4: create routing rules for different versions of a service
1) Create a destination rule.
Create a destination rule and group instances of the reviews service by version. In this example, the instances of the reviews service include the v1, v2, and v3 subsets.
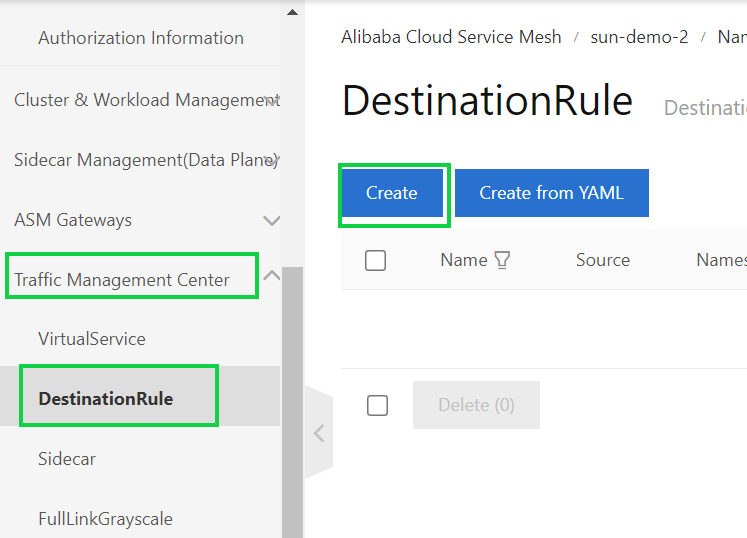

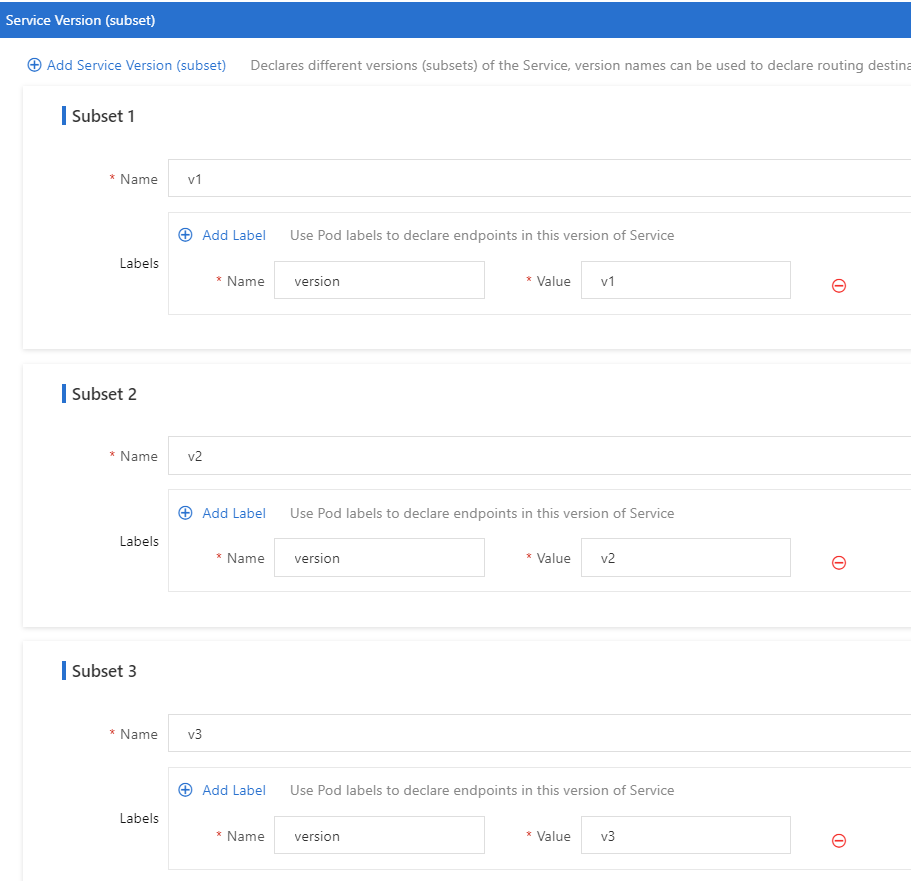

Another way creating a destination rule

2) Create a virtual service.
Create a virtual service to route 10% of the traffic to the v1 version of the reviews service, 40% of the traffic to the v2 version of the reviews service, and 50% of the traffic to the v3 version of the reviews service.
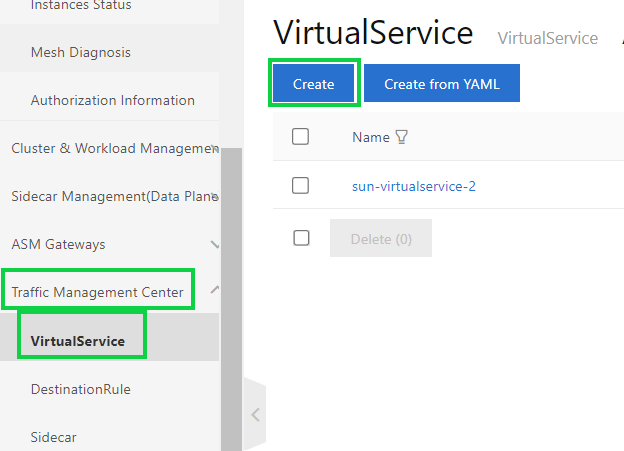
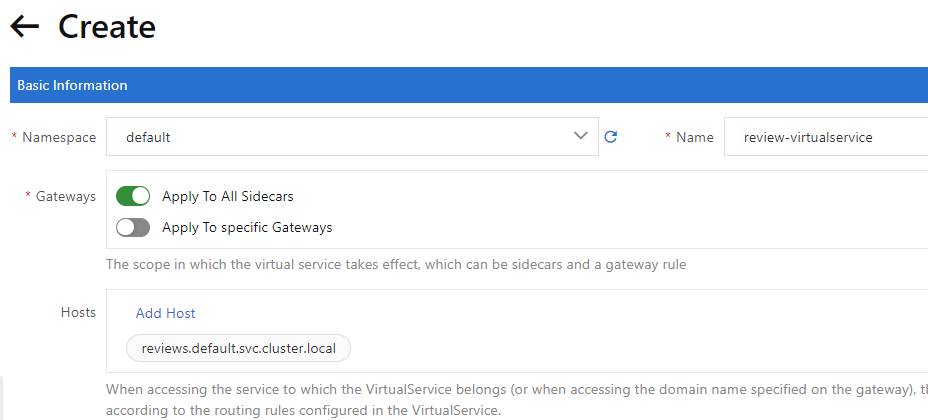
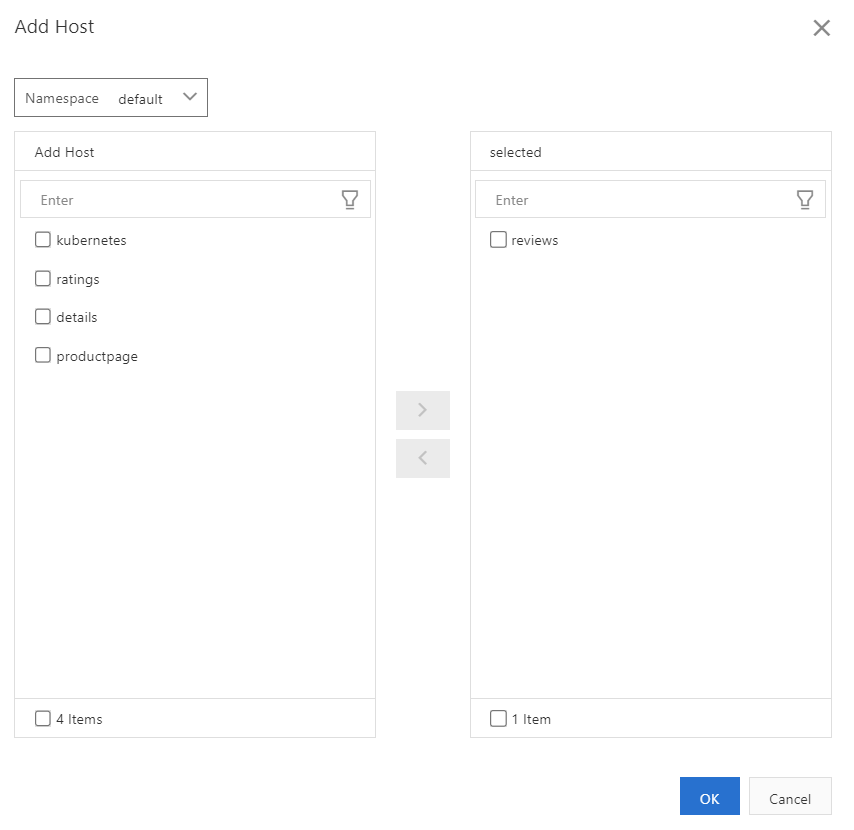
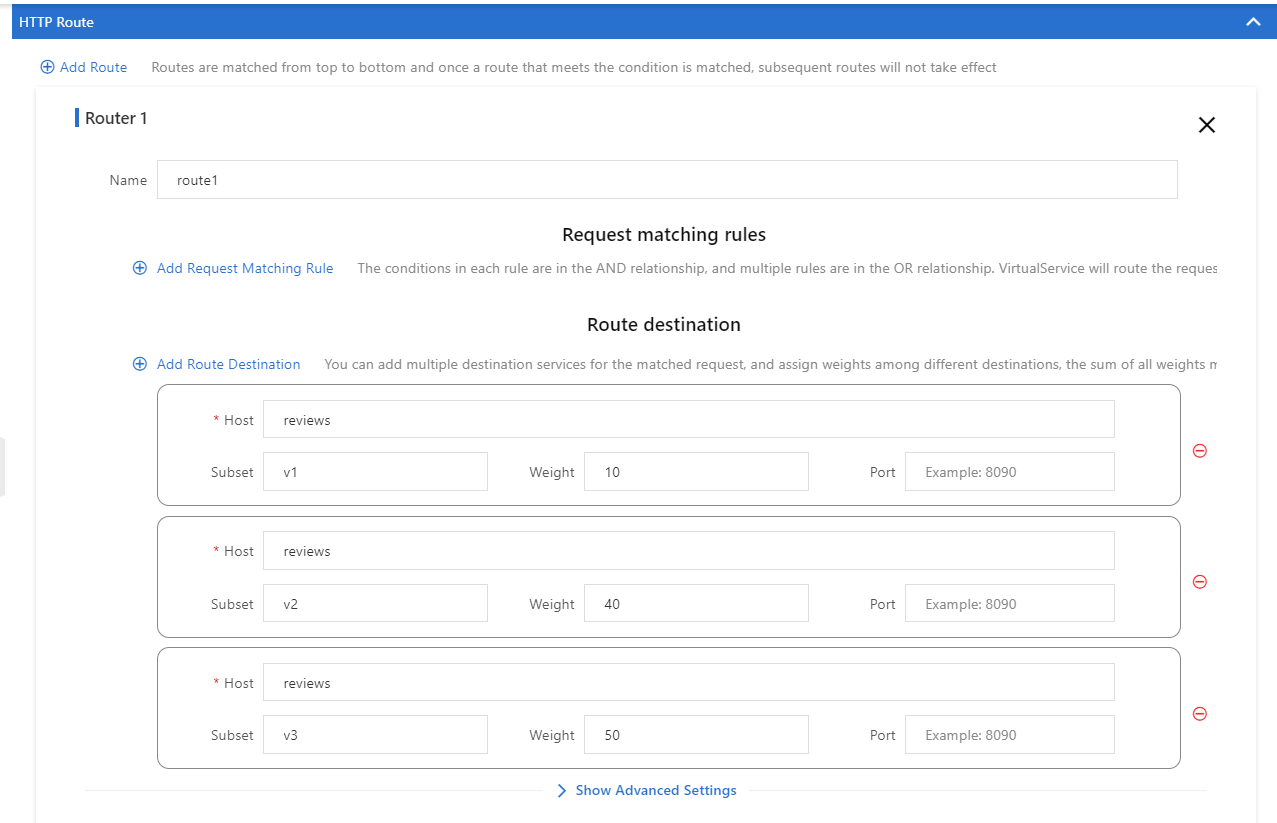

In the address bar of your browser, enter an address in the following format: “http://{IP address of the ingress gateway service}/productpage”. Refresh the page ten times.
You can see that the “reviews served by” changes to v1 one time, changes to v2 on the page four times, and changes to v3 on the page five times. This indicates that 10% of the traffic is routed to the v1 version of the reviews service, 40% of the traffic to the v2 version of the reviews service, and 50% of the traffic to the v3 version of the reviews service. In this case, the settings for routing traffic to different versions of the reviews service take effect.
Applications running on instances of Alibaba Cloud Service Mesh (ASM) can be observed thanks to mesh topology. This tool includes a graphical user interface (GUI) for monitoring service behavior. This last section describes how to use Mesh Topology to view an application's topology and helps you get started with ASM's observability feature. It also shows you how to use Mesh Topology to view an application's topology in a few clicks.
Step 1: Enable Prometheus and Mesh Topology
1) Log on to the ASM console.
2) In the left-side navigation pane, choose Service Mesh > Mesh Management.
3) On the Mesh Management page, find the ASM instance that you want to configure. Click the name of the ASM instance or click Manage in the Actions column.
4) In the upper-right corner of the Basic Information page, click Settings.
5) In the Settings Update panel, select Enable Prometheus and Confirm that the added ACK cluster has installed the Alibaba Cloud ARMS Prometheus monitoring plug-in, and use ARMS Prometheus to collect monitoring indicators. Then, select Enable ASM Mesh Topology and click OK.
Step 2: Access Mesh Topology by using an Internet-facing Server Load Balancer (SLB) instance
1) Log on to the ASM console.
2) In the left-side navigation pane, choose Service Mesh > Mesh Management.
3) On the Mesh Management page, find the ASM instance that you want to configure. Click the name of the ASM instance or click Manage in the Actions column.
4) On the details page of the ASM instance, choose Observability Management Center > Mesh Topology in the left-side navigation pane.
5) On the Mesh Topology page, select Create Server Load Balancer For ASM Mesh Topology.
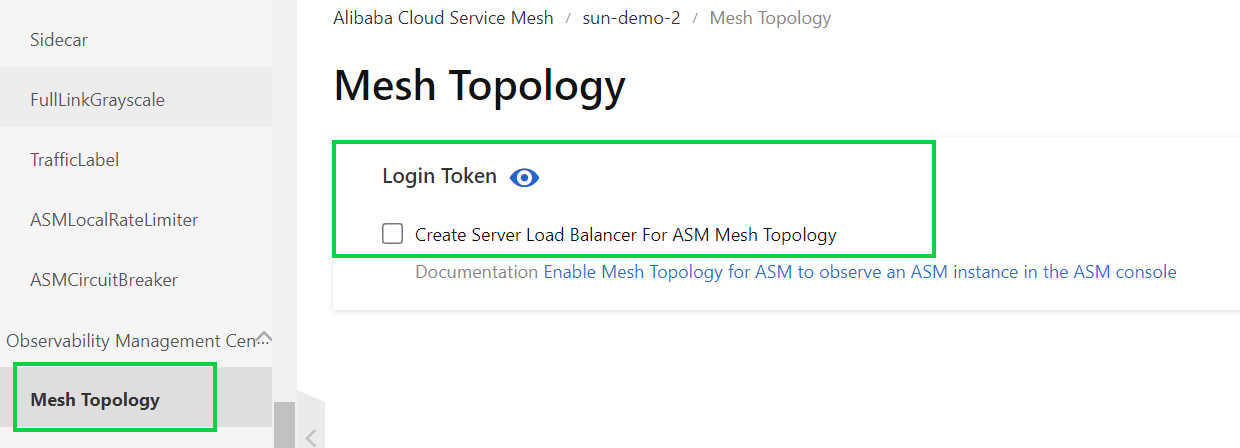
6) In the dialog box that appears, click OK.
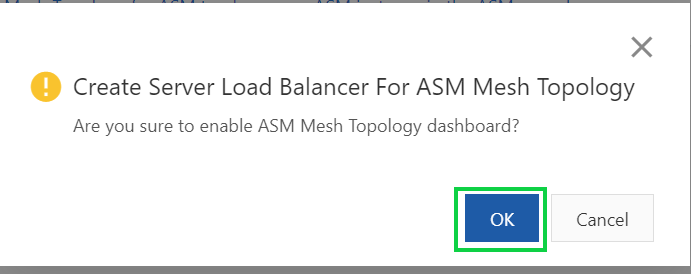
7) Click Copy token and open in new window on the right side of Login Token.

8) On the logon page of Mesh Topology, paste the token in the Token filed and click log in.
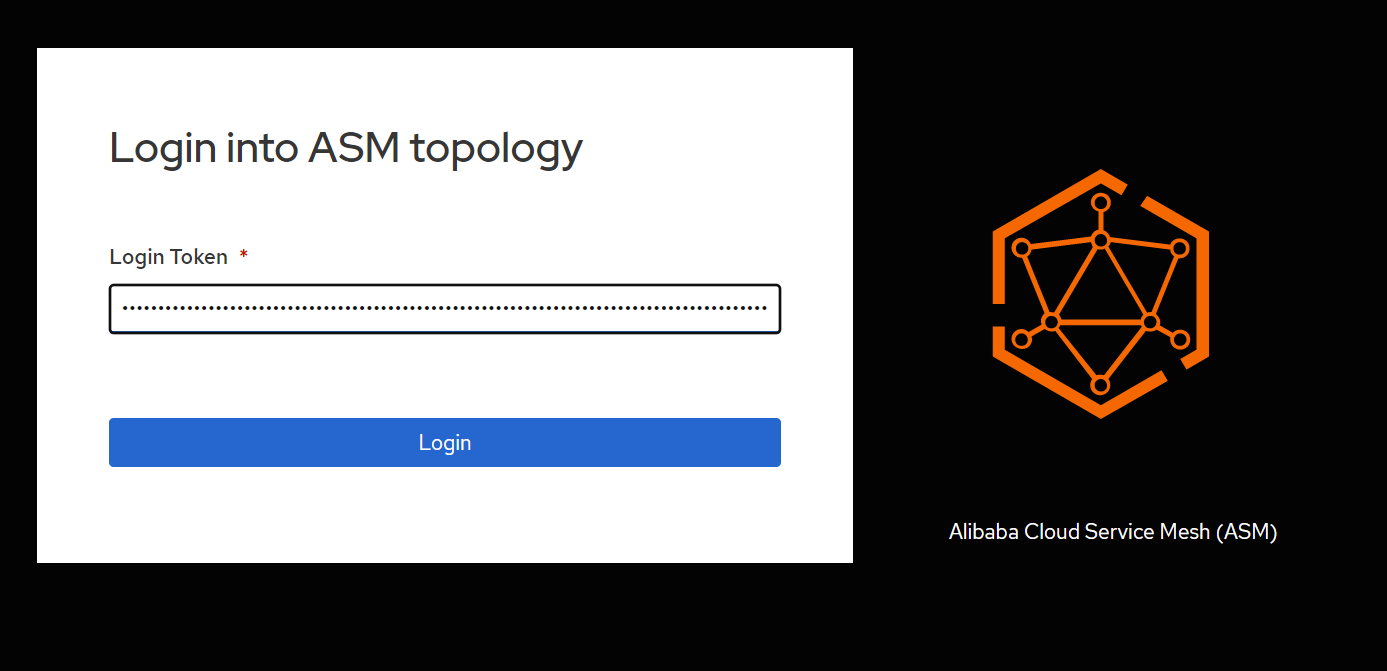
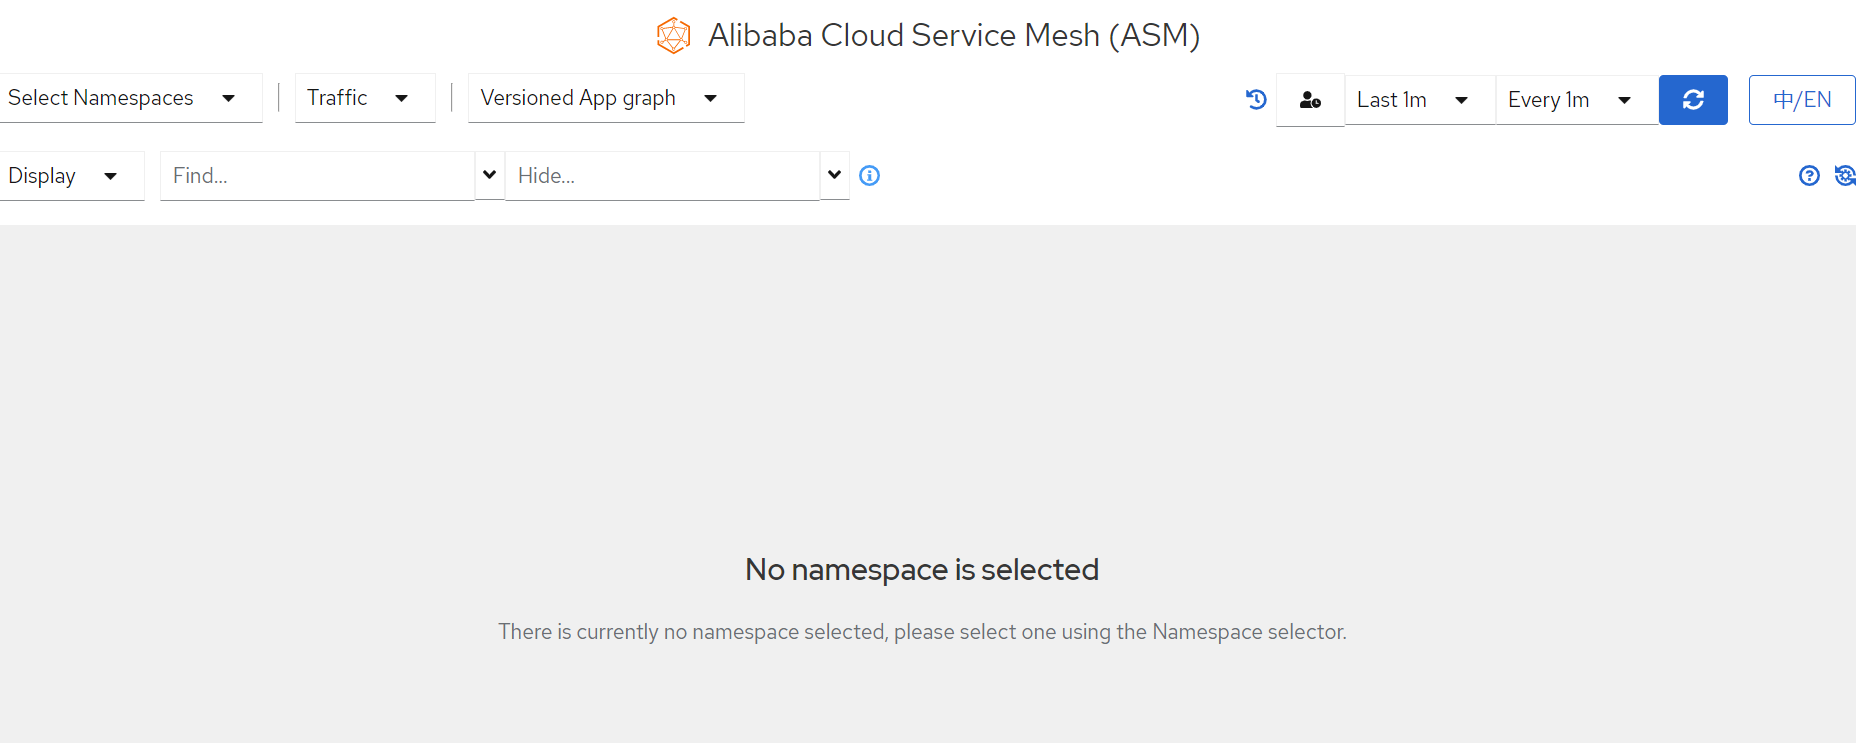
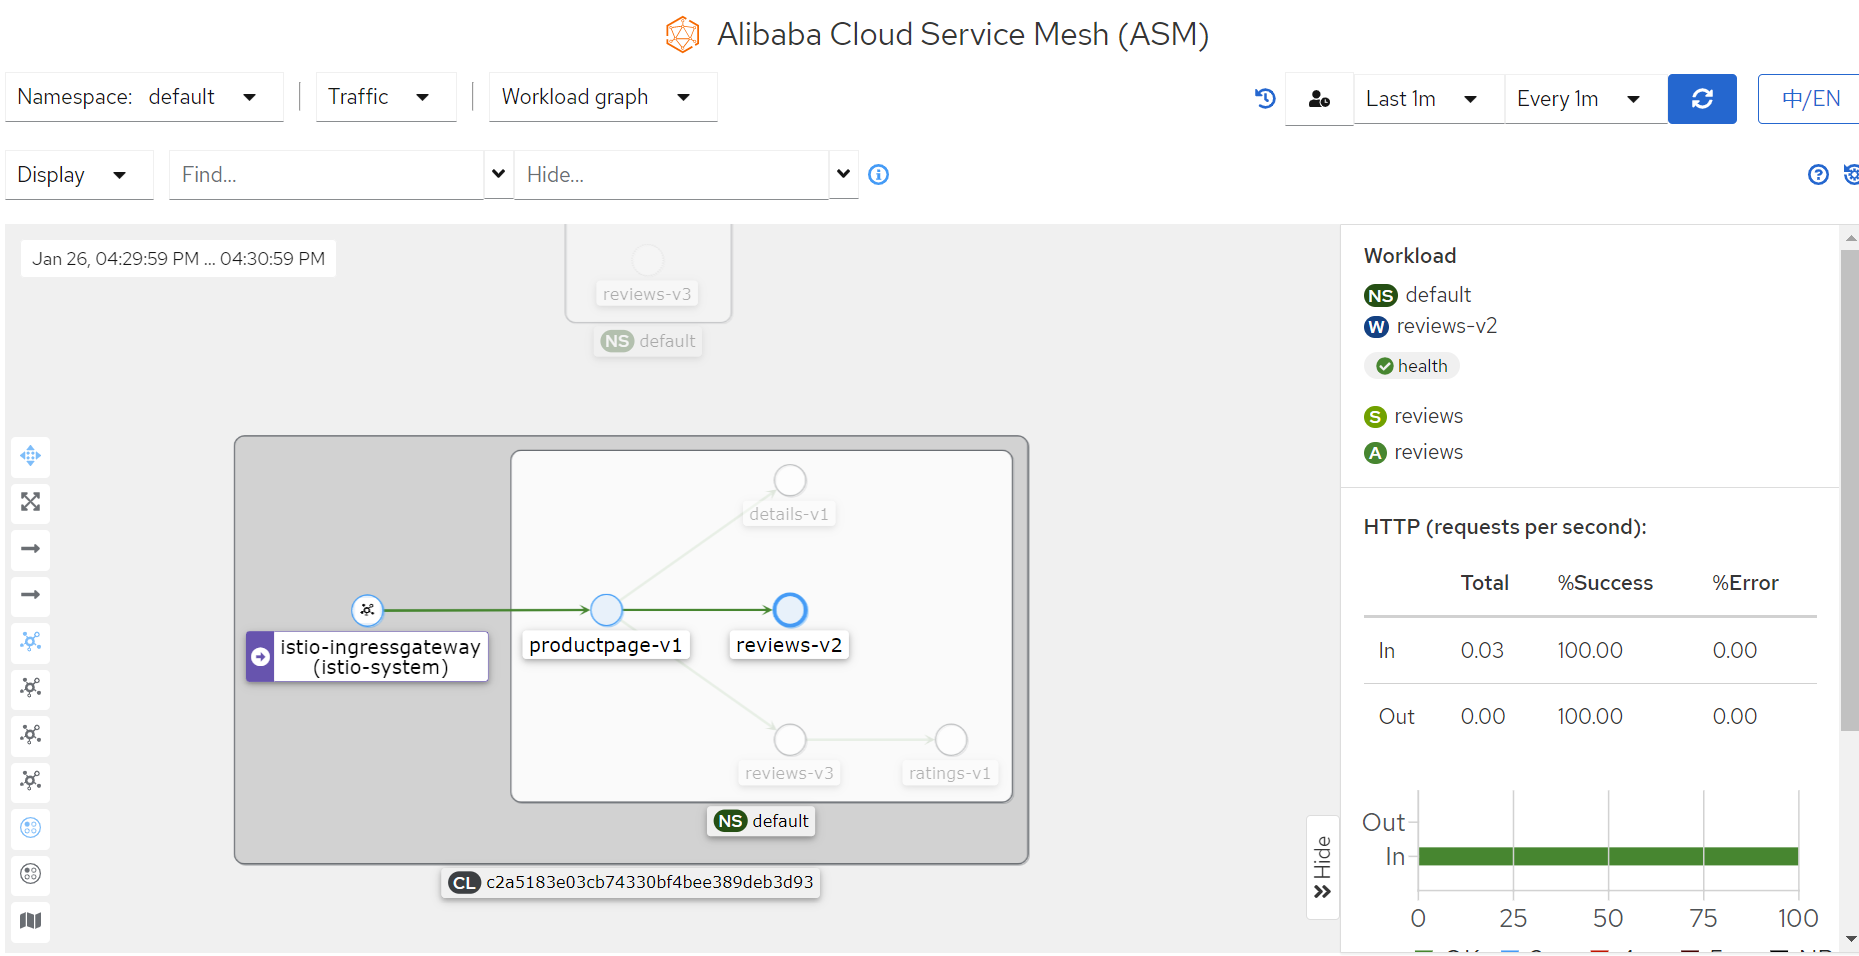
Step 3: View the topology of an application
Enter “http://{IP address of the ingress gateway service}/productpage” in the address bar of Google Chrome to access the Bookinfo application. In the Mesh Topology console, set the Namespace parameter to default and select the Workload graph to view the traffic flows and the communication between workloads.

Note: you can also select the App graph, Service graph, Versioned App graph to view the traffic flows and the calls between applications, services, and application versions. In the Mesh Topology console, click one of the buttons, for example we can try to click reviews-v2 in the topology to view the information about the workload status, ingress traffic, and egress traffic.
You have successfully finished configuring ASM on the microservices application if you are able to get to this last section.
104 posts | 18 followers
FollowAlibaba Cloud Native Community - April 6, 2023
Alibaba Clouder - January 4, 2021
Adrian Peng - February 1, 2021
Alibaba Container Service - September 13, 2024
Alibaba Cloud Community - April 14, 2023
Xi Ning Wang - August 16, 2018
104 posts | 18 followers
Follow Microservices Engine (MSE)
MSE provides a fully managed registration and configuration center, and gateway and microservices governance capabilities.
Learn More Container Service for Kubernetes
Alibaba Cloud Container Service for Kubernetes is a fully managed cloud container management service that supports native Kubernetes and integrates with other Alibaba Cloud products.
Learn More ACK One
Provides a control plane to allow users to manage Kubernetes clusters that run based on different infrastructure resources
Learn More Container Registry
A secure image hosting platform providing containerized image lifecycle management
Learn MoreMore Posts by Alibaba Cloud Indonesia
Start building with 50+ products and up to 12 months usage for Elastic Compute Service
Get Started for Free Get Started for Free