SUSE Linux Enterprise Server for SAP Applications is optimized in various ways for SAP* applications. This document explains how to deploy an SAP HANA High Availability solution cross different Zones on Alibaba Cloud. It is based on SUSE Linux Enterprise Server for SAP Applications 12 SP2. The concept however can also be used with SUSE Linux Enterprise Server for SAP Applications 12 SP3 or newer.
Authors:
SAP HANA provides a feature called System Replication which is available in every SAP HANA installation. It offers an inherent disaster recovery support.
For details, refer to the SAP Help Portal, HANA system replication:
The SUSE High Availability Extension is a high availability solution based on Corosync and Pacemaker. With SUSE Linux Enterprise Server for SAP Applications, SUSE provides SAP specific Resource Agents (SAPHana, SAPHanaTopology etc.) used by Pacemaker. This helps you to build your SAP HANA HA solution up more effectively.
For details, refer to the latest version of the document SAP HANA SR Performance Optimized Scenario at the SUSE documentation web page:
https://www.suse.com/documentation/suse-best-practices.
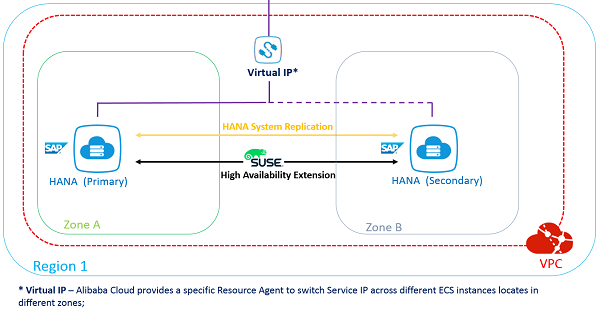
This document guides you on how to deploy an SAP HANA High Availability (HA) solution cross different Zones. The following list contains a brief architecture overview:
1. The High Availability Extension included with SUSE Linux Enterprise Server for SAP Applications is used to set up the HA Cluster;
2. SAP HANA System Replication is activated between the two HANA nodes;
3. Two HANA nodes are located in different Zones of the same Region;
4. The Alibaba Cloud Specific Virtual IP Resource Agent is used to allow Moving IP automatically switched to Active SAP HANA node; the Alibaba Cloud specific STONITH device is used for fencing.
Alibaba Cloud Architecture - Overview:
Network Architeture - Overview:
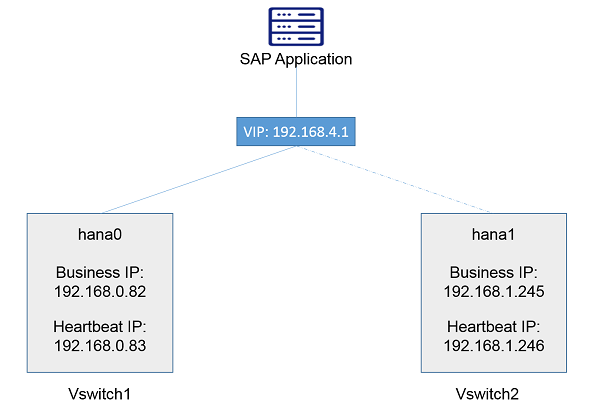
The following table contains information for the Network design.

The next sections contain information about how to prepare the infrastructure.
To set up your infrastructure, the following components are required:
First, create a VPC via Console?úVirtual Private Cloud?úVPCs?úCreate VPC. In this example, a VPC named suse_hana_ha in the Region EU Central 1 (Frankfurt) has been created:

There should be at least two VSwitches (subnets) defined within the VPC network. Each VSwitch should be bound to a different Zone. In this example, the following two VSwitches (subnets) are defined:

Two ECS instances are created in different Zones of the same VPC via Console?úElastic Compute Service ECS?úInstances?úCreate Instance. Choose the "SUSE Linux Enterprise Server for SAP Applications" image from the Image Market place.
In this example, two ECS instances (hostname: hana0 and hana1) are created in the Region EU Central 1, Zone A and Zone B, within the VPC: suse_hana_ha, with SUSE Linux Enterprise Server for SAP Applications 12 SP2 image from the Image Market Place. Host hana0 is the primary SAP HANA database node, and hana1 is the secondary SAP HANA database node.

Create two ENIs via Console?ú Elastic Compute Service ECS?úNetwork and Security?úENI, and attach one for each ECS instance, for HANA System Replication purposes. Configure the IP addresses of the ENIs to the subnet for HANA System Replication only.
In this example, the ENIs are attached to the ECS instances hana0 and hana1. In addition, the IP addresses are configured as 192.168.0.83 and 192.168.1.246 within the same VSwitches of hana0 and hana1, and put into the VPC: suse_hana_ha

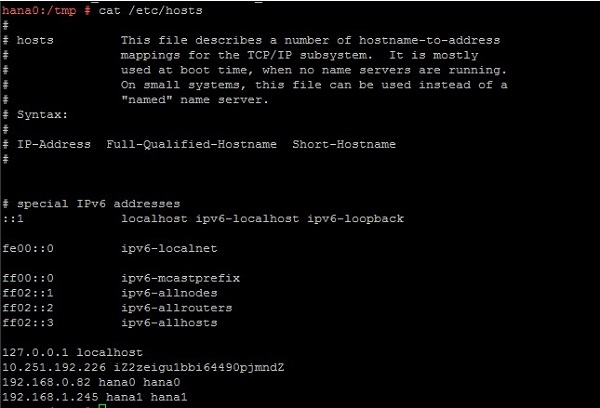
Meanwhile, within the Guest OS, /etc/hosts should also be configured.
According to the example at hand, run the following two commands on boths sites:
echo "192.168.0.82 hana0 hana0" >> /etc/hosts
echo "192.168.1.245 hana1 hana1" >> /etc/hosts
The output looks as follows:
Now create an NAT Gateway attached to the given VPC. In the example at hand, an NAT Gateway named suse_hana_ha_GW has been created:

After having creating the NAT Gateway, you need to create a corresponding SNAT entry to allow ECS instances within the VPC to access public addresses on the Internet.
Note
An Alibaba Cloud specific STONITH device and Virtual IP Resource Agent are mandatory for the cluster. They need to access Alibaba Cloud OpenAPI through a public domain.
In the example at hand, two SNAT entries have been created, for ECS instances located in a different network range:

Download the STONITH fencing software with the following command:
wget http://repository-iso.oss-cn-beijing.aliyuncs.com/ha/aliyun-ecs-pacemaker.tar.gzFor an HA solution, a fencing device is an essential requirement. Alibaba Cloud provides its own STONITH device, which allows the servers in the HA cluster to shut down the node that is not responsive. The STONITH device leverages Alibaba Cloud OpenAPI underneath the ECS instance, which is similar to a physical reset / shutdown in an on-premise environment.

Extract the package and install the software.
tar ¨Cxvf aliyun-ecs-pacemaker.tar.gz
./install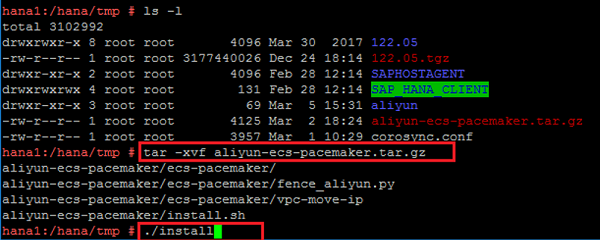
Install Alibaba Cloud OpenAPI SDK.
pip install aliyun-python-sdk-ecs aliyun-python-sdk-vpc aliyuncli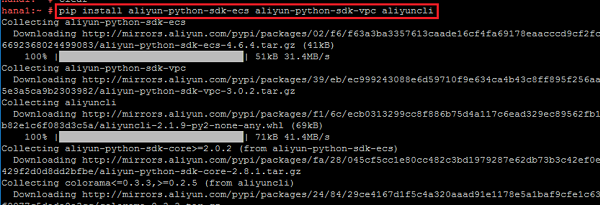
Configure Alibaba Cloud OpenAPI SDK and Client.
aliyuncli configure
Get your Access Key as shown below:

The next sections contain information about the required software.
The following software must be available: - SUSE Linux Enterprise Server for SAP Applications 12 SP2 - HANA Installation Media - SAP Host Agent Installation Media
Both ECS instances are created with the SUSE Linux Enterprise Server for SAP Applications image. On both ECS instances, the High Availability Extension (with the major software components: Corosync and Pacemaker), and the package SAPHanaSR should be installed. To do so, you can use zypper.
First, install the pattern High Availability Extension on both nodes:
zypper in -t pattern ha_slesNow, install the Resource Agents for controlling the SAP HANA system replication on both cluster nodes:
zypper in SAPHanaSR SAPHanaSR-docNext, install the SAP HANA software on both ECS instances. Make sure the SAP HANA SID and Instance Number are the same (this is required by SAP HANA System Replication). It is recommended to use hdblcm to do the installation. For details refer to the SAP HANA Server Installation and Update Guide at https://help.sap.com/viewer/2c1988d620e04368aa4103bf26f17727/2.0.03/en-US.
In the example at hand, both node are installed with SAP HANA (Rev. 2.00.030.00), and SID: JL0, Instance Number: 00.
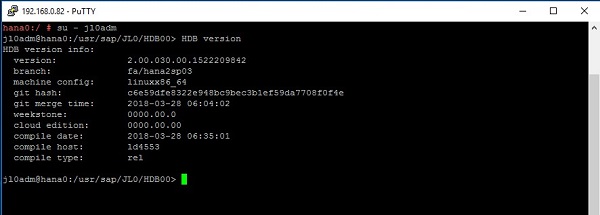
When you have finished the HANA installation with hdblcm as mentioned above, the SAP Host Agent should already be installed on your server. To install it manually, refer to the article Installing SAP Host Agent Manually: https://help.sap.com/saphelp_nw73ehp1/helpdata/en/8b/92b1cf6d5f4a7eac40700295ea687f/content.htm?no_cache=true.
Check the SAP Host Agent status after you have installed SAP HANA with hdblcm on hana0 and hana1:

The following sections detail how to configure SAP HANA System Replication.
To do a backup on SAP HANA, you can either use SAP HANA studio or hdbsql as the client command tool.
The backup command is
For HANA 1 single container mode:
BACKUP DATA USING FILE('COMPLETE_DATA_BACKUP');For HANA 2 with multitenant as default mode (You should back up systemDB and all tenantDB as shown below in the example):
BACKUP DATA for <DATABASE> using FILE('COMPLETE_DATA_BACKUP')Command line example:
BACKUP DATA for SYSTEMDB using FILE('COMPLETE_DATA_BACKUP')BACKUP DATA for JL0 using FILE('COMPLETE_DATA_BACKUP')In this example for HDB Studio, the SAP HANA database backup is executed on both ECS instances as shown below:
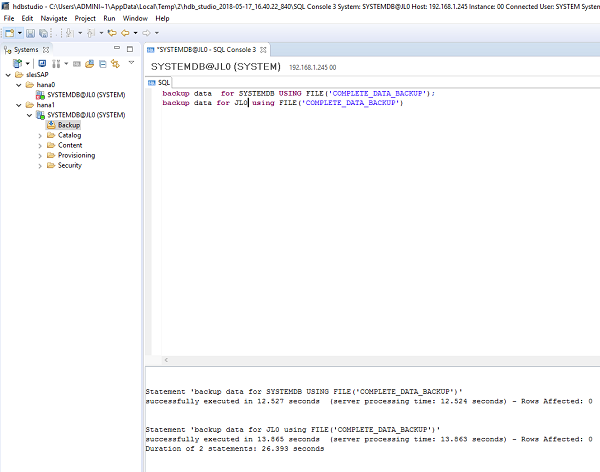
Log on to the primary node with: su - adm. [sidadm] should be replaced by your SAP HANA database SID. In our example it is su - jl0adm;
Stop HANA with: HDB stop.
Change the following file content:
vi /hana/shared/<SID>/global/hdb/custom/config/global.iniAdd the following content:
[system_replication_hostname_resolution]
<IP> = <HOSTNAME>
[IP] should be the address of the ENI (heartbeat IP address for SAP HANA system replication) attached to the Secondary node;
[HOSTNAME] should be the hostname of the Secondary node;
In the example at hand, the configuration is as follows:
[system_replication_hostname_resolution]
192.168.1.246 = hana1Perform the same steps as outlined above for the Primary node on the Secondary node. However, do not forget to use here the IP and hostname of the Primary node instead of the Secondary node.
In the example at hand, the configuration is as follows:
[system_replication_hostname_resolution]
192.168.0.83 = hana0Log on to the primary node with: su - adm;
Start HANA with: HDB start;
Enable System Replication with:
hdbnsutil -sr_enable --name= [primary location name][primary location name] should be replaced by the location of your primary SAP HANA node.
For the example at hand, the following command is used:
hdbnsutil -sr_enable --name=hana0Note
All of the above operations are done on the Primary node.
Log on to the secondary node with: su - adm;
Stop SAP HANA with: HDB stop;
Register the Secondary SAP HANA node to the Primary SAP HANA node by running the following command:
hdbnsutil -sr_register --remoteHost=[location of primary Node] --remoteInstance=[instance number of primary node] --replicationMode=sync --name=[location of the secondary node] --operationMode=logreplayFor the example at hand, the following command is used:
hdbnsutil -sr_register --name=hana1 --remoteHost=hana0 --remoteInstance=00 --replicationMode=sync --operationMode=logreplayStart SAP HANA with: HDB start;
Verify the System Replication Status with the following command:
hdbnsutil -sr_stateIn the example at hand, the following status is displayed on the secondary SAP HANA node hana1:
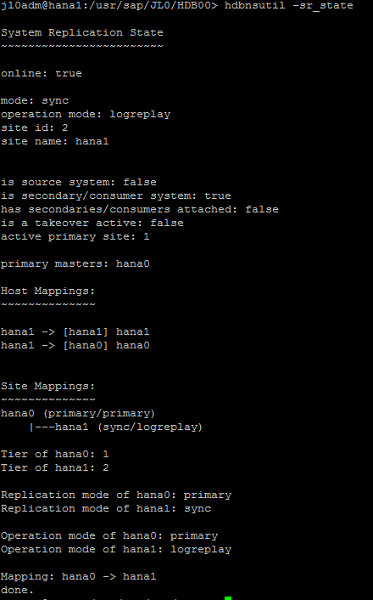
Note
All of the above operations are done on the Secondary node.
It is recommended that you add more redundancy for messaging (Heartbeat) by using separate ENIs attached to the ECS instances with a separate network range.
On Alibaba Cloud, it is strongly suggested to only use Unicast for the transport setting in Corosync.
Follow the steps below to configure Corosync:
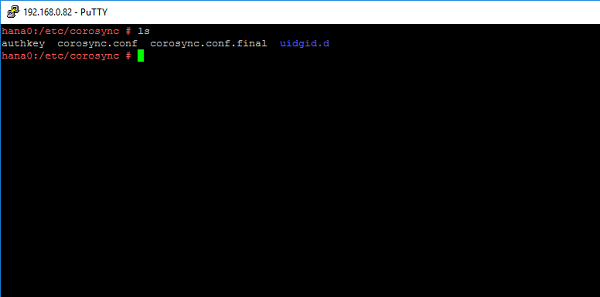
Run corosync-keygen on the Primary SAP HANA node. The generated key will be located in the file: /etc/corosync/authkey.
In the example at hand, the command is executed on hana1:
totem {
        version: 2
        token: 5000
        token_retransmits_before_loss_const: 6
        secauth: on
        crypto_hash: sha1
        crypto_cipher: aes256
        clear_node_high_bit: yes
        interface {
            ringnumber: 0
            bindnetaddr: **IP-address-for-heart-beating-for-the-current-server**
            mcastport: 5405
            ttl: 1
        }
        # On Alibaba Cloud, transport should be set to udpu, means: unicast
        transport: udpu
}
logging {
      fileline: off
      to_logfile: yes
      to_syslog: yes
      logfile: /var/log/cluster/corosync.log
      debug: off
      timestamp: on
      logger_subsys {
          subsys: QUORUM
          debug: off
      }
}
nodelist {
    node {
        ring0_addr: **ip-node-1**
        nodeid: 1
    }
    node {
        ring0_addr: **ip-node-2**
        nodeid: 2
    }
}
quorum {
    # Enable and configure quorum subsystem (default: off)
    # see also corosync.conf.5 and votequorum.5
    provider: corosync_votequorum
    expected_votes: 2
    two_node: 1
}
IP-address-for-heart-beating-for-the-current-server should be replaced by the IP address of the current server, used for messaging (heartbeat) or SAP HANA System Replication. In the example at hand, the IP address of ENI of the current node (192.168.0.83 for hana0 and 192.168.1.246 for hana1) is used.
Note
This value will be different on Primary and Secondary node. The nodelist directive is used to list all nodes in the cluster.
ip-node-1 and ip-node-2 should be replaced by the IP addresses of the ENIs attached to ECS instances for Heartbeat purpose or HANA System Replication purpose. In the example at hand, it should be 192.168.0.83 for hana0 and 192.168.1.246 for hana1.
After completing the editing of /etc/corosync/corosync.conf on the Primary HANA node, copy the files /etc/corosync/authkey and /etc/corosync/corosync.conf to /etc/corosync on the Secondary SAP HANA node with the following command:
scp /etc/corosync/authkey root@**hostnameOfSecondaryNode**:/etc/corosyncIn the example at hand, the following command is executed:

After you have copied the corosync.conf to the Secondary node, configure the bindnetaddr as above to the local heart beating IP address.
For the SAP HANA High Availability solution, you need to configure seven resources and the corresponding constraints in Pacemaker.
Note
The following Pacemaker configuration only needs to be done on one node. It is usually done on the Primary node.
Add the configuration of the bootstrap and default setting of the resource and operations to the cluster. Save the following scripts in a file: crm-bs.txt.
property $id='cib-bootstrap-options' \
              stonith-enabled="true" \
              stonith-action="off" \
              stonith-timeout="150s"
rsc_defaults $id="rsc-options" \
              resource-stickness="1000"    \
              migration-threshold="5000"
op_defaults $id="op-options" \
              timeout="600"
Execute the command below to add the setting to the cluster:
crm configure load update crm-bs.txtThis part defines the Aliyun STONITH devices in the cluster.
Save the following scripts in a file: crm-stonith.txt.
primitive res_ALIYUN_STONITH_1 stonith:fence_aliyun \
            op monitor interval=120 timeout=60 \
            params pcmk_host_list=<primary node hostname> port=<primary node instance id>  \
            access_key=<access key> secret_key=<secret key> \
            region=<region> \
            meta target-role=Started
primitive res_ALIYUN_STONITH_2 stonith:fence_aliyun \
            op monitor interval=120 timeout=60 \
            params pcmk_host_list=<secondary node hostname> port=<secondary node instance id> \
            access_key=<access key> secret_key=<secret key> \
            region=<region> \
            meta target-role=Started
            location loc_<primary node hostname>_stonith_not_on_<primary node hostname> res_ALIYUN_STONITH_1 -inf: <primary node hostname>
            #Stonith 1 should not run on primary node because it is controling primary node
            location loc_<secondary node hostname>_stonith_not_on_<secondary node hostname> res_ALIYUN_STONITH_2 -inf: <secondary node hostname>
            #Stonith 2 should not run on secondary node because it is controling secondary node
Be sure to implement the following changes:
Execute the command below to add the resource to the cluster:
crm configure load update crm-stonith.txtThis part defines an SAPHanaTopology RA, and a clone of the SAPHanaTopology on both nodes in the cluster. Save the following scripts in a file: crm-saphanatop.txt.
primitive rsc_SAPHanaTopology_<SID>_HDB<instance number> ocf:suse:SAPHanaTopology \
        operations $id="rsc_SAPHanaTopology_<SID>_HDB<instance number>-operations" \
           op monitor interval="10" timeout="600"  \
           op start interval="0" timeout="600" \
           op stop interval="0" timeout="300" \
           params SID="<SID>" InstanceNumber="<instance number>"
clone cln_SAPHanaTopology_<SID>_HDB<instance number> rsc_SAPHanaTopology_<SID>_HDB<instance number> \
        meta clone-node-max="1" interleave="true"
Be sure to implement the following changes:
Execute the command below to add the resources to the cluster:
crm configure load update crm-saphanatop.txtThis part defines an SAPHana RA, and a multi-state resource of SAPHana on both nodes in the cluster. Save the following scripts in a file: crm-saphana.txt.
primitive rsc_SAPHana_<SID>_HDB<instance number> ocf:suse:SAPHana \
        operatoins $id="rsc_sap_<SID>_HDB<instance number>-operations" \
        op start interval="0" timeout="3600" \
        op stop interval="0" timeout="3600" \
        op promote interval="0" timeout="3600" \
        op monitor interval="60" role="Master" timeout="700" \
        op monitor interval="61" role="Slave" timeout="700" \
        params SID="<SID>" InstanceNumber="<instance number>" PREFER_SITE_TAKEOVER="true" \
        DUPLICATE_PRIMARY_TIMEOUT="7200" AUTOMATED_REGISTER="false"
ms msl_SAPHana_<SID>_HDB<instance number> rsc_SAPHana_<SID>_HDB<instance number> \
        meta clone-max="2" clone-node-max="1" interleave="true"
Be sure to implement the following changes:
Execute the command below to add the resources to the cluster:
crm configure load update crm-saphana.txtThis part defines a Virtual IP RA in the cluster. Save the following scripts in a file: crm-vip.txt.
primitive res_vip_<SID>_HDB<instance number> ocf:aliyun:vpc-move-ip \
            op monitor interval=60 \
            meta target-role=Started \
            params address=<virtual_IPv4_address> routing_table=<route_table_ID> interface=eth0
Be sure to implement the following changes:
Execute the command below to add the resource to the cluster:
crm configure load update crm-vip.txtTwo constraints are organizing the correct placement of the virtual IP address for the client database access and the start order between the two resource agents SAPHana and SAPHanaTopology. Save the following scripts in a file: crm-constraint.txt.
colocation col_SAPHana_vip_<SID>_HDB<instance number> 2000: rsc_vip_<SID>_HDB<instance number>:started \
            msl_SAPHana_<SID>_HDB<instance number>:Master
order ord_SAPHana_<SID>_HDB<instance number> Optional: cln_SAPHanaTopology_<SID>_HDB<instance number> \
            msl_SAPHana_<SID>_HDB<instance number>
Be sure to implement the following changes:
Execute the command below to add the resource to the cluster:
crm configure load update crm-constraint.txtStart the SAP HANA High Availability Cluster on both nodes:
systemctl start PacemakerMonitor the SAP HANA High Availability Cluster with the following commands:
systemctl status pacemaker
crm_mon ¨Cr
In the example at hand, the result looks as follows:
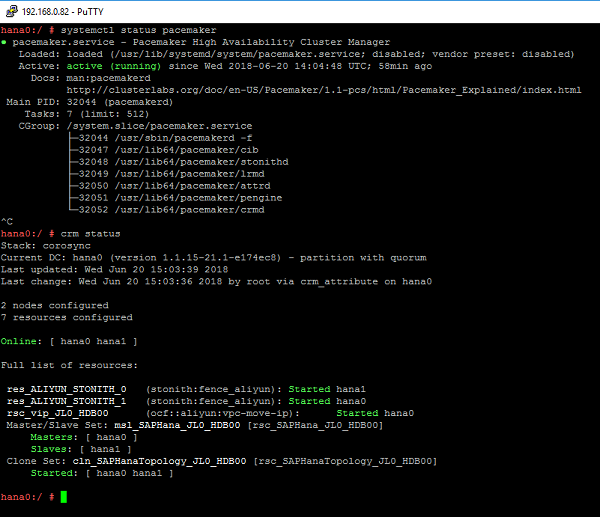
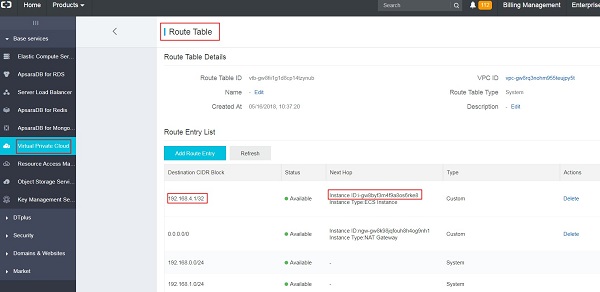
Meanwhile, check if a new entry [virtual_IP4_address] is added into the route table of the VPC.
In the example at hand, the following result is shown:
Shut down the primary node.
Check the status of Pacemaker as shown below:
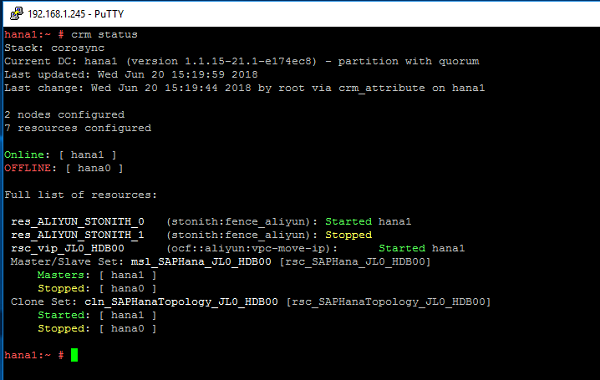
Compare the entry of the route table in the VPC as shown below:
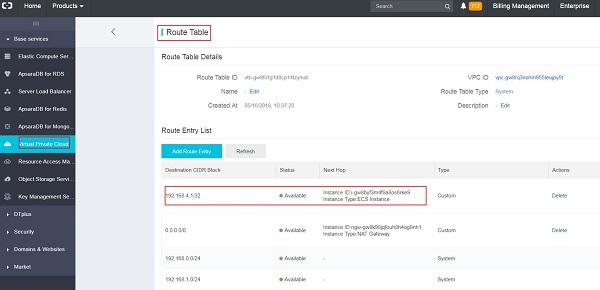
You can check the cluster configuration via the command crm configure show. For the example at hand, the cluster configuration should display the following content:
node 1: hana0 \
    attributes hana_jl0_vhost=hana0 hana_jl0_srmode=sync hana_jl0_remoteHost=hana1 hana_jl0_site=hana0 lpa_jl0_lpt=10 hana_jl0_op_mode=logreplay
node 2: hana1 \
    attributes lpa_jl0_lpt=1529509236 hana_jl0_op_mode=logreplay hana_jl0_vhost=hana1 hana_jl0_site=hana1 hana_jl0_srmode=sync hana_jl0_remoteHost=hana0
primitive res_ALIYUN_STONITH_0 stonith:fence_aliyun \
    op monitor interval=120 timeout=60 \
    params pcmk_host_list=hana0 port=i-gw8byf3m4f9a8os6rke8 access_key=<access key> secret_key=<secret key> region=eu-central-1 \
    meta target-role=Started
primitive res_ALIYUN_STONITH_1 stonith:fence_aliyun \
    op monitor interval=120 timeout=60 \
    params pcmk_host_list=hana1 port=i-gw8byf3m4f9a8os6rke9 access_key=<access key> secret_key=<secret key> region=eu-central-1 \
    meta target-role=Started
primitive rsc_SAPHanaTopology_JL0_HDB00 ocf:suse:SAPHanaTopology \
    operations $id=rsc_SAPHanaTopology_JL0_HDB00-operations \
    op monitor interval=10 timeout=600 \
    op start interval=0 timeout=600 \
    op stop interval=0 timeout=300 \
    params SID=JL0 InstanceNumber=00
primitive rsc_SAPHana_JL0_HDB00 ocf:suse:SAPHana \
    operations $id=rsc_SAPHana_JL0_HDB00-operations \
    op start interval=0 timeout=3600 \
    op stop interval=0 timeout=3600 \
    op promote interval=0 timeout=3600 \
    op monitor interval=60 role=Master timeout=700 \
    op monitor interval=61 role=Slave timeout=700 \
    params SID=JL0 InstanceNumber=00 PREFER_SITE_TAKEOVER=true DUPLICATE_PRIMARY_TIMEOUT=7200 AUTOMATED_REGISTER=false
primitive rsc_vip_JL0_HDB00 ocf:aliyun:vpc-move-ip \
    op monitor interval=60 \
    meta target-role=Started \
    params address=192.168.4.1 routing_table=vtb-gw8fii1g1d8cp14tzynub interface=eth0
ms msl_SAPHana_JL0_HDB00 rsc_SAPHana_JL0_HDB00 \
    meta clone-max=2 clone-node-max=1 interleave=true target-role=Started
clone cln_SAPHanaTopology_JL0_HDB00 rsc_SAPHanaTopology_JL0_HDB00 \
    meta clone-node-max=1 interleave=true
colocation col_SAPHana_vip_JL0_HDB00 2000: rsc_vip_JL0_HDB00:Started msl_SAPHana_JL0_HDB00:Master
location loc_hana0_stonith_not_on_hana0 res_ALIYUN_STONITH_0 -inf: hana0
location loc_hana1_stonith_not_on_hana1 res_ALIYUN_STONITH_1 -inf: hana1
order ord_SAPHana_JL0_HDB00 Optional: cln_SAPHanaTopology_JL0_HDB00 msl_SAPHana_JL0_HDB00
property cib-bootstrap-options: \
    have-watchdog=false \
    dc-version=1.1.15-21.1-e174ec8 \
    cluster-infrastructure=corosync \
    stonith-action=off \
    stonith-enabled=true \
    stonith-timeout=150s \
    last-lrm-refresh=1529503606 \
    maintenance-mode=false
rsc_defaults rsc-options: \
    resource-stickness=1000 \
    migration-threshold=5000
op_defaults op-options: \
timeout=600For the example at hand, the corosync.conf on hana1 should display the following content:
totem{
version: 2
token: 5000
token_retransmits_before_loss_const: 6
secauth: on
crypto_hash: sha1
crypto_cipher: aes256
clear_node_high_bit: yes
interface {
ringnumber: 0
bindnetaddr: 192.168.0.83
mcastport: 5405
ttl: 1
}
# On Alibaba Cloud, transport should be set to udpu, means: unicast
transport: udpu
}
logging {
fileline: off
to_logfile: yes
to_syslog: yes
logfile: /var/log/cluster/corosync.log
debug: off
timestamp: on
logger_subsys {
subsys: QUORUM
debug: off
}
}
nodelist {
node {
ring0_addr: 192.168.0.83
nodeid: 1
}
node {
ring0_addr: 192.168.1.246
nodeid: 2
}
}
quorum {
# Enable and configure quorum subsystem (default: off)
# see also corosync.conf.5 and votequorum.5
provider: corosync_votequorum
expected_votes: 2
two_node: 1
}Setting Up Palo Alto Networks VM-Series Firewall on Alibaba Cloud

21 posts | 12 followers
FollowAlibaba Clouder - August 21, 2020
Alibaba Clouder - March 19, 2019
Alibaba Clouder - October 18, 2018
Alibaba Clouder - July 25, 2019
Alibaba Clouder - March 26, 2019
PM - C2C_Yuan - June 4, 2024

21 posts | 12 followers
Follow SAP Solution
Deploy native systems to drive your organization more effectively, creatively and powerfully in the digital a
Learn More Alibaba Cloud Linux
Alibaba Cloud Linux is a free-to-use, native operating system that provides a stable, reliable, and high-performance environment for your applications.
Learn More Accelerated Global Networking Solution for Distance Learning
Alibaba Cloud offers an accelerated global networking solution that makes distance learning just the same as in-class teaching.
Learn More Networking Overview
Connect your business globally with our stable network anytime anywhere.
Learn MoreMore Posts by Marketplace