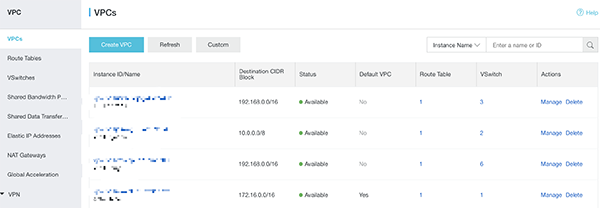
1. Assume this is the new environment, now let's create the VPC first
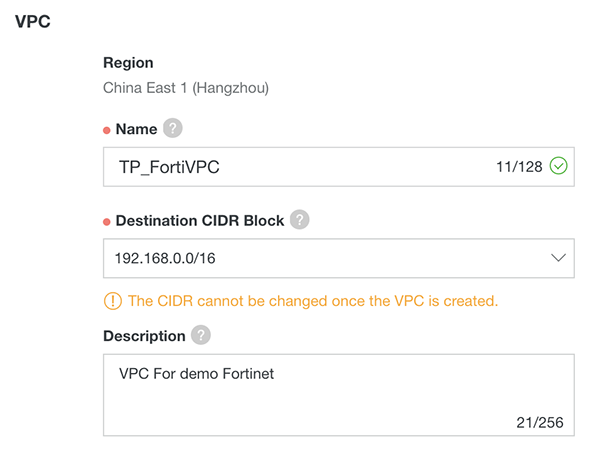
2. The VPC named TP_FortiVPC
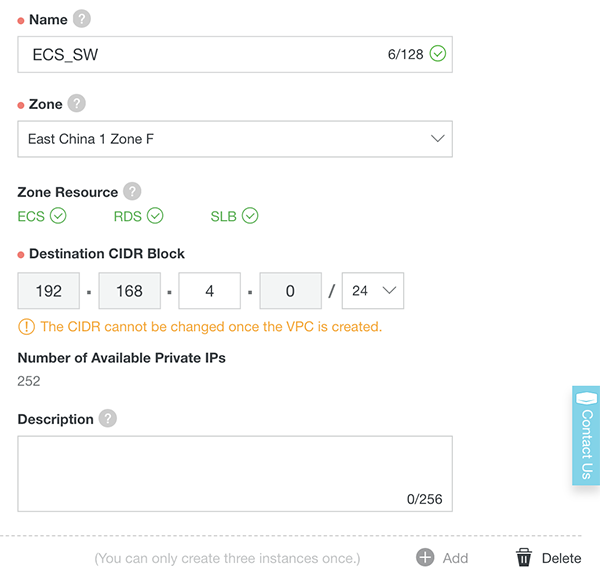
3. We will need at least three VSwitches, one for the ECS, one for the FortiGate VM Inbound/Outbound interface, and one for FortiGate VM HA interface, let's create the ECS VSwitch first (you can create the fourth VSwitch for FortiGate reversed management interface)
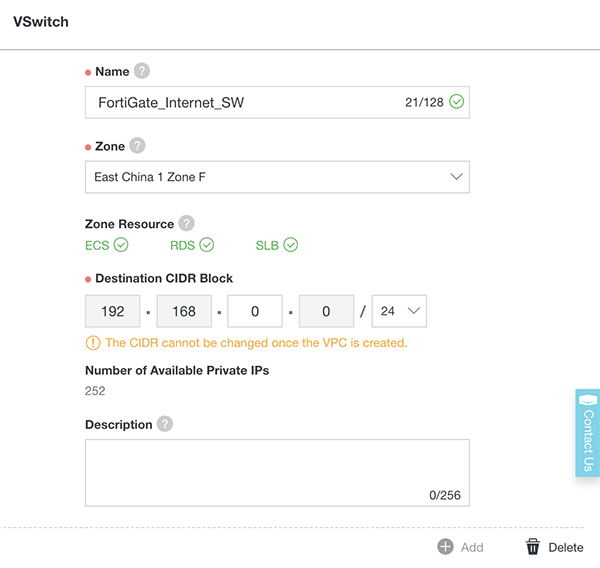
4. And this is the VSwitch for keeping the FortiGate VM Inbound/Outbound interface
5. And this is the VSwitch for keeping the FortiGate VM HA interface
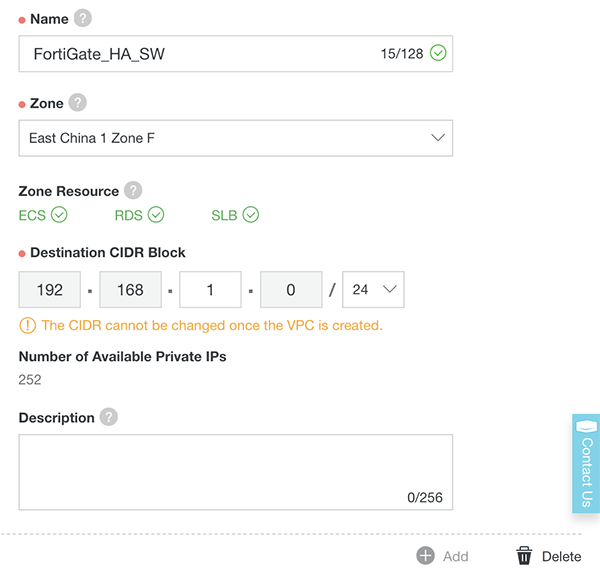
6. The VPC is now ready, next section we will subscribe the FortiGate VM
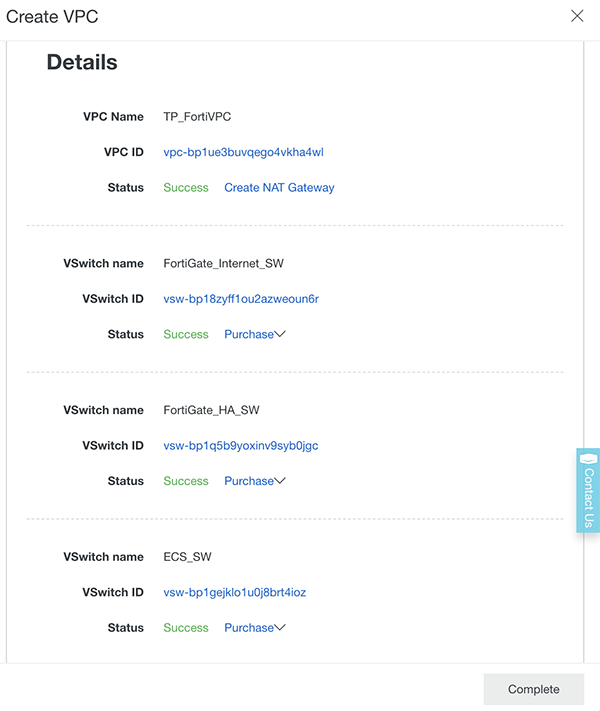
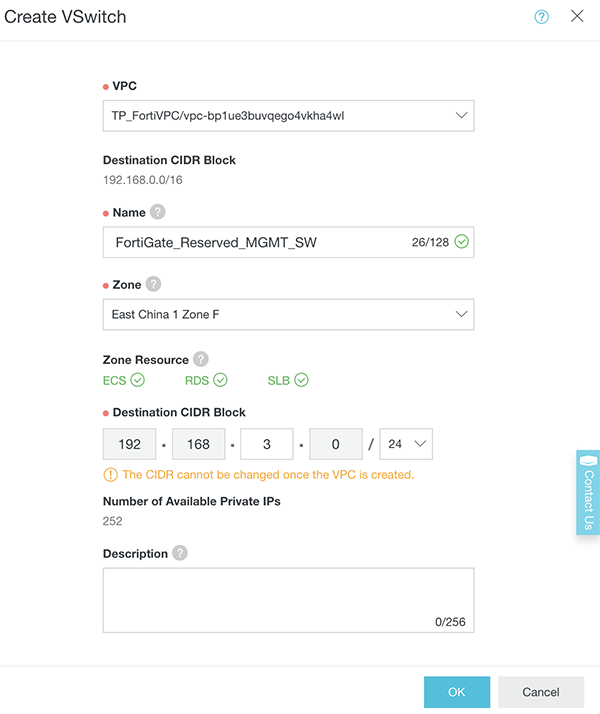
7. (optional) Create one more VSwitch for FortiGate Reserved Management interface.
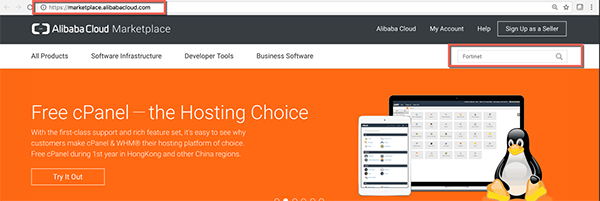
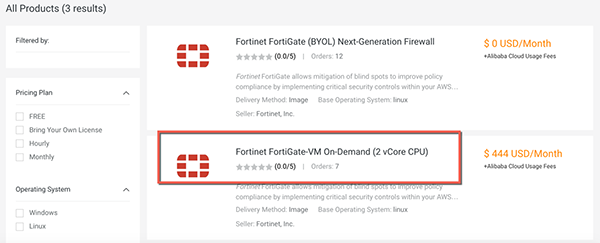
8. Access to our marketplace : https://marketplace.alibabacloud.com/ , and search for Fortinet
9. If customer has their own FortiGate license they can choose the BYOL image, otherwise they can use On-Demand image offered
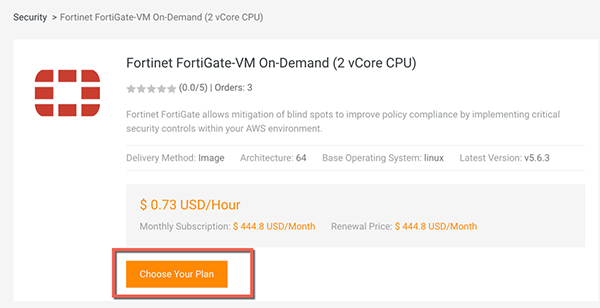
10. Click "Choose Your Plan" to continue
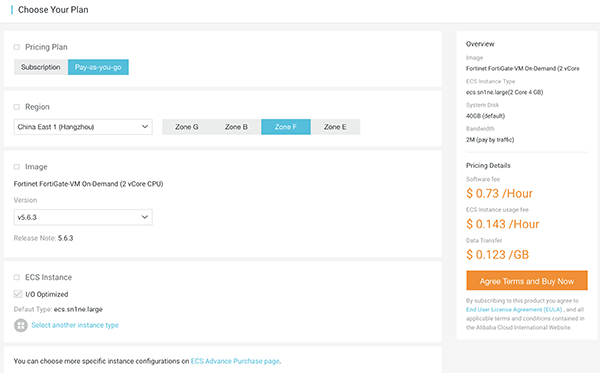
11. In this case I'll use PAYG, select China East 1 (Hangzhou) and Zone F ( Where the VPC and VSwitches located ), and then click the link "ECS Advance Purchase page" because I want to customize the Data disk and VPC information
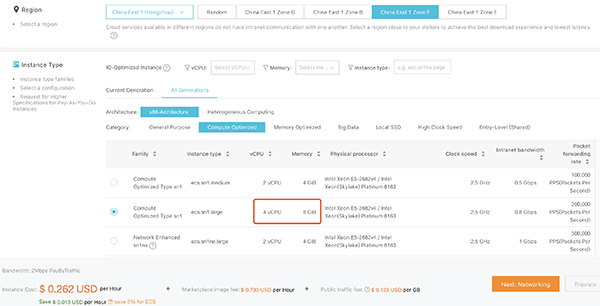
12. Click 4 vCPU ECS type to launch the FortiGate instance (4 vCPU ECS can support maximum 3 NIC, 2 vCPU can support 2 NIC, so if you need FortiGate reserved management interface, please select 4 vCPU ECS type.)
13. Add a data disk for the Log (Suggest to use SSD for better performance)

14. Choose the TP_FortiVPC and FortiGate_internet_SW in Network section, also assign the Public IP to the image, this NIC will be port1 on FortiGate_VM, the default ENI.

15. Leave HTTPS/ICMP/SSH ports open to allow connect, and add one more ENI which is on 'FortiGate_HA_SW' this ENI will be port2 on FortiGate.

16. Set the 'Host' as the hostname on FortiGate

17. Click 'ECS Service Terms'

18. Click Console and back to the ECS instance list
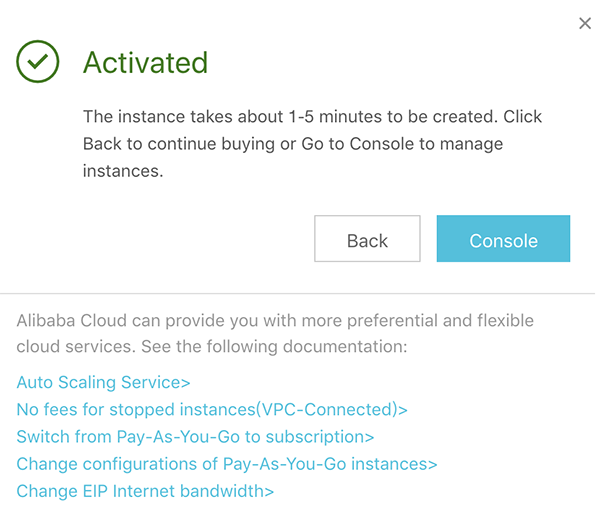
19. You will see the VM created, mark down the Public IP and the instance ID (this will be FortiGate default password) and you will use later

20. Please repeat step 7-17 to create one more FortiGate instance, which name is FGT-Slave.
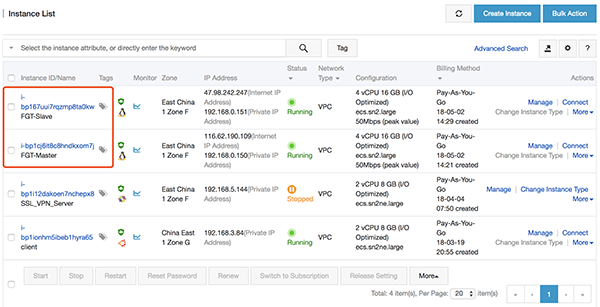
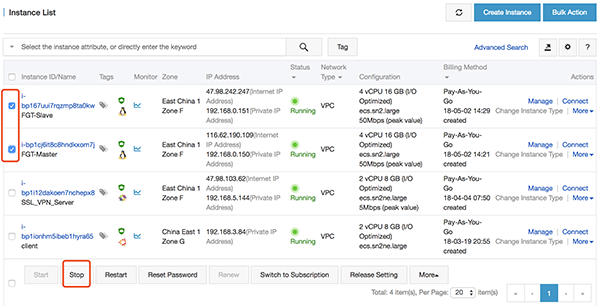
21. (Optional) Stop those two FortiGate instances
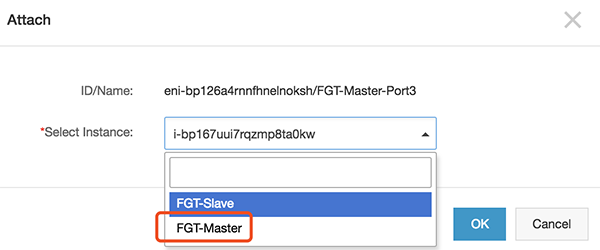
22. (Optional) Go to 'Networks Interfaces' page to create two ENI, and then attach the ENI on each FortiGate instance.
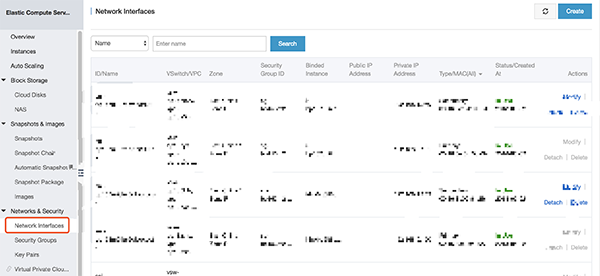
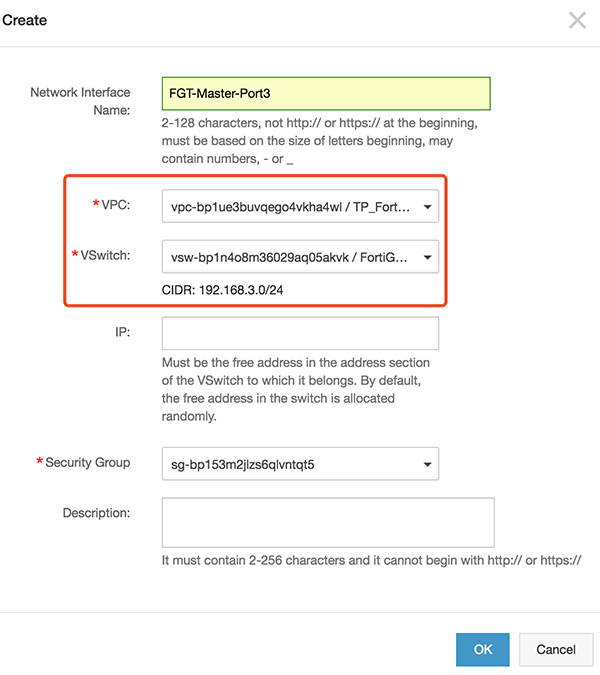
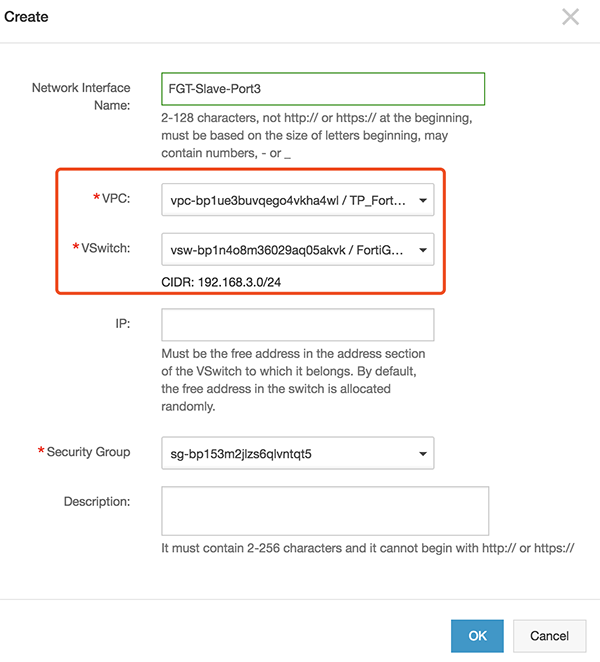
23. (Optional) Attach those two new ENI to two FortiGate.
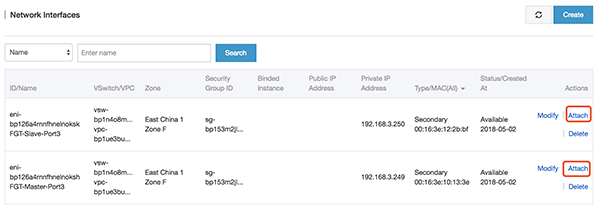
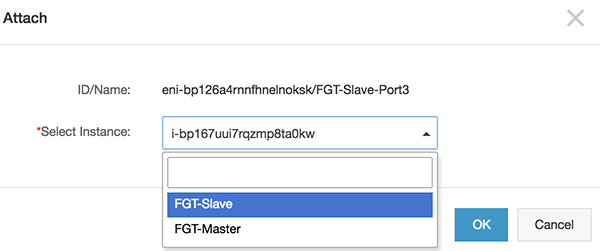

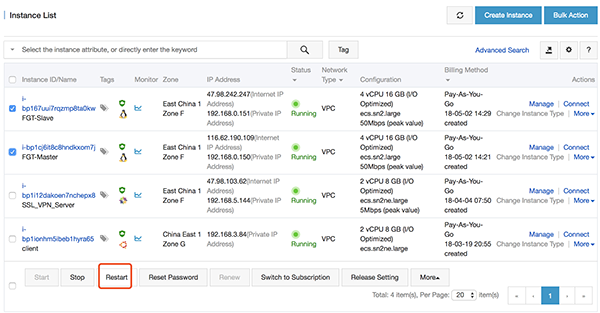
24. (Optional) Restart two FortiGate instance
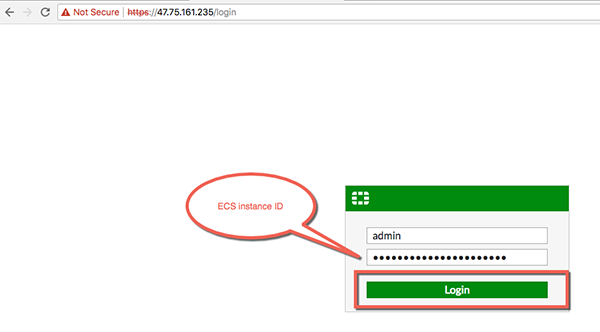
25. Then we will be able to reach the Fortinet Web GUI by user admin/<instanceid>
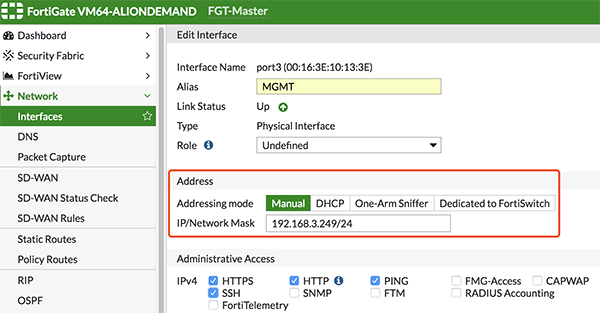
26. Set the ip address on three interfaces on FortiGate.


27. Create a new HAVIP address, select the VPC and FortiGate Port1 VSwitch, and set the HAVIP address.
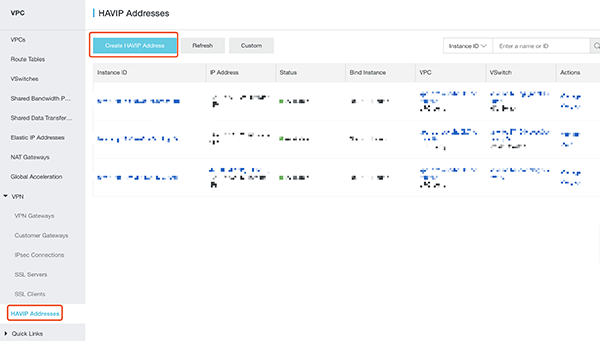
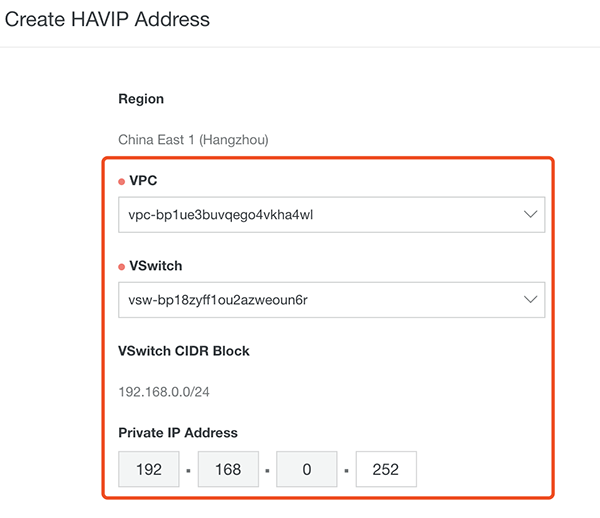
28. Set the HA configuration on FortiGate via VNC console on Alibaba Cloud's web GUI, or via SSH.
FortiGate-Master:
config system ha
    set group-name "ha"
    set mode a-p
    set hbdev "port2" 0
set session-pickup enable
set ha-mgmt-status enable
config ha-mgmt-interface
    edit 1
        set interface "port3"
        set gateway 192.168.3.253 --- gateway on vswitch
    next
end
    set priority 200 --- the higher value will be Master
    set monitor "port1"
    set unicast-hb enable
    set unicast-hb-peerip 192.168.1.250 --- IP address on FGT-Slave port2
end
FortiGate-Slave:
config system ha
    set group-name "ha"
    set mode a-p
    set hbdev "port2" 0
set session-pickup enable
set ha-mgmt-status enable
config ha-mgmt-interface
    edit 1
        set interface "port3"
        set gateway 192.168.3.253 --- gateway on vswitch
    next
end
    set priority 100
    set monitor "port1"
    set unicast-hb enable
    set unicast-hb-peerip 192.168.1.249 --- IP address on FGT-Master port2
end
Then reboot two FortiGate.
Check the status of HA using 'diagnose sys ha status' in CLI, it shows following:
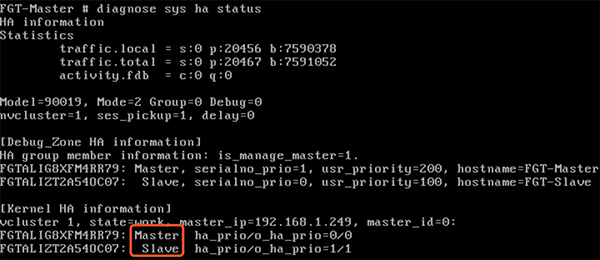
29. Set the HAVIP address to port1 secondary ip address on two FortiGate.
On both FGT-Master and FGT-Slave:
config system interface
    edit "port1"
        set secondary-IP enable
        config secondaryip
            edit 1
                set ip 192.168.0.252 255.255.255.0 --- this ip address should be same with HAVIP address
                set allowaccess ping https ssh
            next
        end
    next
end
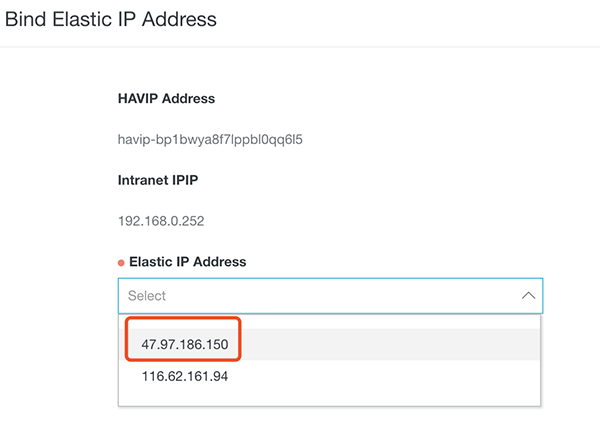
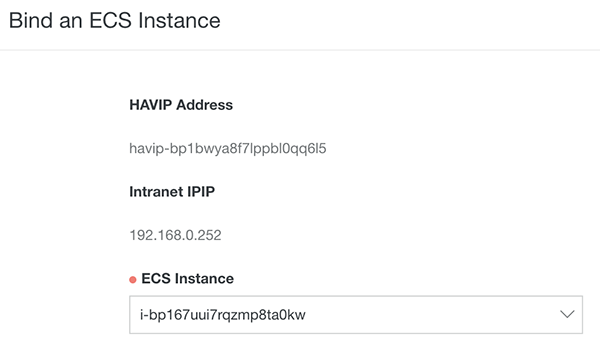
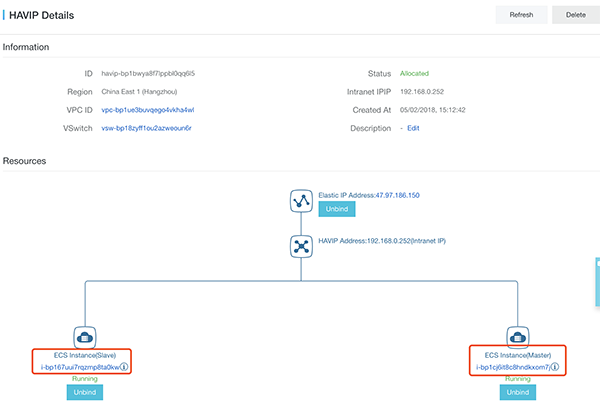
30. Bind 'Elastic IP' and two FortiGate ECS to HAVIP
Create a new EIP

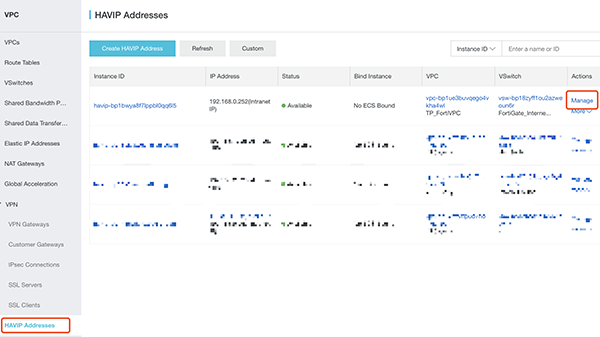
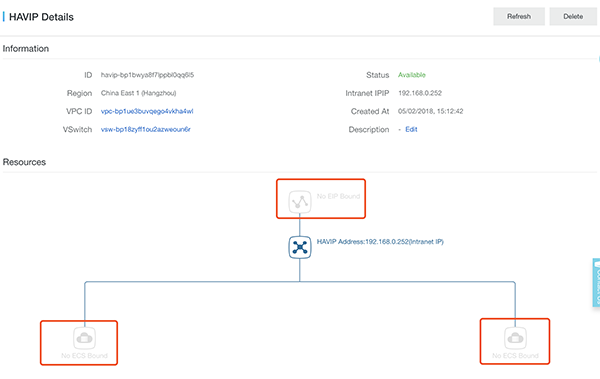
Bind EIP to HAVIP,
Bind two FortiGate to HAVIP,
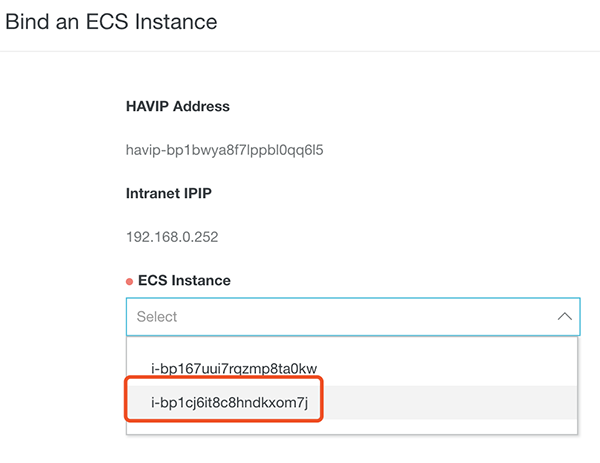
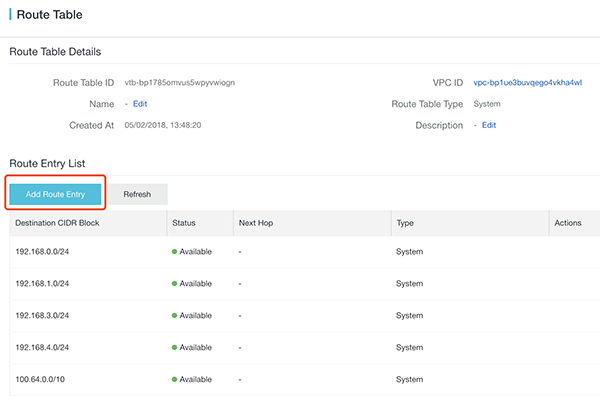
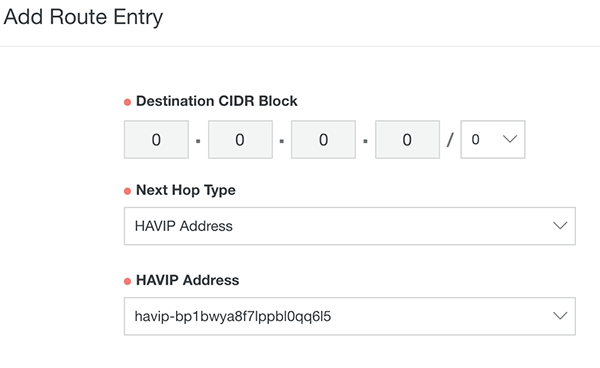
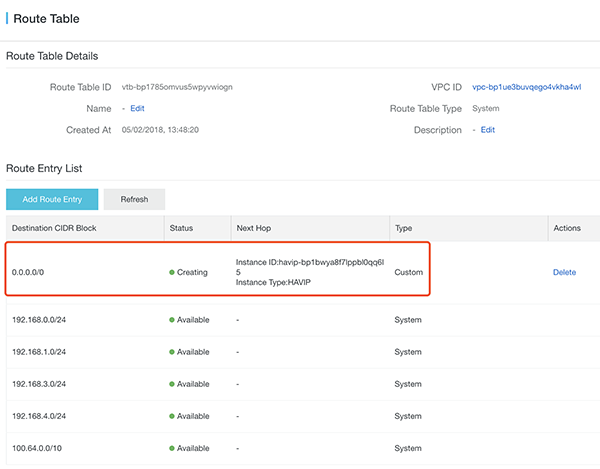
31. Also we need to add the route entry to FortiGate, this make sure all out-going traffic from ECS will go through Fortinet
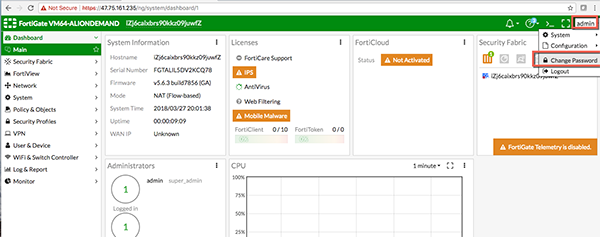
32. You can change password here after logging in
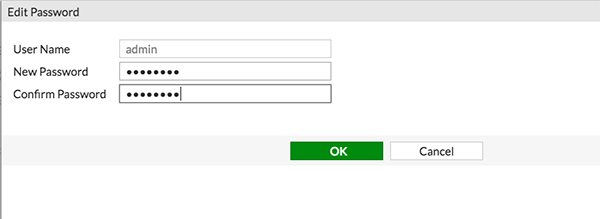
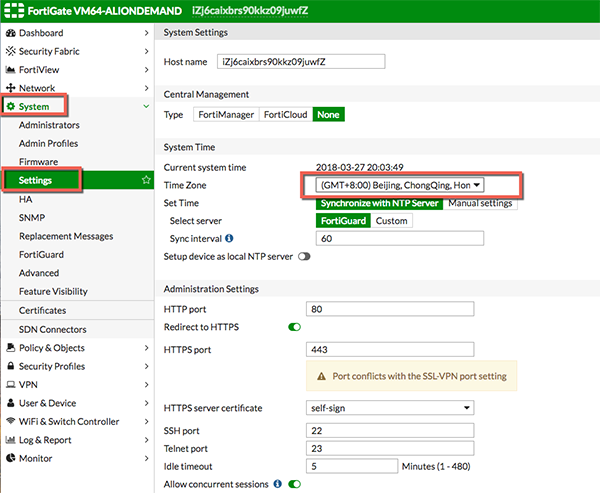
33. After logging in again by new password, you can change the time zone and language as well in System -> Settings
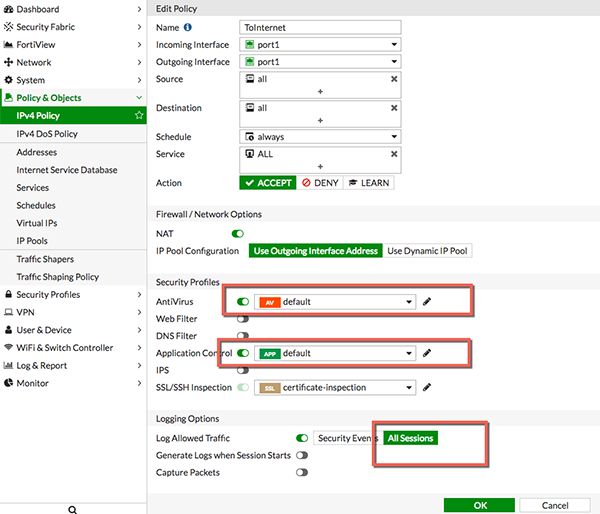
34. Now we need to add the IPv4 Policy for the outbound traffic

35. Specific the following "ToInternet" policy, let's enabled the AntiVirus and Application Control here for Demo, also enabled All Sessions log too, then click "OK"
36. Just create ECS as usual

37. Remember, cannot use the same VSwitch of the Fortinet, in this case I selected the ECS Vswitch. And don't need to assign public IP because ECS with Public IP will not route through Fortinet
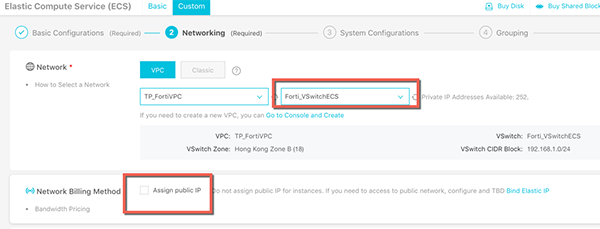
38. Confirm and create the instance
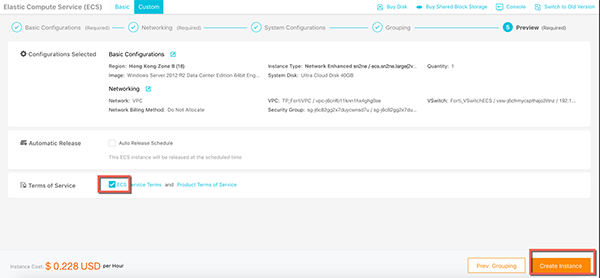
39. Then reset the VNC password, login password and restart the instance

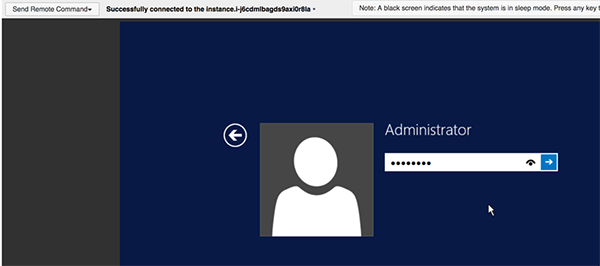
40. Then connect to the VNC, login to the Windows

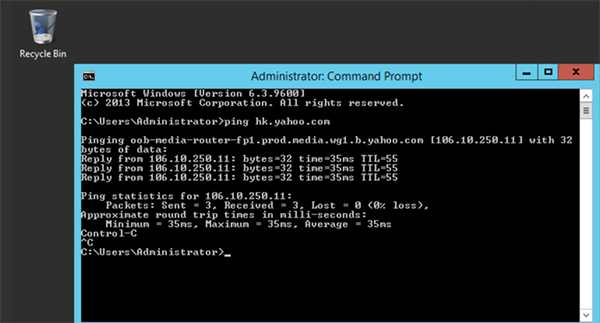
41. You should find it is able to connect internet through the Fortinet
42. You should also find the detail log information in the Fortinet as well!


43. In the ECS, visit the website http://metal.fortiguard.com/tests/
44. Click the run tests, if there is no Firewall Antivirus protection the test will fail
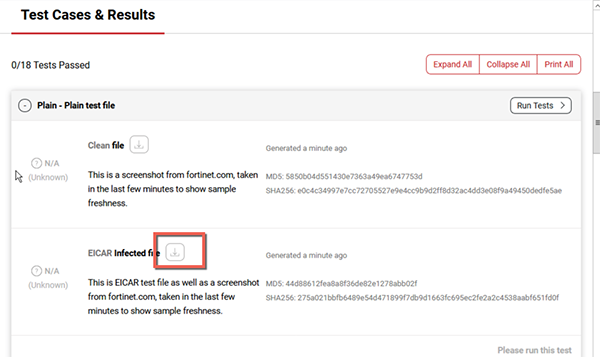
45. As the ECS is protected by Fortinet, you will see it is blocked
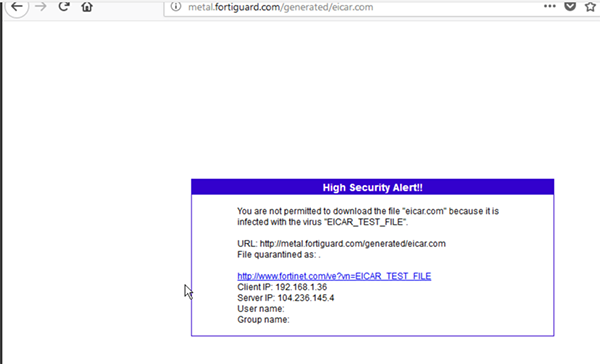
To have the best Anti-Virus scanning capabilities, make sure the anti-virus definition is up-to-update in Fortinet
46. And we also can see the Threats in Fortinet console

47. Go to Security Profiles -> Application Control, let's select to block the Video/Audio and Social Media. And click Apply
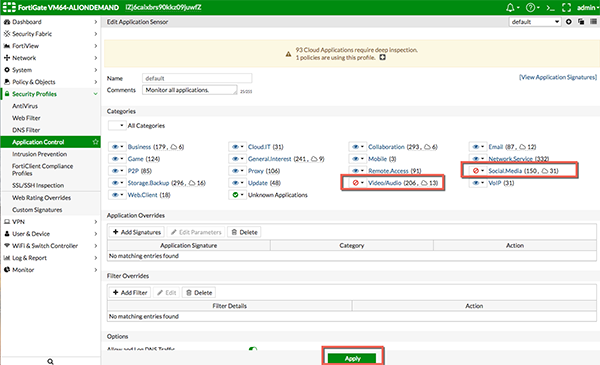
48. Then try to access facebook and youtube in the ECS, you will see they are not able to connect
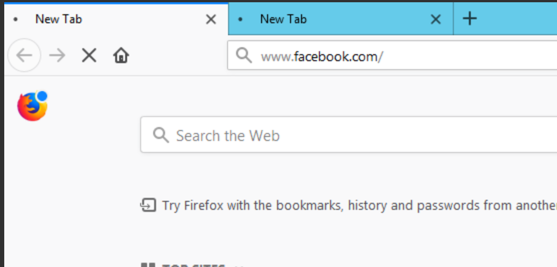
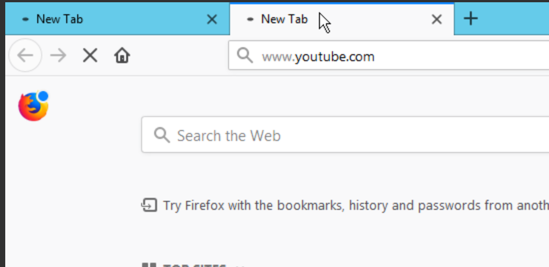
49. In the Fortinet console, we will see which clients trying to connect to facebook as well


In this sample, I'll try to enable the Fortinet to protect inbound RDP traffic, the same concept can be applied to HTTP/HTTPS and other services too, this is very useful because most customers want Fortinet to monitor both inbound and outbound traffic
50. Setup the NAT and point to the RDP address of the ECS, Click Virtual IPs under Policy&Objects
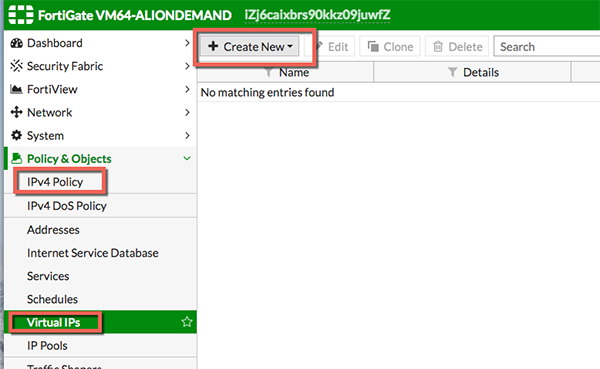
51. We map the 3389 port of the Fortinet to the ECS 192.168.1.36
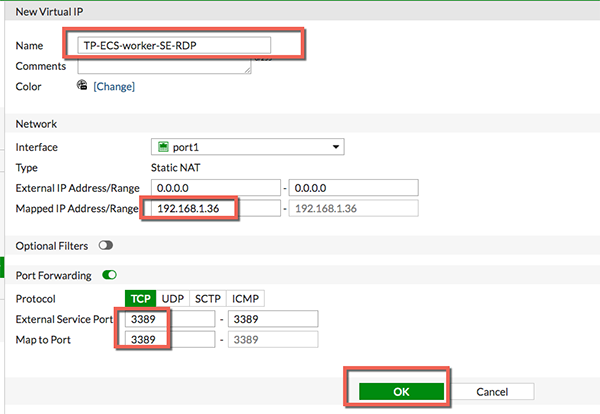
52. Can see the Virtual IP there now

53. Now we will configure the inbound policy for the RDP redirection
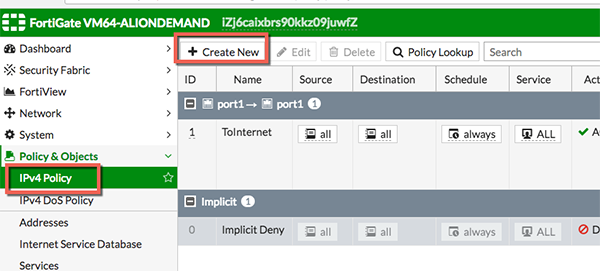
54. Name the rule and then choose the Virtual IP we created as the destination

55. Similarly, enable the security profiles you want, and then use All Sessions as Log allowed traffic for demo purpose.
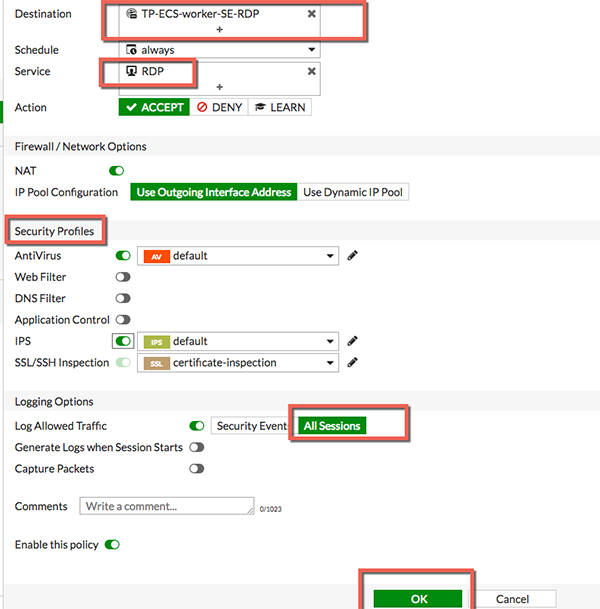
56. The inbound rule is created successfully

57. And now you should be able to use the Fortinet Public IP address to RDP the ECS
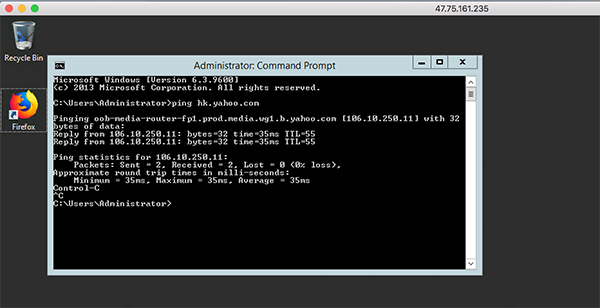
58. Logs and sessions information can also be viewed in Fortinet

Fortinet is a powerful software that widely used by many international customers, financial and securities industries as well. By leveraging this VM, we should be able to strengthen the confidence of customer for using Cloud.

21 posts | 12 followers
FollowMarketplace - August 18, 2020
Marketplace - August 17, 2020
Marketplace - August 18, 2020
Alibaba Clouder - February 11, 2019
Alibaba Cloud Community - August 18, 2022
Haemi Kim - June 15, 2021

21 posts | 12 followers
Follow WAF(Web Application Firewall)
A cloud firewall service utilizing big data capabilities to protect against web-based attacks
Learn More Security Solution
Alibaba Cloud is committed to safeguarding the cloud security for every business.
Learn More Marketplace
Marketplace is an online market for users to search and quickly use the software as image for Alibaba Cloud products.
Learn More Cloud Firewall
Provides traffic control and security protection for the Internet, virtual private cloud (VPCs), and hosts in VPCs
Learn MoreMore Posts by Marketplace