By digoal
HAProxy is a very popular software with high efficiency for load balancing and session routing at layer 4 and layer 7 (HTTP).
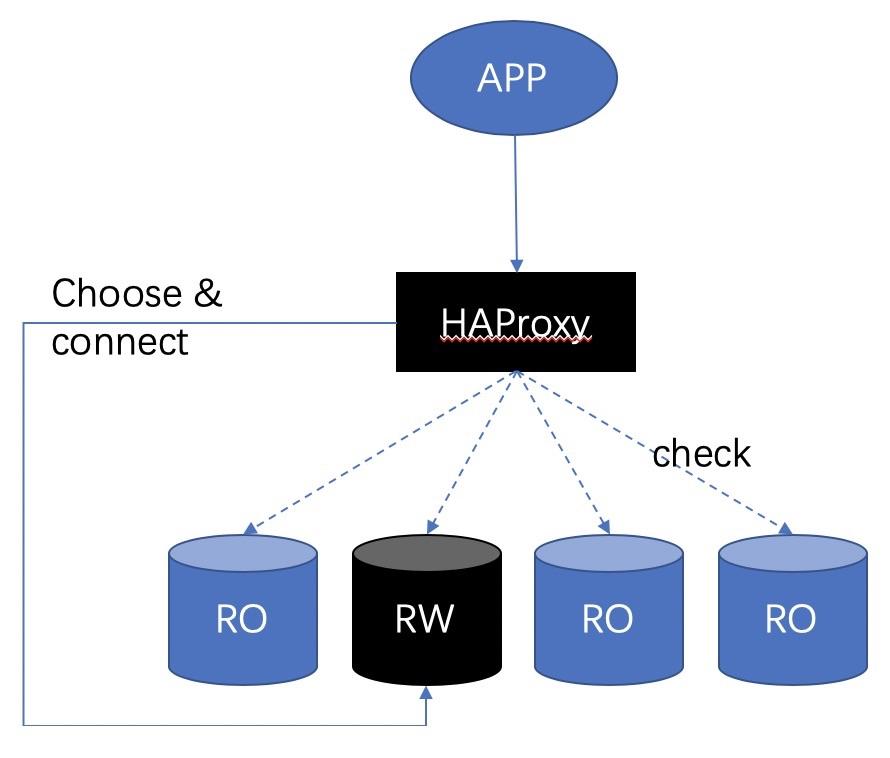
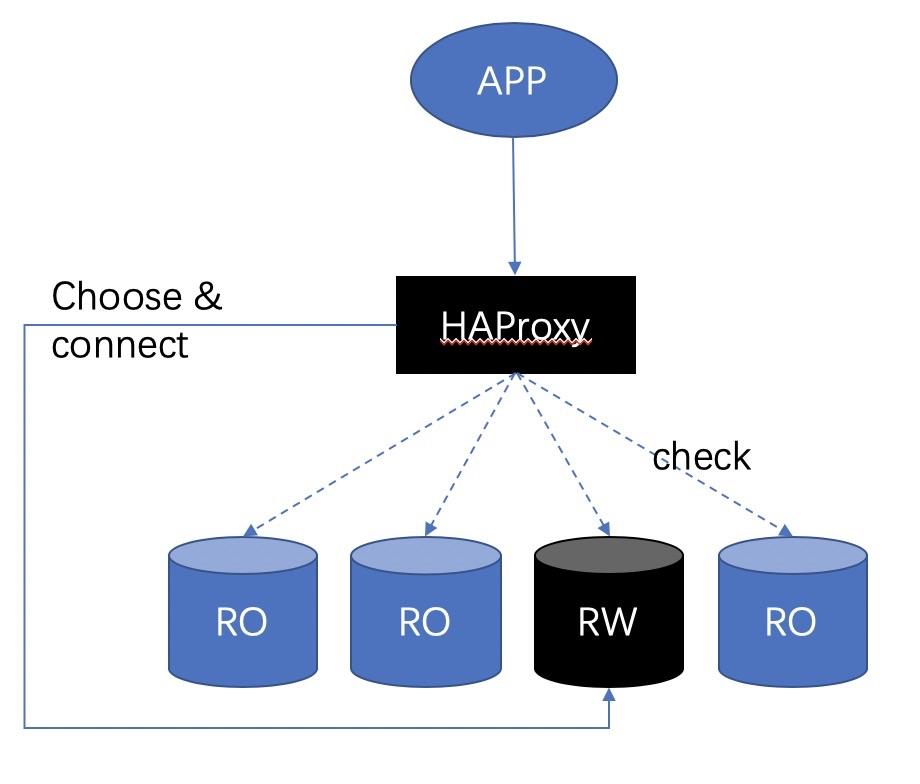
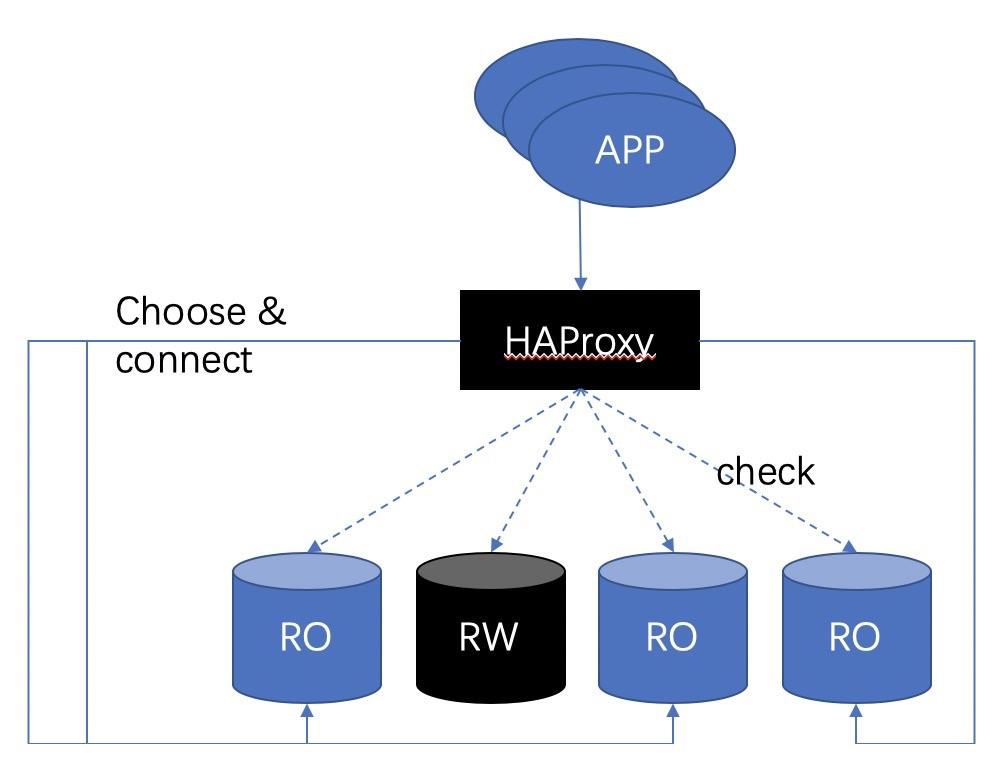
Although it cannot directly implement the read-write separation of PostgreSQL, it can implement several simple types of PostgreSQL access points (listening points) and session failover management:
1) One or more primary instances. (Multiple primary instances usually refer to Postgres-XL coordinators, Citus coordinators, or fully equivalent multi-master nodes.)

When the backend database corresponding to the session detects an unexpected status, the session will be disconnected and reconnected (session failover).
When the RW node is switched, the session on this node is disconnected and migrated to a new RW node.

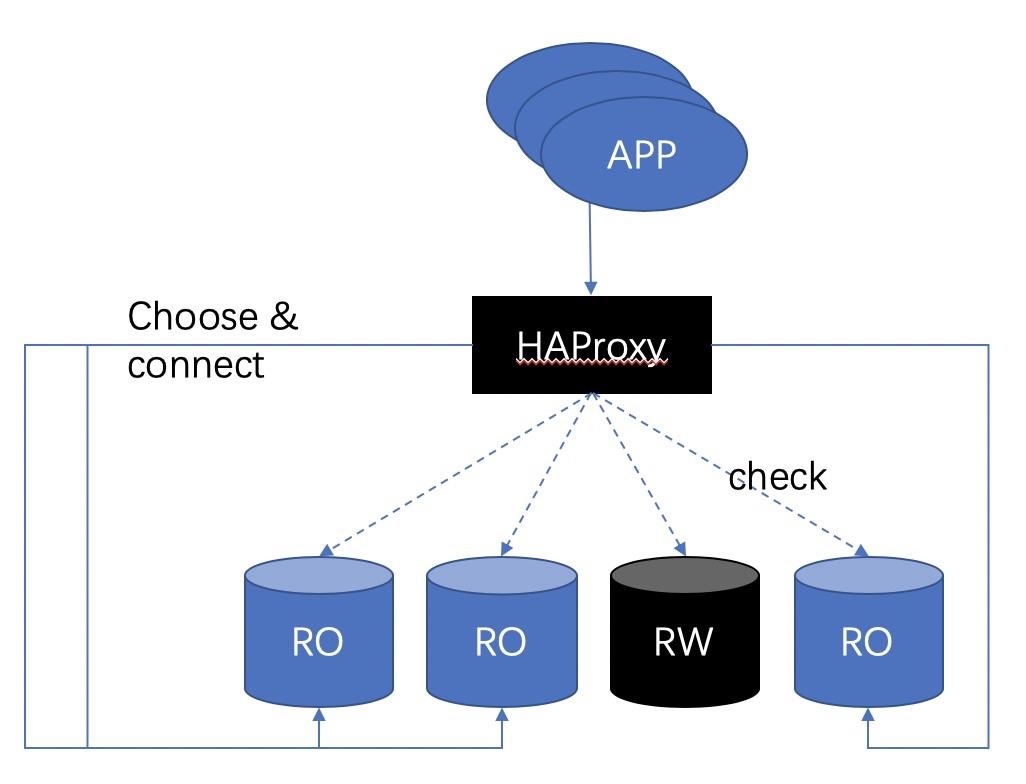
2) One or more read-only instances. (For example, in the one-master-multiple-slave structure)
When there are multiple RO nodes in the backend, load balance (session-level) is enabled.

After switching, the session on this node is disconnected and migrated to the new RO node.

Environment: CentOS 7, PostgreSQL, and multiple master and slave instances. HAProxy is not needed for failover between master and slave instances. It only switches sessions based on the status of backend databases.
A few things for preparation:
The script is configured on the database server to obtain the following three states:
1) In recovery (secondary database): returns 206
2) Primary database: returns 200
3) Confirmation failure (database connection failure or other problems): returns 503
The script is as follows, which returns different codes for different states:
#!/bin/bash
# This script checks if a postgres server is healthy running on localhost. It will return:
# "HTTP/1.x 200 OK\r" (if postgres is running smoothly)
# - OR -
# "HTTP/1.x 500 Internal Server Error\r" (else)
# The purpose of this script is make haproxy capable of monitoring postgres properly
# It is recommended that a low-privileged postgres  user is created to be used by this script.
# For eg. create  user healthchkusr login password 'hc321';

PGBIN=/usr/pgsql-10/bin
PGSQL_HOST="localhost"
PGSQL_PORT="5432"
PGSQL_DATABASE="postgres"
PGSQL_USERNAME="postgres"
export PGPASSWORD="passwd"
TMP_FILE="/tmp/pgsqlchk.out"
ERR_FILE="/tmp/pgsqlchk.err"


# We perform a simple query that should return a few results
# 调用如下脚本,看返回结果pg_is_in_recovery看是不是在恢复中,t表示从库。f表示主库。

VALUE=`/opt/bigsql/pg96/bin/psql -t -h localhost -U postgres -p 5432 -c "select pg_is_in_recovery()" 2> /dev/null`
# Check the output. If it is not empty then everything is fine and we return something. Else, we just do not return anything.


if [ $VALUE == "t" ]
then
    /bin/echo -e "HTTP/1.1 206 OK\r\n"
    /bin/echo -e "Content-Type: Content-Type: text/plain\r\n"
    /bin/echo -e "\r\n"
    /bin/echo "Standby"
    /bin/echo -e "\r\n"
elif [ $VALUE == "f" ]
then
    /bin/echo -e "HTTP/1.1 200 OK\r\n"
    /bin/echo -e "Content-Type: Content-Type: text/plain\r\n"
    /bin/echo -e "\r\n"
    /bin/echo "Primary"
    /bin/echo -e "\r\n"
else
    /bin/echo -e "HTTP/1.1 503 Service Unavailable\r\n"
    /bin/echo -e "Content-Type: Content-Type: text/plain\r\n"
    /bin/echo -e "\r\n"
    /bin/echo "DB Down"
    /bin/echo -e "\r\n"
fi
The script path is /opt/pgsqlchk.
sudo chmod 755 /opt/pgsqlchkConfigure the check script under /opt/pgsqlchk as the xinetd service and call it through a listening port. In this example, the port number is 23267.
yum install -y xinetd telnet

vi /etc/xinetd.d/pgsqlchk

service pgsqlchk
{
        flags           = REUSE
        socket_type     = stream
        port            = 23267
        wait            = no
        user            = nobody
        server          = /opt/pgsqlchk
        log_on_failure  += USERID
        disable         = no
        only_from       = 0.0.0.0/0
        per_source      = UNLIMITED
}
Add xinetd.
bash -c 'echo "pgsqlchk 23267/tcp # pgsqlchk" >> /etc/services' Start xinetd.
systemctl start xinetd Assume two database servers: pg0 and pg1 (hostname or DNS configuration).
One server is deployed with HAProxy, as shown below.
yum install -y haproxy Configure haproxy.cfg.
Listen to two ports. Port 5000 corresponds to the node (pg_is_in_recovery = f) that the check script returns code 200. This node is the RW node.
Port 5001 corresponds to the node (pg_is_in_recovery = t) that the check script returns code 206. This node is the RO node.
vi /etc/haproxy/haproxy.cfg

global
    maxconn 100

defaults
    log global
    mode tcp
    retries 2
    timeout client 30m
    timeout connect 4s
    timeout server 30m
    timeout check 5s

listen stats
    mode http
    bind *:7000
    stats enable
    stats uri /

listen ReadWrite
    bind *:5000
    option httpchk
    http-check expect status 200
    default-server inter 3s fall 3 rise 2 on-marked-down shutdown-sessions
    server pg0 pg0:5432 maxconn 100 check port 23267
    server pg1 pg1:5432 maxconn 100 check port 23267

listen ReadOnly
    bind *:5001
    option httpchk
    http-check expect status 206
    default-server inter 3s fall 3 rise 2 on-marked-down shutdown-sessions
    server pg0 pg0:5432 maxconn 100 check port 23267
    server pg1 pg1:5432 maxconn 100 check port 23267
Configuration description:
If there are multiple read-only nodes, you can configure them in the server.
Start the HAProxy service.
systemctl start haproxy Connect port 5000 of HAProxy for read-write nodes.
$ psql -h localhost -p 5000 -U postgres
Password for user postgres:
psql (9.6.5)
Type "help" for help.

postgres=# select pg_is_in_recovery();
pg_is_in_recovery
-------------------
f
(1 row)
Connect port 5001 of HAProxy for read-only nodes.
$ psql -h localhost -p 5001 -U postgres
Password for user postgres:
psql (9.6.5)
Type "help" for help.

postgres=# select pg_is_in_recovery();
pg_is_in_recovery
-------------------
t
(1 row) ###########全局配置#########
global
log 127.0.0.1 local0 #[日志输出配置,所有日志都记录在本机,通过local0输出]
log 127.0.0.1 local1 notice #定义haproxy 日志级别[error warringinfo debug]
daemon #以后台形式运行harpoxy
nbproc 1 #设置进程数量
maxconn 4096 #默认最大连接数,需考虑ulimit-n限制
#user haproxy #运行haproxy的用户
#group haproxy #运行haproxy的用户所在的组
#pidfile /var/run/haproxy.pid #haproxy 进程PID文件
#ulimit-n 819200 #ulimit 的数量限制
#chroot /usr/share/haproxy #chroot运行路径
#debug #haproxy 调试级别,建议只在开启单进程的时候调试
#quiet
########默认配置############
defaults
log global
mode http #默认的模式mode { tcp|http|health },tcp是4层,http是7层,health只会返回OK
option httplog #日志类别,采用httplog
option dontlognull #不记录健康检查日志信息
retries 2 #两次连接失败就认为是服务器不可用,也可以通过后面设置
#option forwardfor #如果后端服务器需要获得客户端真实ip需要配置的参数,可以从Http Header中获得客户端ip
option httpclose #每次请求完毕后主动关闭http通道,haproxy不支持keep-alive,只能模拟这种模式的实现
#option redispatch #当serverId对应的服务器挂掉后,强制定向到其他健康的服务器,以后将不支持
option abortonclose #当服务器负载很高的时候,自动结束掉当前队列处理比较久的链接
maxconn 4096 #默认的最大连接数
timeout connect 5000ms #连接超时
timeout client 30000ms #客户端超时
timeout server 30000ms #服务器超时
#timeout check 2000 #心跳检测超时
#timeout http-keep-alive10s #默认持久连接超时时间
#timeout http-request 10s #默认http请求超时时间
#timeout queue 1m #默认队列超时时间
balance roundrobin #设置默认负载均衡方式,轮询方式
#balance source #设置默认负载均衡方式,类似于nginx的ip_hash
#balnace leastconn #设置默认负载均衡方式,最小连接数
########统计页面配置########
listen stats
bind 0.0.0.0:1080 #设置Frontend和Backend的组合体,监控组的名称,按需要自定义名称
mode http #http的7层模式
option httplog #采用http日志格式
#log 127.0.0.1 local0 err #错误日志记录
maxconn 10 #默认的最大连接数
stats refresh 30s #统计页面自动刷新时间
stats uri /stats #统计页面url
stats realm XingCloud\ Haproxy #统计页面密码框上提示文本
stats auth admin:admin #设置监控页面的用户和密码:admin,可以设置多个用户名
stats auth Frank:Frank #设置监控页面的用户和密码:Frank
stats hide-version #隐藏统计页面上HAProxy的版本信息
stats admin if TRUE #设置手工启动/禁用,后端服务器(haproxy-1.4.9以后版本)
########设置haproxy 错误页面#####
#errorfile 403 /home/haproxy/haproxy/errorfiles/403.http
#errorfile 500 /home/haproxy/haproxy/errorfiles/500.http
#errorfile 502 /home/haproxy/haproxy/errorfiles/502.http
#errorfile 503 /home/haproxy/haproxy/errorfiles/503.http
#errorfile 504 /home/haproxy/haproxy/errorfiles/504.http
########frontend前端配置##############
frontend main
bind *:80 #这里建议使用bind *:80的方式,要不然做集群高可用的时候有问题,vip切换到其他机器就不能访问了。
acl web hdr(host) -i www.abc.com #acl后面是规则名称,-i为忽略大小写,后面跟的是要访问的域名,如果访问www.abc.com这个域名,就触发web规则,。
acl img hdr(host) -i img.abc.com #如果访问img.abc.com这个域名,就触发img规则。
use_backend webserver if web #如果上面定义的web规则被触发,即访问www.abc.com,就将请求分发到webserver这个作用域。
use_backend imgserver if img #如果上面定义的img规则被触发,即访问img.abc.com,就将请求分发到imgserver这个作用域。
default_backend dynamic #不满足则响应backend的默认页面
########backend后端配置##############
backend webserver #webserver作用域
mode http
balance roundrobin #balance roundrobin 负载轮询,balance source 保存session值,支持static-rr,leastconn,first,uri等参数
option httpchk /index.html HTTP/1.0 #健康检查, 检测文件,如果分发到后台index.html访问不到就不再分发给它
server web1 10.16.0.9:8085 cookie 1 weight 5 check inter 2000 rise 2 fall 3
server web2 10.16.0.10:8085 cookie 2 weight 3 check inter 2000 rise 2 fall 3
#cookie 1表示serverid为1,check inter 1500 是检测心跳频率
#rise 2是2次正确认为服务器可用,fall 3是3次失败认为服务器不可用,weight代表权重
backend imgserver
mode http
option httpchk /index.php
balance roundrobin
server img01 192.168.137.101:80 check inter 2000 fall 3
server img02 192.168.137.102:80 check inter 2000 fall 3
backend dynamic
balance roundrobin
server test1 192.168.1.23:80 check maxconn 2000
server test2 192.168.1.24:80 check maxconn 2000
listen tcptest
bind 0.0.0.0:5222
mode tcp
option tcplog #采用tcp日志格式
balance source
#log 127.0.0.1 local0 debug
server s1 192.168.100.204:7222 weight 1
server s2 192.168.100.208:7222 weight 1 PostgreSQL gzip Plug-in Function Interface: Compress and Decompress Text and Bytea Files
PostgreSQL md5hash Plug-in: 128-bit Storage for Space Saving and Efficiency
Alibaba Clouder - February 19, 2019
vboylin - May 10, 2019
francisndungu - October 9, 2018
Sabith - August 2, 2018
Alibaba Clouder - March 1, 2019
digoal - September 20, 2019
 PolarDB for PostgreSQL
Alibaba Cloud PolarDB for PostgreSQL is an in-house relational database service 100% compatible with PostgreSQL and highly compatible with the Oracle syntax.
Learn More AnalyticDB for PostgreSQL
An online MPP warehousing service based on the Greenplum Database open source program
Learn More ApsaraDB RDS for PostgreSQL
An on-demand database hosting service for PostgreSQL with automated monitoring, backup and disaster recovery capabilities
Learn More Cloud Database Solutions for Gaming
Alibaba Cloud’s world-leading database technologies solve all data problems for game companies, bringing you matured and customized architectures with high scalability, reliability, and agility.
Learn MoreMore Posts by digoal