By Yijun
In the previous two sections of this chapter, the production cases focus on a single CPU and a single memory problem, respectively. And, we also show you the process of locating and troubleshooting the problem in detail. In fact, a relatively more complicated scenario exists - it is essentially a problem caused by the GC of the V8 engine.
What is GC? GC is actually an automatic garbage collection mechanism implemented by the language engine. It will check which objects on the current heap are no longer in use when set conditions trigger (such as the heap memory reaches a certain value), and release the space occupied by these objects that are no longer in use. Many modern advanced languages have implemented this mechanism to reduce the mental burden on programmers.
This manual is first published on GitHub at https://github.com/aliyun-node/Node.js-Troubleshooting-Guide and will be simultaneously updated to the community.
Note: At the time of writing, the Node.js Performance Platform product is only available for domestic (Mainland China) accounts.
Although the GC mechanism of modern languages has lightened the burden of programmers and indirectly improved development efficiency, everything has its pros and cons. After GC was introduced into the underlying engine, programmers no longer need to pay attention to objects being released. Therefore, relatively speaking, programmers cannot precisely control their own programs. This poses two major problems:
We have learned about memory leakage in production scenarios in the previous section. So what about execution performance?
In fact, it is simple: Originally, the purpose of a program is to execute the service logic, but with the GC mechanism, under certain conditions, the program always takes time to scan the heap space to find objects that are no longer in use. This correspondingly reduces the time required for the program to execute the service logic, resulting in a decrease in performance, and the reduced performance is proportional to the time consumed by GC (that is, the number of GC operations * the time spent on each GC).
Now, you should have a general understanding of GC. Let's look at how problems caused by GC manifest in production. In this case, the phenomenon of this problem is firstly that the monitored CPU of the process on the Node.js Performance Platform reaches 100%, but the server load is actually not large at this time, and the QPS is only about 100. According the steps mentioned in the previous section to deal with the CPU problem, we can capture the CPU profile for analysis, as follows:
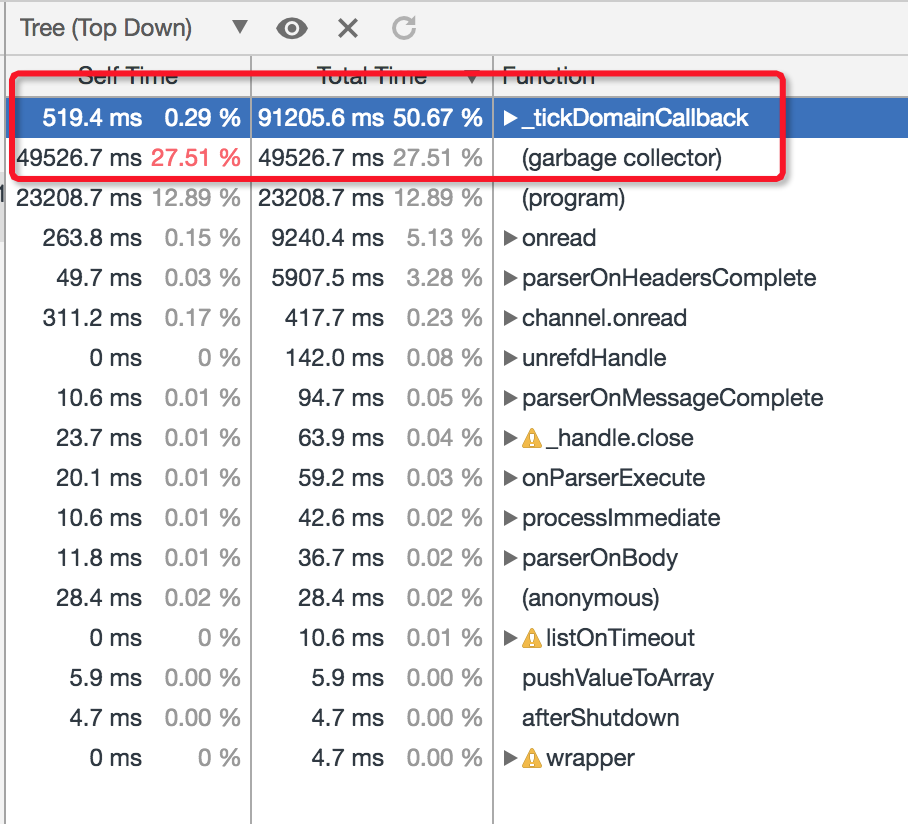
The problem, apparently, is that the Garbage Collector consumes too much CPU, which means that problems occurred with GC. In fact, most of the problems caused by GC mechanism are often reflected in the CPU of Node.js process. In essence, such problems can be considered as problems caused by the GC of the engine, or by a memory problem. Let's look at the generation process of such problems:
In addition, the GC problem is not the same as that caused by the previous EJS template rendering. Even if we can see the cost of this part in the CPU profile, it is basically impossible to solve this problem through optimization. Fortunately, Node.js provides a series of startup flags (actually provided by the V8 engine) that can output relevant logs when the process triggers GC for developers to analyze:
The bold flags means that we need to add it before starting the application to take effect at runtime. This part of the log is actually in a text format. Unfortunately, Chrome DevTools does not natively support the analysis and result display of the GC log, so we need to perform corresponding line-by-line analysis after acquiring the log. We can also use the module v8-gc-log-parser provided by the community to directly analyze the log.
Although Chrome DevTools cannot directly help us analyze and display the GC log results, Node.js Performance Platform actually provides a more convenient way to dynamically obtain the GC status information of online running processes and display the corresponding results. In other words, developers can still obtain the 3-minute GC information through the console, without enabling the flags mentioned above before running your Node.js application.
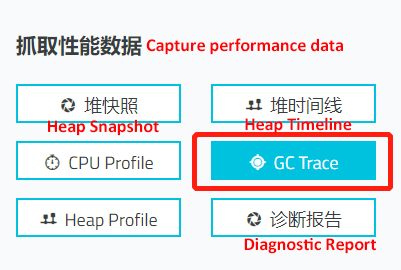
Correspondingly, in this case, we can enter the application instance details page of the platform, find the GC-intensive process, and then click GC Trace to capture GC data:
By default, the GC log information of the corresponding process is captured for 3 minutes, and the files generated are displayed on the File page:

Click Dump to upload the data to the cloud for online analysis and display, as shown in the following figure:

Finally, click Analysis button to view the analysis results of GC information customized by AliNode:
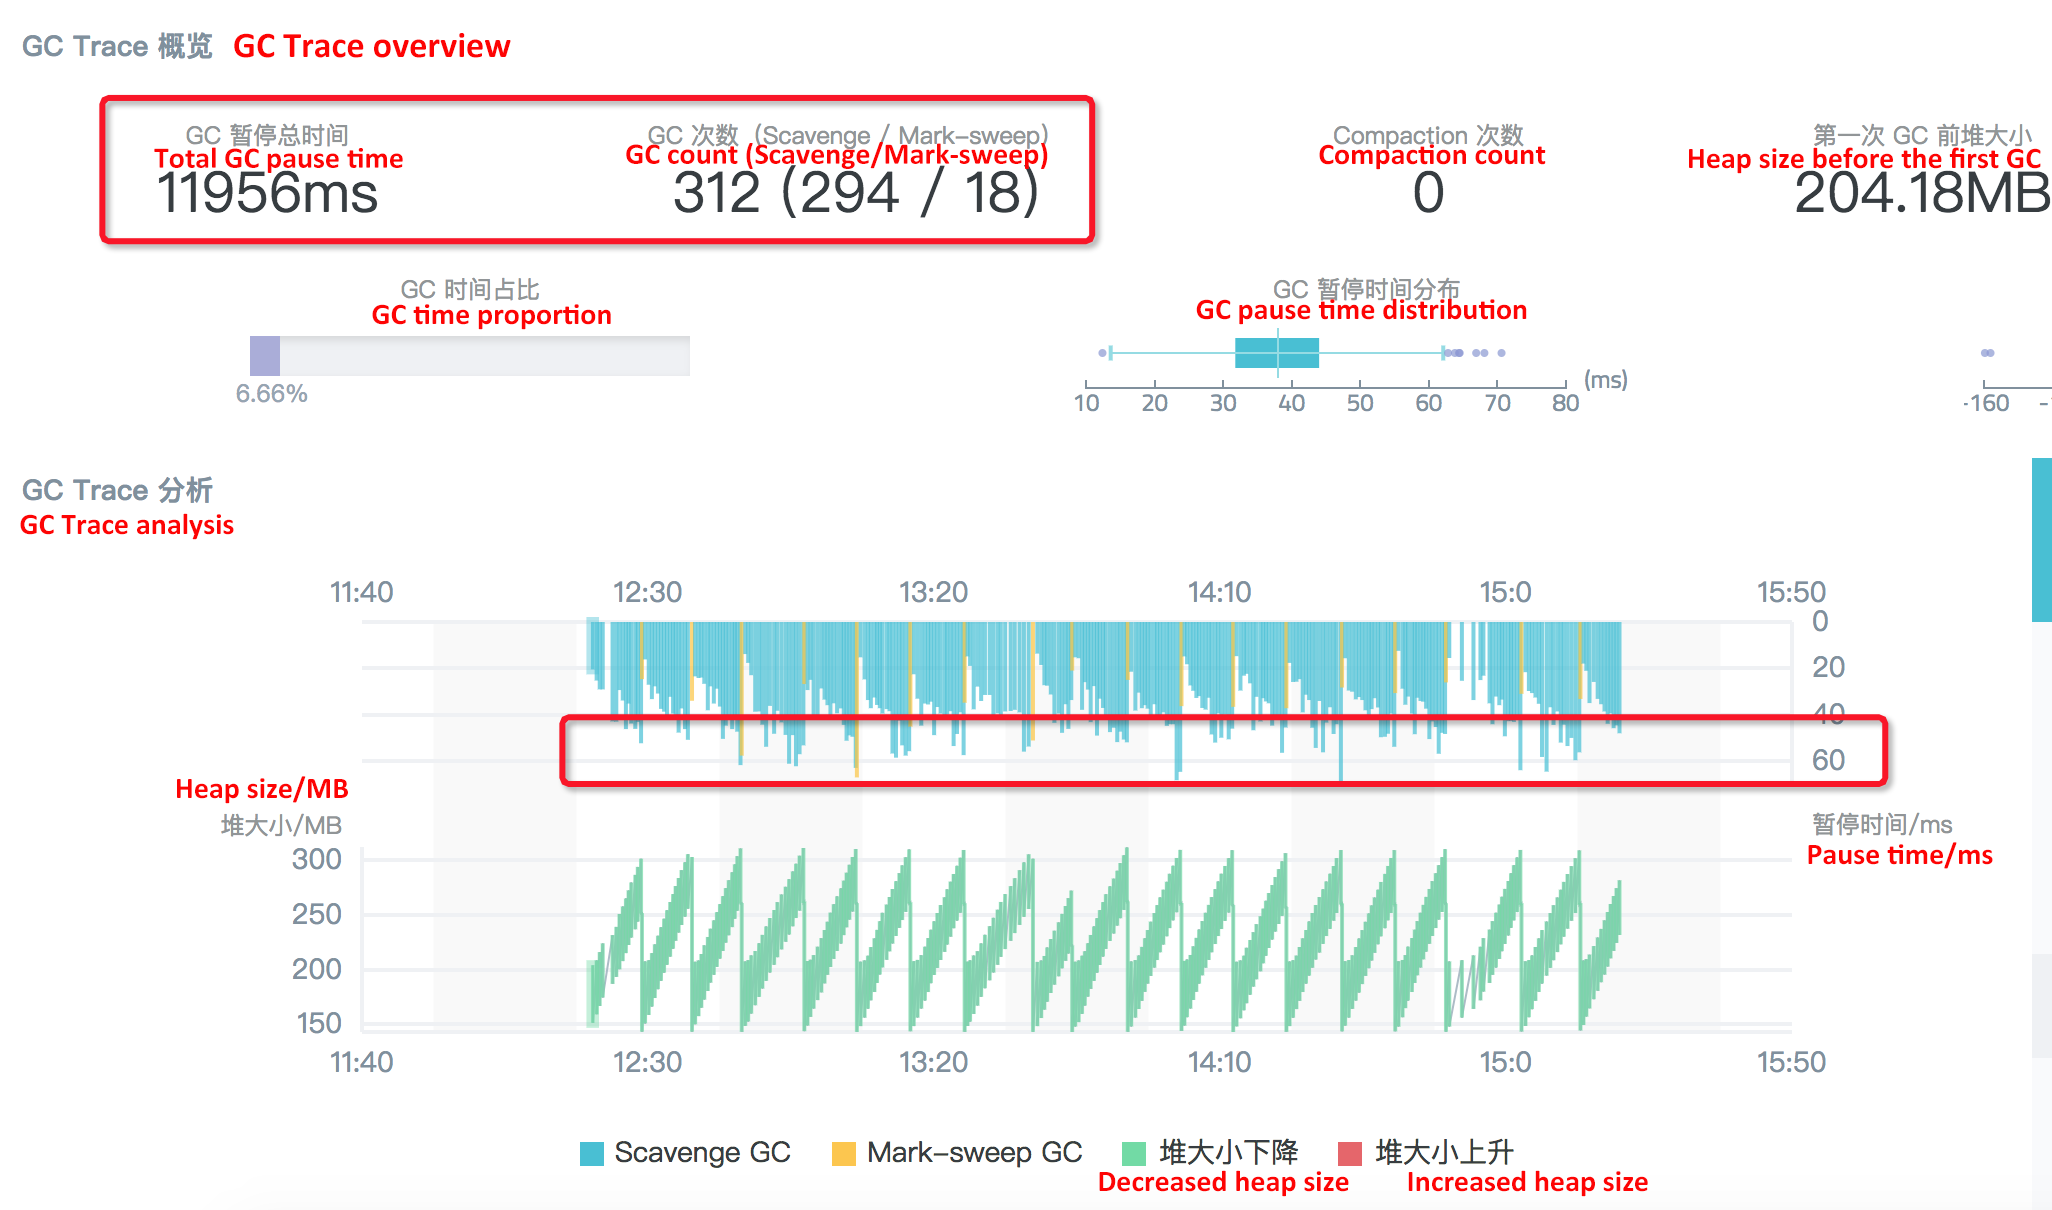
In the displayed results, we can easily see the specific number of GC, GC type, and the time-consuming information of each GC, for the problematic process, which is convenient for us to further analyze and locate. For example, in the analysis chart of GC Trace results for this problem, we can see some important information circled in red:
Based on this information, we can see that the problem of this GC case is concentrated in the Scavenge collection stage, that is, the memory collection of the Young Generation. Looking through V8 Scavenge collection logic, we can know that the condition for triggering the collection at this stage is Semi space allocation failed.
Then, it can be inferred that our application frequently generates a large number of small objects in the Young Generation during the stress test, resulting in the default semi space always being filled up quickly, and thus triggering the Flip status. Therefore, so many Scavenge collections and corresponding CPU consumption occur during GC tracing. In this way, the problem becomes how to optimize the Young Generation GC to improve application performance.
Through the GC data capture and result analysis provided by the platform, we can try to optimize the Young Generation GC to improve the application performance. And, the condition for triggering GC of the Young Generation space is that the space is full, so the size of the Young Generation space is determined by the flag --max-semi-space-size, which defaults to 16 MB. Therefore, naturally we can expect to adjust the default semi space value for optimization.
It should be noted here that the flag that controls the Young Generation space is not the same under different versions of Node.js. For details, check the current version for confirmation.
In this case, it is obvious that the default 16 MB is relatively small for the current application, causing the Scavenge to be too frequent. First, we try to increase the default size of the Young Generation space from 16 MB to 64 MB by adding the flag --max-semi-space-size=64 at startup, and capture the CPU profile when the traffic is large and the CPU usage of the process is very high:
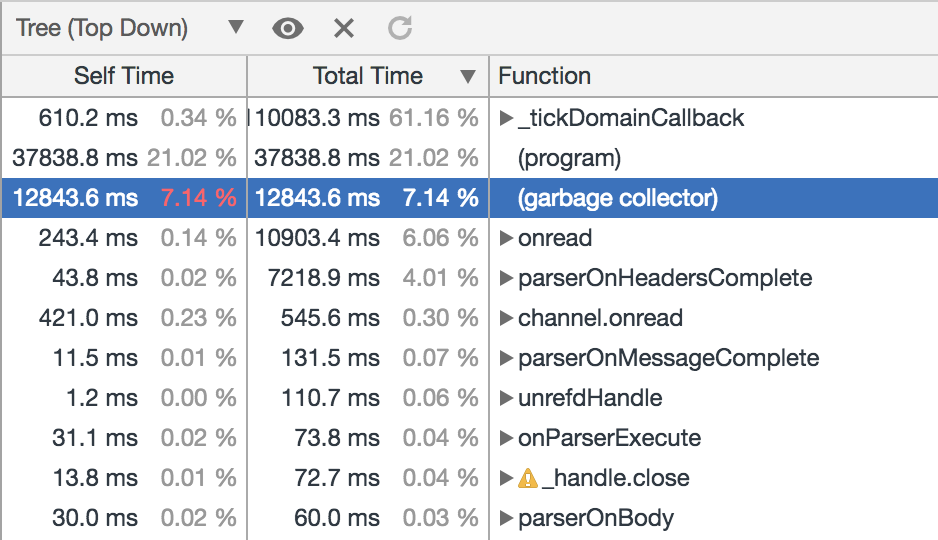
After adjustment, it can be seen that the proportion of CPU consumption in the Garbage collector stage has dropped to about 7%. Then, we can capture the GC Trace log again, and observe the displayed results to confirm whether the consumption in the Scavenge stage is reduced:
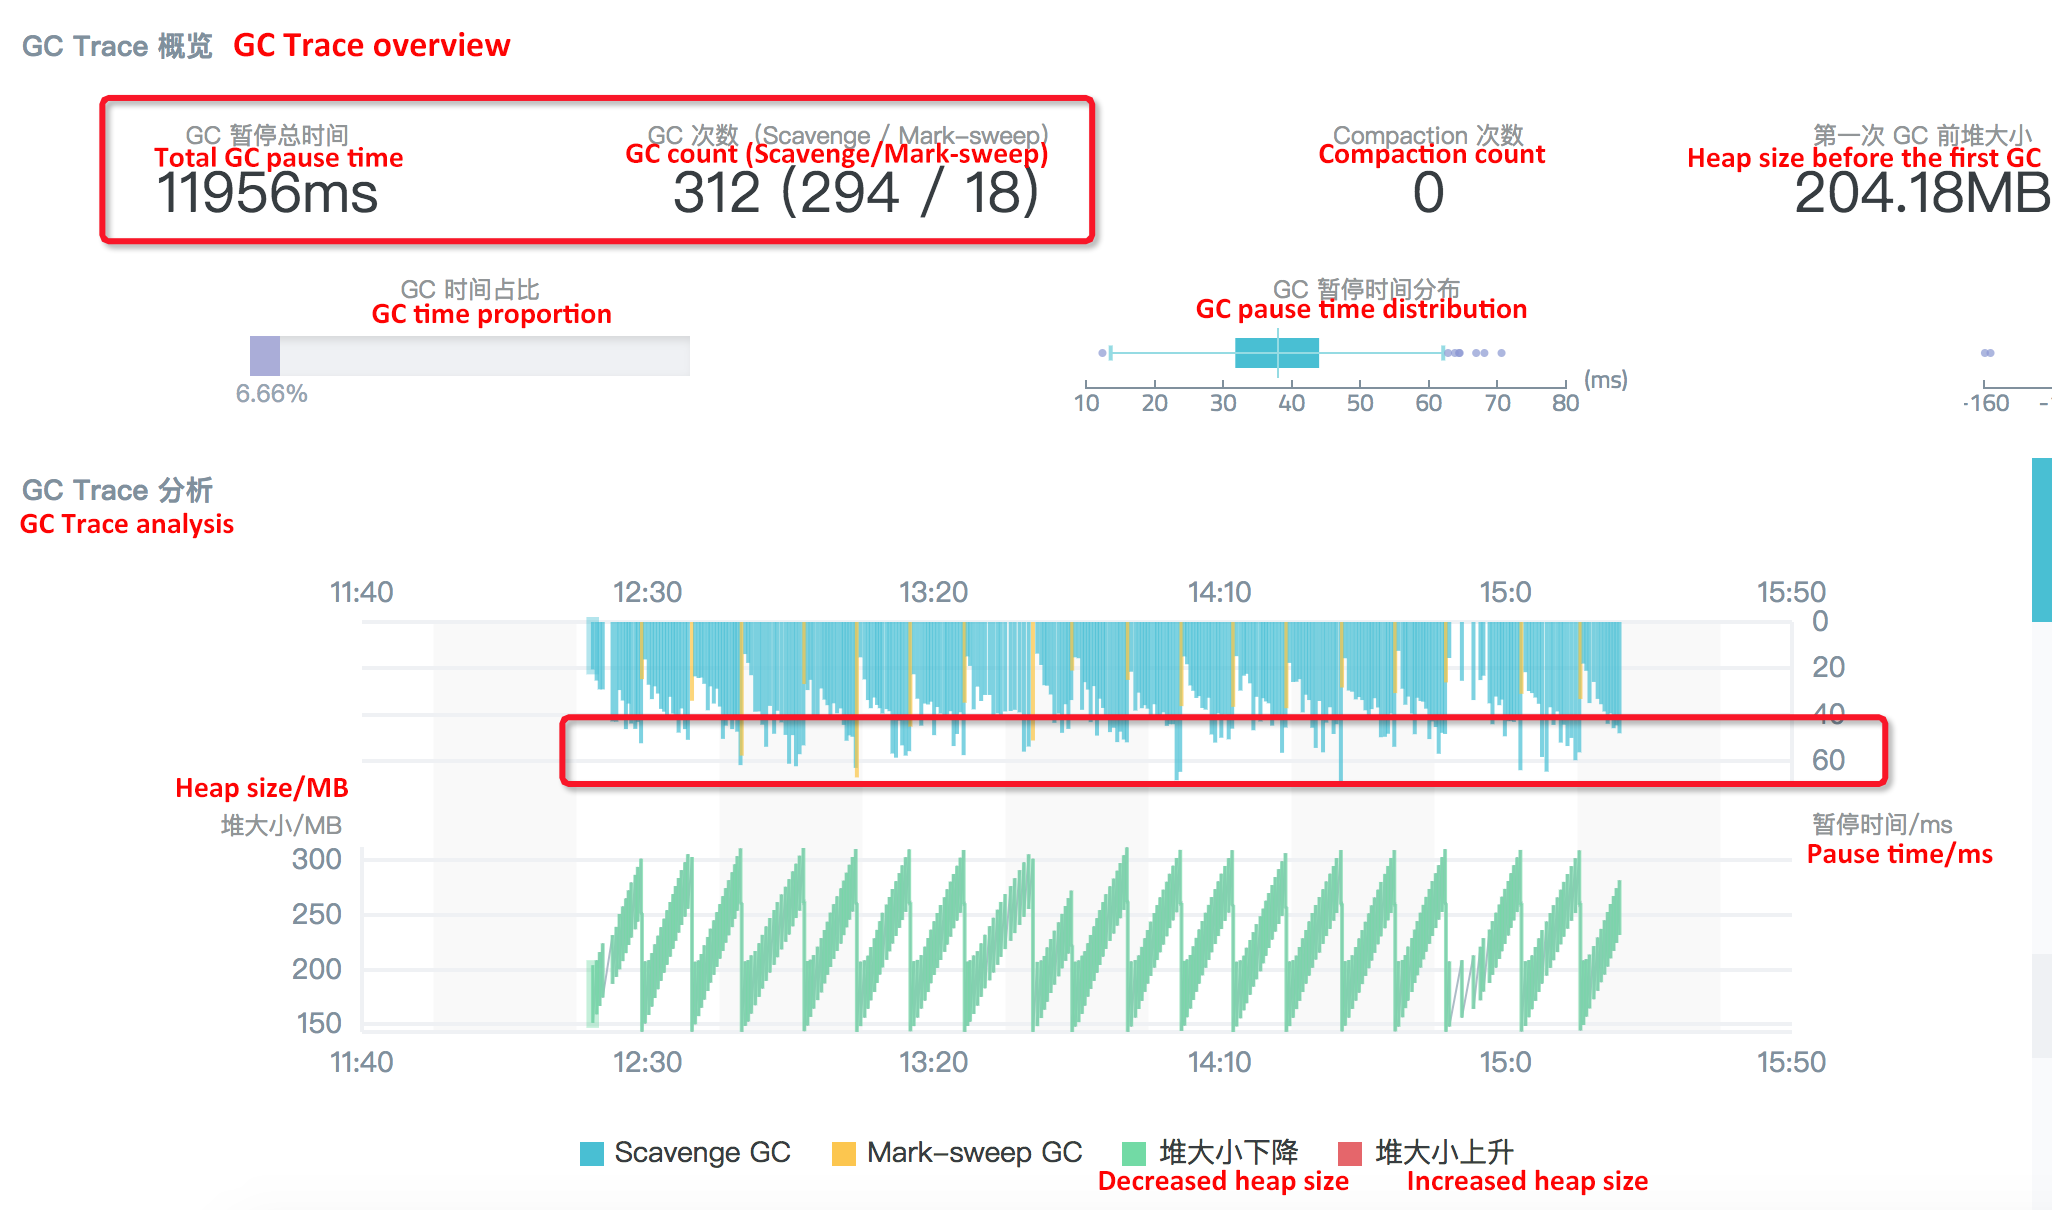
Obviously, after the semi space is adjusted to 64 MB, the number of Scavenge operations has been reduced from nearly 1000 to 294. Moreover, under this condition, the time consumed for each Scavenge collection has not increased significantly, but still fluctuated between 50-60 ms, so the total pause time of GC tracking in 3 minutes is reduced from 48s to 12s. Correspondingly, the QPS of the service is increased by about 10%.
If we use the flag --max-semi-space-size to continue to enlarge the space used by the Young Generation, can we further optimize the performance of this application? At this time, we use the flag --max-semi-space-size=128 to enlarge the Young Generation space from 64 MB to 128MB. When the CPU usage of the process is very high, capture the CPU profile to see the effect:
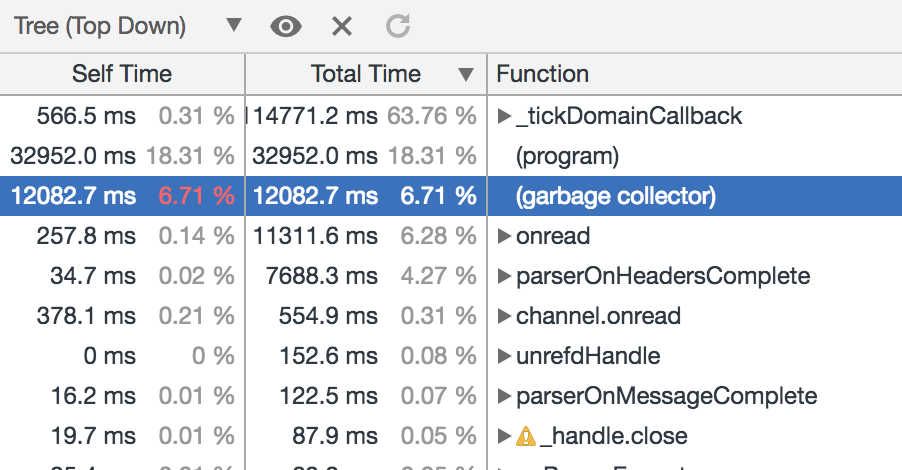
In this case, the CPU consumption in the Garbage collector stage is not obvious compared with the preceding setting of 64 MB, and the decrease in GC consumption accounts for less than 1%. Similarly, let's capture the GC Trace log, and observe the results to view the specific causes:
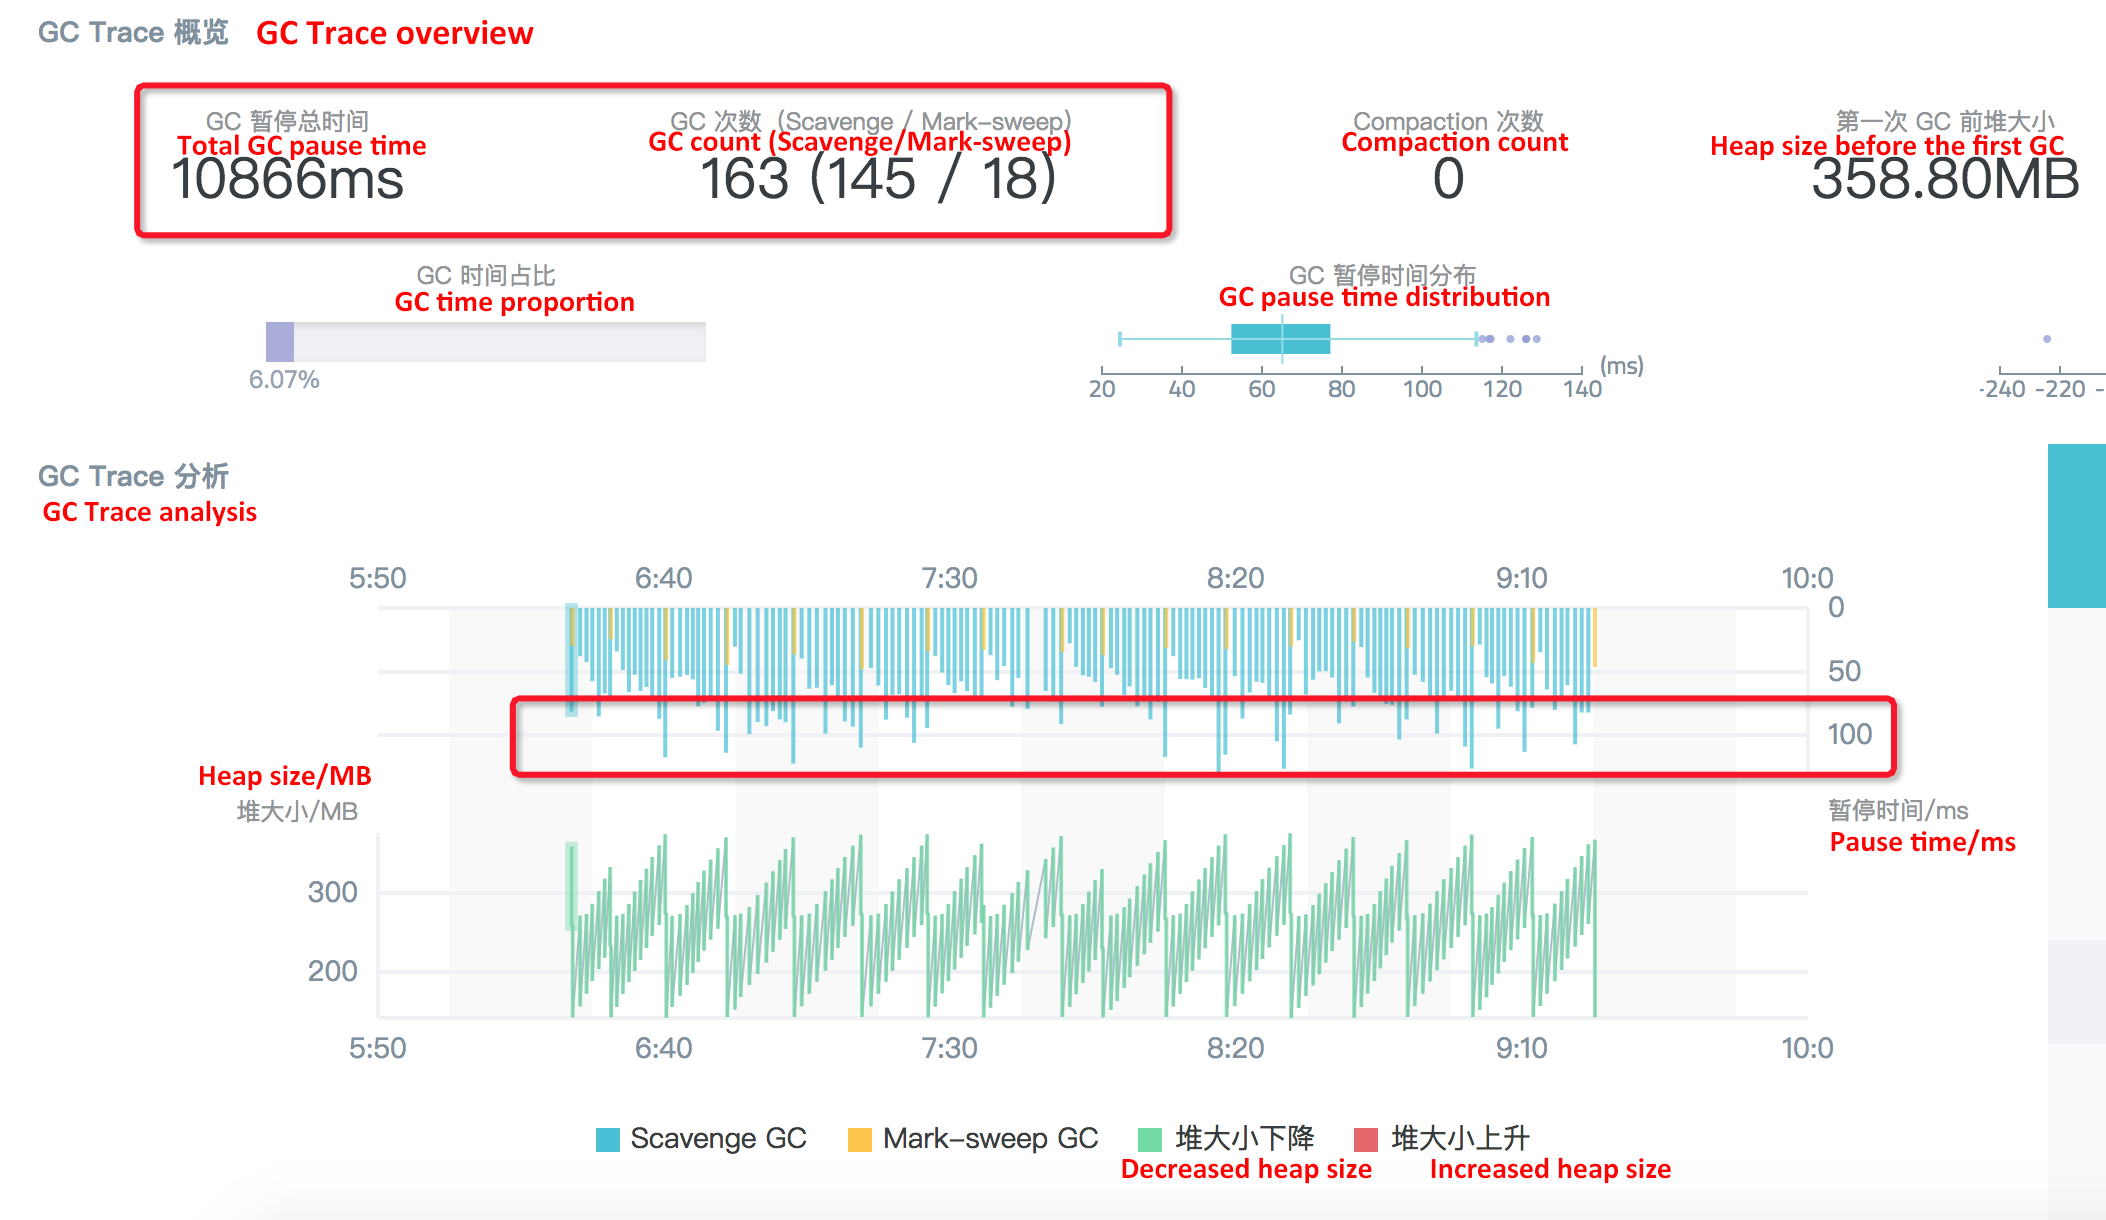
The reason is obvious: Although the semi space size is increased to 128 MB, and the number of the Scavenge collections is reduced from 294 to 145, the time consumption of each collection is almost doubled.
Based on this idea, we again use the flag --max-semi-space-size=256 to further enlarge the space used by the Young Generation to 256 MB:
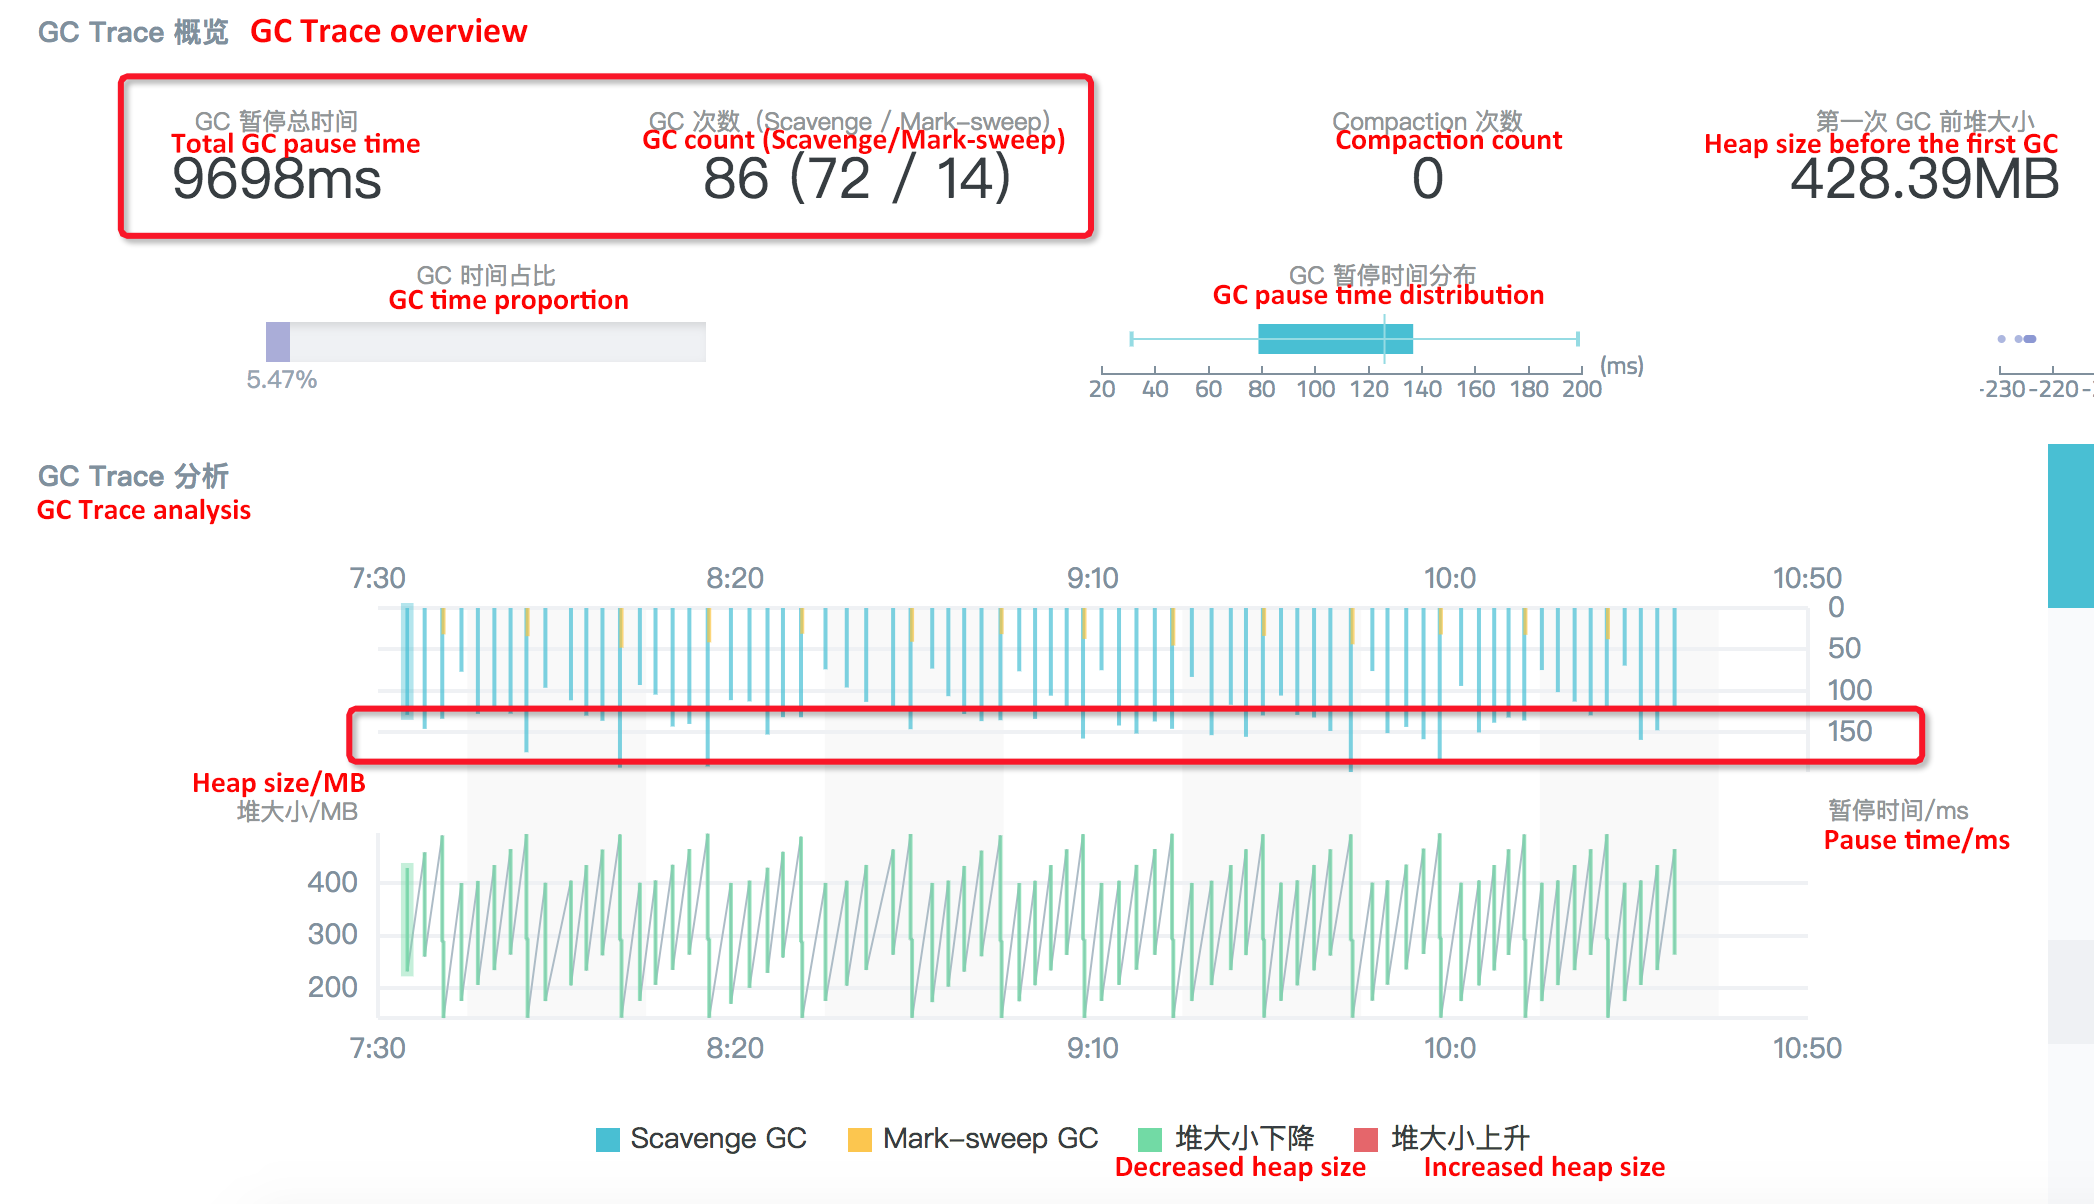
This is similar to the case when the size is adjusted to 128 MB: The number of Scavenge collections drop from 294 to 72 in 3 minutes, but relatively, the time consumed for each algorithm collection fluctuates to about 150 ms, so the overall performance has not been significantly improved.
With the help of GC data capture and result display of the performance platform, and after the above several attempts to adjust the value of the semi space, we can see that the overall GC performance for the Node application is significantly increased and the QPS during the stress test is increased by around 10% after the semi space size is changed from 16 MB (default value) to 64 MB. However, changing the semi space size to 128 MB or 256 MB does not bring obvious performance improvement. In addition, the semi space itself is memory allocated to objects in the Young Generation and cannot be too large. Therefore, the optimal semi space size for this project is 64 MB.
In this production scenario, we can see that the third-party libraries used by the project are not always bug-free in all scenarios (in fact, this is impossible). Therefore, when encountering problems with third-party libraries, we must consider analyzing the problems in depth at the source code level.
Finally, in the production environment, it is not so common to improve the project performance through the runtime optimization for GC, which is also largely due to the fact that the application runtime GC status is not directly exposed to developers. Through the above customer case, we can see that with the help of Node.js Performance Platform, the Node application GC status can be perceived in real time, and corresponding optimization can be carried out, making it very easy to improve project performance without modifying a line of code.
Node.js Application Troubleshooting Manual - Correctly Enabling Chrome DevTools
Node.js Application Troubleshooting Manual - Node.js Performance Platform User Guide
hyj1991 - June 20, 2019
hyj1991 - June 20, 2019
hyj1991 - June 20, 2019
hyj1991 - July 22, 2019
hyj1991 - June 20, 2019
Alibaba Clouder - November 25, 2019
 ECS(Elastic Compute Service)
Elastic and secure virtual cloud servers to cater all your cloud hosting needs.
Learn More Mobile Testing
Provides comprehensive quality assurance for the release of your apps.
Learn More Web App Service
Web App Service allows you to deploy, scale, adjust, and monitor applications in an easy, efficient, secure, and flexible manner.
Learn More Elastic Desktop Service
A convenient and secure cloud-based Desktop-as-a-Service (DaaS) solution
Learn MoreMore Posts by hyj1991