With the booming development of mobile smart devices, a mobile multi-terminal development framework has become a general trend. Download the Flutter Analysis and Practice: Evolution and Innovation of Xianyu Technologies eBook for step-by-step analyses based on real-life problems, as well as clear explanations of the important concepts of Flutter.
When integrating Flutter, Xianyu uses Flutter plug-ins as bridges to acquire various native capabilities, such as obtaining device information and using the basic network library.
This article introduces the Flutter plug-ins and how they work, explains the platform channels that the plug-ins depend on, analyzes the Flutter Battery plug-in that is used to access the battery information of a device an app is running on, summarizes the problems encountered, and their solutions.
As shown in Figure 2-1, the upper-layer capabilities of Flutter are all backed by the Flutter engine, which helps eliminate differences between platforms. The Flutter engine allows plug-ins in this article to create platform channels for communication.
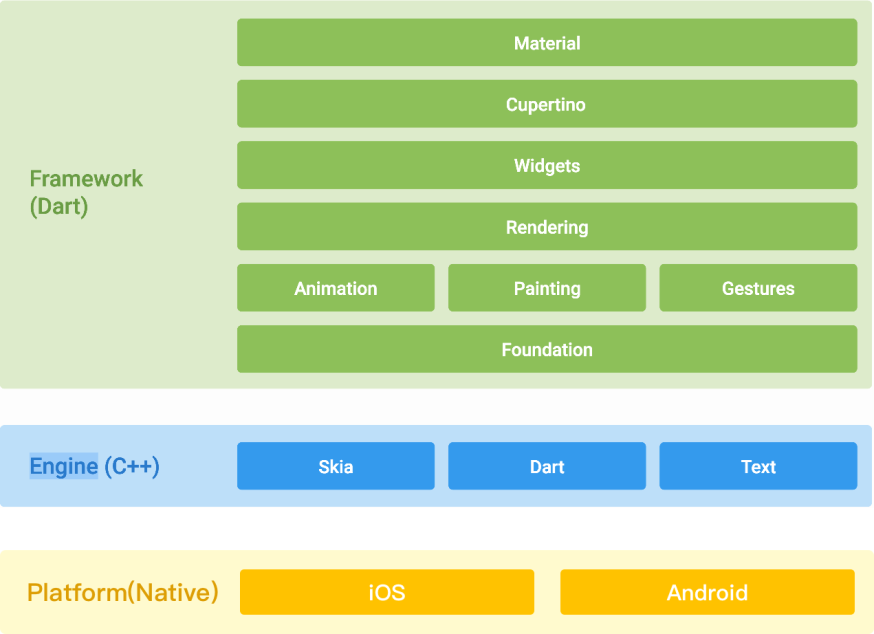
Figure 2-1
As shown in Figure 2-2, the Flutter app calls the native APIs through the platform channel created by the plug-in.
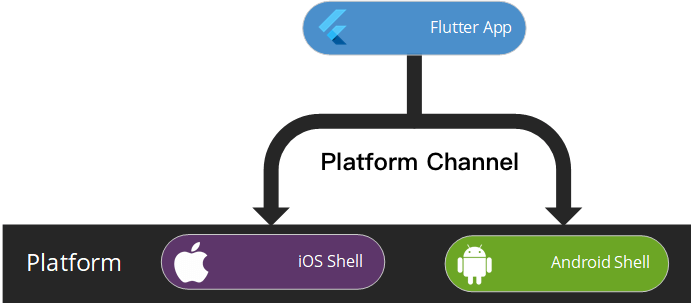
Figure 2-2
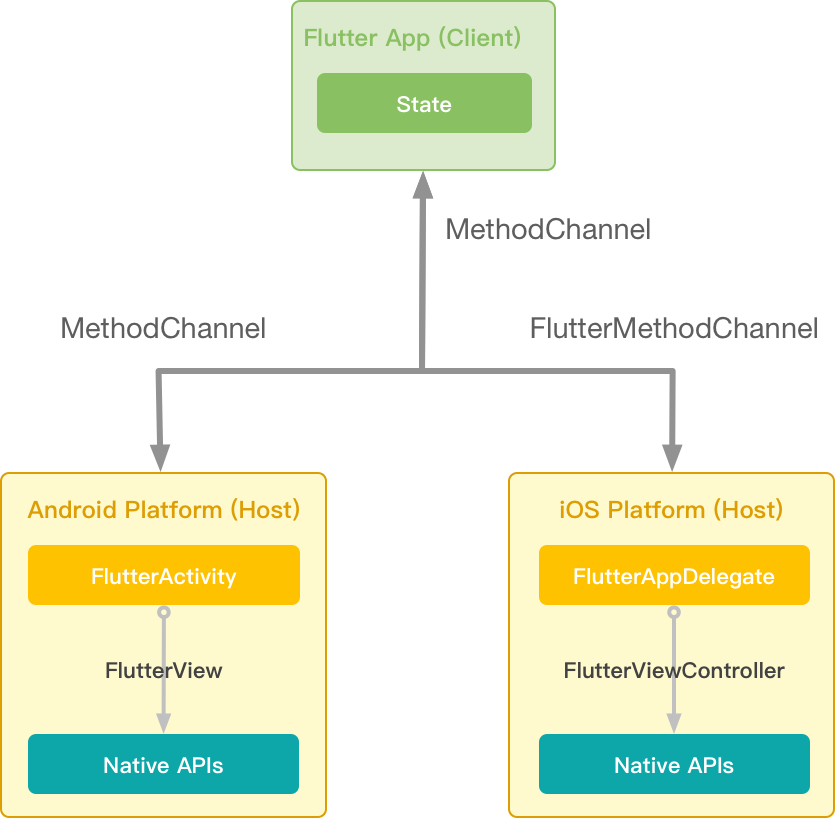
Figure 2-3
1) Platform Channel
MethodChannel class to send call messages to the platform.MethodChannel class to receive call messages.FlutterMethodChannel class to receive call messages.The message codec is binary data serialized in JSON format. Therefore, the type of parameters of the method to be called must be serializable in JSON format. In addition to the preceding method calls, the native platform can also call the methods to send messages to the Flutter app.
2) Android Platform
FlutterActivity is the plug-in manager for Android, which records all plug-ins and binds them to FlutterView.
3) iOS Platform
FlutterAppDelegate is the plug-in manager for iOS, which records all plug-ins and binds them to FlutterViewController (rootViewController by default.)
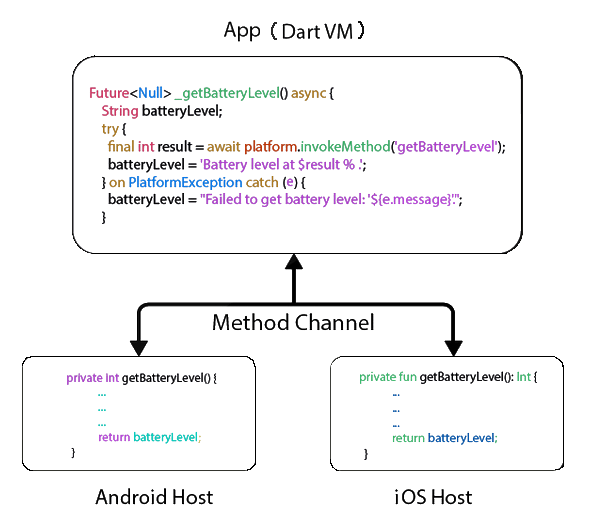
Figure 2-4
Create a plug-in project (flutter_plugin_batterylevel), as shown in Figure 2-5. A plug-in is also a project with a different project type.
1) Access the IntelliJ IDEA welcome page and click Create New Project or choose File > New > Project
2) Click Flutter on the left and then click Next
3) Enter the Project name and Project location and set Project type to Plugin.
4) Click Finish
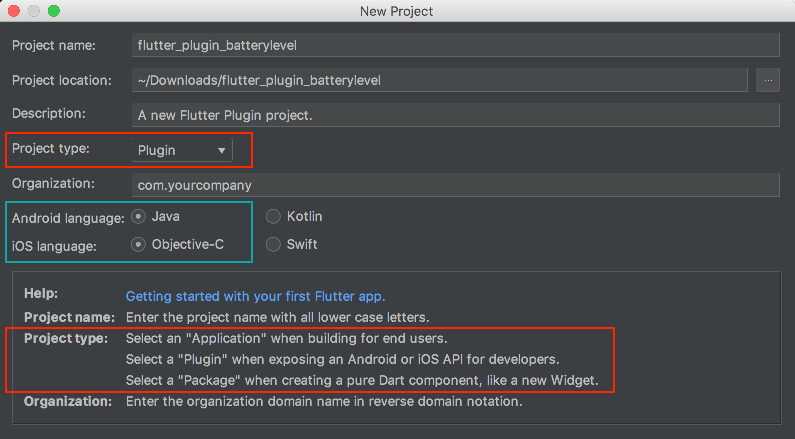
Figure 2-5
Valid values of Project type include:
1) Application: the Flutter app
2) Plugin: exposes Android and iOS APIs for the Flutter app
3) Package: encapsulates a Dart component, such as the image viewer widget
A plug-in project consists of Dart, Android, and iOS code
1) MethodChannel. The Flutter app calls native APIs.
static const MethodChannel _methodChannel = const MethodChannel ('samples. flutter.io/battery');

  //
  Future<String> getBatteryLevel() async {
    String batteryLevel;
    try {
      final int result = await _methodChannel.invokeMethod('getBatteryLevel', {'paramName':'paramVale'});
      batteryLevel = 'Battery level: $result%.';
    } catch(e) {
      batteryLevel = 'Failed to get battery level.';
    }
    return batteryLevel;
  }
First, _methodchannel (the channel name must be unique) calls the invokeMethod() method. The invokeMethod() method has two parameters: the method name cannot be empty. The parameter of the called method must be JSON-serialized and can be empty.
2) EventChannel. A native project calls the Flutter app.
static const EventChannel _eventChannel = const EventChannel('samples. flutter.io/charging');

  void listenNativeEvent() {
    _eventChannel.receiveBroadcastStream().listen(_onEvent, onError:_onError);
  }

  void _onEvent(Object event) {
    print("Battery status: ${event == 'charging' ? '' : 'dis'}charging.");
  }

  void _onError(Object error) {
    print('Battery status: unknown.');
}1) Register a plug-in
import android.os.Bundle;
import io.flutter.app.FlutterActivity;
import io.flutter.plugins.GeneratedPluginRegistrant;

public class MainActivity extends FlutterActivity {
    @Override
    protected void onCreate(Bundle savedInstanceState) {
        super.onCreate(savedInstanceState);
        GeneratedPluginRegistrant.registerWith(this);
    }
}
Register a plug-in in the onCreate() method of FlutterActivity.
    public static void registerWith(Registrar registrar) {
        /**
         * Channel名称:必须与Flutter App的Channel名称一致
         */
        private static final String METHOD_CHANNEL = "samples.flutter.io/battery";
        private static final String EVENT_CHANNEL = "samples.flutter.io/charging";

        // 实例Plugin,并绑定到Channel上
        FlutterPluginBatteryLevel plugin = new FlutterPluginBatteryLevel();

        final MethodChannel methodChannel = new MethodChannel (registrar. messenger(), METHOD_CHANNEL);
        methodChannel.setMethodCallHandler(plugin);

        final EventChannel eventChannel = new EventChannel(registrar.messenger(), EVENT_CHANNEL);
        eventChannel.setStreamHandler(plugin);
}FlutterActivity during the initialization of MethodChannel and EventChannel.MethodCallHandler, the handler of MethodChannel.EventChannel.StreamHandler, the handler of EventChannel.2) MethodCallHandler and EventChannel.StreamHandler
MethodCallHandler enables the Flutter app to call native APIs through the MethodChannel class. EventChannel.StreamHandler enables a native project to call the Flutter app through the EventChannel class.
public class FlutterPluginBatteryLevel implements MethodCallHandler, EventChannel.StreamHandler {

    /**
     * MethodCallHandler
     */
    @Override
    public void onMethodCall(MethodCall call, Result result) {
        if (call.method.equals("getBatteryLevel")) {
            Random random = new Random();
            result.success(random.nextInt(100));
        } else {
            result.notImplemented();
        }
    }

    /**
     * EventChannel.StreamHandler
     */
    @Override
    public void onListen(Object obj, EventChannel.EventSink eventSink) {
        BroadcastReceiver chargingStateChangeReceiver = createChargingState ChangeReceiver(events);
    }

    @Override
    public void onCancel(Object obj) {
    }

    private BroadcastReceiver createChargingStateChangeReceiver(final EventSink events) {
        return new BroadcastReceiver() {
            @Override
            public void onReceive(Context context, Intent intent) {
                int status = intent.getIntExtra(BatteryManager.EXTRA_STATUS, -1);

                if (status == BatteryManager.BATTERY_STATUS_UNKNOWN) {
                    events.error("UNAVAILABLE", "Charging status unavailable", null);
                } else {
                    boolean isCharging = status == BatteryManager.BATTERY_STATUS_CHARGING ||
                            status == BatteryManager.BATTERY_STATUS_FULL;
                    events.success(isCharging ? "charging" : "discharging");
                }
            }
        };
    }
}
Use the following three methods to establish a bridge:
MethodCallHandler:
1) public void onMethodCall(MethodCall call, Result result);
EventChannel.StreamHandler:
2) public void onListen(Object obj, EventChannel.EventSink eventSink);
3) public void onCancel(Object obj);
1) Register a plug-in
/**
 * Channel名称:必须与Flutter App的Channel名称一致
 */
#define METHOD_CHANNEL "samples.flutter.io/battery";
#define EVENT_CHANNEL "samples.flutter.io/charging";

@implementation AppDelegate

- (BOOL)application:(UIApplication*)application didFinishLaunchingWithOptions:(NSDictionary*)launchOptions {
    /**
      * 注册Plugin
      */
    [GeneratedPluginRegistrant registerWithRegistry:self];

    /**
      * FlutterViewController
      */
    FlutterViewController* controller = (FlutterViewController*)self.window. rootViewController;

    /**
      * FlutterMethodChannel & Handler
      */
    FlutterMethodChannel* batteryChannel = [FlutterMethodChannel methodChannelWithName:METHOD_CHANNEL binaryMessenger:controller];
    [batteryChannel setMethodCallHandler:^(FlutterMethodCall* call, FlutterResult result) {
        if ([@"getBatteryLevel" isEqualToString:call.method]) {
            int batteryLevel = [self getBatteryLevel];
            result(@(batteryLevel));
        } else {
            result(FlutterMethodNotImplemented);
        }
    }];

    /**
      * FlutterEventChannel & Handler
      */
    FlutterEventChannel* chargingChannel = [FlutterEventChannel eventChannelWithName:EVENT_CHANNEL binaryMessenger:controller];
    [chargingChannel setStreamHandler:self];

    return [super application:application didFinishLaunchingWithOptions:launchOptions];
}

@end
The plug-in registration process on iOS is the same on Android. The plug-in only needs to be registered with AppDelegate (FlutterAppDelegate).
Bind FlutterMethodChannel and FlutterEventChannel to FlutterViewController.
2) FlutterStreamHandler
@interface AppDelegate () <FlutterStreamHandler>

@property (nonatomic, copy)   FlutterEventSink     eventSink;

@end

- (FlutterError*)onListenWithArguments:(id)arguments eventSink:(FlutterEventSink)eventSink {
    self.eventSink = eventSink;

    // 监听电池状态
    [[NSNotificationCenter defaultCenter] addObserver:self
                                           selector:@selector(onBatteryStateDidChange:)
                                               name:UIDeviceBatteryStateDidChangeNotification
                                             object:nil];
    return nil;
}

- (FlutterError*)onCancelWithArguments:(id)arguments {
    [[NSNotificationCenter defaultCenter] removeObserver:self];
    self.eventSink = nil;
    return nil;
}

- (void)onBatteryStateDidChange:(NSNotification*)notification {
    if (self.eventSink == nil) return;
    UIDeviceBatteryState state = [[UIDevice currentDevice] batteryState];
    switch (state) {
            case UIDeviceBatteryStateFull:
            case UIDeviceBatteryStateCharging:
            self.eventSink(@"charging");
            break;
            case UIDeviceBatteryStateUnplugged:
            self.eventSink(@"discharging");
            break;
        default:
            self.eventSink([FlutterError errorWithCode:@"UNAVAILABLE"
                                           message:@"Charging status unavailable"
                                           details:nil]);
            break;
    }
}We already registered a plug-in, let's see how to load the plug-in to the Flutter app project.
The plug-in can be loaded to the Flutter app project as a package. Dart provides pub, a package management tool to manage packages. There are two types of packages: Dart packages only contain Dart code, such as the image viewer widget. Plug-in packages contain plug-ins whose Dart code can be used to call the native APIs implemented on Android and iOS, for example, the plug-in used to obtain the battery level of the device the app is running on.
pubspec.yaml file in the app root directory to manage dependencies.The packages can be managed as hosted packages, Git packages, and path packages.
You can publish a plug-in to pub.dartlang.org for more users.
1) Publish hosted packages
$flutter packages pub publish --dry-run
$flutter packages pub publish
2) Load hosted packages. Edit the pubspec.yaml file:
dependencies:
url_launcher: ^3.0.0If the code does not need to be frequently modified or if you do not want others to modify it, you can use Git to manage it. Create a plug-in (flutter_remote_package), upload it to Git, and then tag it.
// cd 到 flutter_remote_package
flutter_remote_package $:git init
flutter_remote_package $:git remote add origin git@gitlab.alibaba-inc. com:churui/flutter_remote_package.git
flutter_remote_package $:git add .
flutter_remote_package $:git commit
flutter_remote_package $:git commit -m"init"
flutter_remote_package $:git push -u origin master
flutter_remote_package $:git tag 0.0.1
Load Git packages and edit pubspec.yaml :
dependencies:
 flutter_remote_package:
  git:
   url: git@gitlab.alibaba-inc.com:churui/flutter_remote_package.git
   ref: 0.0.1
In the preceding information, ref can specify a commit, branch, or tag.
If there are no special requirements on scenarios, you can save the code to a local path to facilitate development and debugging.
Create the plugins folder in the flutter_app root directory of the Flutter app project and move the flutter_plugin_batterylevel plug-in to plugins, as shown in Figure 2-6.

Figure 2-6
Load path packages and edit pubspec.yaml :
dependencies:
  flutter_plugin_batterylevel:
path: plugins/flutter_plugin_batterylevelA dependency has been added to pubspec.yaml. However, no plug-in is displayed when an iOS project is started. Run the "pod install" or "pod update" command.
@implementation AppDelegate

- (BOOL)application:(UIApplication *)application didFinishLaunchingWithOptions: (NSDictionary *)launchOptions {
  // Plugin注册方法
  [GeneratedPluginRegistrant registerWithRegistry:self];

  // 显示Window
  self.window = [[UIWindow alloc] initWithFrame:[[UIScreen mainScreen] bounds]];
    [self.window setRootViewController:[[FlutterViewController alloc] initWithNibName:nil bundle:nil]]];
  [self.window setBackgroundColor:[UIColor whiteColor]];
  [self.window makeKeyAndVisible];

  return [super application:application didFinishLaunchingWithOptions: launchOptions];
}

@end
By default, [GeneratedPluginRegistrant registerWithRegistry:self] is registered with self.window.rootViewController. Therefore, initialize rootViewController before registering a plug-in.
A native project fails to call the Flutter app after the Flutter app is started.
This is because it takes about 1.5s to initialize the plug-in channel and this is an asynchronous process. Although the Flutter page is displayed, the plug-in channel initialization has not been completed. Therefore, the native project fails to call the Flutter app.
The Xianyu homepage is a native page. However, the rootViewController of the Window is not FlutterViewController and the plug-in registration will fail. The plug-in must be registered with the specified FlutterViewController.
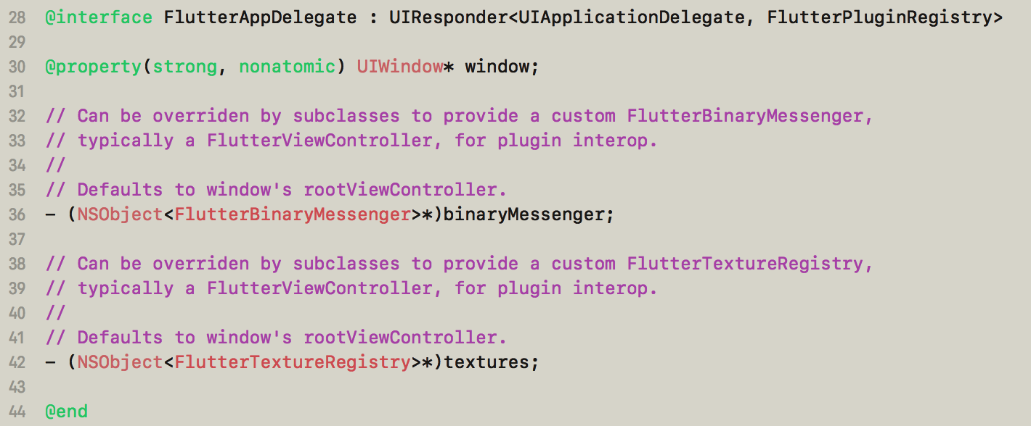
- (NSObject<FlutterBinaryMessenger>*)binaryMessenger;
- (NSObject<FlutterTextureRegistry>*)textures;
We need to rewrite the preceding two methods in AppDelegate to return the specified FlutterViewController in the methods.
As the UI framework of the application layer, Flutter depends on native and needs to call native APIs in many scenarios.
When a plug-in method is called, complex parameters may be passed (sometimes objects are passed.) However, the parameters of a plug-in are binary data serialized in JSON format. Therefore, the parameters must be serializable in JSON format. There should be an object mapping layer to support object passing.
A plug-in can pass textures. Xianyu uses a native player to play Flutter videos and passes the textures to the Flutter app.
Flutter Analysis and Practice: Using Hybrid Stack Framework for Development
Flutter Analysis and Practice: Same Layer External Texture Rendering

56 posts | 4 followers
FollowXianYu Tech - September 11, 2020
XianYu Tech - September 2, 2020
XianYu Tech - September 2, 2020
XianYu Tech - September 3, 2020
Alibaba Tech - June 4, 2019
XianYu Tech - September 2, 2020

56 posts | 4 followers
Follow Alibaba Cloud Flow
An enterprise-level continuous delivery tool.
Learn More Mobile Testing
Provides comprehensive quality assurance for the release of your apps.
Learn More mPaaS
mPaaS
Help enterprises build high-quality, stable mobile apps
Learn More Storage Capacity Unit
Plan and optimize your storage budget with flexible storage services
Learn MoreMore Posts by XianYu Tech