This article describes how to build a WordPress website on a Windows Elastic Compute Service (ECS) instance.
1. A Windows instance is created and deployed with the Web environment. The following software versions are used in this tutorial:
Note: If you use software versions different from the preceding versions, you may need to modify parameter settings.
2. A security group rule is added to a security group of the Windows instance to open port 80 and port 3389. For more information, see Add a security group rule.
1. Connect to the ECS instance that is deployed with the web environment and download the WordPress installation package.
a) Connect to the instance. For more information, see Connect to a Windows instance by using a password or key.
b) Download the WordPress installation package from the official WordPress website. WordPress 5.3.2 is used in this tutorial.
Note: If you download WordPress on an ECS instance that is located in a region inside the Chinese mainland and the 429 Too Many Requests error is reported, we recommend that you try multiple times or download the WordPress installation package from a third-party website.
c) Decompress the WordPress installation package. In this tutorial, the WordPress installation package is decompressed to C:\wordpress.
2. Create a MySQL database for the WordPress website that you want to build.
a) Go to the bin folder in the MySQL installation directory, right-click a blank area when you press and hold the Shift key, and then select Open command window here.
b) Log on to MySQL.
mysql -u root -pc) Create a database for the WordPress website. In this tutorial, a database named wordpress is created for the WordPress website.
create database wordpress;3. Configure the WordPress website.
a) In the C:\wordpress directory, find the wp-config-sample.php file, copy the file, and name the file copy wp-config.php.
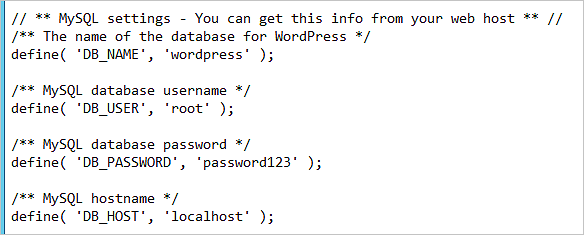
b) Use the text editor to open the wp-config.php file and modify information related to the wordpress database.
The following figure provides an example.

c) Save the wp-config.php file.
4. Add the WordPress website to Server Manager.
a) Find the Server Manager icon in the Windows taskbar and open Server Manager.

b) In the top menu bar of the Server Manager window, choose Tools > Internet Information Services (IIS) Manager.
c) In the Connections pane, choose <ECS instance name> > Sites.
d) Delete the website that is bound to port 80, or change the port number from 80 to an unused port number, such as 8080.

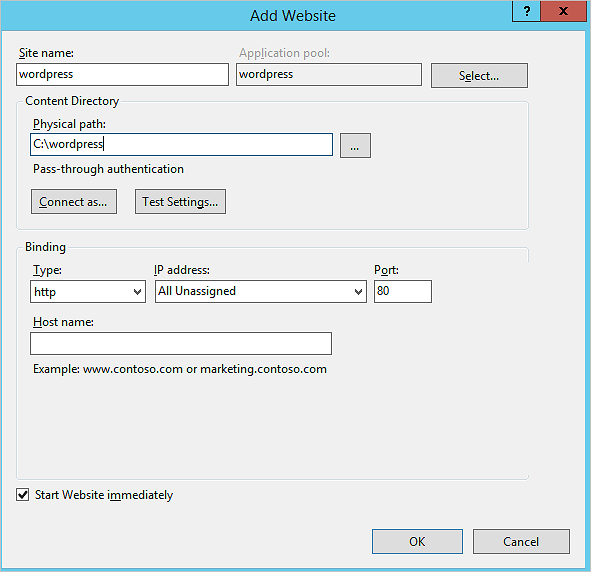
e) In the right-side Actions pane, click Add Website to add the WordPress website.
The following figure provides an example.

Take note of the following parameters:
wordpress.C:\wordpress.5. Install WordPress and log on to the WordPress website.
a) Visit http://localhost/ from the ECS instance. The WordPress installation page is displayed.
b) Enter basic information of the website and click Run the installation.
Take note of the following parameters:
c) Click Install Wordpress.
d) Enter the username and password that are used to install WordPress and click LOGIN.
You are logged on to your WordPress website.
If you allow users to access your WordPress website by using the public IP address of the ECS instance, the security of the ECS instance is compromised. If you have a domain name or need to register a domain name for your WordPress website, perform the following steps. In this example, the domain name www.example.com is registered.
1. Register a domain name.
For more information, see How to register a domain name on Alibaba Cloud.
2. Apply for an Internet Content Provider (ICP) filing for the domain name.
If the website of your domain name is hosted on an ECS instance that is located in a Chinese mainland region, apply for an ICP filing.
3. Resolve the domain name to the public IP address of the ECS instance.
Domain name resolution is a prerequisite for using domain names to access your website. For more information, see Get started with Alibaba Cloud DNS.
4. Return to the ECS instance on which the WordPress website is deployed. Go to the bin folder in the MySQL installation directory, right-click a blank area when you press and hold the Shift key, and then select Open command window here.
5. Log on to MySQL.
mysql -u root -p6. Switch to the wordpress database.
use wordpress;7. Replace http://localhost/ with the new domain name.
update wp_options set option_value = replace(option_value, 'http://localhost', 'http://www.WordPress.EcsQuickStart.com') where option_name = 'home' OR option_name = 'siteurl';The new domain name is configured for your WordPress website.
Build a Drupal Website Based on an Alibaba Cloud Marketplace Image
Alibaba’s DingTalk Hits 700M Users and Unveils AI Agent to Boost Workspace Productivity

1,345 posts | 475 followers
FollowAlibaba Clouder - July 20, 2018
Alibaba Clouder - August 22, 2018
Alibaba Clouder - August 20, 2020
Alibaba Clouder - September 2, 2020
Alibaba Cloud Serverless - June 28, 2022
Alibaba Clouder - August 14, 2019

1,345 posts | 475 followers
Follow ECS(Elastic Compute Service)
Elastic and secure virtual cloud servers to cater all your cloud hosting needs.
Learn More Elastic High Performance Computing Solution
High Performance Computing (HPC) and AI technology helps scientific research institutions to perform viral gene sequencing, conduct new drug research and development, and shorten the research and development cycle.
Learn More Elastic High Performance Computing
A HPCaaS cloud platform providing an all-in-one high-performance public computing service
Learn More Elastic Desktop Service
A convenient and secure cloud-based Desktop-as-a-Service (DaaS) solution
Learn MoreMore Posts by Alibaba Cloud Community