By Alex, Alibaba Cloud Community Blog author
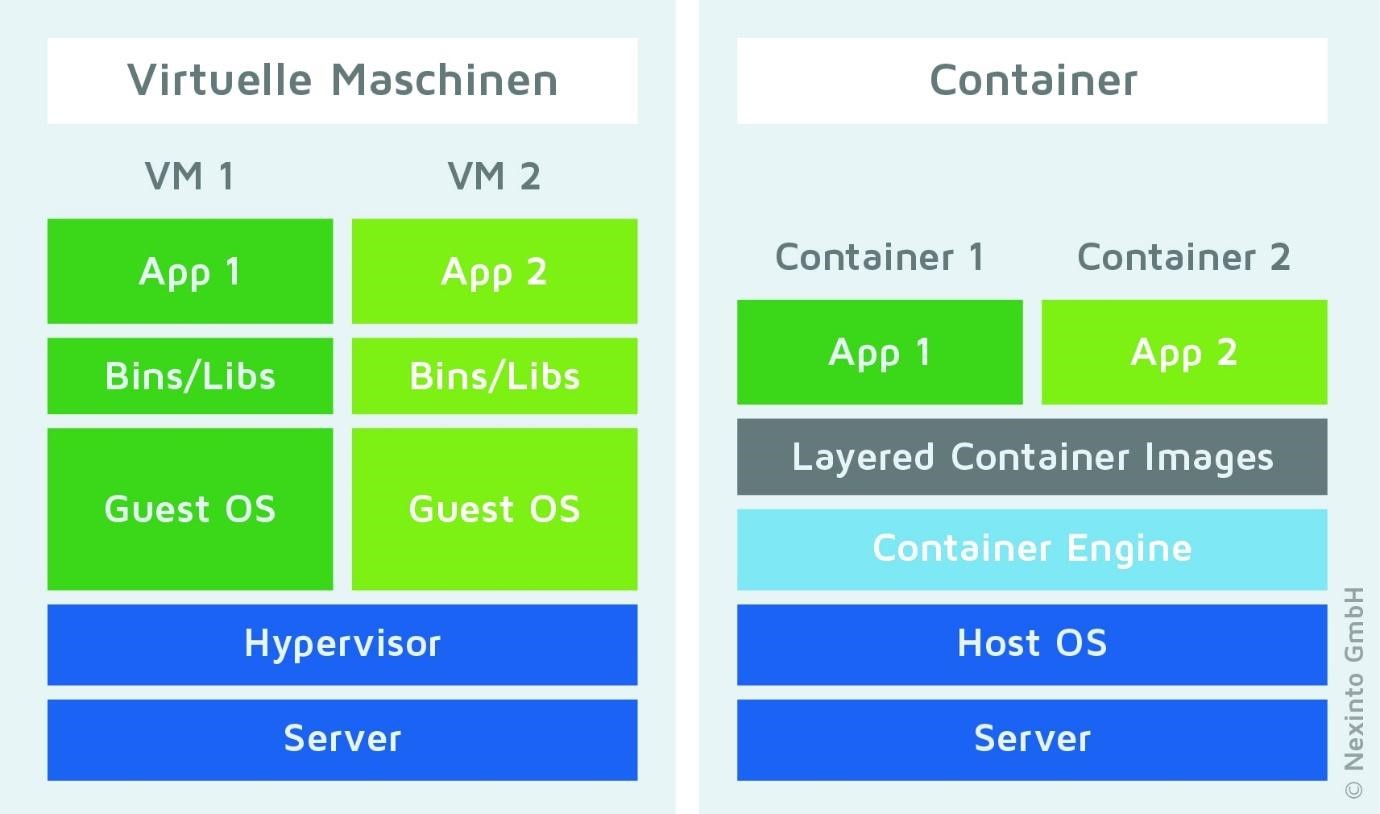
The concept of application containerization requires isolating application instances on the same operating system. It is different from virtual machines as applications share the operating system (OS) kernel. Containers run across different operating systems and diverse infrastructure such as bare-metal, virtual private server (VPS), and cloud platforms.
A container has files, an environment, plugins, and libraries that enable an isolated software instance to run. Collectively, these components constitute an image that is independently executable on the kernel. Images are deployed on hosts and since several containers run on the same resource, they are more effective than virtual machines. Docker is one of the most popular containerization tools available today and RKT container engine is equally famous. These two technologies are based on universal runtime (runC) and app container (appc) respectively. Docker Engine is an open-source containerization technology available on most operating systems. Interaction with containerization may subsequently lead you towards Docker. While there are vendor-specific tools available, most organizations choose portable open-source tools with a large user base.
The image below shows the architecture:

Source: Nexinto
As a developer, you may want to introduce new code into Docker images and use a reliable, consistent method of creating images. Dockerfile provides a declarative and consistent method of creating Docker images. Further, you may want to containerize multiple heterogeneous containers. This tutorial gives you a walkthrough of the basics of containerization, building Docker images from Dockerfiles and container networking.
Requirements
For this tutorial, we shall require the following:
Dockerfiles are simple text-based files with a list of commands and executing such commands using the Docker command line creates a specific image.
The Docker build command evaluates the specified software versions required for image creation. Kindly note to place a Dockerfile in its own directory instead of the root directory.
Dockerfile Commands
Let's take a quick look at the list of various Dockerfile commands:
Build An Image From A Dockerfile
Now, let's create a Dockerfile and then build a Docker image.
mkdir dockerfiles
cd dockerfiles
For this article, we will use a sample Dockerfile
First, create a file as shown below.
sudo nano mysqlNext, paste the below text in the file and save.
FROM debian:stretch-slim


    # add our user and group first to make sure their IDs get assigned consistently, regardless of whatever dependencies get added
    RUN groupadd -r mysql && useradd -r -g mysql mysql


    RUN apt-get update && apt-get install -y --no-install-recommends gnupg dirmngr && rm -rf /var/lib/apt/lists/*


    # add gosu for easy step-down from root
    ENV GOSU_VERSION 1.7
    RUN set -x \
        && apt-get update && apt-get install -y --no-install-recommends ca-certificates wget && rm -rf /var/lib/apt/lists/* \
        && wget -O /usr/local/bin/gosu "https://github.com/tianon/gosu/releases/download/$GOSU_VERSION/gosu-$(dpkg --print-architecture)" \
        && wget -O /usr/local/bin/gosu.asc "https://github.com/tianon/gosu/releases/download/$GOSU_VERSION/gosu-$(dpkg --print-architecture).asc" \
        && export GNUPGHOME="$(mktemp -d)" \
        && gpg --batch --keyserver ha.pool.sks-keyservers.net --recv-keys B42F6819007F00F88E364FD4036A9C25BF357DD4 \
        && gpg --batch --verify /usr/local/bin/gosu.asc /usr/local/bin/gosu \
        && gpgconf --kill all \
        && rm -rf "$GNUPGHOME" /usr/local/bin/gosu.asc \
        && chmod +x /usr/local/bin/gosu \
        && gosu nobody true \
        && apt-get purge -y --auto-remove ca-certificates wget


    RUN mkdir /docker-entrypoint-initdb.d


    RUN apt-get update && apt-get install -y --no-install-recommends \
    # for MYSQL_RANDOM_ROOT_PASSWORD
            pwgen \
    # FATAL ERROR: please install the following Perl modules before executing /usr/local/mysql/scripts/mysql_install_db:
    # File::Basename
    # File::Copy
    # Sys::Hostname
    # Data::Dumper
            perl \
    # mysqld: error while loading shared libraries: libaio.so.1: cannot open shared object file: No such file or directory
            libaio1 \
    # mysql: error while loading shared libraries: libncurses.so.5: cannot open shared object file: No such file or directory
            libncurses5 \
        && rm -rf /var/lib/apt/lists/*


    ENV MYSQL_MAJOR 5.5
    ENV MYSQL_VERSION 5.5.62


    RUN apt-get update && apt-get install -y ca-certificates wget --no-install-recommends && rm -rf /var/lib/apt/lists/* \
        && wget "https://cdn.mysql.com/Downloads/MySQL-$MYSQL_MAJOR/mysql-$MYSQL_VERSION-linux-glibc2.12-x86_64.tar.gz" -O mysql.tar.gz \
        && wget "https://cdn.mysql.com/Downloads/MySQL-$MYSQL_MAJOR/mysql-$MYSQL_VERSION-linux-glibc2.12-x86_64.tar.gz.asc" -O mysql.tar.gz.asc \
        && apt-get purge -y --auto-remove ca-certificates wget \
        && export GNUPGHOME="$(mktemp -d)" \
    # gpg: key 5072E1F5: public key "MySQL Release Engineering <mysql-build@oss.oracle.com>" imported
        && gpg --batch --keyserver ha.pool.sks-keyservers.net --recv-keys A4A9406876FCBD3C456770C88C718D3B5072E1F5 \
        && gpg --batch --verify mysql.tar.gz.asc mysql.tar.gz \
        && gpgconf --kill all \
        && rm -rf "$GNUPGHOME" mysql.tar.gz.asc \
        && mkdir /usr/local/mysql \
        && tar -xzf mysql.tar.gz -C /usr/local/mysql --strip-components=1 \
        && rm mysql.tar.gz \
        && rm -rf /usr/local/mysql/mysql-test /usr/local/mysql/sql-bench \
        && rm -rf /usr/local/mysql/bin/*-debug /usr/local/mysql/bin/*_embedded \
        && find /usr/local/mysql -type f -name "*.a" -delete \
        && apt-get update && apt-get install -y binutils && rm -rf /var/lib/apt/lists/* \
        && { find /usr/local/mysql -type f -executable -exec strip --strip-all '{}' + || true; } \
        && apt-get purge -y --auto-remove binutils
    ENV PATH $PATH:/usr/local/mysql/bin:/usr/local/mysql/scripts


    # replicate some of the way the APT package configuration works
    # this is only for 5.5 since it doesn't have an APT repo, and will go away when 5.5 does
    RUN mkdir -p /etc/mysql/conf.d \
        && { \
            echo '[mysqld]'; \
            echo 'skip-host-cache'; \
            echo 'skip-name-resolve'; \
            echo 'datadir = /var/lib/mysql'; \
            echo '!includedir /etc/mysql/conf.d/'; \
        } > /etc/mysql/my.cnf


    RUN mkdir -p /var/lib/mysql /var/run/mysqld \
        && chown -R mysql:mysql /var/lib/mysql /var/run/mysqld \
    # ensure that /var/run/mysqld (used for socket and lock files) is writable regardless of the UID our mysqld instance ends up having at runtime
        && chmod 777 /var/run/mysqld


    VOLUME /var/lib/mysql


    COPY docker-entrypoint.sh /usr/local/bin/
    RUN ln -s usr/local/bin/docker-entrypoint.sh /entrypoint.sh # backwards compat
    ENTRYPOINT ["docker-entrypoint.sh"]


    EXPOSE 3306
    CMD ["mysqld"]
Run the command below to establish the path to the Dockerfile.
pwdRun the following command inside the directory containing Dockerfile.
docker build -t IMAGE_NAME .Make sure to rename the image appropriately. Till now, we know how to build a single container. However, it's a very basic concept and doesn't suffice advance use cases. The next section introduces Docker Compose which adds to the advancement of the concept.
Docker Compose helps to create and run a multiple container application. Follow the steps below to use Docker Compose:
Dockerfile defining the environment variables for your appdocker-compose.yml file defining your app services variablesdocker-compose up to run the applicationMoving ahead, let's explore the use of Docker Compose files. Here's a sample docker-compose.yml file:
version: "2"
 services:
redis-master:
image: redis:latest
ports:
- "6379"
redis-slave:
image: gcr.io/google_samples/gb-redisslave:v1
ports:
- "6379"
environment: - GET_HOSTS_FROM=dns
frontend:
image: gcr.io/google-samples/gb-frontend:v3
ports:
- "80:80"
environment:
- GET_HOSTS_FROM=dns
A Docker Compose file maintains configurations for creating containers to reuse whenever possible. Furthermore, to ensure data integrity while isolating environments, unique build numbers are used, if necessary, to maintain and reassign volumes to the new containers.
Docker networking configurations enable container isolation for security. By default, Docker installs the bridge, none, and host networks upon installation. A container may use any of the installed networks if it is specified using the --net flag.
You can create more networks if you wish and assign containers to them. Networks also facilitate container communication both within and across them, as long as the container is connected to all the required networks.
Run the command below to create a new network:
sudo docker network create sample_netExecute the following command to get a list of available networks.
docker network lsThe output shows the following list of networks.
NETWORK ID          NAME                DRIVER              SCOPE
7bb95b5aba4f        bridge              bridge              local
d3e1851dfab4        host                host                local
71ef04fce6c4        none                null                local
cef39ad3d250        sample_net          bridge              local
Run the following command for assigning a container to a network.
docker run container --net=sample_netInspect the containers connected to a network using the below command.
docker inspect <network_name>Now, let's explore three types of networking.
Host mode networking in Docker allows exposure of containers on the public network since they inherit the host IP.
Refer to the file below:
docker run -d --net=host ubuntu:18.04 tail -f /dev/null
ip addr | grep -A 2 eth0:
2: eth0: <BROADCAST,MULTICAST,UP,LOWER_UP> mtu 9001 qdisc mq state UP group default qlen 1000
    link/ether 06:58:2b:07:d5:f3 brd ff:ff:ff:ff:ff:ff
    inet **192.168.7.10**/22 brd 192.168.100.10 scope global dynamic eth0

docker ps
CONTAINER ID  IMAGE         COMMAND  CREATED
STATUS        PORTS         NAMES
dj33dd5d9023  ubuntu:18.04  tail -f  2 seconds ago
Up 2 seconds                jovial_blackwell
docker exec -it dj33dd5d9023 ip addr
2: eth0: <BROADCAST,MULTICAST,UP,LOWER_UP> mtu 9001 qdisc mq state UP group default qlen 1000
    link/ether 06:58:2b:07:d5:f3 brd ff:ff:ff:ff:ff:ff
    inet **192.168.7.10**/22 brd 192.168.100.10 scope global dynamic eth0
Container networking is a default mode in Docker but it also allows customization of network stacks for containers which is highly suitable for Kubernetes. As mentioned earlier, it is possible to link containers to the same network. Refer to the following code:
docker run -d -P --net=bridge nginx:1.9.1

docker run -it --net=container:admiring_engelbart ubuntu:14.04 ip addr
...
8: eth0@if9: <BROADCAST,MULTICAST,UP,LOWER_UP> mtu 9001 qdisc noqueue state UP group default
    link/ether 02:42:ac:11:00:03 brd ff:ff:ff:ff:ff:ff
inet **172.17.0.3**/16 scope global eth0Docker no-networking mode allows turning off networking. In this scenario, containers are placed in their own networks but without any configurations, thus disabling them as shown below.
docker run -d -P --net=none nginx:1.9.1
docker ps
CONTAINER ID  IMAGE          COMMAND   CREATED
STATUS        PORTS          NAMES
h7c55d90563f  nginx:1.9.1    nginx -g  2 minutes ago
Up 2 minutes                 grave_perlman
docker inspect h7c55d90563f | grep IPAddress
    "IPAddress": "",
"SecondaryIPAddresses": null,In a preceding section, we discussed the Docker Compose configuration. Now, let's take a look at how to scale services defined in the docker-compose.ymlfile.
docker-compose scale <service name> = <no of instances>For the above compose file, execute any of the following commands.
docker-compose scale redis-master=4or
docker-compose up --scale redis-master=4 -dExecute the following commands to assign a range of ports for the services.
services:
redis-master:
image: redis:latest
ports: - "6379-6385:6379"
With this, you will successfully scale the services defined in the docker-compose.yml file.
This tutorial has explored the concepts of containerization with emphasis on the two methods of building container images- Dockerfiles and Docker Compose. Kubernetes is closely aligned with containerization, primarily for microservices and distributed applications. In a microservice architecture, APIs enable the communication of different services while the container layers handle load distribution. Kubernetes has pods that communicate with each other and are used for hosting microservices. Both Dockerfiles and Docker Compose are declarative mechanisms of building Docker applications. The article also throws some light on how to scale services using Docker Compose.
Alibaba Cloud provides a reliable platform to test different containerization technologies.
Don't have an Alibaba Cloud account? Sign up for an account and try over 40 products for free worth up to $1200. Get Started with Alibaba Cloud to learn more.
Alibaba Cloud Native - July 14, 2023
Alibaba System Software - August 6, 2018
Alibaba Clouder - February 26, 2021
Alibaba Clouder - February 18, 2019
Alibaba Cloud Native - May 11, 2022
Farruh - March 29, 2023
 ACK One
Provides a control plane to allow users to manage Kubernetes clusters that run based on different infrastructure resources
Learn More Container Service for Kubernetes
Alibaba Cloud Container Service for Kubernetes is a fully managed cloud container management service that supports native Kubernetes and integrates with other Alibaba Cloud products.
Learn More Container Registry
A secure image hosting platform providing containerized image lifecycle management
Learn More Cloud-Native Applications Management Solution
Accelerate and secure the development, deployment, and management of containerized applications cost-effectively.
Learn MoreMore Posts by Alex