All Products
Search
Document Center

ApsaraDB RDS:Upgrade an ApsaraDB RDS for SQL Server instance with local disks from SQL Server 2008 R2 to SQL Server 2012 or SQL Server 2016

更新時間:Nov 07, 2024

This topic describes how to upgrade an ApsaraDB RDS for SQL Server instance with local disks from SQL Server 2008 R2 to SQL Server 2012 or SQL Server 2016. During the upgrade, you can also migrate the RDS instance across zones.

Prerequisites

Your RDS instance meet the following conditions:

Usage notes

  • After the upgrade is complete, your RDS instance cannot be rolled back to an earlier major engine version.

    Warning

    Before you start the upgrade, we recommend that you create a temporary RDS instance that runs the required SQL Server version and use the temporary RDS instance to test the compatibility with your workloads. For more information, see Upgrade an ApsaraDB RDS for SQL Server instance with local disks from SQL Server 2008 R2 to SQL Server 2012 or SQL Server 2016.

  • You can upgrade your RDS instance with local disks from SQL Server 2008 R2 to the following versions:

    • SQL Server 2012 EE

    • SQL Server 2016 SE

    • SQL Server 2016 EE

    Note

    If you upgrade your RDS instance to SQL Server 2012 EE or SQL Server 2016 EE, the TDE feature remains available. If you upgrade your RDS instance to SQL Server 2016 SE, the TDE feature becomes unavailable.

  • After the upgrade is complete, you must switch over your workloads. The downtime caused by the switchover varies based on the data volume of your RDS instance. In most cases, the switchover requires approximately 20 minutes. We recommend that you switch over your workloads during the specified maintenance window. Make sure that your application is configured to automatically reconnect to your RDS instance.

  • Do not use the default virtual private cloud (VPC) or vSwitch for the upgrade. You must configure a VPC and a vSwitch based on your business requirements.

  • During the upgrade, we recommend that you do not modify metadata of your RDS instance. Otherwise, data inconsistency issues may occur after the upgrade. For example, we recommend that you do not create databases, delete databases, or modify the recovery models of databases.

Impacts

  • If you start an upgrade task on your RDS instance, you cannot cancel the upgrade task. After the upgrade is complete, your RDS instance cannot be rolled back to the earlier major engine version.

  • The settings of your RDS instance, such as the instance name, port, tags, and database accounts, remain unchanged after the upgrade.

  • The period of time that is required to complete the upgrade varies based on the data volume of your RDS instance. For more information, see FAQ.

  • In most cases, the upgrade requires workload switchover, which may cause your RDS instance to be unavailable for approximately 20 minutes. Make sure that your application is configured to automatically reconnect to your RDS instance. For more information, see FAQ.

  • The upgrade changes the virtual IP address (VIP) of your RDS instance. We recommend that you use the endpoint of the RDS instance instead of the IP address to connect your application to the instance.

  • After the upgrade, we recommend that you immediately delete the cached DNS records from the database client. If the database client runs on a Java virtual machine (JVM), we recommend that you set the time-to-live (TTL) in the JVM configuration to 60 seconds or less. This way, if the VIP that is bound to the in-use endpoint of your RDS instance changes, your application can query the related DNS records to obtain the new VIP. Then, your application can connect to the new VIP.

    Note

    The following TTL-setting methods are provided for reference:

    • For all JVM-based applications, set the networkaddress.cache.ttl parameter in the $JAVA_HOME/jre/lib/security/java.security file to 60.

    • For local applications, configure the networkaddress.cache.ttl java.security.Security.setProperty("networkaddress.cache.ttl" , "60"); setting in the initialization code of local applications. The configuration must be completed before you call the InetAddress.getByName() function for the first time to establish a network connection.

  • If your RDS instance has an ongoing Data Transmission Service (DTS) task, you must re-configure and start the DTS task after the upgrade is complete. For more information, see What is DTS?

Billing rules

You are charged fees for the upgrade. The fees displayed on the purchase page shall prevail. For more information about the upgrade fees, see Specification changes.

Procedure

  1. Log on to the ApsaraDB RDS console and go to the Instances page. In the top navigation bar, select the region in which the RDS instance resides. Then, find the RDS instance and click the instance ID.

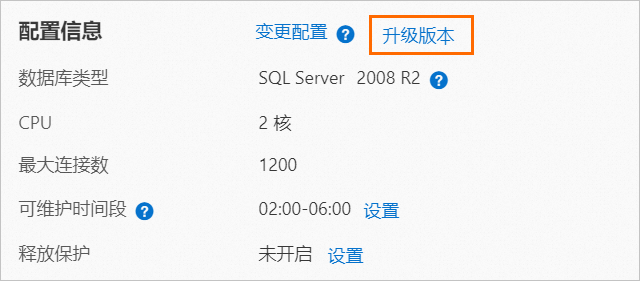
  2. In the Configuration Information section of the Basic Information page, click Upgrade Version. In the message that appears, click OK.

    image.png

  3. On the Upgrade Engine Version page, configure the following parameters.

    Parameter

    Description

    Upgrade To

    Select the required SQL Server version. Valid values of the Edition, Storage Type, and Instance Type parameters vary based on the selected SQL Server version.

    Edition

    Select High-availability Edition. In RDS High-availability Edition, the database system consists of a primary RDS instance and a secondary RDS instance. These instances work in high availability mode to achieve balanced performance in all aspects.

    Storage Type

    Select PL1 ESSD. An enhanced SSD (ESSD) is an ultra-high performance disk that is designed by Alibaba Cloud based on the next-generation distributed block storage architecture. ESSDs deliver ultra high storage performance. ESSDs are integrated with 25 Gigabit Ethernet and remote direct memory access (RDMA) technologies. ESSDs can help you reduce one-way latencies and process up to 1 million read and write requests at random per second. For more information, see Storage types.

    Zone

    Select the required zone. Multi-zone Deployment or Single-zone Deployment is supported.

    Note
    • If your database system consists of primary and secondary RDS instances, we recommend that you select Multi-zone Deployment to implement cross-zone disaster recovery.

    • If you select Multi-zone Deployment, you must manually select the Zone of Secondary Node instead of retaining the default zone.

    Instance Type

    Select an instance type. Each instance type provides a specific number of CPU cores, memory capacity, maximum number of connections, and maximum IOPS. For more information, see Instance families and Primary ApsaraDB RDS instance types.

    Network Type

    Select VPC.

    • If your RDS instance is connected over the classic network before the upgrade, you can change its network type to VPC and configure a vSwitch.

    • If your RDS instance is connected over a VPC or can be connected over both the classic network and a VPC before the upgrade, you cannot change its VPC. However, you can change the vSwitch. The available vSwitches vary based on the values of the Zone and VPC parameters.

    VPC

    Select the required VPC.

    Note

    Do not use the default VPC. You must manually select a VPC based on your business requirements.

    VSwitch of Primary Node

    Select the required vSwitch. If you select multiple zones for your RDS instance, you must select VSwitch of Secondary Node.

    Note

    If your RDS instance is connected over the classic network, do not use the default vSwitch. You must manually select a vSwitch based on your business requirements. If your RDS instance is connected over a VPC or can be connected over both the classic network and a VPC, you cannot change its VPC. However, you can change its vSwitch.

    Switching Time

    • Select the time when you want to switch your workloads. Switch Immediately After Data Migration: Data is migrated and workloads are switched over immediately.

    • Switch Within Maintenance Window: Data is migrated immediately, and workloads are switched over during the specified maintenance window.

    • Take Effect at Specified Time Range: Data is migrated immediately, and workloads are switched over at a specified point in time. The specified point in time must be at least 12 hours later than the current time.

  4. Read and select Terms of Service and click Pay Now.

  5. In the message that appears, click Agree and Place Order.

    The status of the original RDS instance changes to Upgrading/Downgrading > Upgrading Across Networks. If the status of the original RDS instance changes to Running, the upgrade is complete. The time that is required to complete the upgrade varies based on the amount of data.

FAQ about upgrades

What do I do if I cannot find the Upgrade Version button on the Basic Information page in the ApsaraDB RDS console?

Check whether the prerequisites are met. For example, check whether TDE is enabled for your RDS instance or whether your RDS instance has a temporary instance. For more information, see Prerequisites.

Change the endpoints of your RDS instance

After the upgrade, your RDS instance resides in a VPC. The following table describes how to change the endpoints of your RDS instance after the upgrade based on the original network type of your RDS instance.

Original network type

Change rule

Classic network

After the upgrade, your RDS instance is connected over both the classic network and a VPC:

  • The original classic network endpoint remains available and never expires.

  • A VPC endpoint is generated for your RDS instance based on the specified VPC.

VPC

A VPC endpoint is generated for your RDS instance based on the specified VPC. This endpoint replaces the original VPC endpoint of your RDS instance.

Classic network and VPC

After the upgrade, your RDS instance is connected over both the classic network and a VPC. The original classic network endpoint and the original VPC endpoint remain available. The expiration time of the classic network endpoint remains unchanged.

Create a temporary RDS instance that runs the required SQL Server version

Before you start the upgrade, we recommend that you create a temporary RDS instance that runs the required SQL Server version and use the temporary RDS instance to test the compatibility with your workloads.

Note

You can create the temporary RDS instance only for an RDS instance that runs SQL Server 2008 R2 with TDE and SSL disabled. For more information, see Configure TDE and Configure SSL encryption for an ApsaraDB RDS for SQL Server instance.

  1. Log on to the ApsaraDB RDS console and go to the Instances page. In the top navigation bar, select the region in which the RDS instance resides. Then, find the RDS instance and click the instance ID.

  2. In the left-side navigation pane, click Backup and Restoration.

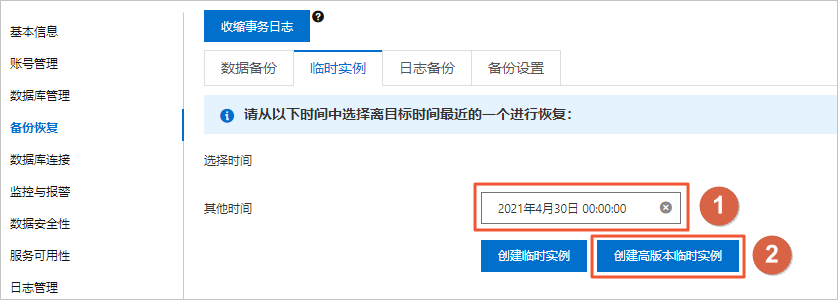
  3. On the Temporary Instance tab, specify the point in time at which you want to clone data and click Create Temporary Instance of Higher Version.选择高版本临时实例

  4. Configure the following parameters.

    Parameter

    Description

    Zone

    Select the zone in which you want to create the temporary RDS instance.

    Upgrade To

    Select the SQL Server version that the temporary RDS instance runs. Valid values:

    • SQL Server 2016 SE

    • SQL Server 2016 EE

    • SQL Server 2012 EE

    VPC

    Select the VPC to which the temporary RDS instance belongs. You must select the VPC of the Elastic Compute Service (ECS) instance to which you want to connect. Otherwise, the temporary RDS instance cannot communicate with the ECS instance over the internal network.

    vSwitch

    Select a vSwitch from the specified VPC.

    Note

    The system provides a default instance type and storage type for the temporary RDS instance. The temporary RDS instance is available for seven days. After the seven-day validity period elapses, the system releases the temporary RDS instance.

  5. Click OK.