Database Backup (DBS) provides the emergency recovery feature for ApsaraDB RDS for MySQL instances. This feature is developed based on copy data management (CDM). After you enable the sandbox feature of DBS, you can quickly create a temporary sandbox instance for emergency disaster recovery. This makes backup data available in a short period of time. Read and write operations that are performed on one sandbox instance do not affect data in other sandbox instances or source databases. A sandbox instance can be used in scenarios such as disaster recovery drills, development and testing, query and analysis, and emergency disaster recovery. This topic describes how to enable and use the emergency recovery feature.
This topic describes how to use the emergency recovery feature for an ApsaraDB RDS for MySQL instance. For more information about how to use the emergency recovery feature for a self-managed MySQL database, see Use the emergency recovery feature for a self-managed MySQL database.
For more information about the data restoration methods that are supported by ApsaraDB RDS for MySQL, see Overview of data restoration methods.
Prerequisites
Your RDS instance meets the following requirements:
The RDS instance runs MySQL 8.0, MySQL 5.7, MySQL 5.6, or MySQL 5.5.
The RDS instance runs RDS High-availability Edition.
The RDS instance uses local SSDs.
The RDS instance resides in one of the following regions: China (Hangzhou), China (Shanghai), China (Shenzhen), China (Heyuan), China (Chengdu), China (Beijing), China (Zhangjiakou), China (Hohhot), China (Ulanqab), China (Hong Kong), Singapore, Malaysia (Kuala Lumpur), Indonesia (Jakarta), Japan (Tokyo), Germany (Frankfurt), US (Silicon Valley), US (Virginia), and China East 1 Finance.
At least one physical backup is complete for the RDS instance in the ApsaraDB RDS console. For more information, see Use the automatic backup feature or Perform a manual backup.
Transparent Data Encryption (TDE) is disabled for the RDS instance. For more information about TDE, see Configure TDE.
PrivateLink is activated. For more information about how to activate PrivateLink in the console or by calling an operation, see Procedure or OpenPrivateLinkService.
You can go to the Basic Information page of your RDS instance to obtain the preceding information.
Feature description
Item | Description |
Restoration range | The entire RDS instance is restored. |
Points in time for data restoration |
|
Billing rules
You are charged based on the following billable items: CDM storage and sandbox instance.
Billable item | Description |
CDM storage | After you enable the sandbox feature of DBS for an RDS instance, the CDM storage is allocated for the RDS instance. DBS automatically synchronizes the data of the RDS instance to the CDM storage and generates snapshots for the data. DBS charges you based on the volume of the data that is stored in the CDM storage. For more information, see Sandbox storage fees. |
Temporary sandbox instance | After you create a temporary sandbox instance, DBS charges you based on the specifications and duration of the sandbox instance on an hourly basis. If you do not create temporary sandbox instances, you are not charged for sandbox instance resources. For more information, see Fees of temporary sandbox instances. |
If you enable the emergency recovery feature and the fast restoration feature for individual databases and tables for your ApsaraDB RDS for MySQL instance, you are charged CDM storage fees because the features are implemented based on the DBS sandbox feature. For more information, see Use the fast restoration for individual databases and tables feature If you want to disable the sandbox feature of DBS, you must disable the emergency recovery feature and the fast restoration feature for individual databases and tables to prevent related costs.
Step 1: Enable the sandbox feature
Before you create an RDS instance as a sandbox instance and restore data to the sandbox instance, you must perform the following operations to enable the sandbox feature and configure a sandbox policy in the DBS console:
Go to the Instances page. In the top navigation bar, select the region in which the RDS instance resides. Then, find the RDS instance and click the ID of the instance.
In the left-side navigation pane, click Backup and Restoration.
On the Backup and Restoration page, click the Crash Recovery tab. On the tab that appears, click Enable DBS Sandbox.
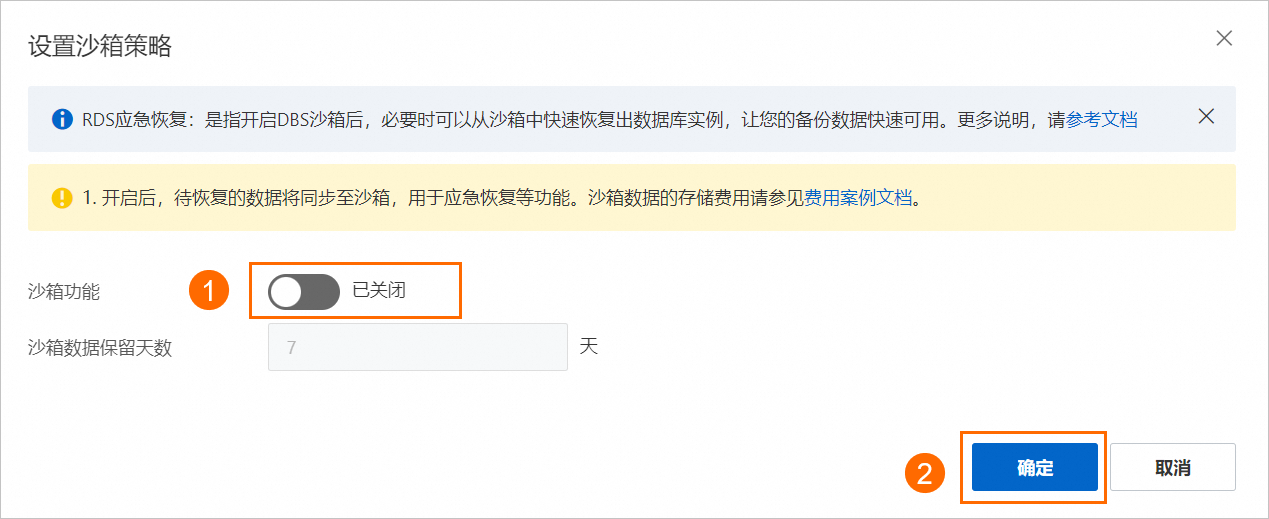
In the Set Sandbox Policy dialog box, configure the following parameters.
Parameter
Description
Sandbox Feature
Specifies whether to enable the sandbox feature. In this example, turn on Sandbox Feature.
Sandbox Data Retention Period
The number of days for which DBS retains the sandbox data or sandbox snapshots. By default, the sandbox data or sandbox snapshots are retained for seven days. The following information describes how to use the sandbox data or sandbox snapshots:
Your sandbox snapshots can be used after the sandbox snapshots are created. The system automatically deletes the snapshots after the retention period expires. When the system deletes a snapshot, only incremental snapshots are deleted. Incremental snapshots refer to the changes to the previous snapshot.
If the value of this parameter does not exceed the log retention period of your RDS instance, you can use sandbox snapshots to restore the data of your RDS instance to a point in time within the time range that the sandbox snapshots cover.
A longer retention period indicates that more storage resources are occupied and storage costs are higher.
If you want to retain only the most recent snapshot, set this parameter to 0.
Click OK.
After you enable the sandbox feature, the value of the Sandbox instance time range parameter changes to Data preparing. If you enable the sandbox feature for a backup schedule for the first time, DBS stores the latest full backup set to the sandbox storage and generates a snapshot that can be used to create sandbox instances. DBS requires a specific period of time to copy data. The period of time may be 5 to 20 minutes based on the size of the backup data.
After a specific time range is displayed as the value of the Sandbox instance time range parameter, you can create a temporary ApsaraDB RDS for MySQL instance and restore data to the temporary ApsaraDB RDS for MySQL instance.
The following table describes the values of the Sandbox instance time range parameter.
Sandbox state
Description
Sandbox feature disabled
The value of the Sandbox instance time range parameter is Unopened.
Preparation after you enable the sandbox feature
The value of the Sandbox instance time range parameter changes to Data preparing.
Preparation completed
The value of the Sandbox instance time range parameter changes to the time range in which available backup sets are created.
NoteThe time range is from the start time of the earliest backup to the end time of the latest backup.
Step 2: Restore data to the sandbox instance
This section describes how to restore data to a sandbox instance in a quick manner. Read and write operations that are performed on one sandbox instance do not affect data in other sandbox instances or source databases.
Go to the Instances page. In the top navigation bar, select the region in which the RDS instance resides. Then, find the RDS instance and click the ID of the instance.
In the left-side navigation pane, click Backup and Restoration.
On the Backup and Restoration page, click the Crash Recovery tab. On the tab that appears, click Enable DBS Sandbox.
Click Recover Sandbox Instance. In the dialog box that appears, configure the following parameters.
Section
Parameter
Description
Sandbox Instance Point in Time
Sandbox Data Time Range
The time range within which data can be restored. The available time range is from the point in time at which the first snapshot was created in the CDM storage to the current point in time. The actual available time range may be shorter.
NoteData can be restored within the time range from the point in time at which the first snapshot was created in CDM storage to the end time of the latest binary log file. Data may not be restored within the time range from the end time of the latest binary log file to the current point in time.
You can view the point in time when the latest binary log file was generated on the Base Backups > Log Backup tab of the Backup and Restoration page.
Recovery Method
Recovery by Snapshot Point in Time: You can select only the point in time when a snapshot was created. If you use this restoration method, the system takes less time to complete the restoration. This is the recommended value.
Recovery by Custom Point in Time: If the log backup feature is enabled, you can restore the data of your RDS instance to a point in time within the log backup retention period. The amount of time required for the restoration to complete varies based on the log size. If the log backup feature is disabled, you can restore the data to the point in time when the full backup was created. For more information about the log backup feature, see Use the log backup feature for an ApsaraDB RDS for MySQL instance.
NoteYou can specify a point in time to restore data only for an RDS instance that runs RDS High-availability Edition after you enable the log backup feature for the instance. For more information, see Use the log backup feature for an ApsaraDB RDS for MySQL instance.
Sandbox Instance Configurations
Specifications
The specifications of the sandbox instance that you want to create. Valid values:
1 Core, 1 GB Memory
1 Core, 2 GB Memory
2 Cores, 4 GB Memory
2 Cores, 8 GB Memory
4 Cores, 8 GB Memory
4 Cores, 16 GB Memory
8 Cores, 16 GB Memory
8 Cores, 32 GB Memory
The restoration speed does not vary with the specifications of sandbox instances. However, sandbox instances with higher specifications deliver better performance. For more information, see Fees of temporary sandbox instances.
Region
The region in which the sandbox instance resides. By default, the value of this parameter is fixed.
Peer VPC
The virtual private cloud (VPC) for the sandbox instance.
NoteIf you want to connect to the sandbox instance from an Elastic Compute Service (ECS) instances, you must set this parameter to the VPC in which the ECS instances reside. For more information about how to create a VPC, see Create and manage a VPC.
Peer vSwitch
The vSwitch for the sandbox instance. The sandbox instance can be accessed by using the CIDR block specified for the vSwitch.
Security Group
The security group that you want to use. You must select an advanced security group. Make sure that the security group allows traffic over port 3306. For more information, see Basic security groups and advanced security groups and Create a security group.
NoteThis parameter is displayed only if you enable the emergency recovery feature for an instance for the first time.
Database Account Type
The type of the database account. Valid values:
Use Original Database Account: Use the account of the source database.
Create Privileged Account: Create a privileged account in the sandbox instance. The privileged account has permissions on all databases in the instance. You must also configure the Database Account and Password parameters. The account of the source database is retained in the sandbox instance.
NoteA privileged account is created only in the current sandbox instance.
If the username of the account for the source database is the same as the username of the privileged account, the account of the source database is overwritten by the privileged account in the sandbox instance.
Click OK.
The system performs a precheck and creates the sandbox instance. When the value of the Sandbox Instance Status parameter changes to Complete, you can connect to the sandbox instance. For more information, see Use DMS to access sandbox instances or Use ECS to access sandbox instances.
The username and password of the account and all configurations of the sandbox instance are consistent with those of the source database. If you select Create Privileged Account in the preceding operation, you can also use the privileged account that is created to connect to the sandbox instance.
NoteThe client, such as an ECS instance, that you use to connect to the sandbox instance reside in the same VPC as the sandbox instance.
What to do next
Correct the online data on the original RDS instance
After the sandbox instance is created, you can use Data Transmission Service (DTS) to migrate data of some or all databases or tables to the original RDS instance to correct the online data of the original RDS instance. For more information, see Migrate data between ApsaraDB RDS for MySQL instances.
When you create a migration task, specify the sandbox instance as the source database and the original RDS instance as the destination database and set the Access Method parameter to Self-managed Database on ECS for the source database and Alibaba Cloud Instance for the destination database.
Release a sandbox instance
If you no longer need the sandbox instance, you can release it based on your business requirements. After you release the sandbox instance, DBS no longer charges you for the CDM storage. For more information, see Billing rules.
In the left-side navigation pane, click Backup and Restoration. On the Crash Recovery tab of the page that appears, click Release Sandbox Instance in the Actions column of the sandbox instance.
Disable the emergency recovery feature
If you do not require the emergency recovery feature, you can disable it. After the emergency recovery feature is disabled, existing sandbox instances are not affected.
In the left-side navigation pane, click Backup and Restoration. On the Crash Recovery tab of the page that appears, click Set Sandbox Policy. In the dialog box that appears, turn off Sandbox Feature.
The emergency recovery feature described in this topic and the fast restoration feature for individual databases and tables provided by ApsaraDB RDS are developed based on the DBS sandbox feature. After you disable the emergency recovery feature, the usage and billing of the fast restoration feature for individual databases and tables are not affected. For more information, see Restore individual databases and tables.