開啟互連網邊界防火牆後,如果您未配置存取控制策略,Cloud Firewall在存取控制策略匹配環節中預設允許存取所有流量。您可以配置公網資產的出向(內部網路訪問外部互連網)策略和入向(外部互連網訪問內部網路)策略,避免公網資產和互連網之間的未授權訪問。本文介紹如何配置互連網邊界防火牆的存取控制策略。
前提條件
已開啟互連網邊界防火牆開關,並且已開啟公網資產保護。具體操作,請參見開啟互連網邊界防火牆。
Cloud Firewall支援防護的公網資產範圍,請參見防護範圍。
已購買足夠的策略授權規格數。您可以在頁面,查看策略的使用規格。關於策略佔用規格的計算方法,請參見存取控制策略概述。
如果剩餘可用的策略授權規格不足,您可以單擊规格升级,購買存取控制全域擴充數量。更多操作,請參見購買Cloud Firewall服務。

如果您需要同時添加多個對象作為訪問源地址或目的地址,您可以先添加地址簿。具體操作,請參見地址簿管理。
配置互連網邊界存取控制策略
Cloud Firewall提供以下存取控制策略配置方式,您可以根據實際需要,配置策略。
自訂存取控制策略:您可以根據業務需求,自訂符合業務情境的策略。
下發智能推薦策略:Cloud Firewall自動學習您的業務近30日的流量情況,結合發現的流量風險,為您推薦適合您業務的存取控制策略,您可以根據需要選擇是否下發推薦的策略。
下發常用推薦策略:Cloud Firewall內建的推薦策略。如果常用的推薦策略符合您的業務需求,您可以直接下發對應的常用策略。
對於已開放的公網IP,我們建議您在Cloud Firewall上允許存取已開放且有流量的連接埠,並拒絕所有到其他連接埠的訪問,從而減少資產在互連網的暴露面。
如果您需要配置允許存取可信源(包括IP、網域名稱等)、拒絕其他訪問源的策略。推薦配置:首先建立一個允許存取可信源的高優先順序策略;再建立一個拒絕所有訪問源的低優先順序策略。
未下發的智能推薦策略和常用推薦策略不會生效。
自訂存取控制策略
您可以按需自訂互連網邊界防火牆的出向策略(內網訪問外部互連網)和入向策略(外部互連網訪問您的內部網路)。
在左側導覽列,選擇。
在出向或者入向頁簽,選擇需要建立的IP類型(預設建立IPv4類型的策略),然後單擊新增策略。

在新增內-外策略或者新增外-內策略面板,單擊自定义创建。
參考以下表格,配置策略詳情,然後單擊確定。
下發智能推薦策略
Cloud Firewall自動學習您的業務近30日的流量情況,結合發現的流量風險,為您推薦適合您業務的存取控制策略。如果智能推薦策略符合您的業務需求,您可以直接下發智能推薦策略。
支援下發出向(內網訪問外部互連網)和入向(外部互連網訪問您的內部網路)的智能策略。
下發策略操作涉及一定風險,請確保您已完整知悉即將下發的策略內容,再執行下發操作。
推薦的智能策略支援忽略,忽略後該策略將無法找回,請謹慎操作。
您可以在頁面,查看是否有Cloud Firewall產生的智能策略。

在左側導覽列,選擇。
通過以下方式,進入智能策略推薦頁面。
在策略列表右上方,單擊智能策略,然後單擊出向頁簽或入向頁簽。

在出向頁簽或入向頁簽,單擊新增策略,然後單擊智能策略推薦頁簽。
查看智能推薦策略,在需要下發的策略地區單擊下發策略;或者批量選中需要下發的多個策略後,單擊批量下发。
下發常用推薦策略
如果Cloud Firewall內建的常用推薦策略符合您的業務需求,您可以直接下發對應的常用策略。
下發策略操作涉及一定風險,請確保您已完整知悉即將下發的策略內容,再執行下發操作。
推薦的常用策略支援忽略,忽略後該策略將無法找回,請謹慎操作。如果您將所有的常用策略均已忽略,那常用推薦策略頁簽也無法顯示。
在左側導覽列,選擇。
在出向頁簽或入向頁簽,單擊新增策略,然後單擊常用策略推薦頁簽。
查看常用推薦策略,在需要下發的策略地區單擊一鍵下發。
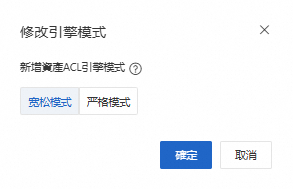
配置ACL引擎模式
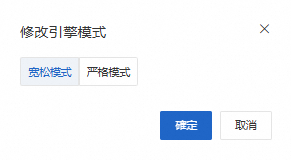
互連網邊界防火牆的ACL引擎模式支援寬鬆和嚴格模式:
寬鬆模式(預設):開啟寬鬆模式後,針對未識別應用或網域名稱的業務流量將允許存取,以優先保證業務。
strict 模式:開啟strict 模式後,針對未識別應用或網域名稱的流量將嚴格匹配所配置的策略,如果有配置拒絕策略,將拒絕未識別流量業務訪問。
ACL引擎模式配置方式支援新增資產預設、單資產配置和批量資產配置三種方式,您可以在頁面,單擊存取控制策略列表右上方ACL引擎管理,在ACL引擎管理-互連網邊界防火牆面板中進行配置。


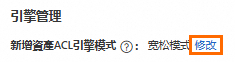
新增資產ACL引擎模式
在ACL引擎管理-互連網邊界防火牆面板中,中顯示當前配置的引擎模式,新增的資產在開啟保護時會使用此模式。
點擊修改按鈕可以變更當前配置模式:
|
|
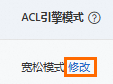
修改單個資源的ACL引擎模式
在ACL引擎管理-互連網邊界防火牆面板,資產列表中的ACL引擎模式列,顯示當前資產使用的引擎模式。
點擊修改按鈕可以變更選中資產的引擎模式:
|
|
批量修改ACL引擎模式
在ACL引擎管理-互連網邊界防火牆面板,選中多個資產後,點擊左下方的批量修改引擎模式按鈕,即可批量修改選中資產的隱形模式:
|
|

查看策略的命中情況
業務運行一段時間後,您可以在存取控制策略列表的叫用次數/最近命中时间列,查看存取控制策略的命中情況。
單擊叫用次數可跳轉到流量日誌頁面,查看流量日誌。關於如何查看流量日誌,請參見日誌審計。

相關操作
建立自訂策略後,您可以在存取控制自訂策略列表中,對目標策略進行編輯、刪除(支援逐個刪除和大量刪除)、下載(支援下載自訂策略列表)、複製或移動(移動即修改策略的優先順序)。
存取控制策略的優先順序可設定為1~N,其中N為當前已配置的存取控制策略數量。數值越小,優先順序越高。優先順序修改後,策略原優先順序之後的策略優先順序都將相應依次遞減。
刪除策略後,該策略管控的流量將不受Cloud Firewall的存取控制。請謹慎刪除。
相關文檔
如果您需要管控公網資產和指定網站網域名稱的訪問流量,請參見只允許公網主機訪問指定網域名稱的策略配置教程。
如果您需要針對指定地區進行流量存取控制,請參見拒絕海外地區訪問主機的策略配置教程。
存取控制策略的工作原理,請參見存取控制策略概述。
更多存取控制策略配置原則,請參見存取控制策略配置樣本。
查看及管理存取控制策略中的IP地址簿、連接埠地址簿、網域名稱地址簿等,請參見地址簿管理。
更多關於存取控制策略的配置和使用問題,請參見存取控制策略常見問題。