本文介紹在Service Mesh環境下服務端應用如何擷取並保持服務訪問時的用戶端源IP。
前提條件
已建立Kubernetes託管版叢集。具體操作,請參見建立ACK託管叢集。
已添加叢集到ASM執行個體。具體操作,請參見添加叢集到ASM執行個體。
已部署入口網關。具體操作,請參見建立入口網關。
通過kubectl串連叢集。具體操作,請參見擷取叢集KubeConfig並通過kubectl工具串連叢集。
背景資訊
原始IP在很多情況下被廣泛使用,典型的使用情境包括:
應用的存取控制:例如,許多應用程式在檢測到使用者從不同地區登入時強制執行額外的身分識別驗證,可以通過擷取原始IP來完成。
簡單的會話保持:可以根據用戶端的地址,基於源IP做負載平衡,將來自同一個用戶端的請求,轉寄到同一個服務執行個體。
訪問日誌和監控統計:訪問日誌和監控指標中包含真實的源地址,有助於開發人員進行分析統計。
雲上的負載平衡器也支援將用戶端源IP傳遞到後端服務。Istio應提供允許應用程式擷取原始源IP的能力。但在使用Istio時,Pod注入了Sidecar代理之後,所有入站流量都是從Envoy重新導向。目前,Envoy將流量發送到綁定了本地地址(127.0.0.1)的應用程式,所以應用看不到真正的原始IP。
部署應用樣本
部署sleep應用。
使用以下內容,建立sleep.yaml。
apiVersion: v1
kind: ServiceAccount
metadata:
  name: sleep
---
apiVersion: v1
kind: Service
metadata:
  name: sleep
  labels:
    app: sleep
    service: sleep
spec:
  ports:
  - port: 80
    name: http
  selector:
    app: sleep
---
apiVersion: apps/v1
kind: Deployment
metadata:
  name: sleep
spec:
  replicas: 1
  selector:
    matchLabels:
      app: sleep
  template:
    metadata:
      labels:
        app: sleep
    spec:
      terminationGracePeriodSeconds: 0
      serviceAccountName: sleep
      containers:
      - name: sleep
        image: curlimages/curl
        command: ["/bin/sleep", "3650d"]
        imagePullPolicy: IfNotPresent
        volumeMounts:
        - mountPath: /etc/sleep/tls
          name: secret-volume
      volumes:
      - name: secret-volume
        secret:
          secretName: sleep-secret
          optional: true
執行以下命令,部署sleep應用。
kubectl -n default apply -f sleep.yaml
部署httpbin應用。
使用以下內容,建立httpbin.yaml。
apiVersion: v1
kind: Service
metadata:
  name: httpbin
  labels:
    app: httpbin
spec:
  ports:
  - name: http
    port: 8000
  selector:
    app: httpbin
---
apiVersion: apps/v1
kind: Deployment
metadata:
  name: httpbin
spec:
  replicas: 1
  selector:
    matchLabels:
      app: httpbin
      version: v1
  template:
    metadata:
      labels:
        app: httpbin
        version: v1
    spec:
      containers:
      - image: docker.io/citizenstig/httpbin
        imagePullPolicy: IfNotPresent
        name: httpbin
        ports:
        - containerPort: 8000
執行以下命令,部署httpbin應用。
kubectl -n default apply -f httpbin.yaml
情境一:東西向流量
步驟一:驗證預設情況下服務端看到的用戶端源IP
在Istio中,東西向服務訪問時,由於Sidecar的注入,所有進出服務的流量均被Envoy攔截代理,然後再由Envoy將請求轉給應用。因此,應用收到的請求的源地址,是Envoy的訪問地址127.0.0.6。
執行以下命令,查看Pod狀態。
kubectl -n default get pods -o wide預期輸出:
NAME                            READY   STATUS        RESTARTS   AGE     IP             NODE                     NOMINATED NODE   READINESS GATES
httpbin-c85bdb469-4ll2m         2/2     Running       0          3m22s   172.17.X.XXX   cn-hongkong.10.0.0.XX    <none>           <none>
sleep-8f764df66-q7dr2           2/2     Running       0          3m9s    172.17.X.XXX   cn-hongkong.10.0.0.XX    <none>           <none>
由預期輸出得到,sleep應用的地址為
172.17.X.XXX。執行以下命令,從sleep容器發起請求。
kubectl -n default exec -it deploy/sleep -c sleep -- curl http://httpbin:8000/ip預期輸出:
{
  "origin": "127.0.0.6"
}
由預期輸出得到,httpbin應用收到請求的源地址是Envoy的訪問地址
127.0.0.6,而不是sleep應用的地址。從Socket資訊中確認源IP地址是否為127.0.0.6。
登入到httpbin容器,執行以下命令,安裝netstat。
apt update & apt install net-tools退出httpbin容器,執行以下命令,根據80連接埠查看運行相關資訊。
kubectl -n default exec -it deploy/httpbin -c httpbin -- netstat -ntp | grep 80預期輸出:
tcp 0 0 172.17.X.XXX:80 127.0.0.6:42691 TIME_WAIT -由預期輸出得到,源IP地址為
127.0.0.6。
查看httpbin Pod中的代理日誌內容。
格式化處理之後的日誌樣本如下:
{
  "trace_id":null,
  "bytes_received":0,
  "upstream_host":"172.17.X.XXX:80",
  "authority":"httpbin:8000",
  "downstream_remote_address":"172.17.X.XXX:56160",
  "upstream_service_time":"1",
  "upstream_transport_failure_reason":null,
  "istio_policy_status":null,
  "path":"/ip",
  "bytes_sent":28,
  "request_id":"4501a50a-dab0-44c9-b52c-2a4f425a****",
  "protocol":"HTTP/1.1",
  "method":"GET",
  "duration":1,
  "start_time":"2022-11-22T16:09:30.394Z",
  "user_agent":"curl/7.86.0-DEV",
  "upstream_local_address":"127.0.0.6:42169",
  "response_flags":"-",
  "route_name":"default",
  "response_code":200,
  "upstream_cluster":"inbound|80||",
  "x_forwarded_for":null,
  "downstream_local_address":"172.17.X.XXX:80",
  "requested_server_name":"outbound_.8000_._.httpbin.default.svc.cluster.local"
}
由日誌得到:
"downstream_remote_address":"172.17.X.XXX:56160":sleep的地址。"downstream_local_address":"172.17.X.XXX:80":sleep訪問的目標地址。"upstream_local_address":"127.0.0.6:42169":httpbin Envoy串連httpbin的local address(此時獲得的源IP地址是127.0.0.6)。"upstream_host":"172.17.X.XXX:80":httpbin Envoy訪問的目標地址。
步驟二:佈建服務網格使得服務端能夠擷取正確的用戶端源IP。
方法一:通過TPROXY透明攔截模式保留用戶端源IP(適用於非CentOS作業系統)
修改httpbin應用的deployment,使用TPROXY作為入流量攔截模式。
執行以下命令,修改httpbin應用的deployment。
kubectl patch deployment -n default httpbin -p '{"spec":{"template":{"metadata":{"annotations":{"sidecar.istio.io/interceptionMode":"TPROXY"}}}}}'執行以下命令,從sleep容器發起請求。
kubectl -n default exec -it deploy/sleep -c sleep -- curl http://httpbin:8000/ip預期輸出:
{
  "origin": "172.17.X.XXX"
}
由預期輸出得到,httpbin可以得到sleep端的真實IP。
執行以下命令,根據80連接埠查看運行相關資訊。
說明Pod重啟之後,需要重新安裝netstat。
kubectl -n default exec -it deploy/httpbin -c httpbin -- netstat -ntp | grep 80預期輸出:
tcp 0 0 172.17.X.XXX:80 172.17.X.XXX:36728 ESTABLISHED -由預期輸出得到,源IP地址為
172.17.X.XXX。查看httpbin Pod中的代理日誌內容。
格式化處理之後的日誌樣本如下:
{
  "route_name":"default",
  "bytes_received":0,
  "trace_id":null,
  "request_id":"1ccabe60-63cf-469b-8565-99cac546****",
  "upstream_cluster":"inbound|80||",
  "response_flags":"-",
  "protocol":"HTTP/1.1",
  "upstream_transport_failure_reason":null,
  "requested_server_name":"outbound_.8000_._.httpbin.default.svc.cluster.local",
  "response_code":200,
  "user_agent":"curl/7.86.0-DEV",
  "start_time":"2022-11-22T16:03:32.803Z",
  "path":"/ip",
  "authority":"httpbin:8000",
  "bytes_sent":31,
  "downstream_remote_address":"172.17.X.XXX:39058",
  "upstream_service_time":"1",
  "method":"GET",
  "downstream_local_address":"172.17.X.XXX:80",
  "duration":1,
  "upstream_host":"172.17.X.XXX:80",
  "istio_policy_status":null,
  "upstream_local_address":"172.17.X.XXX:46129",
  "x_forwarded_for":null
}
由日誌得到:
"downstream_remote_address":"172.17.X.XXX:39058":sleep的地址。"downstream_local_address":"172.17.X.XXX:80":sleep訪問的目標地址。"upstream_local_address":"172.17.X.XXX:46129":httpbin Envoy串連httpbin的local address(即sleep的IP地址)。"upstream_host":"172.17.X.XXX:80":httpbin Envoy訪問的目標地址。
方法二:通過XFF要求標頭擷取用戶端源IP
您可以通過下面的配置使得服務端應用的網格代理Sidecar轉寄Inbound請求至應用前,為請求添加X-Forwarded-For要求標頭,並將其值設定為真實用戶端IP。這種方法對於節點作業系統沒有限制,但是要求應用能夠識別並擷取由XFF要求標頭攜帶的用戶端源IP地址。
參考文檔使用Envoy過濾器模板建立Envoy過濾器,將下面的EnvoyFilter通過EnvoyFilter模板應用至ASM執行個體。
apiVersion: networking.istio.io/v1alpha3
kind: EnvoyFilter
metadata:
  name: enable-xff-for-sidecar-inbound
  namespace: istio-system  # 將此命名空間更改為網關所處的命名空間
  labels:
    asm-system: "true"
    provider: "asm"
spec:
  configPatches:
  - applyTo: NETWORK_FILTER
    match:
      proxy:
        proxyVersion: "^1.*"
      context: SIDECAR_INBOUND
      listener:
        name: "virtualInbound"
        filterChain:
          filter:
            name: "envoy.filters.network.http_connection_manager"
    patch:
      operation: MERGE
      value:
        typed_config:
          "@type": "type.googleapis.com/envoy.extensions.filters.network.http_connection_manager.v3.HttpConnectionManager"
          use_remote_address: true
執行以下命令,從sleep容器發起請求。
kubectl -n default exec -it deploy/sleep -c sleep -- curl http://httpbin:8000/ip預期輸出:
{
  "origin": "172.17.X.XXX"
}
由預期輸出得到,httpbin可以得到sleep端的真實IP。需要注意的是,此時用戶端源IP是被Sidecar通過X-Forwarded-For要求標頭透傳至httpbin應用的,且httpbin應用支援從X-Forwarded-For要求標頭中擷取用戶端源IP,因此才能夠正確地讀取到用戶端源IP,如果應用不具備從X-Forwarded-For要求標頭中擷取源IP的能力,則方法不適用。
情境二:南北向流量
對於南北向流量,用戶端先請求負載平衡,然後將請求轉給Istio ingressgateway,再轉到後端服務。由於中間多了ingressgateway,使得擷取用戶端源IP地址變得更加複雜。下文介紹如何設定及驗證HTTP和HTTPS協議的請求保留源IP地址。
HTTP協議的請求
未設定保留源IP
使用以下內容,建立http-demo.yaml,以HTTP協議訪問httpbin。
apiVersion: networking.istio.io/v1alpha3
kind: Gateway
metadata:
  name: httpbin-gw-httpprotocol
  namespace: default
spec:
  selector:
    istio: ingressgateway
  servers:
    - hosts:
        - '*'
      port:
        name: http
        number: 80
        protocol: HTTP
---
apiVersion: networking.istio.io/v1alpha3
kind: VirtualService
metadata:
  name: httpbin
  namespace: default
spec:
  gateways:
    - httpbin-gw-httpprotocol
  hosts:
    - '*'
  http:
    - route:
        - destination:
            host: httpbin
            port:
              number: 8000
執行以下命令,部署網關和虛擬服務。
kubectl -n default apply -f http-demo.yaml執行以下命令,通過ingressgateway訪問httpbin。
export GATEWAY_URL=$(kubectl -n istio-system get service istio-ingressgateway -o jsonpath='{.status.loadBalancer.ingress[0].ip}')
curl http://$GATEWAY_URL:80/ip
預期輸出:
{
  "origin": "10.0.0.93"
}
由預期輸出得到,返回的IP地址為Kubernetes叢集的節點地址。
查看ingressgateway的訪問日誌。
日誌樣本如下:
{
  "upstream_service_time":"1",
  "response_code":200,
  "protocol":"HTTP/1.1",
  "bytes_sent":28,
  "upstream_cluster":"outbound|8000||httpbin.default.svc.cluster.local",
  "start_time":"2022-11-23T03:29:20.017Z",
  "istio_policy_status":null,
  "upstream_transport_failure_reason":null,
  "trace_id":null,
  "route_name":null,
  "request_id":"292903be-a889-4d5d-83a0-ab1f5d1a****",
  "method":"GET",
  "upstream_host":"172.17.X.XXX:80",
  "duration":1,
  "path":"/ip",
  "downstream_local_address":"172.17.X.XXX:80",
  "authority":"47.242.XXX.XX",
  "user_agent":"curl/7.79.1",
  "downstream_remote_address":"10.0.0.93:5899",
  "upstream_local_address":"172.17.X.XXX:54322",
  "requested_server_name":null,
  "x_forwarded_for":"10.0.0.93",
  "response_flags":"-",
  "bytes_received":0
}
由日誌得到:
"downstream_remote_address":"10.0.0.93:5899":不是真實的用戶端源地址。"downstream_local_address":"172.17.X.XXX:80":ingressgateway Pod的地址。"upstream_local_address":"172.17.X.XXX:54322":保留了ingressgateway Pod的地址,連接埠值改變。"upstream_host":"172.17.X.XXX:80":httpbin Pod的地址。
設定保留源IP
設定外部流量策略為Local。(網路模式為Terway的叢集可跳過該步驟。)
登入ASM控制台,在左側導覽列,選擇。
在網格管理頁面,單擊目標執行個體名稱,然後在左側導覽列,選擇。
在入口網關頁面,單擊目標網關右側的查看YAML。
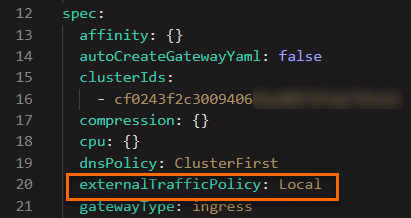
在編輯對話方塊的spec欄位下,將externalTrafficPolicy欄位配置為Local,然後單擊確定。
執行以下命令,通過ingressgateway訪問httpbin。
curl http://$GATEWAY_URL:80/ip預期輸出:
{
  "origin": "120.244.xxx.xxx"
}
由預期輸出得到,返回的IP地址為實際的用戶端的源IP地址。
查看ingressgateway的訪問日誌。
日誌樣本如下:
{
  "istio_policy_status":null,
  "upstream_transport_failure_reason":null,
  "path":"/ip",
  "x_forwarded_for":"120.244.XXX.XXX",
  "route_name":null,
  "method":"GET",
  "duration":2,
  "downstream_remote_address":"120.244.XXX.XXX:28504",
  "bytes_received":0,
  "upstream_cluster":"outbound|8000||httpbin.default.svc.cluster.local",
  "bytes_sent":34,
  "protocol":"HTTP/1.1",
  "response_flags":"-",
  "upstream_local_address":"172.17.X.XXX:57498",
  "upstream_service_time":"2",
  "request_id":"9c0295d4-e77f-4a3a-b292-e5c58d92****",
  "start_time":"2022-11-23T03:24:04.413Z",
  "response_code":200,
  "trace_id":null,
  "authority":"47.242.XXX.XX",
  "user_agent":"curl/7.79.1",
  "downstream_local_address":"172.17.X.XXX:80",
  "upstream_host":"172.17.X.XXX:80",
  "requested_server_name":null
}
由日誌得到:
"downstream_remote_address":"120.244.XXX.XXX:28504":用戶端源地址,符合預期。"downstream_local_address":"172.17.X.XXX:80":ingressgateway Pod的地址。"upstream_local_address":"172.17.X.XXX:57498":保留了ingressgateway Pod的地址,連接埠值改變。"upstream_host":"172.17.X.XXX:80":httpbin Pod的地址。
HTTPS協議的請求
上文已詳細說明HTTP協議的請求設定保留源IP地址前後的對比,因此,下文僅介紹如何設定及驗證HTTPS協議的請求保留源IP。
使用以下內容,建立https-demo,以HTTPS協議訪問httpbin。
apiVersion: networking.istio.io/v1alpha3
kind: Gateway
metadata:
  name: httpbin-gw-https
  namespace: default
spec:
  selector:
    istio: ingressgateway
  servers:
    - hosts:
        - '*'
      port:
        name: https
        number: 443
        protocol: HTTPS
      tls:
        credentialName: myexample-credential
        mode: SIMPLE
---
apiVersion: networking.istio.io/v1alpha3
kind: VirtualService
metadata:
  name: httpbin-https
  namespace: default
spec:
  gateways:
    - httpbin-gw-https
  hosts:
    - '*'
  http:
    - route:
        - destination:
            host: httpbin
            port:
              number: 8000
執行以下命令,部署網關和虛擬服務。
kubectl -n default apply -f https-demo.yaml執行以下命令,通過ingressgateway訪問httpbin。
export GATEWAY_URL=$(kubectl -n istio-system get service istio-ingressgateway -o jsonpath='{.status.loadBalancer.ingress[0].ip}')
curl -k https://$GATEWAY_URL:443/ip
預期輸出:
{
  "origin": "120.244.XXX.XXX"
}
由預期輸出得到,返回的IP地址為實際的用戶端的源IP地址。