阿里雲Service Mesh (ASM)支援將指標資料上報到阿里雲可觀測鏈路OpenTelemetry版和自建系統。您可以通過控制台進行配置。本文介紹如何將鏈路追蹤資料擷取到阿里雲可觀測鏈路OpenTelemetry版和自建系統。
前提條件
已添加ACK叢集到ASM執行個體。具體操作,請參見添加叢集到ASM執行個體。
阿里雲帳號已開通阿里雲可觀測鏈路OpenTelemetry版。關於如何計費,請參見計費規則。
ASM執行個體已部署入口網關。具體操作,請參見建立入口網關。
將鏈路追蹤資料擷取到阿里雲可觀測鏈路OpenTelemetry版
請您按照ASM執行個體版本選擇對應的頁簽進行操作。若您需要升級現有的執行個體版本,請參見升級ASM執行個體。
1.17.2.35以下
登入ASM控制台,在左側導覽列,選擇。
在網格管理頁面,單擊目標執行個體名稱,然後在左側導覽列,選擇。
在基本資料頁面,單擊功能設定,在功能設定更新面板,選中啟用鏈路追蹤,設定採樣百分比,採樣方式選擇阿里雲可觀測鏈路OpenTelemetry版,然後單擊確定。
在左側導覽列,選擇,跳轉至可觀測鏈路OpenTelemetry版控制台查看鏈路追蹤資訊。

關於鏈路追蹤的更多資訊,請參見什麼是可觀測鏈路OpenTelemetry版。
若您不再需要此功能,可以在功能設定更新面板取消選中啟用鏈路追蹤,然後單擊確定。
1.17.2.35及以上,1.18.0.124以下
登入ASM控制台,在左側導覽列,選擇。
在網格管理頁面,單擊目標執行個體名稱,然後在左側導覽列,選擇。
在鏈路追蹤頁面,單擊將服務網格鏈路追蹤資料擷取到阿里雲可觀測鏈路OpenTelemetry版,然後在確認對話方塊,單擊確定。
單擊開啟阿里雲可觀測鏈路OpenTelemetry版控制台,查看鏈路追蹤資訊。
關於鏈路追蹤的更多資訊,請參見什麼是可觀測鏈路OpenTelemetry版。
若您不再需要此功能,可以在鏈路追蹤頁面,單擊關閉採集,然後在確認對話方塊,單擊確定。
1.18.0.124及以上,1.22.6.89以下
在目前的版本範圍內,控制台不支援直接設定匯出至阿里雲可觀測鏈路OpenTelemetry版,您可以通過以下方式在系統中配置Collector進行上報。
步驟一:部署OpenTelemetry Operator
在ACK叢集對應的kubeconfig環境,執行以下命令,建立opentelemetry-operator-system命名空間。
kubectl create namespace opentelemetry-operator-system執行以下命令,使用Helm在opentelemetry-operator-system命名空間下安裝OpenTelemetry Operator。
helm repo add open-telemetry https://open-telemetry.github.io/opentelemetry-helm-charts
helm install --namespace=opentelemetry-operator-system opentelemetry-operator open-telemetry/opentelemetry-operator \
  --set "manager.collectorImage.repository=otel/opentelemetry-collector-k8s" \
  --set admissionWebhooks.certManager.enabled=false \
  --set admissionWebhooks.autoGenerateCert.enabled=true
執行以下命令,檢查opentelemetry-operator是否正常運行。
kubectl get pod -n opentelemetry-operator-system預期輸出:
NAME READY STATUS RESTARTS AGE opentelemetry-operator-854fb558b5-pvllj 2/2 Running 0 1mSTATUS為Running,表明opentelemetry-operator正常運行。
步驟二:建立OpenTelemetry Collector
使用以下內容,建立collector.yaml檔案。
請將YAML中的
${ENDPOINT}替換為gRPC協議的VPC網路存取點,${TOKEN}替換為鑒權Token。關於如何擷取阿里雲可觀測鏈路OpenTelemetry版的存取點和鑒權Token,請參見接入和鑒權說明。在ACK叢集對應的kubeconfig環境下,執行以下命令,將collector部署到叢集。
kubectl apply -f collector.yaml執行以下命令,檢查collector是否正常啟動。
kubectl get pod -n opentelemetry-operator-system預期輸出:
NAME                                      READY   STATUS    RESTARTS   AGE
opentelemetry-operator-854fb558b5-pvllj   2/2     Running   0          3m
default-collector-5cbb4497f4-2hjqv        1/1     Running   0          30s
預期輸出表明collector正常啟動。
執行以下命令,檢查服務是否建立。
kubectl get svc -n opentelemetry-operator-system預期輸出:
opentelemetry-operator           ClusterIP   172.16.138.165   <none>        8443/TCP,8080/TCP   3m
opentelemetry-operator-webhook   ClusterIP   172.16.127.0     <none>        443/TCP             3m
default-collector              ClusterIP   172.16.145.93    <none>        4317/TCP   30s
default-collector-headless     ClusterIP   None             <none>        4317/TCP   30s
default-collector-monitoring   ClusterIP   172.16.136.5     <none>        8888/TCP   30s
預期輸出表明服務已建立成功。
步驟三:通過ASM控制台啟用鏈路追蹤
登入ASM控制台,在左側導覽列,選擇。
在網格管理頁面,單擊目標執行個體名稱,然後在左側導覽列,選擇。
在可觀測配置頁面的鏈路追蹤設定地區,將採樣百分比設定為100,然後單擊提交。
在左側導覽列,選擇,在OpenTelemetry服務地址/網域名稱輸入default-collector.opentelemetry-operator-system.svc.cluster.local,在OpenTelemetry服務連接埠輸入4317,然後單擊將服務網格鏈路追蹤資料擷取到OpenTelemetry。
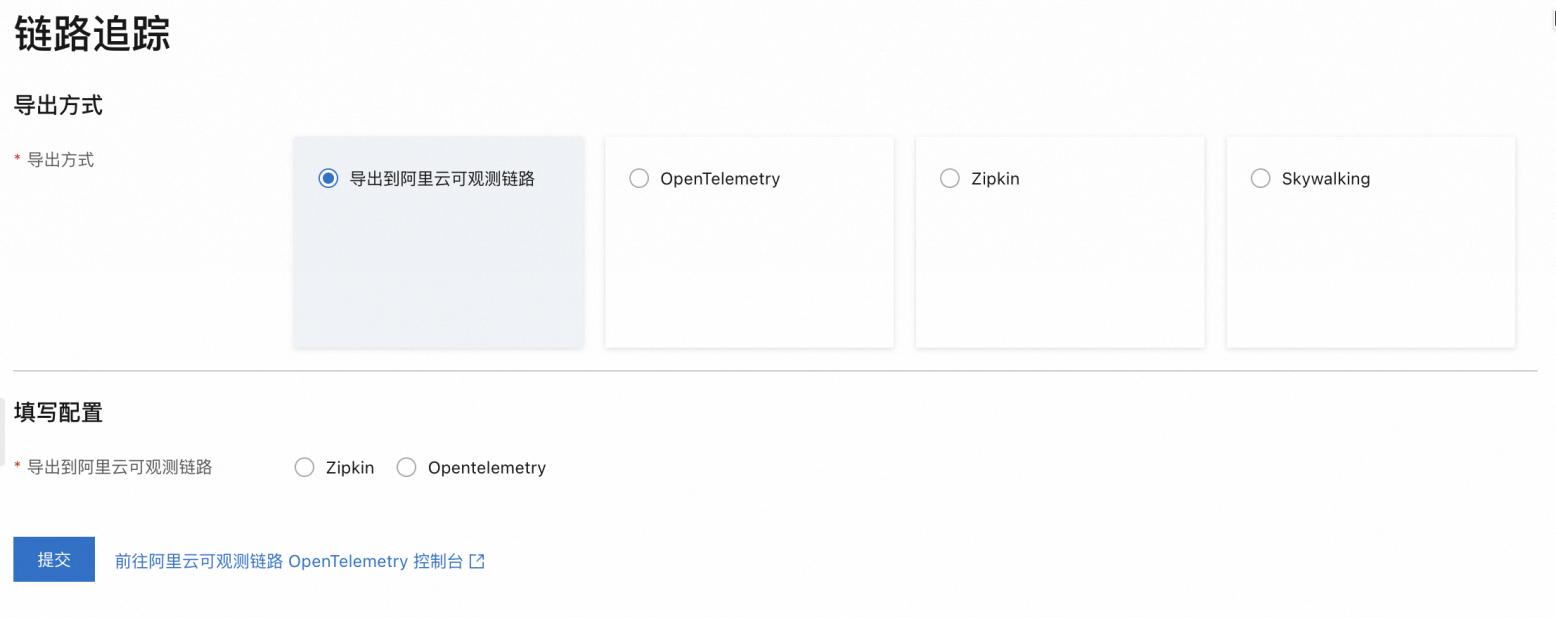
1.22.6.89及以上
登入ASM控制台,在左側導覽列,選擇。
在網格管理頁面,單擊目標執行個體名稱,然後在左側導覽列,選擇。
在鏈路追蹤頁面,選擇匯出到阿里雲可觀測鏈路的匯出方式,然後再填寫配置選擇您的上報方式,如Zipkin,然後單擊提交。
單擊前往阿里雲可觀測鏈路OpenTelemetry版控制台,查看鏈路追蹤資訊。關於鏈路追蹤的更多資訊,請參見什麼是可觀測鏈路 OpenTelemetry 版。
 說明
說明若您不再需要此功能,可以在鏈路追蹤頁面,單擊關閉匯出,然後在確認對話方塊,單擊確定。
向自建系統匯出ASM鏈路追蹤資料
不同版本的ASM執行個體所支援的向自建系統匯出鏈路追蹤資料的方式不同,請按照您執行個體的版本進行選擇。
1.18.0.124以下
ASM執行個體版本為1.17.2.28以下:登入ASM控制台,在目標執行個體的基本資料頁面,單擊功能設定,選中啟用鏈路追蹤,按需進行配置,然後單擊確定。
ASM執行個體版本為1.17.2.28及以上,1.18.0.124以下:啟用鏈路追蹤的方式,請參見鏈路追蹤設定說明。
1.18.0.124及以上,1.22.6.89以下
在此版本範圍內,僅支援在控制台上報到阿里雲可觀測鏈路OpenTelemetry。您可以登入ASM控制台,在目標執行個體的頁面進行配置。
配置說明
配置項 | 說明 |
OpenTelemetry服務網域名稱(完整FQDN) | 自建系統服務網域名稱,需要為完整的FQDN。例如 |
OpenTelemetry服務連接埠 | 自建系統服務連接埠,例如 |
1.22.6.89及以上
您可以登入ASM控制台,在目標執行個體的頁面選擇您的鏈路追蹤自建系統進行配置。
在配置鏈路追蹤上報到自建系統時,請確保您的自建系統是網格內服務。如果自建系統在網格外部,您可以通過ServiceEntry將自建系統註冊到網格內。具體操作,請參見ServiceEntry。
配置說明
上報到OpenTelemetry
配置項 | 說明 | |
服務網域名稱(完整FQDN) | 自建系統服務網域名稱,需要為完整的FQDN。例如 | |
服務連接埠 | 自建系統服務連接埠,例如 | |
通過gRPC上報 | 逾時時間 | 可選,配置上報鏈路追蹤資料的請求逾時時間,單位為秒。例如 |
要求標頭 | 可選,配置上報鏈路追蹤資料時攜帶的要求標頭,例如 | |
通過HTTP上報 | 請求路徑 | 上報鏈路追蹤資料的請求路徑,例如 |
逾時時間 | 可選,配置上報鏈路追蹤資料的請求逾時時間,單位為秒。例如 | |
要求標頭 | 可選,配置上報鏈路追蹤資料時攜帶的要求標頭,例如 | |
上報到Zipkin
配置項 | 說明 |
服務網域名稱(完整FQDN) | 自建系統服務網域名稱,需要為完整的FQDN。例如 |
服務連接埠 | 自建系統服務連接埠,例如 |
請求路徑 | 上報鏈路追蹤資料的請求路徑,例如 |
上報到Skywalking
配置項 | 說明 |
服務網域名稱(完整FQDN) | 自建系統服務網域名稱,需要為完整的FQDN。例如 |
服務連接埠 | 自建系統服務連接埠,例如 |
驗證鏈結路追蹤資料上報
部署應用
部署樣本應用。
使用以下內容建立bookinfo.yaml。
將Bookinfo應用部署到資料面叢集中。
kubectl --kubeconfig=${DATA_PLANE_KUBECONFIG} apply -f bookinfo.yaml
部署sleep應用。
使用以下內容,建立sleep.yaml
部署sleep應用。
kubectl --kubeconfig=${DATA_PLANE_KUBECONFIG} apply -f sleep.yaml
發起測試
執行以下命令,發起測試。
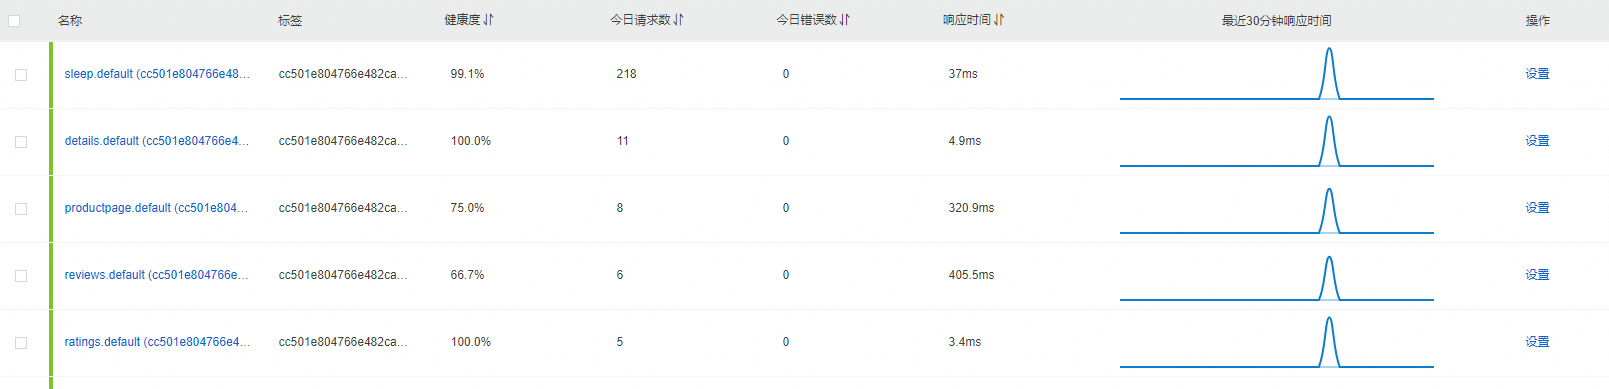
kubectl exec -it deploy/sleep -- sh -c 'for i in $(seq 1 100); do curl -s productpage:9080/productpage > /dev/null; done'查看上報資料
以下以上報到阿里雲可觀測鏈路OpenTelemetry版為例,展示資料上報結果。
單擊左側導覽列的應用列表。可以看到類似下圖的資料。