本文主要示範如何在Kubernetes叢集中安裝、註冊GitLab Runner,添加Kubernetes類型的Executor來執行構建,並以此為基礎完成一個Java源碼樣本專案從編譯構建、鏡像打包到應用部署的CICD過程。
背景資訊
本文以構建一個Java軟體專案並將其部署到阿里雲Container ServiceKubernetes叢集中為例,說明如何使用GitLab CI在阿里雲Kubernetes服務上運行GitLab Runner、配置Kubernetes類型的Executor,並執行Pipeline。
建立GitLab源碼專案並上傳範例程式碼
- 建立GitLab源碼專案。 本樣本中建立的GitLab源碼專案地址為:
http://xx.xx.xx.xx/demo/gitlab-java-demo.git - 執行以下命令擷取範例程式碼並上傳至GitLab。
git clone https://github.com/haoshuwei/gitlab-ci-k8s-demo.git
git remote add gitlab http://xx.xx.xx.xx/demo/gitlab-java-demo.git
git push gitlab master
在Kubernetes叢集中安裝GitLab Runner
- 擷取GitLab Runner的註冊資訊。
- 擷取專案專用Runner的註冊資訊。
- 登入GitLab。
- 在頂部導覽列中,選擇。
- 在Your projects頁簽下,選擇相應的Project。
- 在左側導覽列中,選擇。
- 單擊Runners右側的Expand。
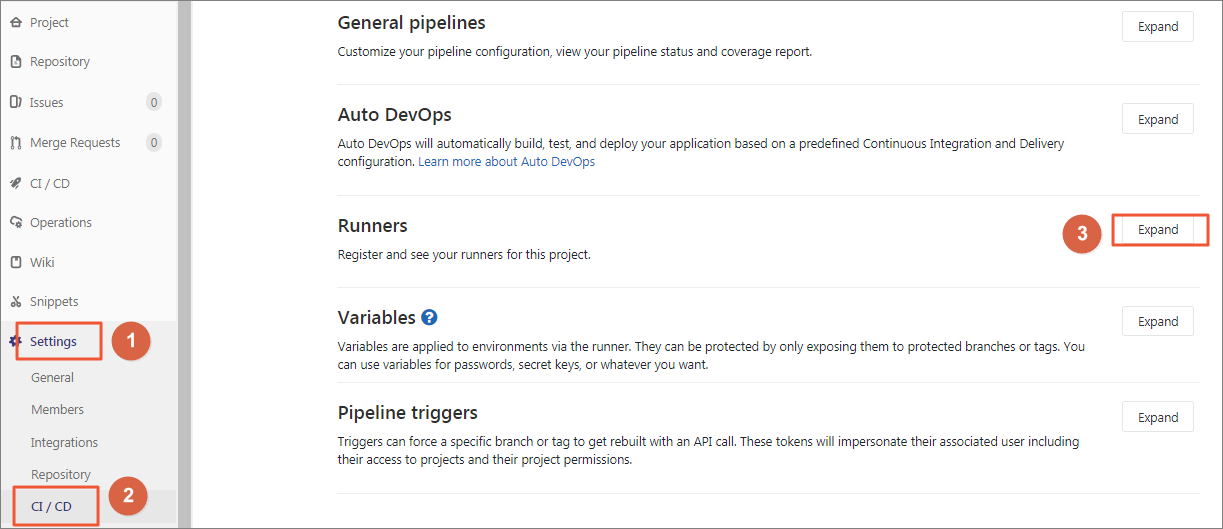
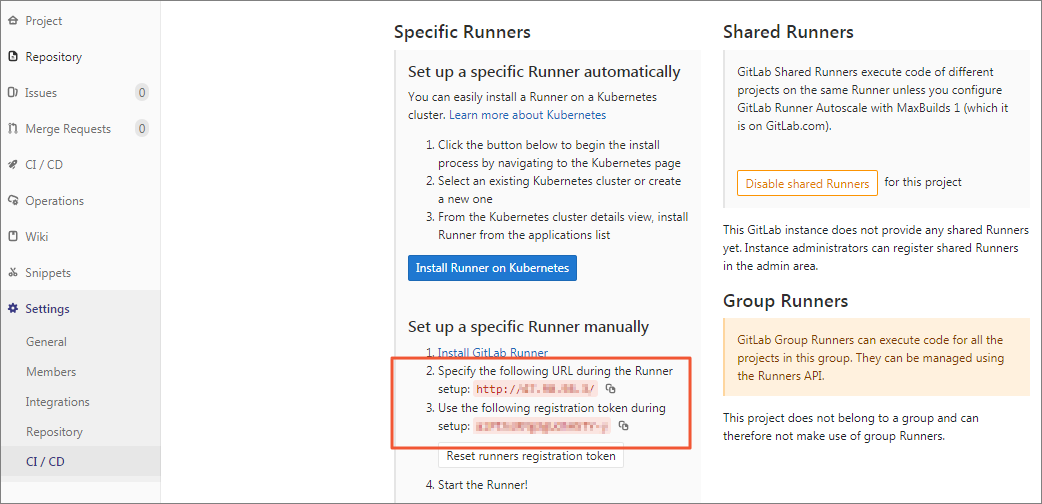
- 擷取URL和registration token資訊。
- 擷取Group Runners的註冊資訊。
- 在頂部導覽列中,選擇。
- 在Your groups頁簽下,選擇相應的group。
- 在左側導覽列中,選擇。
- 單擊Runners右側的Expand。

- 擷取URL和registration token資訊。
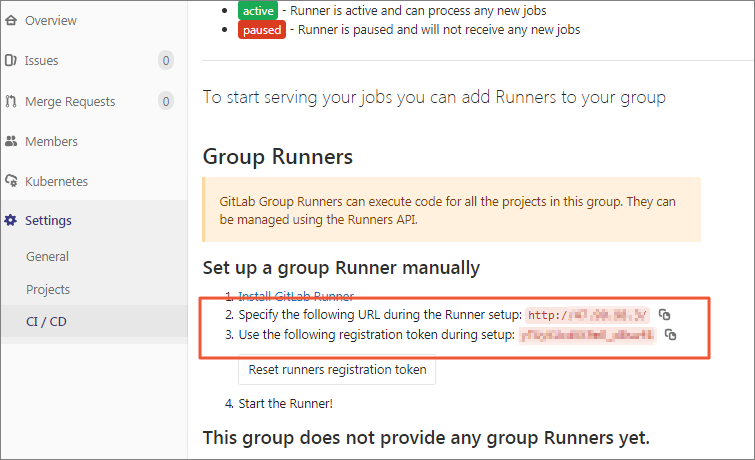
- 擷取Shared Runners的註冊資訊。 說明 只有管理員有許可權執行此步操作。
- 在頂部導覽列中,單擊
 進入Admin Area頁面。
 - 在左側導覽列中,選擇。
- 擷取URL和registration token資訊。

- 在頂部導覽列中,單擊
- 擷取專案專用Runner的註冊資訊。
- 執行以下命令擷取並修改GitLab Runner的Helm Chart。
git clone https://github.com/haoshuwei/gitlab-runner.git替換gitlabUrl和runnerRegistrationToken欄位,樣本如下:## GitLab Runner Image ## image: gitlab/gitlab-runner:alpine-v11.4.0 ## Specify a imagePullPolicy ## imagePullPolicy: IfNotPresent ## Default container image to use for initcontainer init: image: busybox tag: latest ## The GitLab Server URL (with protocol) that want to register the runner against ## gitlabUrl: http://xx.xx.xx.xx/ ## The Registration Token for adding new Runners to the GitLab Server. This must ## be retreived from your GitLab Instance. ## runnerRegistrationToken: "AMvEWrBTBu-d8czE****" ## Unregister all runners before termination ## unregisterRunners: true ## Configure the maximum number of concurrent jobs ## concurrent: 10 ## Defines in seconds how often to check GitLab for a new builds ## checkInterval: 30 ## For RBAC support: ## rbac: create: true clusterWideAccess: false ## Configure integrated Prometheus metrics exporter ## metrics: enabled: true ## Configuration for the Pods that that the runner launches for each new job ## runners: ## Default container image to use for builds when none is specified ## image: ubuntu:16.04 ## Specify the tags associated with the runner. Comma-separated list of tags. ## tags: "k8s-runner" ## Run all containers with the privileged flag enabled ## This will allow the docker:dind image to run if you need to run Docker ## commands. Please read the docs before turning this on: ## privileged: true ## Namespace to run Kubernetes jobs in (defaults to the same namespace of this release) ## namespace: gitlab cachePath: "/opt/cache" cache: {} builds: {} services: {} helpers: {} resources: {} - 執行以下命令安裝GitLab Runner。
- 打包應用
helm package .預期輸出:
Successfully packaged chart and saved it to: /root/gitlab/gitlab-runner/gitlab-runner-0.1.37.tgz - 安裝應用
helm install --namespace gitlab gitlab-runner *.tgz
查看相關的deployment/pod是否成功啟動。若成功啟動,則可在GitLab上看到註冊成功的GitLab Runner,如下圖所示。
- 打包應用
緩衝配置
GitLab Runner對緩衝方案的支援有限,所以您需要使用掛載Volume的方式做緩衝。在上面的樣本中,安裝GitLab Runner時預設使用/opt/cache目錄作為緩衝空間。您也可以通過修改values.yaml檔案中的runners.cachePath欄位修改緩衝目錄。
例如,如需建立Maven緩衝,您可以在
variables下添加MAVEN_OPTS變數並指定本機快取目錄: variables:
KUBECONFIG: /etc/deploy/config
MAVEN_OPTS: "-Dmaven.repo.local=/opt/cache/.m2/repository"修改templates/configmap.yaml檔案中的以下欄位掛載docker.sock和用於cache的volume。
cat >>/home/gitlab-runner/.gitlab-runner/config.toml <<EOF
[[runners.kubernetes.volumes.pvc]]
name = "gitlab-runner-cache"
mount_path = "{{ .Values.runners.cachePath }}"
[[runners.kubernetes.volumes.host_path]]
name = "docker"
mount_path = "/var/run/docker.sock"
read_only = true
host_path = "/var/run/docker.sock"
EOF設定全域變數
- 在GitLab的頂部導覽列中,選擇。
- 在Your projects頁簽下,選擇相應的Project。
- 在左側導覽列中,選擇。
- 單擊Variables右側的Expand。添加GitLab Runner可用的環境變數。本樣本中,添加以下三個變數。

- REGISTRY_USERNAME:鏡像倉庫使用者名稱。
- REGISTRY_PASSWORD:鏡像倉庫密碼。
- kube_config:KubeConfig的編碼字串。
執行以下命令產生KubeConfig的編碼字串:echo $(cat ~/.kube/config | base64) | tr -d " "
編寫.gitlab-ci.yml
編寫.gitlab-ci.yml檔案,完成Java Demo源碼專案的編譯構建、鏡像推送和應用部署(可參考gitlabci-java-demo源碼專案中的.gitlab-ci.yml.example)。
.gitlab-ci.yml樣本如下。
image: docker:stable
stages:
- package
- docker_build
- deploy_k8s
variables:
  KUBECONFIG: /etc/deploy/config
  MAVEN_OPTS: "-Dmaven.repo.local=/opt/cache/.m2/repository"
mvn_build_job:
image: maven:3.6.2-jdk-14
stage: package
tags:
- k8s-runner
script:
- mvn package -B -DskipTests
- cp target/demo.war /opt/cache
docker_build_job:
image: docker:latest
stage: docker_build
tags:
- k8s-runner
script:
- docker login -u $REGISTRY_USERNAME -p $REGISTRY_PASSWORD registry.cn-beijing.aliyuncs.com
- mkdir target
- cp /opt/cache/demo.war target/demo.war
- docker build -t registry.cn-beijing.aliyuncs.com/haoshuwei24/gitlabci-java-demo:$CI_PIPELINE_ID .
- docker push registry.cn-beijing.aliyuncs.com/haoshuwei24/gitlabci-java-demo:$CI_PIPELINE_ID
deploy_k8s_job:
image: registry.cn-hangzhou.aliyuncs.com/haoshuwei24/kubectl:1.16.6
stage: deploy_k8s
tags:
- k8s-runner
script:
- mkdir -p /etc/deploy
- echo $kube_config |base64 -d > $KUBECONFIG
- sed -i "s/IMAGE_TAG/$CI_PIPELINE_ID/g" deployment.yaml
- cat deployment.yaml
- kubectl apply -f deployment.yaml.gitlab-ci.yml定義了一個Pipeline, 分三個階段步驟執行:
image: docker:stable  # Pipeline中各個步驟階段的構建鏡像沒有指定時, 預設使用docker:stable鏡像
stages:
  - package                # 源碼打包階段
  - docker_build         # 鏡像構建和打包推送階段
  - deploy_k8s           # 應用部署階段
variables:
KUBECONFIG: /etc/deploy/config # 定義全域變數KUBECONFIG- maven源碼打包階段。
mvn_build_job: # job名稱 image: maven:3.6.2-jdk-14 # 本階段構建使用的構建鏡像 stage: package # 關聯的階段名稱 tags: # GitLab Runner的tag - k8s-runner script: - mvn package -B -DskipTests # 執行構建指令碼 - cp target/demo.war /opt/cache # 構建物儲存至緩衝區 - 鏡像構建和打包推送階段。
docker_build_job: # job名稱 image: docker:latest # 本階段構建使用的構建鏡像 stage: docker_build # 關聯的階段名稱 tags: # GitLab Runner的tag - k8s-runner script: - docker login -u $REGISTRY_USERNAME -p $REGISTRY_PASSWORD registry.cn-beijing.aliyuncs.com # 登入鏡像倉庫 - mkdir target - cp /opt/cache/demo.war target/demo.war - docker build -t registry.cn-beijing.aliyuncs.com/haoshuwei24/gitlabci-java-demo:$CI_PIPELINE_ID . # 打包Docker鏡像,使用的tag為本次Pipeline的ID - docker push registry.cn-beijing.aliyuncs.com/haoshuwei24/gitlabci-java-demo:$CI_PIPELINE_ID # 推送Docker鏡像 - 應用部署階段。
deploy_k8s_job:   # job名稱
  image: registry.cn-hangzhou.aliyuncs.com/haoshuwei24/kubectl:1.16.6   # 本階段構建使用的構建鏡像
  stage: deploy_k8s   # 關聯的階段名稱
  tags:                      # GitLab Runner的tag
    - k8s-runner
  script:
    - mkdir -p /etc/deploy
    - echo $kube_config |base64 -d > $KUBECONFIG   # 配置串連Kubernetes叢集的config檔案
    - sed -i "s/IMAGE_TAG/$CI_PIPELINE_ID/g" deployment.yaml  # 動態替換部署檔案中的鏡像tag
    - cat deployment.yaml
    - kubectl apply -f deployment.yaml
執行Pipeline
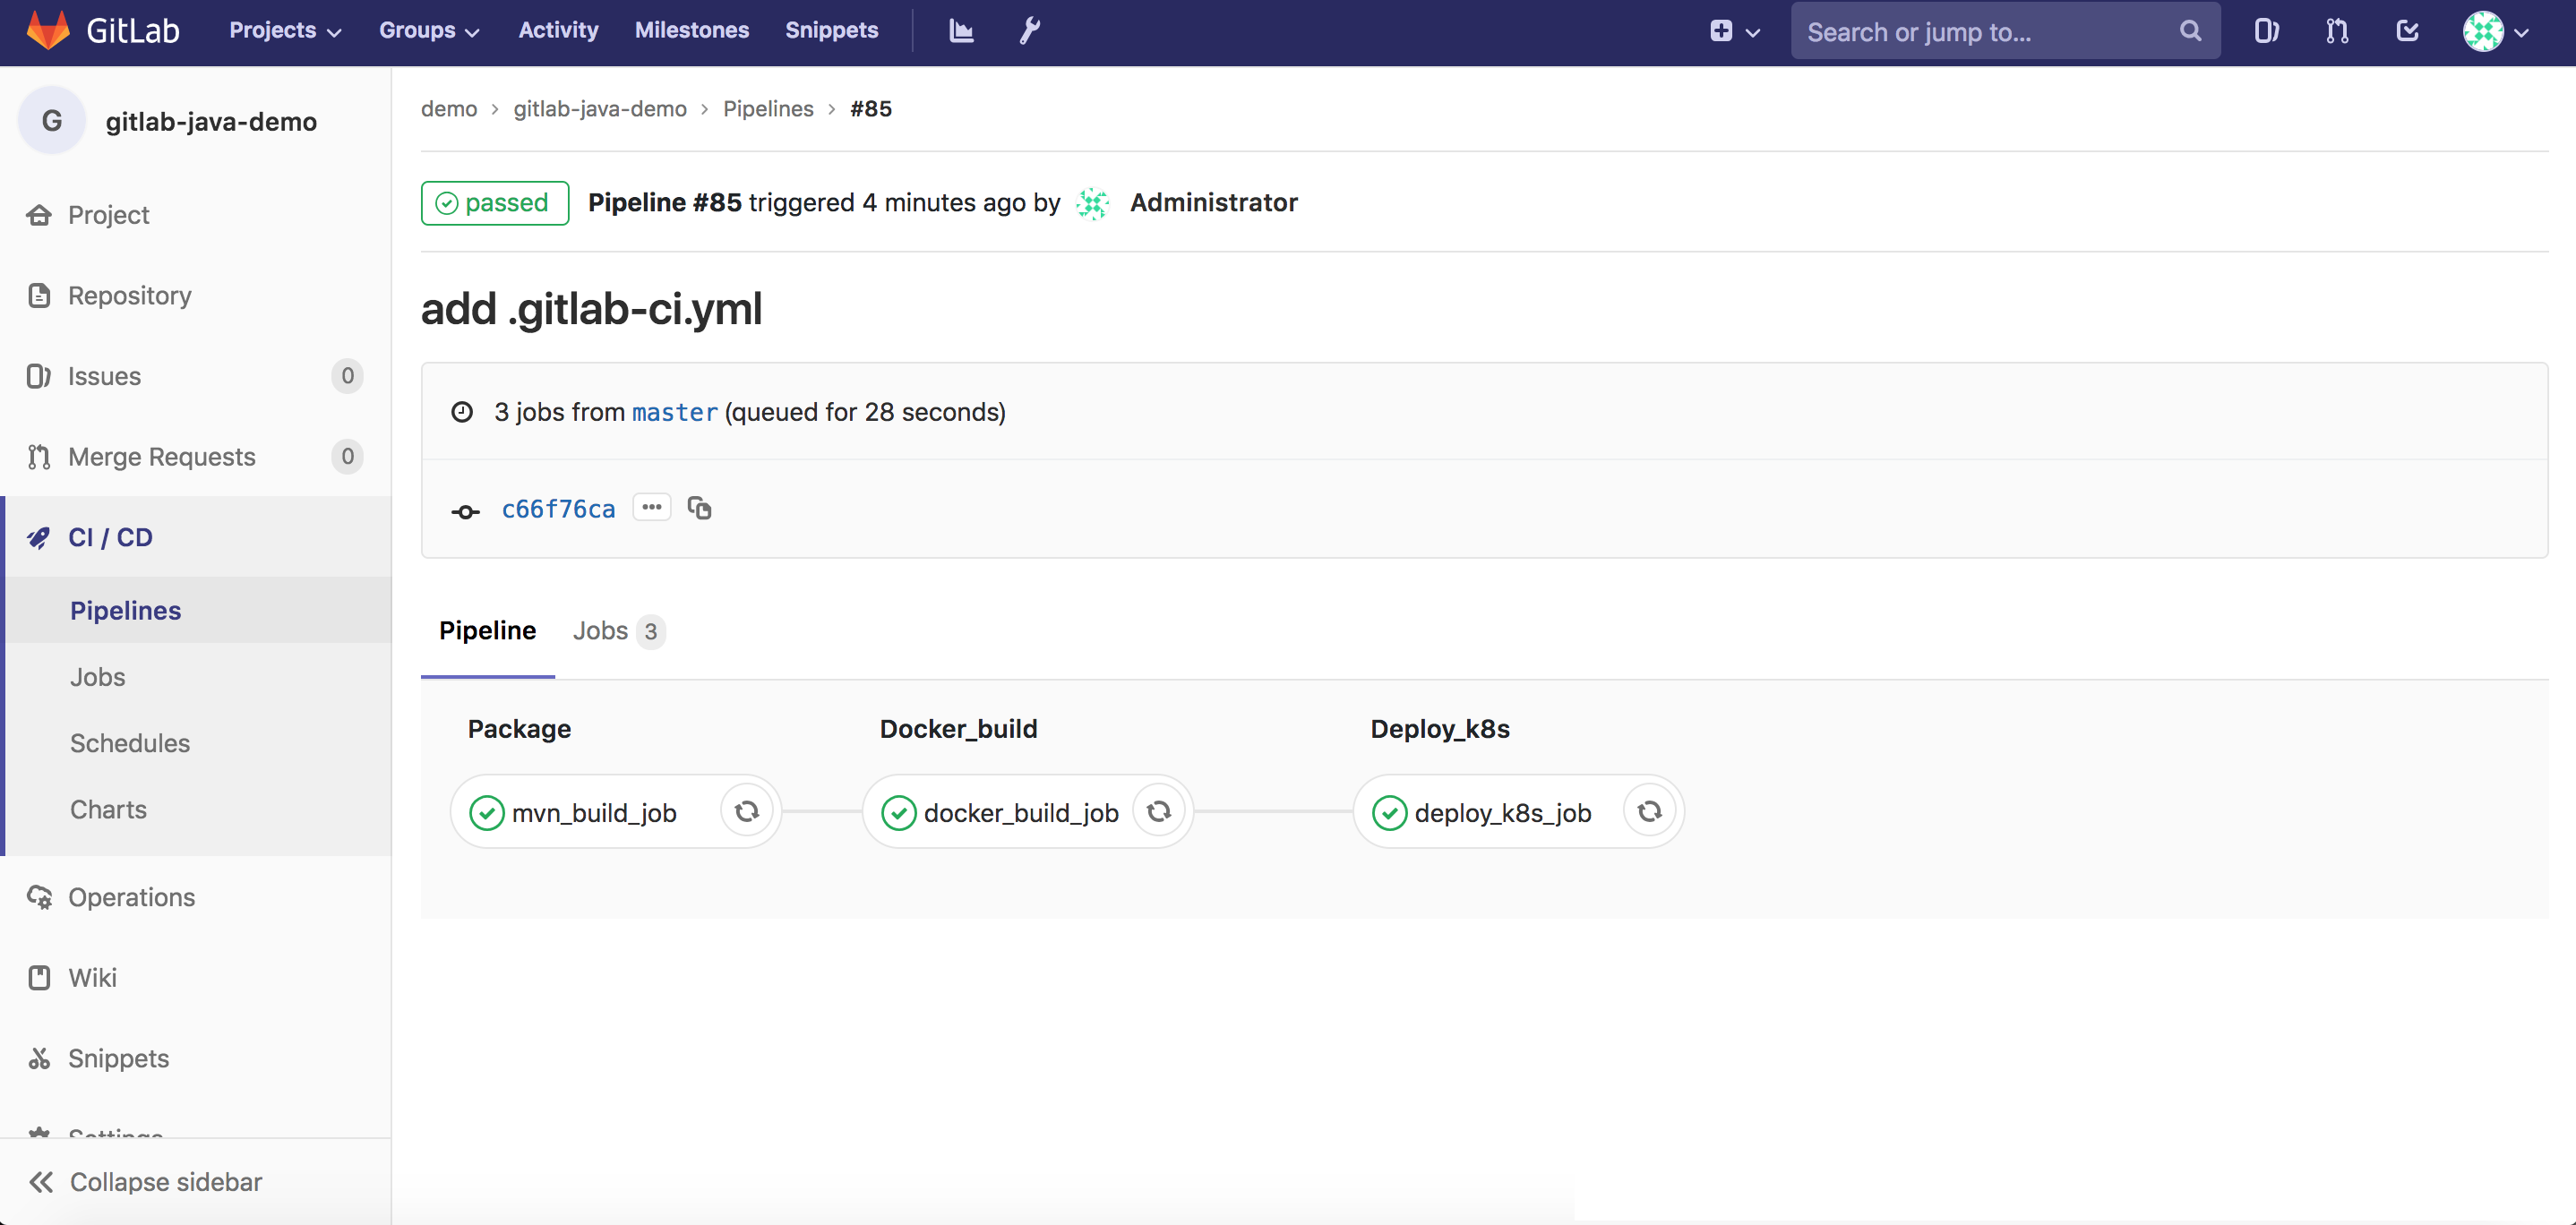
提交.gitlab-ci.yml檔案後,Project gitlab-java-demo會自動檢測到這個檔案並執行Pipeline, 如下圖所示。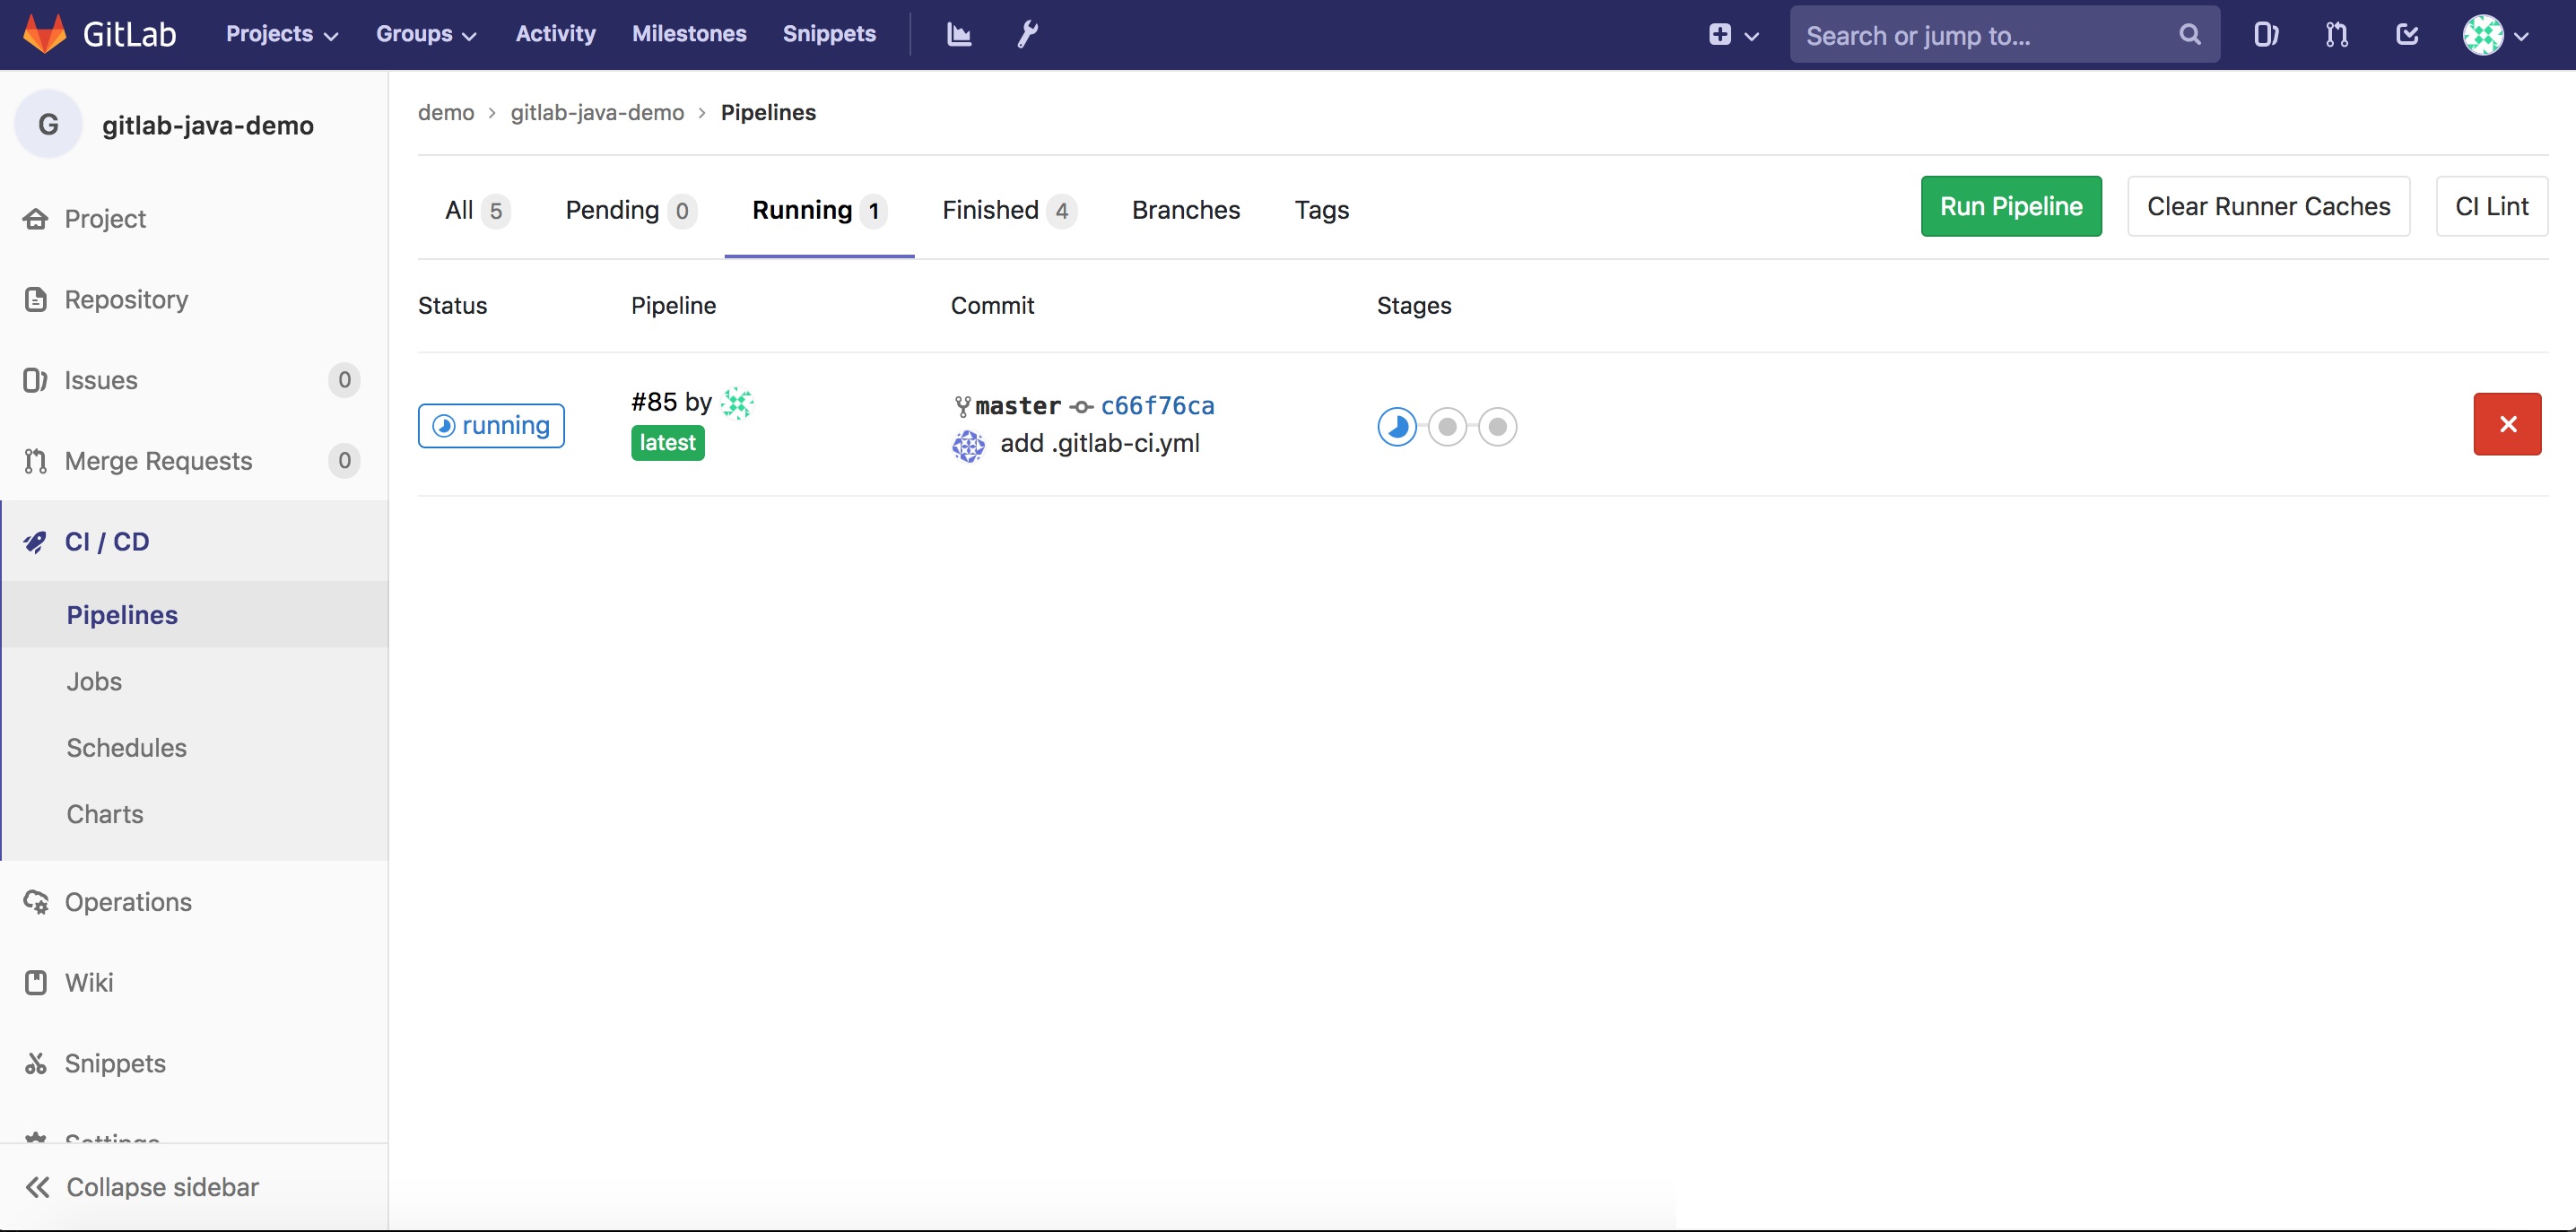


訪問服務
如果部署檔案中沒有指定Namespace,則預設會部署到GitLab命名空間下:
kubectl -n gitlab get svc 預期輸出:
NAME        TYPE           CLUSTER-IP     EXTERNAL-IP      PORT(S)        AGE
java-demo   LoadBalancer   172.19.9.252   xx.xx.xx.xx   80:32349/TCP   1m
瀏覽器訪問xx.xx.xx.xx/demo進行驗證。
瞭解更多Container Service的相關內容,請參見Container Service。
瞭解更多GitLab CI的相關內容,請參見GitLab CI。