SAP HANA High Availability Deployment Guide
Release History
Version | Revision Date | Change Content | Release Date |
1.0 | 2018/9/7 | ||
2.0 | 2019/4/23 | 1. Optimize deployment process and document structure 2. Update all screenshots 3. Add LVM configuration process for SAP HANA file system | 2019/4/23 |
2.1 | 2019/7/4 | 1. Update deployment architecture 2. Optimize NAS parameters | 2019/7/4 |
2.2 | 2020/10/27 | 1. Update SAP HANA-certified instance specifications | 2020/10/27 |
2.3 | 2020/12/10 | 1Add operating system and storage configuration content, such as clock source setting and disabling automatic hostname configuration by DHCP 2.update SAP HANA certified instance specifications | 2020/12/10 |
2.4 | 2021/05/28 |
| 2021/05/28 |
2.5 | 2021/06/08 | 1. Optimize file system planning and configuration | 2021/06/08 |
2.6 | 2021/11/11 | 1. Update fence_aliyun sbd algorithm 2. Optimize the deployment of cloud products | 2021/11/11 |
Overview
This document describes how to deploy SAP HANA high availability (HA) within a zone of Alibaba Cloud.
This document is not a substitute for SAP standard documents. The installation and deployment methods described in this document are for reference only. We recommend that you read official SAP installation and configuration document and SAP Notes that are recommended in this document before deployment.
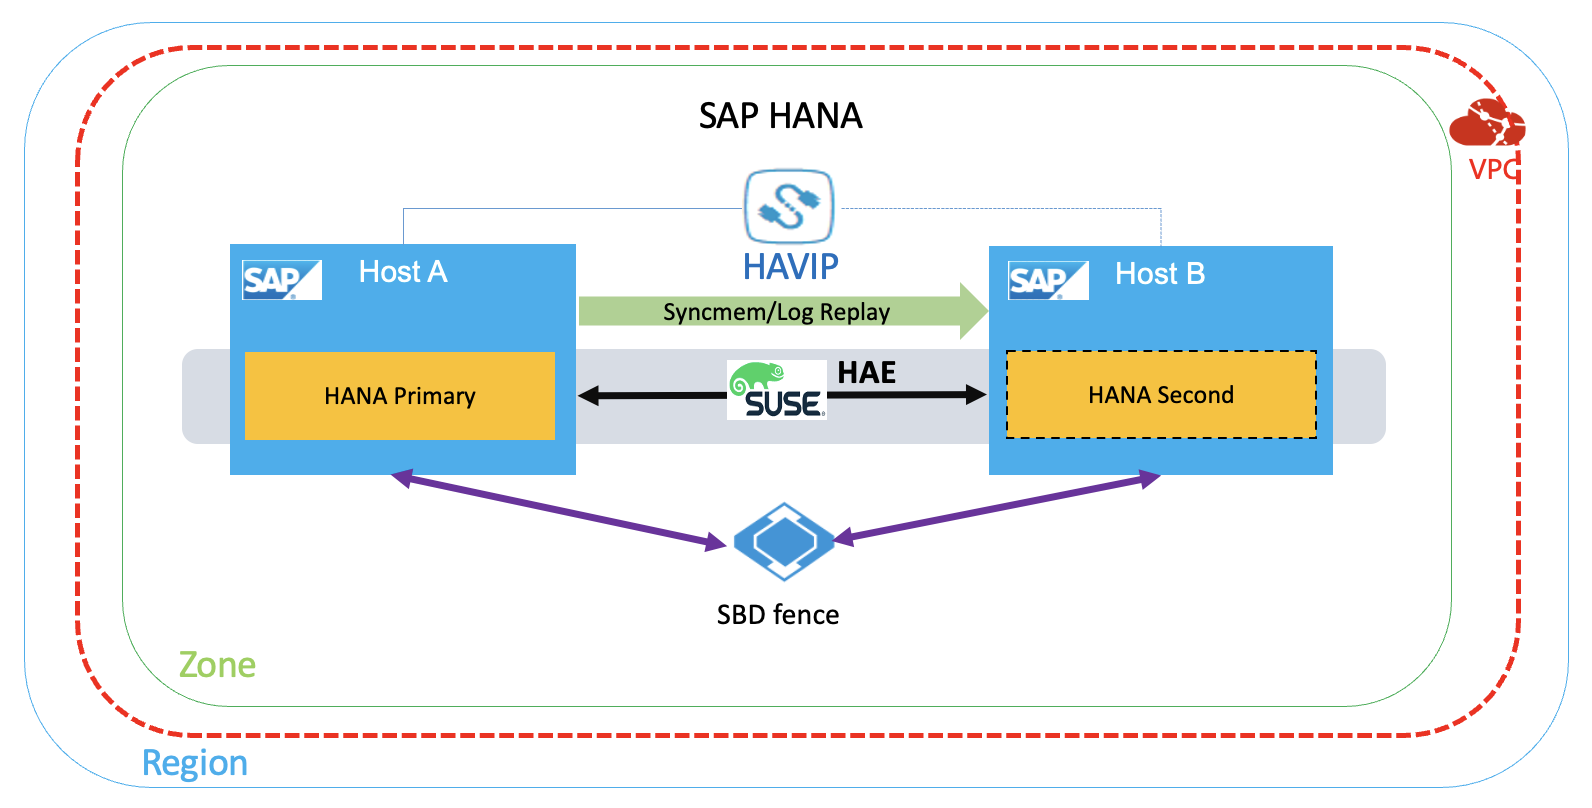
HANA HA architecture
The architecture in this deployment is as follows:
Preparations
Installation media
Access Method | Access Principle | Remarks |
Upload directly | Upload the package to ECS | |
OSS+ ossutil | Upload the package to OSS and then download it to ECS. |
VPC network planning
Network | Location | Usage | Allocated Subnet |
Service network | East China 2 zone F | For Business/SR | 192.168.10.0/24 |
Heartbeats network | East China 2 zone F | For HA | 192.168.20.0/24 |
Host planning
Host Name | Role | Heartbeat adress | Service Address | Virtual Address |
saphana-01 | Hana primary node | 192.168.10.19 | 192.168.10.168 | 192.168.10.12 |
saphana-02 | Hana secondary node | 192.168.20.20 | 192.168.10.169 | 192.168.10.12 |
File system planning
The file systems in this example are divided as follows:
Property | File System Size | Cloud Disk Capacity * Number | Cloud Disk Type | File System | VG | Striped based on LVM | Mount Point |
Data Disk | 900G | 300G*3 | SSD or ESSD | XFS | datavg | Yes | /hana/data |
Data Disk | 400G | 400G*3 | SSD or ESSD | XFS | logvg | No | /hana/log |
Data Disk | 300G | 300G*1 | SSD or ESSD | XFS | sharedvg | No | /hana/shared |
Data Disk | 50G | 50G*1 | Ultra Disk | XFS | sapcg | No | /usr/sap |
Create VPC
The Virtual Private Cloud (VPC) is an isolated network environment built on Alibaba Cloud. VPCs are logically isolated from each other. VPC is your dedicated private network on cloud. You have full control over your own VPC instance, including choosing IP address range and configuring route table and gateway. For more information and related documents, see product documentation.
Log on to VPC console, and click Create VPC . Create a VPC, SAP service subnet, heartbeat subnet as planned.
Create SAP HANA ECS instance
Create SAP HANA primary node ECS instance
ECS purchasing page
Access ECS product page to open the purchasing page. Select an instance type under SAP HANA and click Buy.
Select a payment method
Select either of the following payment methods: Subscription and Pay-As-You-Go.
Select region and zone.
Select region and zone. By default, the zones are allocated randomly. You can select a zone according to your needs. For details about region and zone selection, see Region and Zone. In this example, China East 2 zone A is selected.
Select instance specifications
So far SAP HANA-certified instance types, see SAP HANA-certified ECS instance. You can also visit SAP official website to obtain Certified and Supported SAP HANA Hardware.
Select image
You can select public, custom, or shared image, or select an image from market.
You can select image type and version of SAP HANA according to your needs.
Click "select from image marketplace" to enter image marketplace. Query the keyword "sap". In this example, "SUSE linux Enterprise Server for SAP 12 SP3" image is used.
Configure storage
System disk:Mandatory. Used to install the operating system. You need to specify cloud disk type and capacity of system disk.
Data disk:Optional. If you create a cloud disk as a data disk, you must specify cloud disk type, capacity, quantity, and whether to encrypt. You can create an empty cloud disk, or use snapshot to create a cloud disk. A maximum of 16 cloud disks can be configured as the data disks.
The capacity of data disks needs to be adjusted according to the number of HANA instances.
In this example, /hana/data uses three SSDs or ESSDs of the same capacity are striped with LVM to meet the performance requirements of SAP hana, /hana/log, /hana/shared uses a single SSD or ESSD, all file systems are XFS.
For more information about SAP HANA storage requirements, see Sizing SAP HANA.
Select a network type
Click Next: Network and Security Group to configure network and security group.
1. Select a network type.
Select VPC and business CIDR block as planned.
2. Set public network bandwidth.
Set appropriate public network bandwidth as needed.
Select security group
Select a security group. If you do not create a security group, retain the default security group. For the rules of the default security group, see Default security group rules.
ENI configuration
The second ENI should be added after ECS instance is successfully created.
Configure deployment set
When you create an ECS instance in a specified deployment set, ECS instances in the specified deployment set are dispersed strictly based on physical servers. This ensures high availability of services when exceptions such as hardware faults occur.
For more information about deployment sets, see Overview.
In this example, two SAP HANA instances of the HA architecture are added to the deployment set S4HANA_HA, we also recommend that you use this method to manage ECS instances in SAP ASCS and SCS high-availability deployments.
Select a created deployment set. If no deployment set is available, You can access ECS console to create deployment set.
After the deployment set is created, return to the page and select the deployment set to complete the system configurations and grouping settings.
Create SAP HANA secondary node ECS instance
Follow the preceding steps to create SAP HANA secondary node ECS instance.
SAP HANA primary node ECS instance and HANA secondary node ECS instance must be deployed in the same deployment set.
Deploy cloud resources
Configure ENI
ENI is a virtual network card that can be appended to an ECS instance in VPC. With ENI, you can build high-availability clusters, implement failover at a low cost, and achieve refined network management. All regions support ENI. For more information, see ENI.
Create an ENI
In this example, create an ENI for each ECS instance as planned.
[1] Log on to the ECS console, Select Network and Security > ENI from the left navigation bar. Select a region. Click Create ENI.
[2] Select the corresponding VPC and vSwitch as planned. After creating an ENI, bind it to the HANA ECS instance.
[3] Logon to the operating system to configure NIC.
Log on to SUSE graphic window to enter network configuration or run yast2 network through terminal, configure static IP address and subnet mask of the new ENI as planned, and ensure that the ENI is active. You can run the following command to query the configuration and status of the Eni:
ip addr shIf you need to modify the internal IP address of the primary Nic, see Modify the private IP address of an instance.
Configure HaVip
Private High-Availability Virtual IP Address (HaVip) is a private IP resource which can be created and released independently. The uniqueness of HaVip is that you can broadcast IP address on ECS using ARP. In this deployment, the HaVip is used as virtual IP address of cluster and is attached to each node in cluster.
Create HaVip
The HaVip is used by the HANA instance to provide service, and is an IP address on the service subnet.
Log on to the VPC console, choose high-availability virtual IP(havip), and click create high-availability virtual IP (havip). Select a vSwitch (primary Nic) in the business CIDR block, select automatic or manual IP address allocation as needed.
Please contact your Alibaba Cloud Solution Architect (SA) to help you complete product application.
Associate SAP HANA primary and secondary nodes
Access management page of the created HaVIP, and bind two ECS instances in cluster.
After the initial binding, the two ECS instances are in the standby state. The correct status is displayed only after SUSE HAE's cluster software takes over the resources.
Configure fence
Alibaba Cloud provides two solutions for you to achieve fence function in SAP system deployment. We recommend that you use Solution 1: shared block storage. If the selected region does not support shared block storage, Select Solution 2: fence_aliyun.
Solution 1: shared block storage
ECS shared block storage refers to the data block-level storage device that allows multiple ECS instances to read and write data concurrently. It features high concurrency rate, high performance, and high reliability. A single block can be attached to a maximum of 16 ECS instances.
As the SBD device of the HA cluster, select shared block storage in the same region and zone as the ECS instance, and attach it to the ECS instance in HA cluster.
Please contact your Alibaba Cloud Solution Architect (SA) to help you complete product application.
[1] Create shared block storage
Log on to the ECS console, choose ECS Storage and snapshots, click shared block storage, and create shared block storage in the same region and zone.
After the shared block storage device is created, return to shared block storage console and attach it to the two ECS instances in HA cluster.
[2] Configure shared block storage
Log on to operating system and view disk information.
lsblk
NAME   MAJ:MIN RM  SIZE RO TYPE MOUNTPOINT
vda    253:0    0  100G  0 disk
└─vda1 253:1    0  100G  0 part /
vdb    253:16   0  500G  0 disk
vdc    253:32   0  500G  0 disk
vdd    253:48   0  500G  0 disk
vde    253:64   0   64G  0 disk
vdf    253:80   0   20G  0 disk
In this example, /dev/vdf disk is the shared block storage device ID.
configure watchdog(two nodes in cluster)
echo "modprobe softdog" > /etc/init.d/boot.local
echo "softdog" > /etc/modules-load.d/watchdog.conf
modprobe softdog

# watchdog configuration check
ls -l /dev/watchdog
crw------- 1 root root 10, 130 Apr 23 12:09 /dev/watchdog
lsmod | grep -e wdt -e dog
softdog                16384  0
grep -e wdt -e dog /etc/modules-load.d/watchdog.conf
softdog
Configure SBD (two nodes in cluster)
sbd -d /dev/vdf -4 60 -1 30 create

# Set SBD parameters
vim /etc/sysconfig/sbd

# Replace the SBD_DEVICE value with the device ID of the shared block storage device
SBD_DEVICE="/dev/vdf"
SBD_STARTMODE="clean"
SBD_OPTS="-W"
Check the SBD status
Check the SBD status on both nodes
sbd -d /dev/vdf listEnsure that the SBD status is clear on both SAP HANA nodes:
sbd -d /dev/vdf list
0       saphana-01      clear
1       saphana-02      clear
Vertify SBD configuration
Ensure that the fenced node is disabled, this operation will restart the node.
In this example, log on to the primary node saphana01
sbd -d /dev/vdf message saphana-02 resetIf the secondary node saphana-02 restarted normally, the configuration was successful.
After the secondary node is restarted, you need to manually reset it to clear state.
sbd -d /dev/vdf list
0       saphana-01      clear
1       saphana-02      reset   saphana-01
sbd -d /dev/vdf message saphana-02 clear
sbd -d /dev/vdf list
0       saphana-01      clear
1       saphana-02      clear   saphana-01
Solution 2: fence aliyun
Fence_aliyun is developed for Alibaba Cloud platform and used to isolate faulty nodes of SAP system in a high-availability environment. By calling Alibaba Cloud APIs, you can flexibly schedule and manage Alibaba cloud resources and deploy SAP systems in the same zone to meet the high availability deployment requirements of your core SAP applications.
Fence_aliyun is an open source fence agent developed for Alibaba cloud environment. It is used to isolate the failure nodes of SAP system high availability environment.
SUSE Enterprise Server for SAP Applications 12 SP4 and later versions already natively integrate the fence_aliyun component. With this component, you can use it directly for high-availability deployment of SAP systems on Alibaba Cloud public cloud without the need for additional download and installation.
[1] Prepare the environment
In this example, we use an Alibaba Cloud SUSE CSP image to download or update SUSE components. You can directly connect to the SUSE SMT update source to download or update SUSE components.
If your custom image is used, see How to register SLES using the SUSE Connect command line tool to connect to SUSE official update repository.
To install open-source software such as python, you must connect to internet. Make sure that you have configured an EIP for the ECS instance or a NAT gateway.
Install python and pip
Fence_aliyun supports only python3.6 and later versions. Make sure that you meet the minimum version requirements.
# Check version of Python3.
python3 -V
Python 3.6.15
# Check pip version of Python package management tool.
pip -V
pip 21.2.4 from /usr/lib/python3.6/site-packages/pip (python 3.6)
If Python 3 is not installed or earlier than Python 3.6, you need to install python 3.6 or above.
The following is an example of installing python 3.6.15.
#  Install python3.6
wget https://www.python.org/ftp/python/3.6.15/Python-3.6.15.tgz
tar -xf Python-3.6.15.tgz
./configure
make && make install
# Verify the installation
python3 -V

# Install pip
curl https://bootstrap.pypa.io/pip/3.6/get-pip.py -o get-pip.py
python3 get-pip.py
# Verify the installation
pip3 -V
[2] Install aliyun SDK
Make sure that the aliyun-python-sdk-core version is not earlier than 2.13.35 and the aliyun-python-sdk-ecs version is not earlier than 4.24.8.
python3 -m pip install --upgrade pip
pip3 install --upgrade  aliyun-python-sdk-core
pip3 install --upgrade  aliyun-python-sdk-ecs
# Install dependency packages
pip3 install pycurl pexpect
zypper install libcurl-devel

# Verify the installation
pip3 list | grep aliyun-python
aliyun-python-sdk-core 2.13.35
aliyun-python-sdk-core-v3 2.13.32
aliyun-python-sdk-ecs  4.24.8
[3] Configure the RAM Role
Fence_aliyun uses a RAM role to obtain the status of cloud resources such as ECS instances and start or stop instances.
Log on to the Alibaba Cloud Console. Choose Access Control Policies. On the policies page, click create policy.
In this example, the policy name is SAP-HA-ROLE-POLICY. The policy content is as follows:
{
    "Version": "1",
    "Statement": [
        {
            "Effect": "Allow",
            "Action": [
                "ecs:StartInstance",
                "ecs:StopInstance",
                "ecs:RebootInstance",
                "ecs:DescribeInstances"
            ],
            "Resource": [
                "acs:ecs:*:*:instance/*"
            ]
        }
    ]
}
Grant a permission policy to a role
Return to the console, choose roles and locate AliyunECSAccessingHBRRole. Click add permissions and select custom policy, add the SAP-HA-ROLE-POLICY to AliyunECSAccessingHBRRole ROLE.
Authorize a RAM Role to an ECS instance
In the ECS console, choose More, select grant or unbind RAM roles, and select or manually create AliyunECSAccessingHBRRole.
[4] Install and configure fence_aliyun
Download the latest version of fence_aliyun
To download fence_aliyun, you need to access github. Make sure that the network environment of your ECS instance can access github properly. If you encounter problems, please submit a ticket for help.
curl https://raw.githubusercontent.com/ClusterLabs/fence-agents/master/agents/aliyun/fence_aliyun.py > /usr/sbin/fence_aliyun

# Configure permissions
chmod 755 /usr/sbin/fence_aliyun
chown root:root /usr/sbin/fence_aliyun
Adaptive user environment
# Specifies that the interpreter is python3
sed -i "1s|@PYTHON@|$(which python3 2>/dev/null || which python 2>/dev/null)|" /usr/sbin/fence_aliyun
# Specify the lib Directory of the Fence agent
sed -i "s|@FENCEAGENTSLIBDIR@|/usr/share/fence|" /usr/sbin/fence_aliyun
Verify the installation
# Use fence_aliyun to query the running status of the ECS instance
# Syntax example:
# fence_aliyun --[region ID] --ram-role [RAM role] --action status --plug '[ECS Instance ID]'
# Example:
fence_aliyun --region cn-beijing --ram-role AliyunECSAccessingHBRRole --action status --plug 'i-xxxxxxxxxxxxxxxxxxxx'

# If the configuration is normal, the status of the instance is returned. Example:
Status: ONFor more information about regions and Region IDs, see Regions and zones.
Operating system configuration
Modify host name
You can configure hostname resolution between two SAP HANA servers on two ECS instances of HA cluster.
The content of file /etc/hosts for this example is as follows:
127.0.0.1       localhost
#Service network
192.168.10.168  saphana-01      saphana-01
192.168.10.169  saphana-02      saphana-02

#Heartbeat network
192.168.20.19   hana-ha01 hana-ha01
192.168.20.20   hana-ha02 hana-ha02
Configure SSH password-free connection service
The SSH password-free connection service must be configured on the two HANA servers. The operation is as follows:
Configure the authentication public key
Run the following command on the HANA primary node:
ssh-keygen -t rsa
ssh-copy-id -i /root/.ssh/id_rsa.pub root@192.168.10.169
Run the following command on the HANA secondary node:
ssh-keygen -t rsa
ssh-copy-id -i /root/.ssh/id_rsa.pub root@192.168.10.168
Verify the configurations
Verify the SSH password-free connection service: Log on to the nodes from each other through SSH. If both logon processes do not need a password, the service is successful.
Disabled automatic hostname configuration by DHCP
Run the following command on both HANA primary node and HANA secondary node:
sed -i '/DHCLIENT_SET_HOSTNAME/ c\DHCLIENT_SET_HOSTNAME="no"' /etc/sysconfig/network/dhcpDisabled automatic update of files in etc/hosts
sed -i "s/^ - update_etc_hosts/#- update_etc_hosts/" /etc/cloud/cloud.cfgSet clock source to tsc
[1] Check current time source configuration
cat /sys/devices/system/clocksource/clocksource0/current_clocksource
kvm-clock
[2] Query available clock sources
cat /sys/devices/system/clocksource/clocksource0/available_clocksource
kvm-clock tsc acpi_pm
[3] Set clock source to tsc
sudo bash -c 'echo tsc > /sys/devices/system/clocksource/clocksource0/current_clocksource'If the setting is successful, the following information will be displayed in the kernel message.
dmesg | less
clocksource: Switched to clocksource tsc
[4] Configure clock source at system startup to be tsc
Back up and edit /etc/default/grub, add clocksource=tsc tsc=reliable to GRUB_CMDLINE_LINUX.
GRUB_CMDLINE_LINUX=" net.ifnames=0 console=tty0 console=ttyS0,115200n8 clocksource=tsc tsc=reliable"

# Generate the grub.cfg file
grub2-mkconfig -o /boot/grub2/grub.cfg
Log on to the ECS console and restart the ECS instance for the changes to take effect.
ECS Metrics Collector for SAP
ECS Metrics Collector is a monitoring agent that the SAP system uses on Alibaba Cloud to collect required virtual machine configuration information and underlying physical resource usage information for future performance statistics and problem analysis.
You must install Metrics Collector for each SAP application and database. for more information about how to deploy the monitoring agent, see ECS Metrics Collector for SAP Deployment Guide.
Partition SAP HANA file system
According to the previous file system planning, LVM is used to manage and configure cloud disks.
For more information about LVM, see LVM HOWTO.
Create PV&VG
pvcreate /dev/vdb /dev/vdc /dev/vdd /dev/vde /dev/vdf /dev/vdg
vgcreate datavg /dev/vdb /dev/vdc /dev/vdd
vgcreate logvg /dev/vde
vgcreate sharedvg /dev/vdf
vgcreate sapvg /dev/vdg
Creater LV
'Make stripes of the three 300GB SSDs in datavg'
 lvcreate -l 100%FREE -n datalv -i 3 -I 256 datavg
 lvcreate -l 100%FREE -n loglv logvg
 lvcreate -l 100%FREE -n sharedlv sharedvg
 lvcreate -l 100%FREE -n usrsaplv sapvg
Create a mount point and format the file system
mkdir -p /usr/sap /hana/data /hana/log /hana/shared
mkfs.xfs /dev/sapvg/usrsaplv
mkfs.xfs /dev/datavg/datalv
mkfs.xfs /dev/logvg/loglv
mkfs.xfs /dev/sharedvg/sharedlv
Mount a file system and add it to the automatic startup configuration
vim /etc/fstab
# Add the following items:
/dev/mapper/datavg-datalv  /hana/data  xfs defaults    0   0
/dev/mapper/logvg-loglv   /hana/log   xfs defaults    0   0
/dev/mapper/sharedvg-sharedlv    /hana/shared    xfs defaults    0   0
/dev/mapper/sapvg-usrsaplv /usr/sap    xfs defaults    0   0

# Mount a file system
mount -a
Install and configure SAP HANA
Install SAP HANA
The System ID and Instance ID of the primary and secondary nodes for SAP HANA must be the same. In this example, the System ID of SAP HANA is H01, and the Instance ID is 00.
For SAP HANA installation and configuration, see SAP HANA Platform.
Configure HANA System Replication
Install and configure SLES Cluster HA
Install SUSE HAE
For more information about SUSE HAE operations, see SUSE Product Documentation.
Check whether SUSE HAE and SAPHanaSR are installed on primary and secondary nodes of SAP HANA database.
In this example, a paid SUSE image is used. The image is pre-installed with the SUSE SMT Server and can be used for component check and installation. If the image is a custom image or other images, you need to purchase SUSE-authorized images and register them with the official SUSE SMT Server, or manually configure the zypper repository.
Ensure that the following components have been installed correctly:
# SLES 12 for Components of the SAP version
zypper in -y patterns-sles-sap_server
zypper in -y patterns-ha-ha_sles sap_suse_cluster_connector saptune fence-agents
# SLES 15 for Components of the SAP version
zypper in -y patterns-server-enterprise-sap_server
zypper in -y patterns-ha-ha_sles sap-suse-cluster-connector corosync-qdevice saptune fence-agents
Configure cluster
Configure Corosync from the VNC on SAP HANA instance.
# Go to the cluster configuration page
yast2 cluster
[1] Configure communication channel
Select a heartbeat CIDR block for Channel and a service CIDR block for Redundant Channel.
Add the Member address in correct order (Redundant Channel input service address)
Excepted Votes: 2
Transport: Unicast
[2] Configure Security
Choose"Enable Security Auth",and click Generate Auth Key File
[3] Configure Csync2
Add Sync host
Click Add Suggested Files
Click Generate Pre-Shared-Keys
Click Turn csync2 ON
Configure conntrackd retain the default value and goes to the next step.
[4] Configure Service
Check that the Cluster service is not automatically started at startup.
After the configuration is complete, save the file and exit. Copy the Corosync configuration file to secondary node of SAP HANA.
# scp -pr /etc/corosync/authkey /etc/corosync/corosync.conf root@saphana-02:/etc/corosync/[5] Start cluster
Run the following command on both nodes:
# systemctl start pacemaker[6] View the cluster status
Now that both nodes are online, configure the managed resources later.
crm_mon -r
Stack: corosync
Current DC: saphana-02 (version 1.1.16-4.8-77ea74d) - partition with quorum
Last updated: Tue Apr 23 11:22:38 2019
Last change: Tue Apr 23 11:22:36 2019 by hacluster via crmd on saphana-02

2 nodes configured
0 resources configured

Online: [ saphana-01 saphana-02 ]

No resources
[7] Launch WEB page graphical configuration
(1)Activate the Hawk2 service on two ECS instances.
# Sets the password for an hacluster user.
passwd hacluster

# Restart the service to make the settings take effect.
systemctl restart hawk
(2)Access Hawk2
Open a browser and access the hawk WEB Console
https://[ECS instance IP ADDRESS]:7630Enter the username hacluster and the password to log on.
SAP HANA integrates with SUSE HAE
This example introduces two configurations of the SBD fence device. Select corresponding configuration script based on the SBD fence scheme.
Solution 1: Use shared block storage to implement the SBD fence
Log on to a node in the cluster and replace SID, InstanceNumber, and params ip in the script with the values of SAP system.
In this example, SID:H01, InstanceNumber:00, params ip:192.168.10.12, Script file name HANA_HA_script.txt
###SAP HANA Topology is a resource agent that monitors and analyze the HANA landscape and communicate the status between two nodes##
primitive rsc_SAPHanaTopology_HDB ocf:suse:SAPHanaTopology \
        operations $id=rsc_SAPHanaTopology_HDB-operations \
        op monitor interval=10 timeout=600 \
        op start interval=0 timeout=600 \
        op stop interval=0 timeout=300 \
        params SID=H01 InstanceNumber=00
###This file defines the resources in the cluster together with the Virtual IP###
primitive rsc_SAPHana_HDB ocf:suse:SAPHana \
        operations $id=rsc_SAPHana_HDB-operations \
        op start interval=0 timeout=3600 \
        op stop interval=0 timeout=3600 \
        op promote interval=0 timeout=3600 \
        op monitor interval=60 role=Master timeout=700 \
        op monitor interval=61 role=Slave timeout=700 \
        params SID=H01 InstanceNumber=00 PREFER_SITE_TAKEOVER=true DUPLICATE_PRIMARY_TIMEOUT=7200 AUTOMATED_REGISTER=false
#This is for sbd setting##
primitive rsc_sbd stonith:external/sbd \
        op monitor interval=20 timeout=15 \
        meta target-role=Started maintenance=false
#This is for VIP resource setting##
primitive rsc_vip IPaddr2 \
        operations $id=rsc_vip-operations \
        op monitor interval=10s timeout=20s \
        params ip=192.168.10.12
ms msl_SAPHana_HDB rsc_SAPHana_HDB \
        meta is-managed=true notify=true clone-max=2 clone-node-max=1 target-role=Started interleave=true maintenance=false
clone cln_SAPHanaTopology_HDB rsc_SAPHanaTopology_HDB \
        meta is-managed=true clone-node-max=1 target-role=Started interleave=true maintenance=false
colocation col_saphana_ip_HDB 2000: rsc_vip:Started msl_SAPHana_HDB:Master
order ord_SAPHana_HDB Optional:cln_SAPHanaTopology_HDB msl_SAPHana_HDB
property cib-bootstrap-options:\
        have-watchdog=true \
        cluster-infrastructure=corosync \
        cluster-name=cluster \
        no-quorum-policy=ignore \
        stonith-enabled=true \
        stonith-action=reboot \
        stonith-timeout=150s
rsc_defaults rsc-options: \
        migration-threshold=5000 \
        resource-stickiness=1000
op_defaults op-options: \
        timeout=600 \
        record-pending=true
Solution 2: Use Fence agent to implement SBD fence
Log on to a cluster node and create a txt file. Copy the script in the preceding example and modify the following parameters based on the SAP HANA deployment situation:
Replace the value of plug with the IDs of two ECS instances in the SAP HANA cluster.
Replace the value of ram_role with the value of the ram role configured above.
Replace the value of region with the region ID of the ECS instance.
Replace the ip address with the havip address of the cluster.
Replace SID and InstanceNumber with the SID and ID of the SAP HANA instance.
Replace location parameters with the hostname of the SAP HANA instance.
The relationship between the Alibaba Cloud Region and the Region ID is obvious, see Regions and zones.
The script file name in this example:HANA_HA_script.txt
primitive res_ALIYUN_STONITH_1 stonith:fence_aliyun \
    op monitor interval=120 timeout=60 \
    params plug=
i-xxxxxxxxxxxxxxxxxxxx
 ram_role=
AliyunECSAccessingHBRRole
 region=
cn-beijing
 \
    meta target-role=Started
primitive res_ALIYUN_STONITH_2 stonith:fence_aliyun \
    op monitor interval=120 timeout=60 \
    params plug=
i-xxxxxxxxxxxxxxxxxxxx
 ram_role=
AliyunECSAccessingHBRRole
 region=
cn-beijing
 \
    meta target-role=Started
# havip resources
primitive rsc_vip IPaddr2 \
        operations $id=rsc_vip-operations \
        op monitor interval=10s timeout=20s \
        params ip=
192.168.10.12

# SAP HANA Topology is a resource agent that monitors and analyze the HANA landscape and communicate the status between two nodes
primitive rsc_SAPHanaTopology_HDB ocf:suse:SAPHanaTopology \
        operations $id=rsc_SAPHanaTopology_HDB-operations \
        op monitor interval=10 timeout=600 \
        op start interval=0 timeout=600 \
        op stop interval=0 timeout=300 \
        params SID=
H01
 InstanceNumber=
00

# This file defines the resources in the cluster together with the Virtual IP
primitive rsc_SAPHana_HDB ocf:suse:SAPHana \
        operations $id=rsc_SAPHana_HDB-operations \
        op start interval=0 timeout=3600 \
        op stop interval=0 timeout=3600 \
        op promote interval=0 timeout=3600 \
        op monitor interval=60 role=Master timeout=700 \
        op monitor interval=61 role=Slave timeout=700 \
        params SID=
H01
 InstanceNumber=
00
 PREFER_SITE_TAKEOVER=true DUPLICATE_PRIMARY_TIMEOUT=7200 AUTOMATED_REGISTER=false

ms msl_SAPHana_HDB rsc_SAPHana_HDB \
        meta is-managed=true notify=true clone-max=2 clone-node-max=1 target-role=Started interleave=true maintenance=false
clone cln_SAPHanaTopology_HDB rsc_SAPHanaTopology_HDB \
        meta is-managed=true clone-node-max=1 target-role=Started interleave=true maintenance=false
colocation col_saphana_ip_HDB 2000: rsc_vip:Started msl_SAPHana_HDB:Master
location
loc_hana-master_stonith_not_on_hana-master
 res_ALIYUN_STONITH_1 -inf:
hana-master

#Stonith 1 should not run on primary node because it is controling primary node
location
loc_hana-slave_stonith_not_on_hana-slave
 res_ALIYUN_STONITH_2 -inf:
hana-slave

order ord_SAPHana_HDB Optional: cln_SAPHanaTopology_HDB msl_SAPHana_HDB

property cib-bootstrap-options: \
        have-watchdog=false \
        cluster-infrastructure=corosync \
        cluster-name=cluster \
        stonith-enabled=true \
        stonith-action=off \
        stonith-timeout=150s
rsc_defaults rsc-options: \
        migration-threshold=5000 \
        resource-stickiness=1000
op_defaults op-options: \
        timeout=600
Run the following command as the root user to allow SUSE HAE to take over SAP HANA resources.
crm configure load update HANA_HA_script.txtVerify cluster status
Log on to Hawk2 web console and access the server at https:// [ECS instance IP address]:7630.
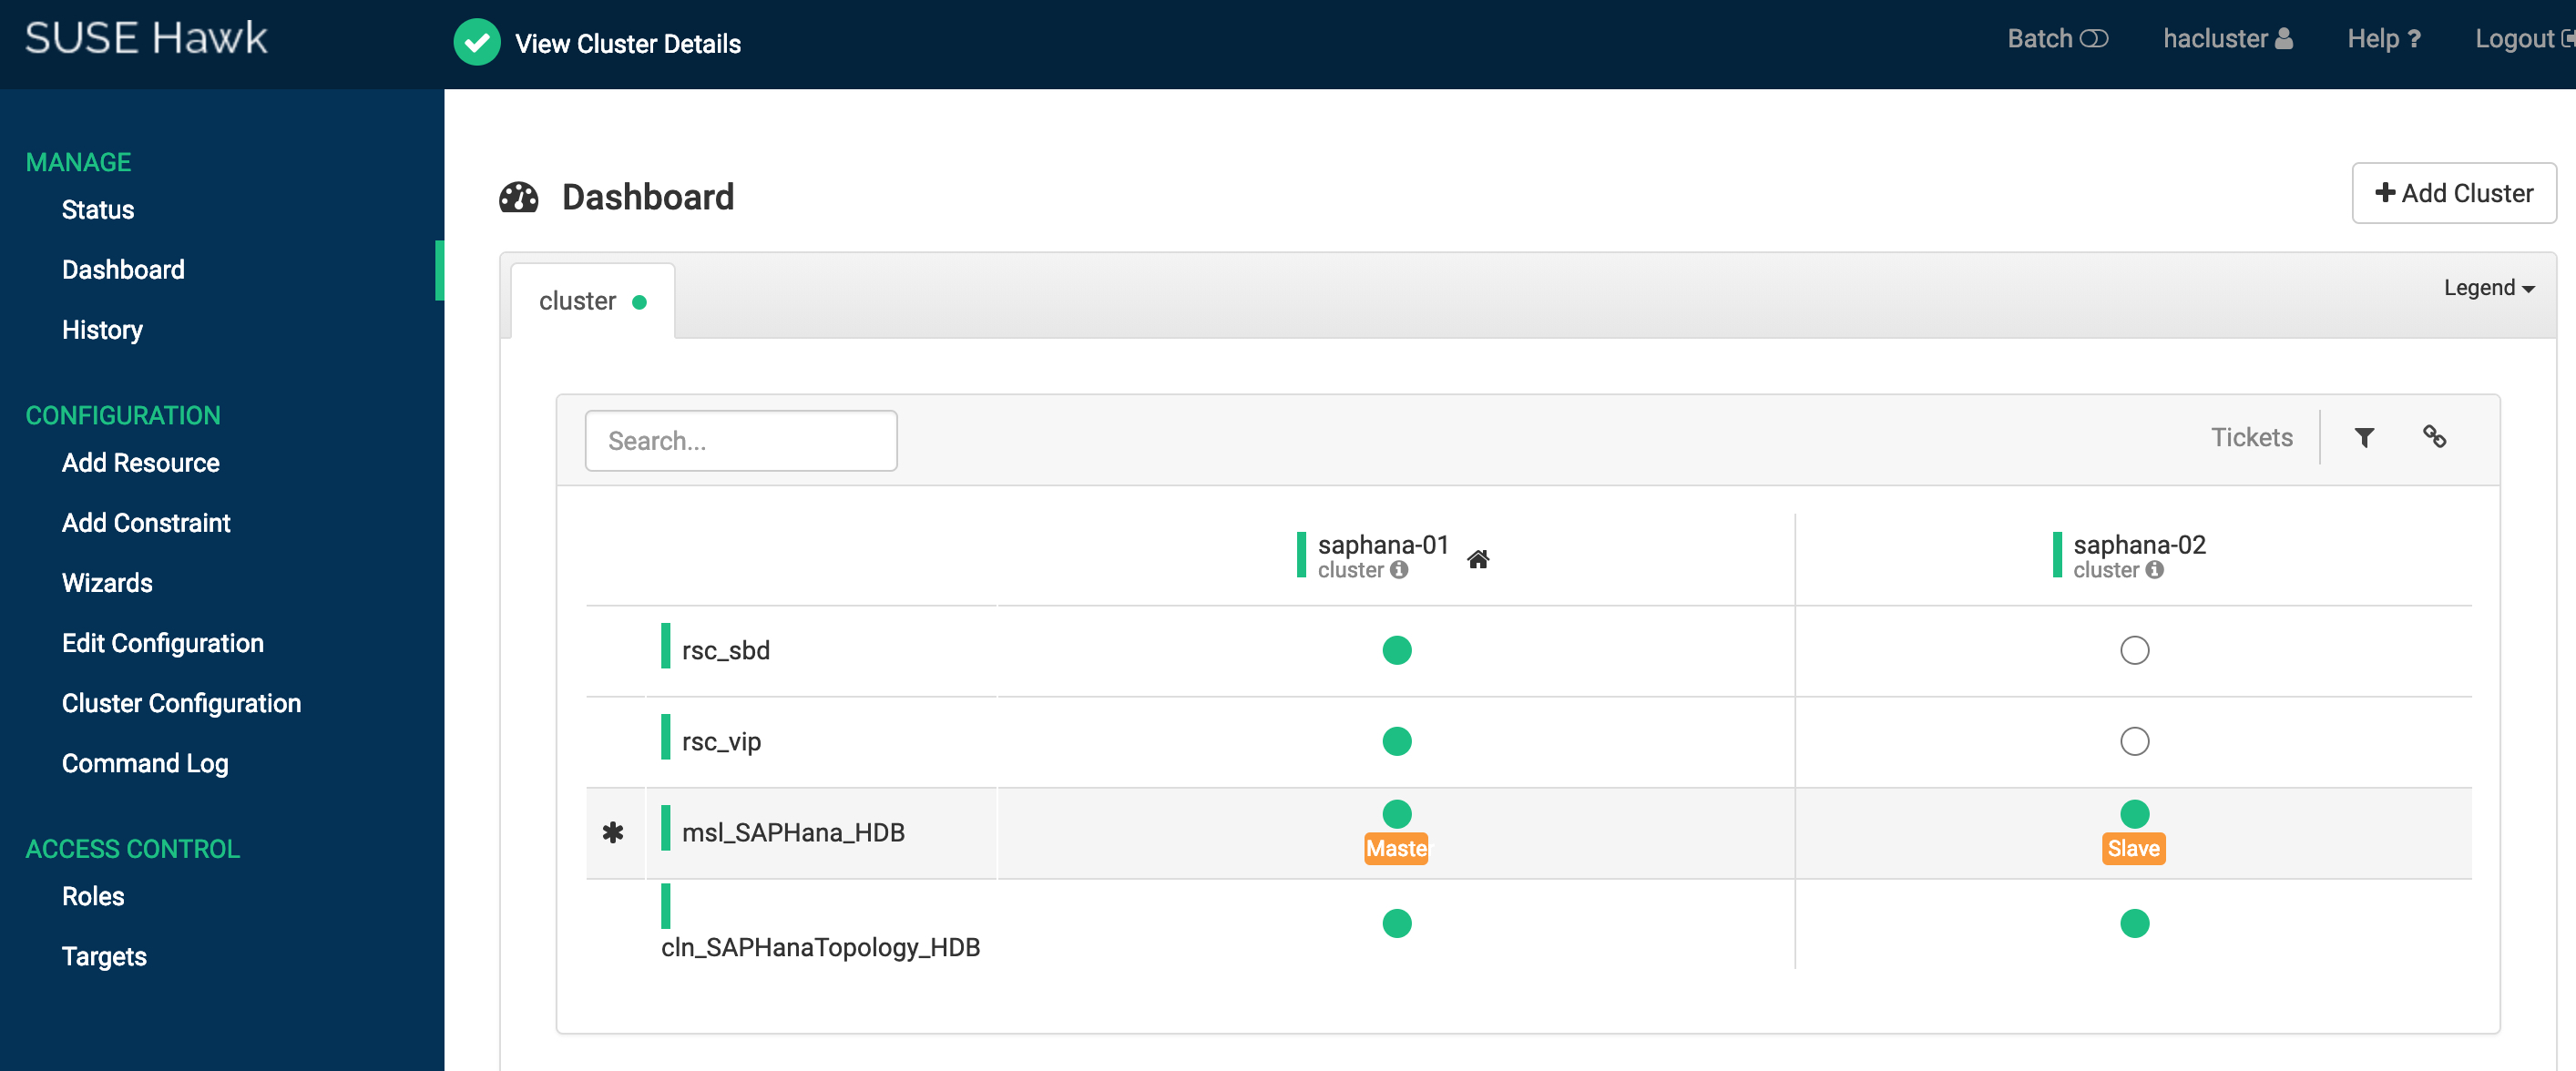
Solution 1: The Status and Dashboard of the SUSE HAE Cluster are as follows:

You can also log on to any node and run crmsh command to check cluster status.
crm_mon -r
Stack: corosync
Current DC: saphana-01 (version 1.1.16-4.8-77ea74d) - partition with quorum
Last updated: Wed Apr 24 11:48:38 2019
Last change: Wed Apr 24 11:48:35 2019 by root via crm_attribute on saphana-01

2 nodes configured
6 resources configured

Online: [ saphana-01 saphana-02 ]

Full list of resources:

rsc_sbd (stonith:external/sbd): Started saphana-01
rsc_vip (ocf::heartbeat:IPaddr2):       Started saphana-01
 Master/Slave Set: msl_SAPHana_HDB [rsc_SAPHana_HDB]
     Masters: [ saphana-01 ]
     Slaves: [ saphana-02 ]
 Clone Set: cln_SAPHanaTopology_HDB [rsc_SAPHanaTopology_HDB]
     Started: [ saphana-01 saphana-02 ]
Solution 2: the Status and Dashboard of the SUSE HAE Cluster in the Fence agent are as follows:

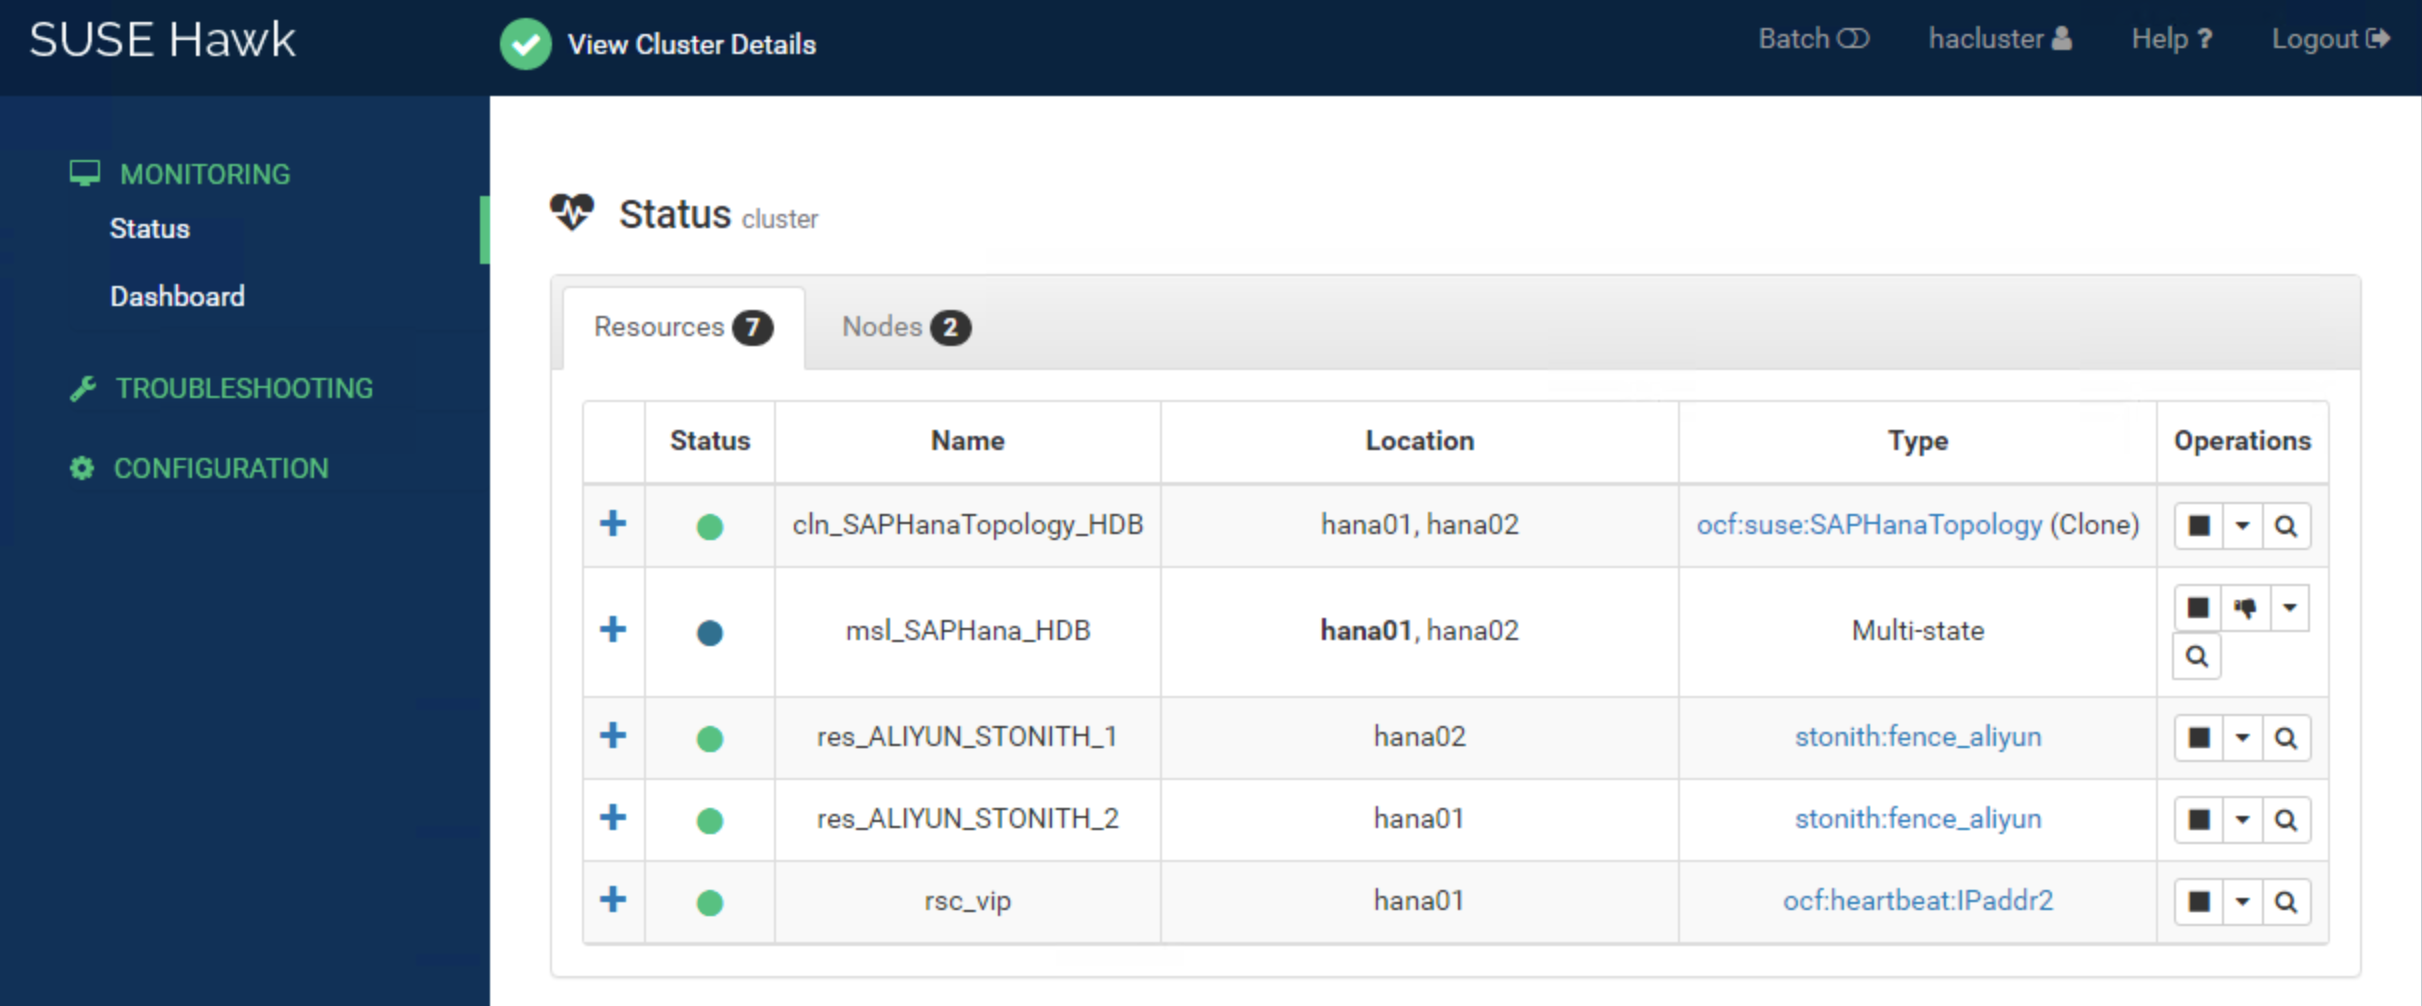
You can also log on to any node and run the crmsh command to check cluster status.
crm_mon -r
Stack: corosync
Current DC: hana02 (version 2.0.1+20190417.13d370ca9-3.21.1-2.0.1+20190417.13d370ca9) - partition with quorum
Last updated: Sat Jan 29 13:14:47 2022
Last change: Sat Jan 29 13:13:44 2022 by root via crm_attribute on hana01

2 nodes configured
7 resources configured

Online: [ hana01 hana02 ]

Full list of resources:

res_ALIYUN_STONITH_1    (stonith:fence_aliyun): Started hana02
res_ALIYUN_STONITH_2    (stonith:fence_aliyun): Started hana01
rsc_vip (ocf::heartbeat:IPaddr2):       Started hana01
 Clone Set: msl_SAPHana_HDB [rsc_SAPHana_HDB] (promotable)
     Masters: [ hana01 ]
     Slaves: [ hana02 ]
 Clone Set: cln_SAPHanaTopology_HDB [rsc_SAPHanaTopology_HDB]
     Started: [ hana01 hana02 ]