This topic describes the project modes and directories used by the Register Transfer Level (RTL) compiler. This topic also provides a sample framework to help you understand how to use RTL.
Project modes
Vivado Design Suite is an integrated design environment released by a field-programmable gate array (FPGA) vendor. Vivado provides two use modes: Project Mode and Non-Project Mode. The following section describes the two use modes:
Non-Project Mode
In Non-Project Mode, a
.bitfile is created from a .dcp file. In this mode, you must combine all the .dcp files into one .dcp file and perform placement and routing before you can generate the .bit file. The RTL compiler on f3 instances uses the Non-Project mode.Project Mode
In Project Mode, a
.bitfile is created from a project. In this mode, you must create aXXX_prj.xprproject and import the RTL code and constraint files to the project before you can generate the .bit file.
Main directory of a project
The directories of a project include a main directory and a source directory. The project files of the Pull Request (PR) section are stored in the source directory, whereas the script files that are used to run the project are stored in the main directory. The following table describes the scripts that are stored in the main directory.
Script | Description |
compiling.sh | This script runs the entire project and generates the xclbin load file. |
create_design.tcl | This script can be executed in the Tcl Console of Vivado Design Suite. You must use this script to create the |
mem_design.tcl | This script is executed in the Tcl Console of Vivado Design Suite to re-instantiate the intellectual property (IP) core files of double data rate (DDR) memory. This script must be used together with the |
run_synth.tcl | This script must be used together with the |
run.tcl | This script is called by the |
generate_dcp.tcl | This script combines multiple .dcp files into one .dcp file to generate the final .dcp and .bit files. You can modify the policy to generate the final .dcp and .bit files. |
Sample framework
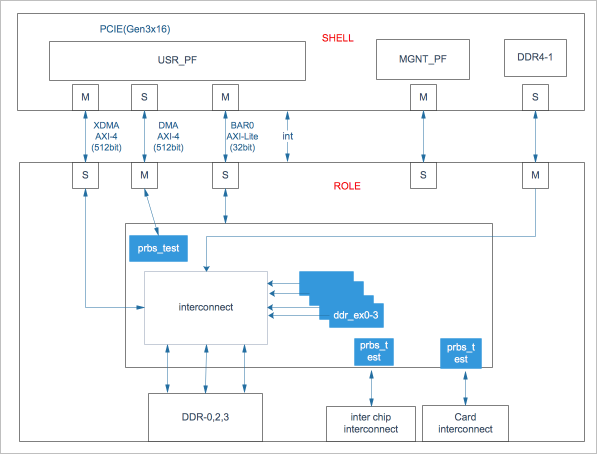
Alibaba Cloud provides sample code based on the following framework. For more information about the code, see Xilinx/dma_ip_drivers.
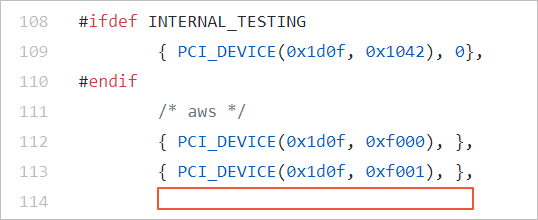
You can add
{ PCI_DEVICE(0x1ded, 0x1004), },to the following position in the sample code to change the ID of the device. Then, you can use the tool in the device to test your project. For more information about the AR65444 software and its tools, visit the Xilinx official website.
You can run the
create_design.tclscript in the Tcl Console of Vivado Design Suite to create a project and test the overall process.After the project is created, you can use Vivado Design Suite to open the .dcp file and view project information such as resources, timing, and wiring.