クラウドアシスタントエージェントは、Elastic Compute Service (ECS) インスタンスでクラウドアシスタントコマンドを実行するプログラムです。このトピックでは、クラウドアシスタントエージェントを使用して Windows ECS インスタンスに OpenSSH をインストールする方法について説明します。
前提条件
インスタンスにクラウドアシスタントエージェントがインストールされていること。詳細については、「クラウドアシスタントエージェントのインストール」をご参照ください。
パブリック IP アドレスが ECS インスタンスに自動的に割り当てられます。 または、Elastic IP アドレス (EIP) が ECS インスタンスに関連付けられます。 パブリック帯域幅を有効にする手順については、「パブリック帯域幅を有効にする」をご参照ください。
SSH ポート 22 でのトラフィックを許可するセキュリティグループルールが追加されていること。詳細については、「セキュリティグループルールの追加」をご参照ください。
説明クラウドアシスタントエージェントがサポートするオペレーティングシステムについては、「クラウドアシスタントの概要」の「制限事項」セクションをご参照ください。
操作手順
上部のナビゲーションバーで、管理するリソースのリージョンとリソースグループを選択します。

[コマンドの作成] ページで、コマンドを設定し、インスタンスを選択します。
パラメーター
説明
コマンド情報
コマンドソース
[コマンドコンテンツの入力] を選択して、新しいコマンドを作成します。
コマンドタイプ
コマンドタイプを選択します。
Windows の場合は、[PowerShell] を選択します。
コマンドコンテンツ
次のコマンドをコマンドコンテンツボックスに貼り付けます:
$curDir = $PSScriptRoot Set-Location $curDir # OS バージョンを確認 $OSversion = [Environment]::OSVersion.Version if ($OSversion.Major -lt 6 -or ($OSversion.Major -eq 6 -and $OSversion.Minor -lt 1)) { throw "このスクリプトは Windows 2008 以前ではサポートされていません" } $Arch =([Array](Get-WmiObject -Query "select AddressWidth from Win32_Processor"))[0].AddressWidth if ($Arch -ne "64") { throw "64 ビットのシステムアーキテクチャーのみがサポートされています" } function Check-Env() { $srv_status = (Get-WmiObject -Class win32_service -Filter "name= 'sshd'").Status if ( $srv_status -match "OK") { Write-Host "システムにはすでに opensshd がインストールされています" exit } } function Download-File($file_url = "{{sshd_download_url}}", $file_path = "C:\Programdata\OpenSSH-Win64.zip") { if (Test-Path $file_path) { return; } [System.Net.ServicePointManager]::SecurityProtocol=[System.Net.SecurityProtocolType]::Tls12 Invoke-WebRequest -Uri $file_url -OutFile $file_path -UseBasicParsing if (! $?) { throw "$file_url から $file_path へのダウンロードエラー" } } function Unzip-File($src_file = "C:\Programdata\OpenSSH-Win64.zip", $dst_file = "C:\Programdata") { Expand-Archive -Path $src_file -DestinationPath $dst_file if (! $?) { throw "$src_file から $dst_file への展開エラー、確認してください" } } function Install-Ssh() { powershell.exe -ExecutionPolicy Bypass -File C:\Programdata\OpenSSH-Win64\install-sshd.ps1 if (! $?) { throw "openssh のインストールエラー、確認してください" } Start-Service sshd Set-Service -Name "sshd" -StartupType Automatic; Start-Service sshd if (! $?) { throw "sshd の自動起動有効化または sshd の起動エラー、確認してください" } } Check-Env Download-File Unzip-File Install-Sshパラメーターの使用: このオプションをオンにします。
{{sshd_download_url}}パラメーターには、OpenSSH 公式サイトから目的の OpenSSH バージョンのダウンロード URL を指定します。例:https://github.com/PowerShell/Win32-OpenSSH/releases/download/v9.5.0.0p1-Beta/OpenSSH-Win64.zip。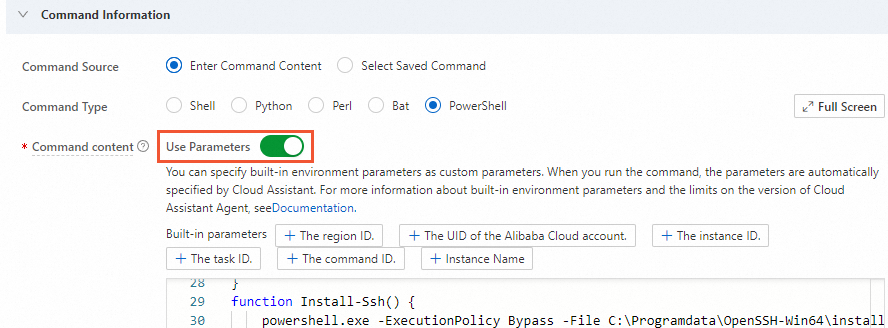
実行計画
[即時実行] をクリックします。
コマンド名
コマンドの名前を入力します。
コマンドの説明
コマンドの説明を入力します。分かりやすい説明は、コマンドの目的を明確にし、将来の管理に役立ちます。
実行ユーザー
ECS インスタンスでコマンドを実行するために使用するユーザー名です。
最小権限でコマンドを実行することは、権限管理のベストプラクティスです。クラウドアシスタントコマンドは一般ユーザーとして実行してください。詳細については、「一般ユーザーを設定してクラウドアシスタントコマンドを実行する」をご参照ください。
説明デフォルトでは、コマンドは Linux インスタンスでは root ユーザーとして、Windows インスタンスでは System ユーザーとして実行されます。
実行パス
コマンドが実行されるパスです。デフォルトのパスは次のとおりです:
Windows:デフォルトのパスはクラウドアシスタントエージェントのプロセスディレクトリです:
C:\ProgramData\aliyun\assist\$(version)。タイムアウト
インスタンスでのコマンドの [タイムアウト] 期間を設定します。コマンドタスクがタイムアウトすると、クラウドアシスタントはタスクプロセスを停止します。
単位は秒です。デフォルト値は 60 です。300 の値を推奨します。ネットワークの状況に応じて値を調整できます。
インスタンスの選択
コマンドを実行するターゲットインスタンスを選択します。
管理対象インスタンスの選択
コマンドを実行するターゲットの管理対象インスタンスを選択します。
説明管理対象インスタンスは、クラウドアシスタントによって管理される Alibaba Cloud 以外のサーバーです。詳細については、「ハイブリッドクラウド向けの管理対象インスタンス」をご参照ください。
[実行して保存] をクリックし、コマンドが正常に実行されたことを確認します。
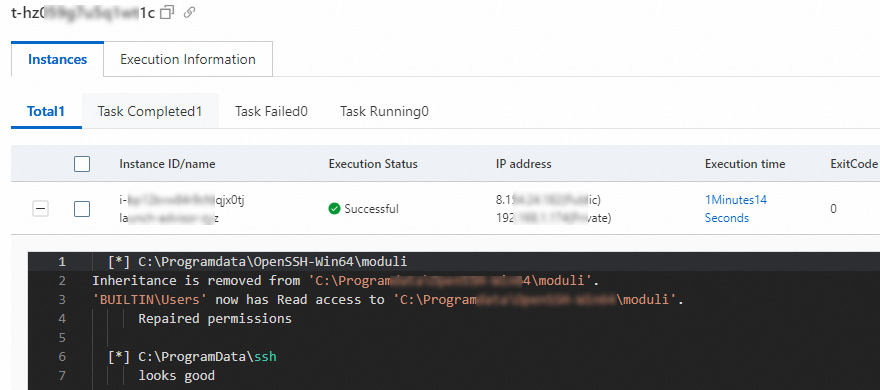
OpenSSH がインストールされていることを確認します。
VNC を使用して Windows インスタンスに接続します。
詳細については、「VNC を使用したインスタンスへの接続」をご参照ください。
 > [Windows PowerShell] をクリックして、[Windows PowerShell] ターミナルを開きます。
次のコマンドを実行して、インストールを確認します。
NETSTAT.EXE -ano出力には、ポート 22 が LISTENING 状態であることが示されます。

SSH クライアントを使用して Windows インスタンスに接続できることを確認します。
説明Windows インスタンスの現在のユーザー名とパスワードを使用してログインします。