このトピックでは、データ移行の前に必要な準備について説明します。
ステップ 1: リストファイルのアップロード
HTTP/HTTPS リストファイルには、manifest.json ファイルと 1 つ以上の example.csv.gz ファイルの 2 種類のファイルが含まれます。example.csv.gz ファイルは、圧縮された CSV リストファイルです。1 つの example.csv.gz ファイルのサイズは 100 MB を超えることはできません。manifest.json ファイルは、マニフェストのスキーマと一連の CSV ファイルを定義します。
CSV リストファイルの作成
ローカルマシンに CSV 形式のリストファイルを作成します。各行はファイルを表し、行は改行 (\n) で区切られます。各ファイルには複数のプロパティがあり、カンマ (,) で区切られます。
重要[Key] と [Url] は必須ですが、他の項目はオプションです。
各行は改行で終わる必要があります。そうしないと、CSV の解析失敗によりタスクが中断される可能性があります。
必須項目
名前
必須
説明
注意
Url
はい
Data Online Migration は、このリンクを使用して GET リクエストでファイルコンテンツをダウンロードし、HEAD リクエストでファイルメタデータを取得します。
説明[Url] が `curl --HEAD "$Url"` や `curl --GET "$Url"` などのコマンドでアクセスできることを確認してください。Data Online Migration は `$Url` のリダイレクトをサポートしていません。
[Url] と [Key] 項目はエンコードする必要があります。エンコードされておらず、特殊文字が含まれている場合、ファイル移行が失敗する可能性があります。
[Url] 項目:
curlなどのコマンドラインツールでアクセス可能な URL (リダイレクトなし) を URL エンコードします。[Key] エンコーディングの原則: OSS 内のファイルの目的のオブジェクト名に対して URL エンコーディングを実行します。
重要[Url] と [Key] 項目をエンコードした後、以下を確認してください。そうしないと、ファイル移行が失敗したり、移行先のファイルパスが期待どおりにならない可能性があります。
元の文字列のプラス記号 (+) は %2B としてエンコードされます。
元の文字列のパーセント記号 (%) は %25 としてエンコードされます。
元の文字列のカンマ (,) は %2C としてエンコードされます。
たとえば、元の文字列が
a+b%c,d.fileの場合、エンコードされた文字列はa%2Bb%25c%2Cd.fileになります。Key
はい
移行後のオブジェクト名は `プレフィックス + ファイル名` です。
URL エンコードされていない plain_example.csv という名前の CSV ファイルを生成したとします。ファイルには 2 つの列しかありません。最初の列は Url で、これらの URL は curl コマンドを使用して直接アクセスできます。2 番目の列は Key で、これらのキーは OSS 内のファイルに期待するオブジェクト名です。以下に例を示します。
https://help-static-aliyun-doc.aliyuncs.com/assets/img/zh-CN/1354977961/p486238.jpg,assets/img/zh-CN/1354977961/p486238.jpg https://www.example-fake1.com/url-that-can-be-accessed-only-after-encoding/123.png,url-that-can-be-accessed-only-after-encoding/123.png https://www.example-fake2.com/url-that-can-be-accessed-without-encoding/123.png,url-that-can-be-accessed-without-encoding/123.png https://www.example-fake3.com/Chinese/Japanese/Korean/123.png,Chinese/Japanese/Korean/123.png重要Windows の組み込みのメモ帳アプリケーションを使用して manifest.json または plain_example.csv を編集しないでください。このアプリケーションは、ファイルの最初の 3 バイトにバイトオーダーマーク (BOM) (0xefbbbf) を追加する可能性があり、Data Online Migration で解析エラーが発生する可能性があります。Linux または macOS では、
od -c plain_example.csv | lessを実行して、ファイルの最初の 3 バイトにこのマークが含まれているかどうかを確認できます。Windows では、Notepad++ や Visual Studio Code などのアプリケーションを使用してファイルを作成または編集してください。次のサンプル Python コードは、plain_example.csv を 1 行ずつ読み取り、エンコードされた結果を example.csv に出力します。このコードは参照用です。必要に応じて変更できます。
# -*- coding: utf-8 -*-
import sys

if sys.version_info.major == 3:
    from urllib.parse import quote_plus
else:
    from urllib import quote_plus
    reload(sys)
    sys.setdefaultencoding("utf-8")

# ソース CSV ファイルのパス。
src_path = "plain_example.csv"
# URL エンコードされたファイルのパス。
out_path = "example.csv"

# サンプル CSV には url と key の 2 つの列のみが含まれます。
with open(src_path) as fin, open(out_path, "w") as fout:
    for line in fin:
        items = line.strip().split(",")
        url, key = items[0], items[1]
        enc_url = quote_plus(url.encode("utf-8"))
        enc_key = quote_plus(key.encode("utf-8"))
        # enc_url と enc_key 変数はエンコードされた形式です。
        fout.write(enc_url + "," + enc_key + "\n")
上記のコードを実行すると、example.csv の内容は次のようになります:
https%3A%2F%2Fhelp-static-aliyun-doc.aliyuncs.com%2Fassets%2Fimg%2Fzh-CN%2F1354977961%2Fp486238.jpg,assets%2Fimg%2Fzh-CN%2F1354977961%2Fp486238.jpg
https%3A%2F%2Fwww.example-fake1.com%2Furl-that-can-be-accessed-only-after-encoding%2F123.png,url-that-can-be-accessed-only-after-encoding%2F123.png
https%3A%2F%2Fwww.example-fake2.com%2Furl-that-can-be-accessed-without-encoding%2F123.png,url-that-can-be-accessed-without-encoding%2F123.png
https%3A%2F%2Fwww.example-fake3.com%2FChinese%2FJapanese%2FKorean%2F123.png,Chinese%2FJapanese%2FKorean%2F123.png
すべての項目
名前
必須
注意
Key
はい
移行後のオブジェクト名は `プレフィックス + ファイル名` です。
Url
はい
Data Online Migration は、このリンクを使用して GET リクエストでファイルコンテンツをダウンロードし、HEAD リクエストでファイルメタデータを取得します。
Size
いいえ
移行するファイルのサイズ (バイト単位)。
説明このフィールドは、移行されたファイルのストレージ使用量を計算するために使用されます。このフィールドがない場合、コンソールのストレージ使用量チャートは利用できなくなります。
説明上記の例の項目の順序は固定されていません。順序は、manifest.json ファイルの [fileSchema] フィールドの項目の順序と一致する必要があります。
CSV ファイルの圧縮
CSV ファイルを .csv.gz ファイルに圧縮します。次の圧縮方法が利用可能です:
単一ファイルの圧縮
たとえば、dir ディレクトリに example.csv という名前のファイルが存在する場合、次のコマンドを実行して圧縮できます:
gzip -c example.csv > example.csv.gz説明上記の
gzipコマンドを実行してファイルを圧縮すると、ソースファイルは保持されません。ソースファイルを保持するには、gzip -c <source_file> > <source_file>.gzコマンドを実行します。圧縮後、
.csv.gzファイルが生成されます。複数ファイルの圧縮
たとえば、dir ディレクトリに example1.csv、example2.csv、example3.csv という名前の 3 つのファイルが存在する場合、次のコマンドを実行して圧縮できます:
gzip -r dir説明gzipコマンドはディレクトリをパッケージ化しません。代わりに、指定されたディレクトリ内の各ファイルを個別に圧縮し、対応するソースファイルを保持しません。圧縮後、dir ディレクトリに example1.csv.gz、example2.csv.gz、example3.csv.gz という 3 つのファイルが生成されます。
manifest.json ファイルの作成
複数の CSV ファイルを構成できます。詳細は次のとおりです:
fileFormat: リストファイルの形式が CSV であることを指定します。
fileSchema: CSV ファイル内の項目に対応します。順序に注意してください。
説明CSV ファイルの列数がこの構成のフィールド数と同じであることを確認してください。移行サービスは一貫性をチェックします。
files:
key: バケット内の CSV ファイルの場所。
MD5checksum: 16 桁の 16 進数 MD5 文字列。値は大文字と小文字を区別しません。例: 91A76757B25C8BE78BC321DEEBA6A5AD。この値を指定しない場合、チェックは実行されません。
size: リストファイルのサイズ。
以下の例は参照用です。
{
    "fileFormat":"CSV",
    "fileSchema":"Url, Key",
    "files":[{
        "key":"dir/example1.csv.gz",
        "MD5checksum":"",
        "size":0
    },{
        "key":"dir/example2.csv.gz",
        "MD5checksum":"",
        "size":0
    }]
}
作成したマニフェストファイルを OSS または AWS S3 にアップロードします。
manifest.json ファイルと圧縮された CSV リストファイルをアップロードします。CSV リストファイルの名前は、manifest.json ファイル内の CSV ファイル名と一致する必要があります。
manifest.json ファイルのパスを記録します。ソースデータアドレスを作成するときにマニフェストの場所を指定する必要があります。
ステップ 2: 移行先バケットの作成
移行したデータを保存する移行先として Object Storage Service (OSS) バケットを作成します。詳細については、「バケットの作成」をご参照ください。
ステップ 3: RAM ユーザーの作成と RAM ユーザーへの権限付与
Resource Access Management (RAM) ユーザーは、データ移行タスクを実行するために使用されます。RAM ロールを作成し、RAM ユーザーとしてデータ移行タスクを実行する必要があります。ソースまたは移行先の OSS バケットを所有する Alibaba Cloud アカウント内に RAM ユーザーを作成することをお勧めします。
詳細については、「RAM ユーザーの作成と RAM ユーザーへの権限付与」をご参照ください。
Alibaba Cloud アカウントで RAM コンソールにログインします。[ユーザー] ページで、作成した RAM ユーザーを見つけ、[操作] 列の [権限を追加] をクリックします。
システムポリシー: AliyunOSSImportFullAccess。このポリシーは、Data Online Migration を管理する権限を付与します。
カスタムポリシー: ポリシーには、
ram:CreateRole、ram:CreatePolicy、ram:AttachPolicyToRole、およびram:ListRoles権限を含める必要があります。カスタムポリシーのアタッチ方法の詳細については、「カスタムポリシーの作成」をご参照ください。次のサンプルコードは、カスタムポリシーの例を示しています:
{
    "Version":"1",
    "Statement":[
        {
            "Effect":"Allow",
            "Action":[
                "ram:CreateRole",
                "ram:CreatePolicy",
                "ram:AttachPolicyToRole",
                "ram:ListRoles"
            ],
            "Resource":"*"
        }
    ]
}
ステップ 4: マニフェストバケットに権限を付与する
インベントリリストを保存するバケットが現在の Alibaba Cloud アカウントに属しているかどうかに基づいて、対応する操作を実行します。
インベントリリストを保存するバケットが現在の Alibaba Cloud アカウントに属している
自動権限付与
Data Online Migration コンソールで権限付を完了することをお勧めします。詳細については、データ移行トピックの「ステップ 2: ソースデータアドレスの作成」セクションをご参照ください。
手動権限付与
インベントリリストを保存するバケットに権限を付与する
[ロール] ページで、作成した RAM ロールを見つけ、[操作] 列の 権限を付与 をクリックします。
カスタムポリシー:
oss:List*およびoss:Get*権限を含むカスタムポリシーを RAM ロールにアタッチします。
カスタムポリシーのアタッチ方法の詳細については、「カスタムポリシーの作成」をご参照ください。次のサンプルコードは、カスタムポリシーの例を示しています。
説明以下のポリシーは参照用です。<myInvBucket> をインベントリリストを保存するバケットの名前に置き換えてください。
OSS の RAM ポリシーの詳細については、「RAM ポリシーの一般的な例」をご参照ください。
重要Key Management Service マネージドキー (SSE-KMS) を使用したサーバ側暗号化がインベントリリストを保存するバケットに構成されている場合は、AliyunKMSFullAccess システムポリシーを RAM ロールにアタッチする必要があります。
{
  "Version": "1",
  "Statement": [
    {
      "Effect": "Allow",
      "Action": [
        "oss:List*",
        "oss:Get*"
      ],
      "Resource": [
        "acs:oss:*:*:<myInvBucket>",
        "acs:oss:*:*:<myInvBucket>/*"
      ]
    }
  ]
}
インベントリリストを保存するバケットが現在の Alibaba Cloud アカウントに属していない
インベントリリストを保存するバケットに権限を付与する
インベントリリストを保存するバケットを所有する Alibaba Cloud アカウントで OSS コンソール にログインします。
左側のナビゲーションウィンドウで、[バケット] をクリックします。[バケット] ページで、インベントリリストを保存するバケットの名前をクリックします。
左側のナビゲーションウィンドウで、[権限コントロール] > [バケットポリシー] を選択します。
[バケットポリシー] タブで、[構文で追加] をクリックします。表示されたページで [編集] をクリックし、コードエディタにカスタムバケットポリシーを入力してから、[保存] をクリックします。
カスタムポリシー:
インベントリリストを保存するバケット内のすべてのリソースをリストおよび読み取りする権限を RAM ロールに付与します。
説明以下のポリシーは参照用です。<otherInvBucket> をインベントリリストを保存するバケットの名前に、<myuid> をData Online Migration コンソールへのログインに使用される Alibaba Cloud アカウントの ID に、<otherUid> をインベントリリストを保存するバケットを所有する Alibaba Cloud アカウントの ID に、<roleName> を作成した RAM ロールの名前に置き換えてください。OSS の RAM ポリシーの詳細については、「RAM ポリシーの一般的な例」をご参照ください。
{
  "Version": "1",
  "Statement": [
    {
      "Effect": "Allow",
      "Action": [
        "oss:List*",
        "oss:Get*"
      ],
      "Principal": [
         "arn:sts::<myUid>:assumed-role/<roleName>/*"
      ],
      "Resource": [
        "acs:oss:*:<otherUid>:<otherInvBucket>",
        "acs:oss:*:<otherUid>:<othereInvBucket>/*"
      ]
    }
  ]
}
2. カスタムキーのポリシーを設定する
Key Management Service マネージドキー (SSE-KMS) を使用したサーバ側暗号化がインベントリリストを保存するバケットに構成されている場合は、AliyunKMSFullAccess システムポリシーを RAM ロールにアタッチする必要があります。
KMS のカスタムキーを使用してインベントリリストを保存するバケット内のデータを暗号化する場合は、次の手順を実行してカスタムキーのポリシーを設定します:
KMS コンソールにログインし、カスタムキーを見つけます。
詳細ページの [キーポリシー] タブで、[キーポリシーの設定] をクリックします。[キーポリシー] パネルで、[クロスアカウントユーザー] フィールドに RAM ロールの ARN を入力します。詳細については、「キーポリシーの設定」をご参照ください。

ステップ 5: 移行先バケットに権限を付与する
移行先バケットが現在の Alibaba Cloud アカウントに属しているかどうかに基づいて、対応する操作を実行します。
移行先バケットが現在の Alibaba Cloud アカウントに属している
自動権限付与
Data Online Migration コンソールで自動権限付与を使用することをお勧めします。詳細については、データ移行トピックの「ステップ 3: 移行先データアドレスの作成」セクションをご参照ください。
手動権限付与
説明次のシナリオでは、手動で権限付与を実行できます:
複数のソースバケットに対する権限を 1 つの RAM ロールに付与したい場合。これにより、複数のソースバケットを効果的に管理できます。
現在の Alibaba Cloud アカウント内の RAM ロールの数が上限に近いため、これ以上 RAM ロールを作成したくない場合。
自動権限付与が適用できない、または使用できない場合。
1. データ移行に使用する RAM ロールを作成する
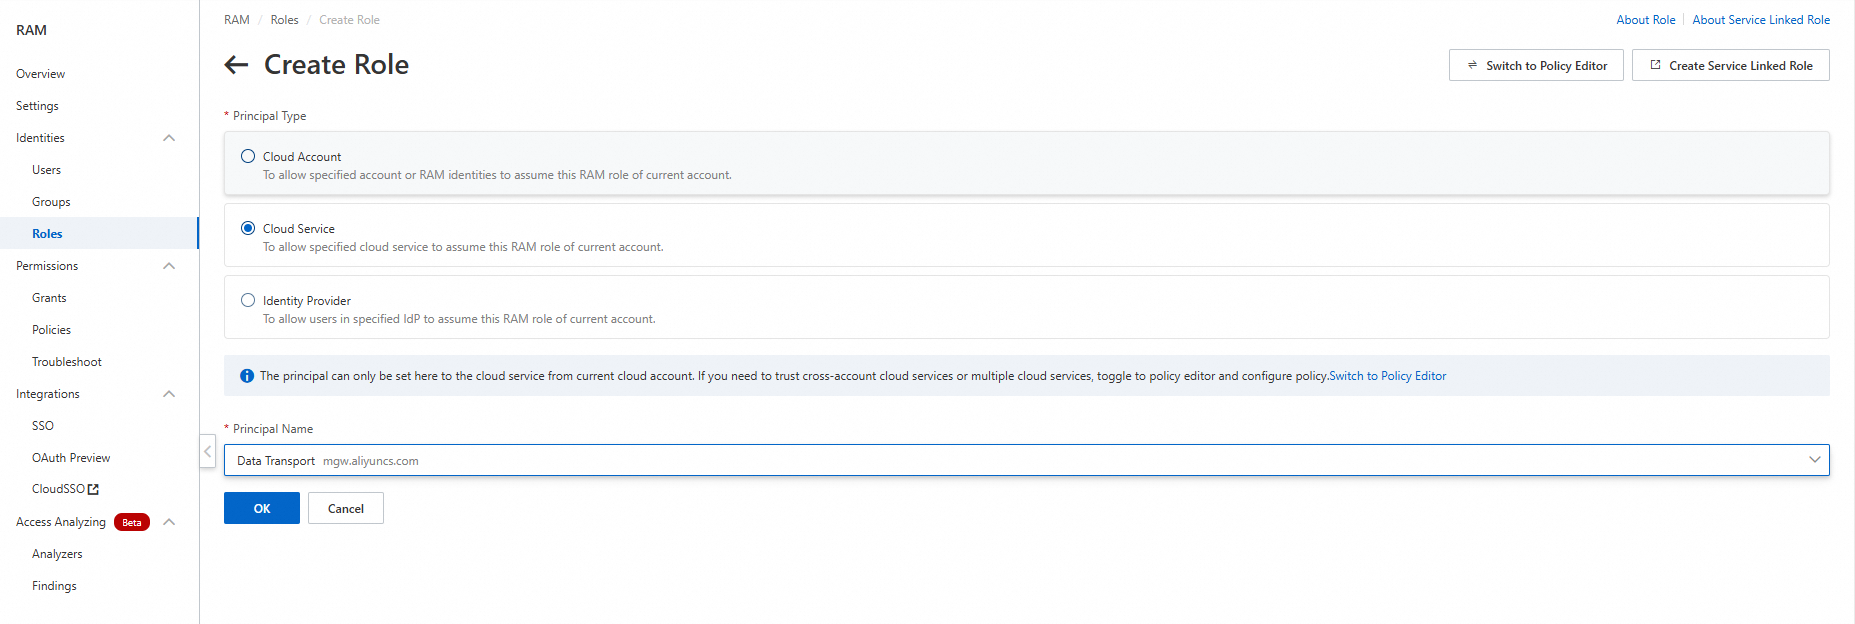
RAM ユーザーが作成された RAM コンソールにログインします。[ロール] ページで、[ロールの作成] をクリックします。
プリンシパルタイプ: [クラウドサービス] を選択します。
プリンシパル名: [Data Transport] を選択します。
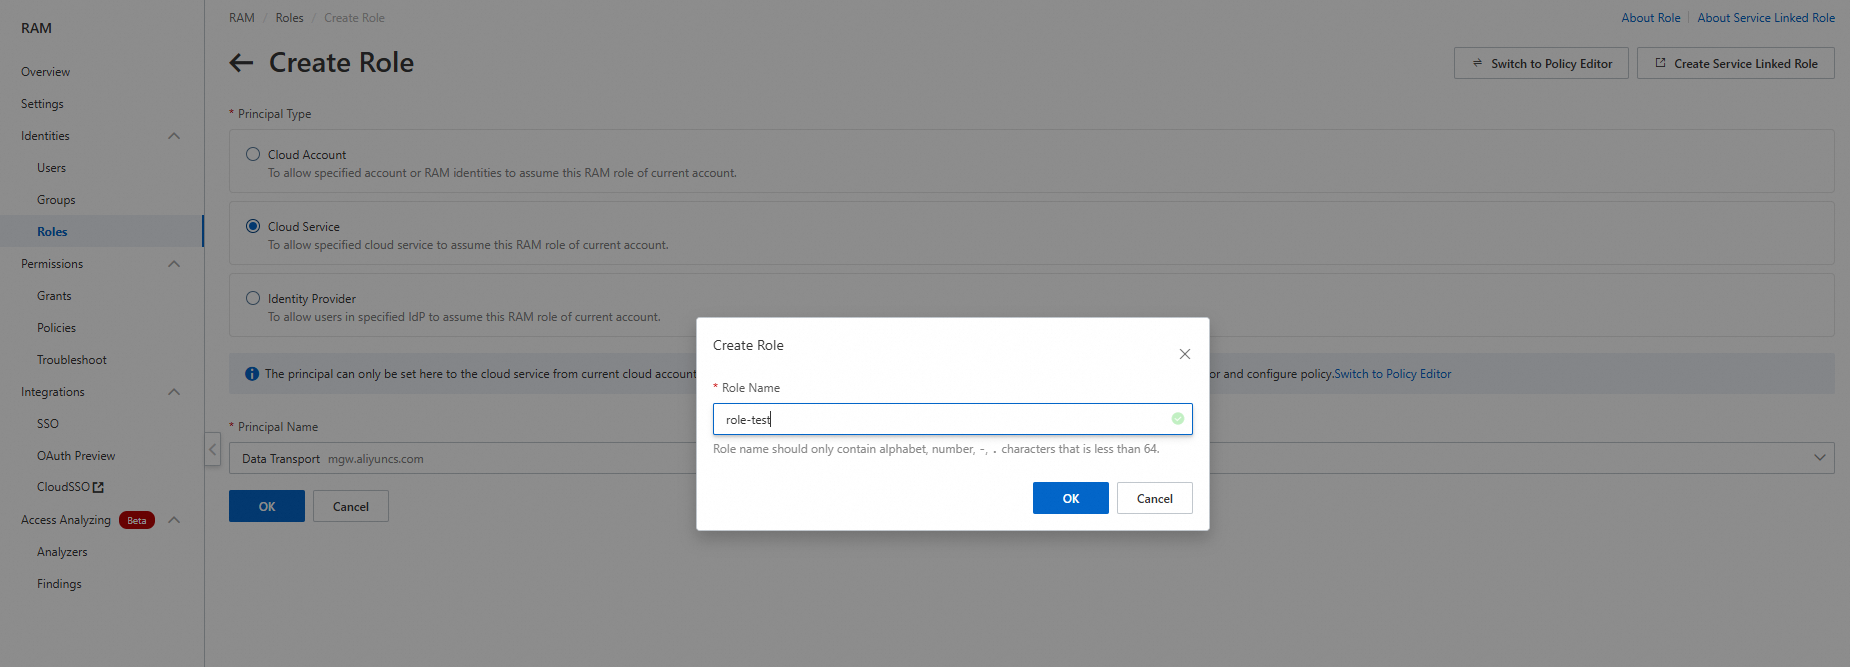
[ロール名]: RAM ロール名を入力します。RAM ロール名は小文字である必要があります。
2. 移行先バケットに対する権限を RAM ロールに付与する
「ロール」ページで、作成した RAM ロールを見つけ、[操作] 列の [権限の付与] をクリックします。
カスタムポリシー:
oss:List*、oss:Get*、oss:Put*、およびoss:AbortMultipartUpload*権限を含むカスタムポリシーを RAM ロールにアタッチします。
カスタムポリシーのアタッチ方法の詳細については、「カスタムポリシーの作成」をご参照ください。次のサンプルコードは、カスタムポリシーの例を示しています:
説明以下のポリシーは参照用です。<myDestBucket> を移行先バケットの名前に置き換えてください。
OSS の RAM ポリシーの詳細については、「RAM ポリシーの一般的な例」をご参照ください。
重要Key Management Service マネージドキー (SSE-KMS) を使用したサーバ側暗号化が移行先バケットに構成されている場合は、AliyunKMSFullAccess システムポリシーを RAM ロールにアタッチする必要があります。
{
  "Version": "1",
  "Statement": [
    {
      "Effect": "Allow",
      "Action": [
        "oss:List*",
        "oss:Get*",
        "oss:Put*",
        "oss:AbortMultipartUpload"
      ],
      "Resource": [
        "acs:oss:*:*:<myDestBucket>",
        "acs:oss:*:*:<myDestBucket>/*"
      ]
    }
  ]
}
移行先バケットが現在の Alibaba Cloud アカウントに属していない
1. データ移行に使用する RAM ロールを作成する
RAM ユーザーが作成された RAM コンソールにログインします。[ロール] ページで、[ロールの作成] をクリックします。
プリンシパルタイプ: [クラウドサービス] を選択します。
プリンシパル名: [Data Transport] を選択します。
[ロール名]: RAM ロール名を入力します。RAM ロール名は小文字である必要があります。
2. 移行先バケットに対する権限を RAM ロールに付与する
ポリシーステートメントを指定してバケットポリシーを構成し、RAM ロールに必要な権限を付与すると、新しいバケットポリシーが既存のバケットポリシーを上書きします。新しいバケットポリシーに既存のバケットポリシーの内容が含まれていることを確認してください。そうしないと、既存のバケットポリシーに基づく権限付与が失敗する可能性があります。
移行先バケットを所有する Alibaba Cloud アカウントで OSS コンソール にログインします。
左側のナビゲーションウィンドウで、[バケット] をクリックします。[バケット] ページで、移行先バケットの名前をクリックします。
バケット詳細ページの左側のペインで、[権限コントロール] > [バケットポリシー] を選択します。
[バケットポリシー] タブで、[構文で追加] をクリックし、次に [編集] をクリックします。コードエディタにカスタムバケットポリシーを入力します。次に、[保存] をクリックします。
移行先バケット内のオブジェクトをリスト、読み取り、削除、および書き込みする権限を RAM ロールに付与します。
以下のポリシーは参照用です。<otherDestBucket> を移行先バケットの名前に、<otherUid> を移行先バケットを所有する Alibaba Cloud アカウントの ID に、<myUid> をData Online Migration コンソールへのログインに使用される Alibaba Cloud アカウントの ID に、<roleName> を作成した RAM ロールの名前に置き換えてください。 OSS の RAM ポリシーの詳細については、「RAM ポリシーの一般的な例」をご参照ください。
{
  "Version": "1",
  "Statement": [
    {
      "Effect": "Allow",
      "Action": [
        "oss:List*",
        "oss:Get*",
        "oss:Put*",
        "oss:AbortMultipartUpload"
      ],
      "Principal": [
         "arn:sts::<myUid>:assumed-role/<roleName>/*"
      ],
      "Resource": [
        "acs:oss:*:<otherUid>:<otherDestBucket>",
        "acs:oss:*:<otherUid>:<otherDestBucket>/*"
      ]
    }
  ]
}
3. カスタムキーのポリシーを設定する
SSE-KMS が移行先バケットに構成されている場合は、AliyunKMSFullAccess システムポリシーを RAM ロールにアタッチする必要があります。
KMS のカスタムキーを使用して移行先バケット内のデータを暗号化する場合は、次の手順を実行してカスタムキーのポリシーを設定します。
KMS コンソールにログインし、カスタムキーを見つけます。
詳細ページの [キーポリシー] タブで、[キーポリシーの設定] をクリックします。[キーポリシー] パネルで、[クロスアカウントユーザー] フィールドに RAM ロールの ARN を入力します。詳細については、「キーポリシーの設定」をご参照ください。