The transparent proxy mode is supported for different types of origin servers. The origin servers can be Application Load Balancer (ALB), Layer 7 Server Load Balancer (SLB), Layer 4 SLB, and Elastic Compute Service (ECS) instances. This topic describes how to configure a traffic redirection port for a domain name that is added to Web Application Firewall (WAF) in transparent proxy mode. After the traffic redirection port is configured, traffic on the port is redirected to WAF.
Configure a traffic redirection port for an ALB instance
Scenarios: Your web services are hosted on an ALB instance, and you want to enable WAF protection for the listening ports of the ALB instance.
Procedure: In the port configuration section, click the ALB-based Domains tab.
Instance list description: The ALB-based Domains tab displays the Internet-facing ALB instances that are created in the SLB console. The Port column displays the HTTP or HTTPS listening ports of the ALB instances. 
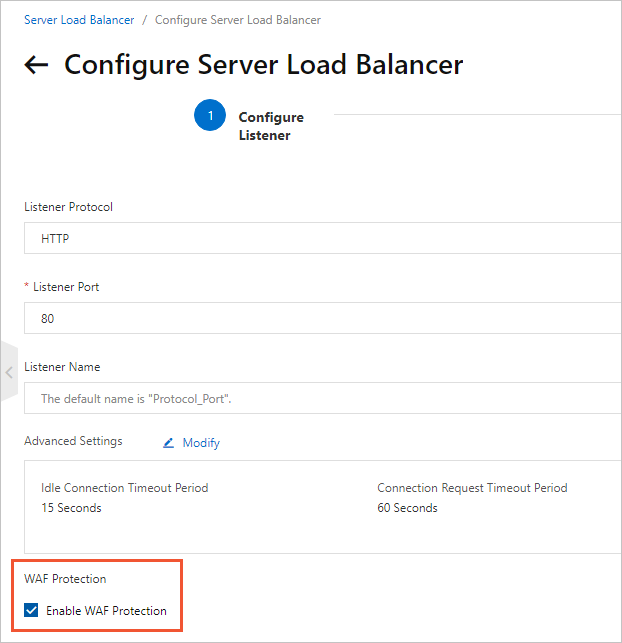
Enable WAF protection for a listening port: In the SLB console, create an HTTP or HTTPS listener for the ALB instance and select Enable WAF Protection in the Configure Listener step. For more information about how to create HTTP or HTTPS listeners for ALB instances, see Add an HTTP listener and Add an HTTPS listener. 
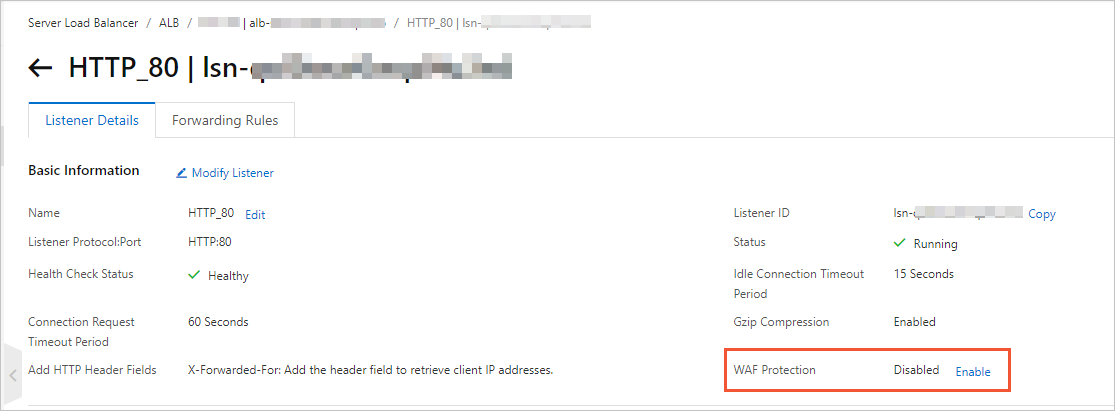
If an HTTP or HTTPS listener is created, you can enable or disable WAF Protection for the listener in the SLB console. 
In the ALB-based Domains tab under Transparent Proxy Mode, you can check whether WAF protection is enabled for HTTP or HTTPS listening ports. However, you cannot enable or disable WAF protection for the ports in the WAF console. If you want to enable or disable WAF protection for a listening port, you must go to the SLB console.
Configure a traffic redirection port for a Layer 7 SLB instance
Scenarios: Your web services are hosted on an SLB instance with a Layer 7 HTTP or HTTPS listener, and you want to enable WAF protection for the listening ports of the SLB instance.
Procedure: In the port configuration section, click the Layer 7 SLB-based Domains tab.
Instance list description: The Layer 7 SLB-based Domains tab displays the Internet-facing SLB instances that are created in the SLB console. The Port column displays the HTTP or HTTPS listening ports of the SLB instances. 
Enable WAF protection for a listening port: Log on to the WAF console. On the Layer 7 SLB-based Domains tab, select the HTTP or HTTPS listening port in the Port column.
If you select a port, traffic on the port is redirected to WAF, which detects and filters the traffic. Traffic on the ports that are not selected is directly sent from the client to the origin server and does not pass through WAF.
If you select a port that listens to the traffic of multiple domain names at the same time, WAF protection is enabled for all domain names whose traffic the port listens to. In this case, you cannot enable WAF protection for a specific domain name.
If the Port column displays No Ports Available, no HTTP or HTTPS listeners are created for the instance. You must go to the SLB console to create an HTTP or HTTPS listener for the instance. Then, you can enable WAF protection for the listening port in the WAF console. For more information about how to create HTTP or HTTPS listeners for Layer 7 SLB instances, see Add an HTTP listener and Add an HTTPS listener.
Configure a traffic redirection port for a Layer 4 SLB instance
Scenarios: Your web services are hosted on an SLB instance with a Layer 4 TCP listener, and you want to enable WAF protection for the TCP listening ports of the SLB instance.
Procedure: In the port configuration section, click the Layer 4 SLB-based Domains tab.
Instance list description: The Layer 4 SLB-based Domains tab displays the Internet-facing SLB instances that are created in the SLB console. The Port column displays the TCP listening ports of the SLB instances. 
Procedure
You must add a listening port of an SLB instance to WAF. Then, you can enable WAF protection for the added port. The following steps explain how to enable WAF protection for a port:
Add a TCP listening port of an SLB instance to WAF.
You can add a TCP listening port to WAF only after you create a TCP listener for the SLB instance in the SLB console. For more information about how to create a TCP listener for an SLB instance, see Add a TCP listener.
On the Layer 4 SLB-based Domains tab, find the SLB instance and click Add in the Port column.
In the Add Port dialog box, select the TCP listening port in the Port drop-down list and then select HTTP or HTTPS.
Optional:If you select HTTP, skip this step. If you select HTTPS, upload a default certificate or add additional certificates. You can add a maximum of three additional certificates.
Certificate descriptions:
Default Certificate: the default certificate returned by the server after an HTTPS request from a client is received. If your server uses only one SSL certificate, you need only to upload the default certificate.
Extended Certificate: the certificate that a server returns to a client when the server receives an HTTPS request from the client and matches the additional certificate. The additional certificate must contain the same domain name as the Server Name Indication (SNI) field in the request. If the server cannot match an additional certificate based on the SNI field, the server returns the default certificate.
The SNI field is an extension of the SSL and TLS protocols. A server can use multiple domain names and certificates based on the SNI field. Before a client establishes an SSL connection to a server, the client includes the domain name that you want to access in the request. Then, the server returns the certificate that matches the requested domain name.
You can upload a certificate by using one of the following methods:
Manual Upload: You must manually configure the Certificate Name, Certificate File, and Private Key File parameters.
Select Existing Certificate: You need only to select the required certificate from the list of existing certificates that are managed in the SSL Certificates Service console. We recommend that you use this method.
If the certificate that you want to upload is not in the list, you must click Cloud Security - Certificates Service to upload the required certificate to the SSL Certificates Service console. Then, you can select the certificate from the list.
Enable WAF protection for the added port. To do this, log on to the WAF console and on the Layer 4 SLB-based Domains tab select the added port in the Port column.
If you select a port, traffic on the port is redirected to WAF, which detects and filters the traffic. Traffic on the ports that are not selected is directly sent from the client to the origin server and does not pass through WAF.
If you select a port that listens to the traffic of multiple domain names at the same time, WAF protection is enabled for all domain names whose traffic the port listens to. In this case, you cannot enable WAF protection for a specific domain name.
Configure a traffic redirection port for an ECS instance
Scenarios: Your web services are hosted on an ECS instance, and you want to enable WAF protection for the HTTP or HTTPS traffic of the ECS instance.
Procedure: In the port configuration section, click the ECS-based Domains tab.
Instance list description: The ECS-based Domains tab displays the ECS instances that are created in the ECS console and have public IP addresses. The Port column displays the ports that are added to WAF. 
Procedure
You must add a port of an ECS instance to WAF. Then, you can enable WAF protection for the added port. The following steps explain how to enable WAF protection for a port:
Add a port of an ECS instance to WAF.
On the ECS-based Domains tab, click Add in the Port column.
In the Add Port dialog box, enter the HTTP or HTTPS port of the ECS instance in the Port field and select HTTP or HTTPS.
Optional:If you select HTTP, skip this step. If you select HTTPS, upload a default certificate or add additional certificates. You can add a maximum of three additional certificates.
Certificate descriptions:
Default Certificate: the default certificate returned by the server after an HTTPS request from a client is received. If your server uses only one SSL certificate, you need only to upload the default certificate.
Extended Certificate: the certificate that a server returns to a client when the server receives an HTTPS request from the client and matches the additional certificate. The additional certificate must contain the same domain name as the Server Name Indication (SNI) field in the request. If the server cannot match an additional certificate based on the SNI field, the server returns the default certificate.
The SNI field is an extension of the SSL and TLS protocols. A server can use multiple domain names and certificates based on the SNI field. Before a client establishes an SSL connection to a server, the client includes the domain name that you want to access in the request. Then, the server returns the certificate that matches the requested domain name.
You can upload a certificate by using one of the following methods:
Manual Upload: You must manually configure the Certificate Name, Certificate File, and Private Key File parameters.
Select Existing Certificate: You need only to select the required certificate from the list of existing certificates that are managed in the SSL Certificates Service console. We recommend that you use this method.
If the certificate that you want to upload is not in the list, you must click Cloud Security - Certificates Service to upload the required certificate to the SSL Certificates Service console. Then, you can select the certificate from the list.
Enable WAF protection for the port that is added to WAF. To do this, log on to the WAF console and on the ECS-based Domains tab select the port in the Port column.
If you select a port, traffic on the port is redirected to WAF, which detects and filters the traffic. Traffic on the ports that are not selected is directly sent from the client to the origin server and does not pass through WAF.
If you select a port that listens to the traffic of multiple domain names at the same time, WAF protection is enabled for all domain names whose traffic the port listens to. In this case, you cannot enable WAF protection for a specific domain name.


