When you create a virtual private cloud (VPC) and a vSwitch, you must specify their CIDR blocks. Proper network planning is crucial to prevent network conflicts, ensure scalability, and avoid high rebuilding costs. As your network grows, planning becomes more complex. You can use Alibaba Cloud's IP Address Manager (IPAM) to simplify this process. IPAM automatically allocates and tracks IP addresses and detects potential conflicts. This topic describes how to use IPAM to manage address spaces according to your development needs. It also shows how to allocate resources from an IPAM pool to create a VPC with an IPv4 CIDR block.
Example scenario
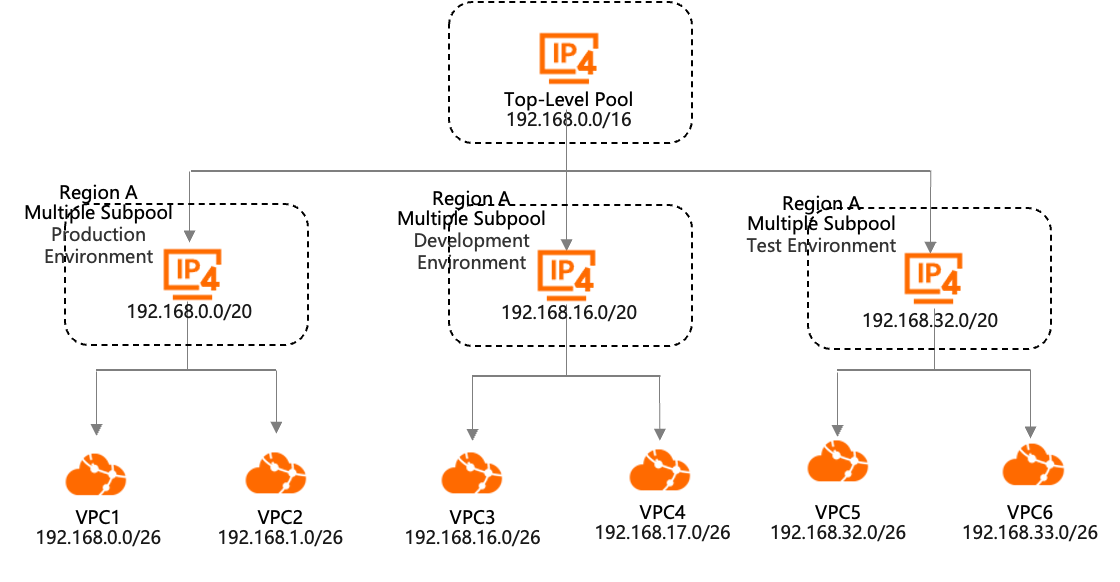
An enterprise has multiple business departments, and each department has production and staging environments. These environments have different security and deployment requirements and must be strictly isolated using VPCs. A network administrator needs to efficiently manage the company's address resources to meet current business needs and allow for future growth.
The enterprise decides to use IPAM for address planning and management. IPAM automatically allocates and tracks IP addresses and detects potential IP address conflicts. IPAM allows for flexible management of address pools. You can design a CIDR hierarchy by dividing IP address blocks into levels, such as region, department, or line-of-business. This enables flexible and efficient management.
This topic uses the creation of VPC1 in the production environment, as shown in the following figure, as an example. It demonstrates how to use IPAM for network planning and to create a VPC with an IPv4 CIDR block:
Create an IPAM and a private IPAM scope.
Create a top-level pool and a sub-pool in sequence, and then provision a CIDR block.
A large CIDR block,
192.168.0.0/16, is allocated to the top-level pool. The sub-pool for the production environment is created from the top-level pool and has a CIDR block of192.168.0.0/20.Create VPC1 and allocate its CIDR block from the production environment address pool.
Procedure
Step 1: Create an IPAM
Log on to the IPAM console. In the top menu bar, select the region where you want to create the IPAM.
On the IPAM page, click Create IPAM and set the Applicable Region. For the other parameters, you can use the default values or change them as needed.
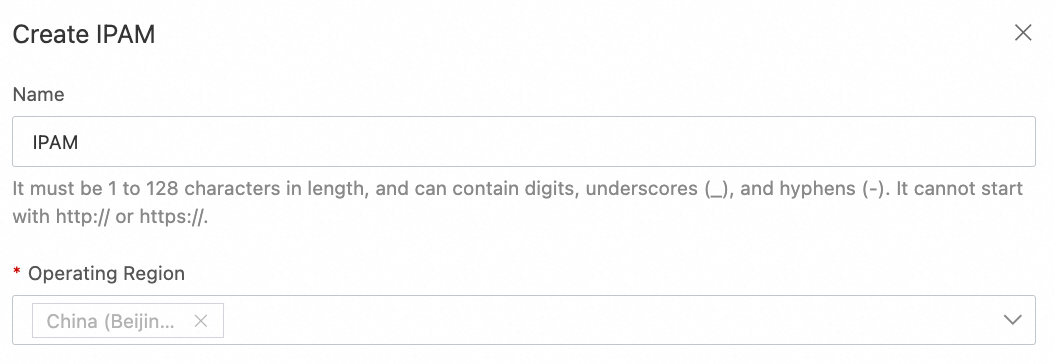 Note
NoteYou must specify at least one applicable region when you create an IPAM. The applicable regions must include the managed region of the IPAM.
The managed region is the region where the IPAM is located and cannot be deleted.
Step 2: Create a top-level pool
In the navigation pane, click IPAM Pools.
On the IPAM Pools page, click Create Pool. Configure the parameters as shown in the following figure.
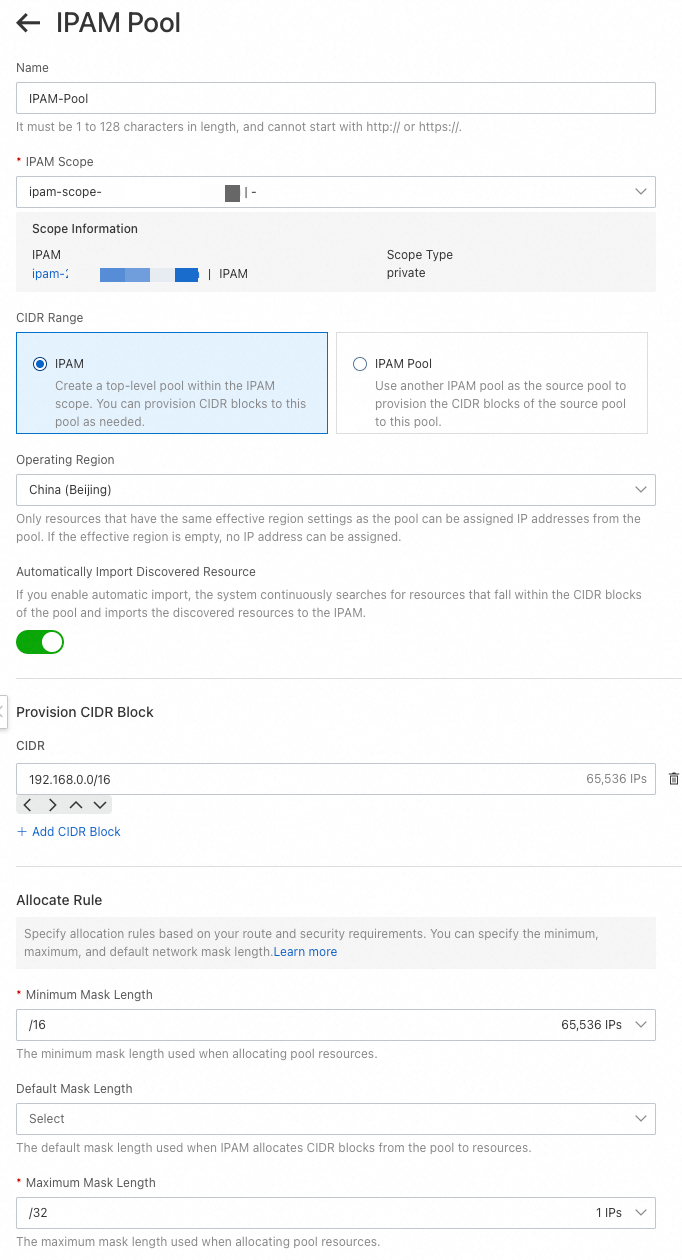 This topic describes only the parameters that are relevant to this example. For all other parameters, use the default values. For more information, see Create and manage IPAM pools.
IPAM scope: Select a private IPAM scope.
CIDR range: Select IPAM to create a top-level pool.
Applicable Region: The region of the IPAM pool. The region must be supported by the IPAM. This setting cannot be changed after the pool is created.
Auto Import: If this feature is enabled, IPAM continuously discovers VPCs and automatically imports resources whose CIDR blocks are within the scope of the IPAM pool and are not already allocated.
Provisioned CIDR block: Click Add CIDR to add one or more IPv4 CIDR blocks.
Allocation Rule: You can set the Minimum Mask Length, Default Mask Length, and Maximum Mask Length for resources allocated from the pool.
Step 3: Create a sub-pool
Configure the parameters as shown in the following figure. The sub-pool, with a CIDR block of 192.168.0.0/20 provisioned from the top-level pool, is used for the production environment.
 This topic describes only the parameters that are relevant to this example. For parameters not listed, use the default values. For more information about the parameters, see Create and manage IPAM pools.
IPAM scope: Only private IPAM scopes can be selected.
CIDR range: You can select IPAM Pool. This creates a sub-pool of the source pool.
Source IPAM Pool: Select the top-level pool created in Step 2.
Applicable Region: If an applicable region is set for the source IPAM pool, you do not need to set one for the sub-pool because it inherits the region from its source pool.
Auto Import: When enabled, IPAM continuously discovers VPCs and automatically imports unallocated resources whose CIDR blocks are within the pool's range.
Provisioned CIDR block: Click Add CIDR to add one or more IPv4 CIDR blocks.
Allocation Rule: You can set the Minimum Mask Length, Default Mask Length, and Maximum Mask Length for resources allocated from the pool.
After the sub-pool is created, the pool hierarchy is shown in the following figure.

Step 4: Create VPC1 and a vSwitch, and allocate a CIDR block from the IPAM pool
Log on to the VPC console.
In the top menu bar, select the region for the VPC. In this example, select the same region as the IPAM pool.
On the VPCs page, click Create VPC. Set the following parameters for the VPC and vSwitch, and then click OK.
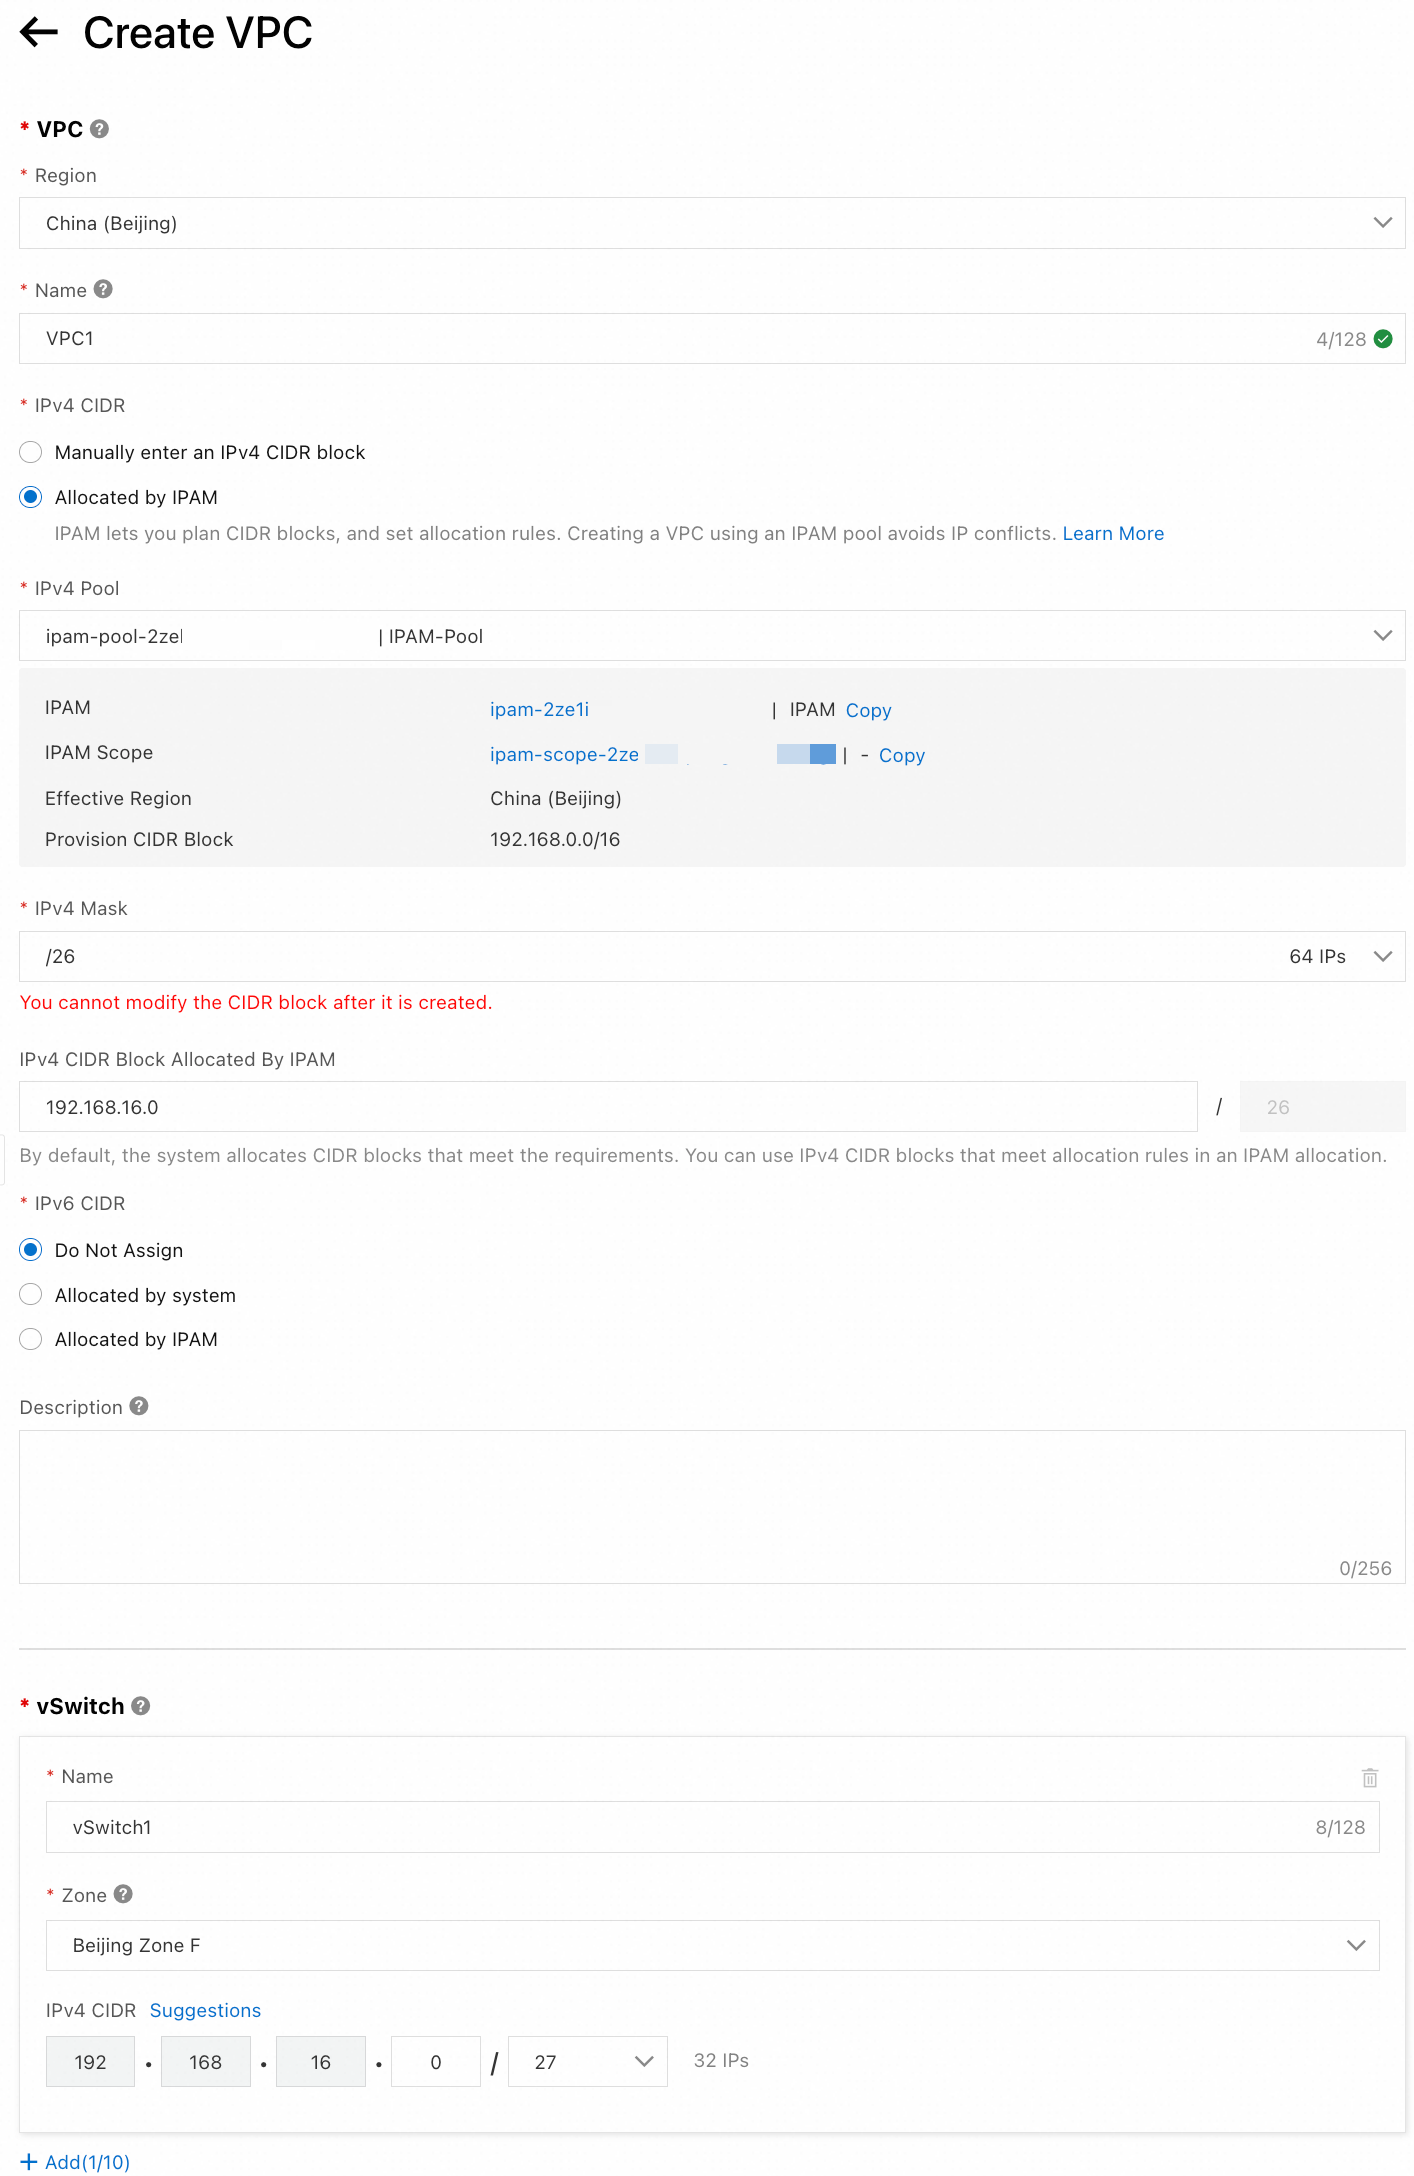 This topic describes only the parameters that are relevant to this example. For parameters not listed, use the default values. For more information about the parameters, see Create and manage a VPC.
IPv4 CIDR Block: Select IPv4 CIDR block allocated by IPAM.
IPv4 Pool: Select the pool that you created in Step 3.
Network Mask: After you specify the network mask, the system allocates the first available CIDR block that matches the specified mask range by default. Alternatively, you can specify an IPv4 CIDR block from the provisioned CIDR blocks of the pool.
IPv4 CIDR Block for the vSwitch: This must be a sub-block of the IPv4 CIDR block allocated by IPAM.
After the address pool is created, the Details tab shows that 1.6% of the address resources in the pool have been allocated, as described in Step 3.
NoteThe provisioned CIDR block for the sub-pool is
192.168.0.0/20, which provides 4,096 available IP addresses. The network mask is specified as/26, which means 64 IP addresses from the pool are allocated to VPC1. Therefore,64/4096 = 1.6%of the address resources in the pool are allocated to the VPC.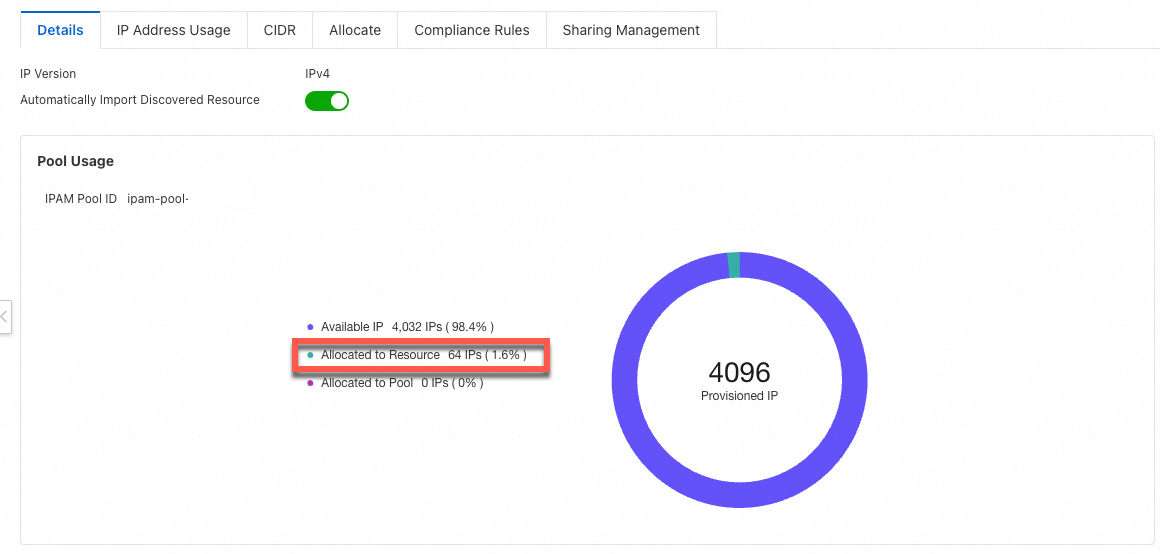
On the Allocations tab, you can view the address resources that are allocated to the VPC.

References
For more information about the features, scenarios, limits, and billing of IPAM, see IP Address Manager (IPAM).
For more information about how to use IPAM for efficient, scalable, and secure network address planning, see Address planning.