This topic describes how to install and configure a MySQL database in a Linux environment.
Procedure
Log on to the Linux server terminal.
NoteThis topic uses Ubuntu 18.04 as an example. The steps may vary for other Linux distributions.
Update the software repository and install wget.
sudo apt update
sudo apt install wget
Download the MySQL installation package.
wget https://dev.mysql.com/get/mysql-apt-config_0.8.16-1_all.deb -y
NoteIf wget is not installed, run apt install wget to install it.
Update the software repository using the .deb package.
sudo dpkg -i mysql-apt-config_0.8.16-1_all.deb
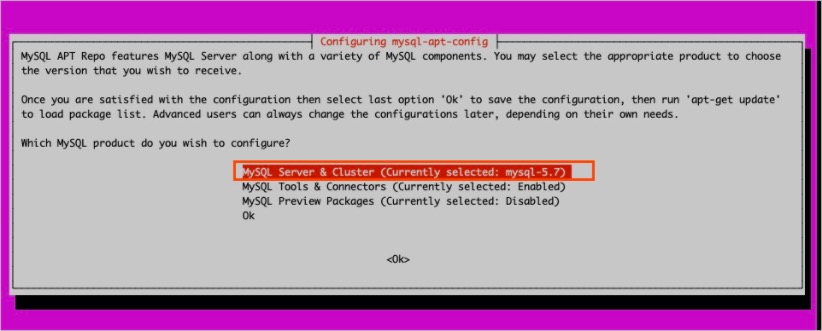
In the dialog box that appears, select MySQL Server & Cluster (Currently selected: mysql-5.7), and then select Ok.
Query all versions of the software package that can be installed.
sudo apt update
sudo apt-cache policy mysql-server
mysql-server:
  Installed: (none)
  Candidate: 5.7.32-1ubuntu18.04
  Version table:
  ...
In the output, 5.7.32-1ubuntu18.04 is the version of the MySQL database that you can install.
Install MySQL 5.7 based on the obtained version. During installation, you must set the password for the root user and keep the password confidential.
sudo apt install -f mysql-client=5.7.32-1ubuntu18.04 mysql-community-server=5.7.32-1ubuntu18.04 mysql-server=5.7.32-1ubuntu18.04
Configure the MySQL database.
Configure routine security.
sudo mysql_secure_installation
Configure the settings as shown below:
Enter current password for root (enter for none): <Enter password>
VALIDATE PASSWORD PLUGIN can be used to test passwords
and improve security. It checks the strength of password
and allows the users to set only those passwords which are
secure enough. Would you like to setup VALIDATE PASSWORD plugin?

Press y|Y for Yes, any other key for No: Y

There are three levels of password validation policy:

LOW    Length >= 8
MEDIUM Length >= 8, numeric, mixed case, and special characters
STRONG Length >= 8, numeric, mixed case, special characters and dictionary

Please enter 0 = LOW, 1 = MEDIUM and 2 = STRONG: 1
Using existing password for root.
Estimated strength of the password: 25
Change the password for root ? ((Press y|Y for Yes, any other key for No) : d
Remove anonymous users? [Y/n] Y
Disallow root login remotely? [Y/n] Y
Remove test database and access to it? [Y/n] Y
Reload privilege tables now? [Y/n] Y
Enable the remote access feature.
Edit the MySQL database configuration file.
sudo vim /etc/mysql/mysql.conf.d/mysqld.cnf
Press the I key and change the value of bind-address to 0.0.0.0.
Press the Esc key, and then enter :wq! to save the file and exit.
Restart the MySQL database to make the configuration take effect.
sudo systemctl restart mysql
Check whether the MySQL database works as expected.
Log on to the MySQL database as the root user.
mysql -u root -p
Query the existing database in the MySQL database console.
show databases;
+--------------------+
| Database           |
+--------------------+
| information_schema |
| mysql              |
| performance_schema |
| sys                |
+--------------------+
5 rows in set (0.00 sec)
The preceding query result indicates that the existing MySQL database works as expected.