HTTPS protects sensitive user data, boosts SEO rankings, and builds visitor trust. This guide walks you through securing your website by deploying an SSL certificate to Alibaba Cloud CDN or install it directly on an NGINX server.
Before you begin
Ensure you have a domain (such as www.example.com) and choose a deployment path for Step 3:
Alibaba Cloud CDN (Recommended): Fastest setup. Requires an active accelerated domain. Deploy to edge nodes via the console without origin server changes.
NGINX server: Full control. Requires SSH access with sudo privileges, and a domain that resolves to the server's public IP address.
For other deployment targets:
Web servers (Apache/Tomcat/IIS): see Deploy standard SSL certificates.
Cloud services (SLB/WAF/API Gateway): see Deploy certificates to cloud services.
Websites serving users in Chinese mainland require an ICP filing. For more information, see What is an ICP filing?.
Step 1: Purchase a certificate
Go to the Commercial Certificates tab of the Certificate Management Service console, click Buy Now.
On the buy page, configure the following parameters and click Buy Now to complete the payment.
Parameter
Example
Description
Certificate Type
Single Domain
Protects one domain (such as
www.example.com). Choose Wildcard for multiple subdomains (such as *.example.com).Brand
Alibaba Cloud
Cost-effective for most use cases. Choose DigiCert for higher trust requirements.
Certificate Specifications
DV SSL
Domain Validation issues in minutes. Choose organization validated (OV) SSL or extended validation (EV) SSL if you need organization verification (takes 1–5 business days).
Quantity
1
Defaults to 1.
Service Duration
1 Year
Maximum validity per industry standards.
Step 2: Apply for the certificate
Return to the Commercial Certificates tab, find the target certificate and click Apply for Certificate in the Actions column.

In the Apply for Certificate panel, configure the parameters and click Submit.

Parameter
Description
Domains to Bind
Enter your accelerated domain.
Domain Verification Method
Select a verification method:
Automatic DNS Verification — Use when your domain uses Alibaba Cloud DNS.
Manual DNS Verification — Use when you manage DNS elsewhere.
File Verification — Use when you cannot modify DNS settings
NoteIf you select Manual DNS Verification or File Verification, you must manually add the TXT record or upload the verification file at your DNS provider. For details, see Verify domain name ownership.
Contact
Select an existing contact or click Create Contact to create one.
Location
Select your location.
Encryption Algorithm
Select RSA for broad compatibility.
CSR Generation
Select Automatic to let Alibaba Cloud generate the certificate signing request automatically.
DV certificates are typically issued within minutes after the accelerated domain is verified.

Step 3: Deploy the certificate
After the certificate is issued, deploy it to enable HTTPS. Choose the method that matches your infrastructure.
Deploy to CDN
Deploy directly from the console without modifying your origin server.
Return to the Commercial Certificates tab, find your issued certificate and click Deploy in the Actions column.
In the Select Resource step: Click CDN to filter resources, select the domain you want to protect, and click Preview and Submit.
NoteCloud resources are synced automatically. If your domain is missing, check the sync status. A grayed-out Synchronize Cloud Resources button indicates a sync is in progress.
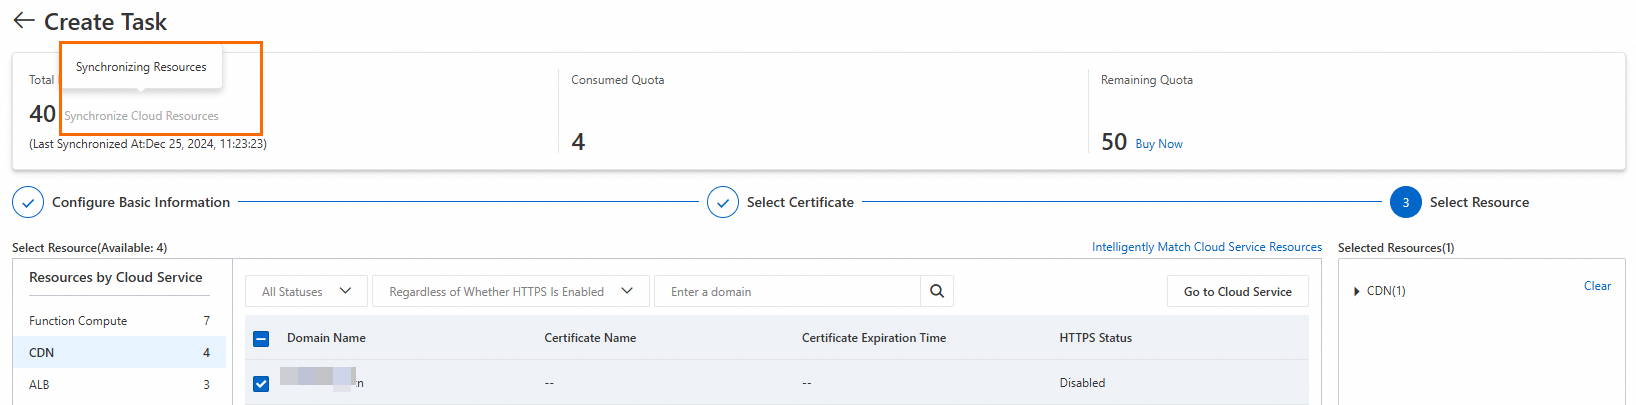
In the Task Preview panel, confirm the selected resources and click Submit.
Wait for deployment to complete (typically 5 minutes for CDN edge node propagation).
Verify the deployment.
Log on to the CDN console. In the left navigation pane, click Domain Names. Then find the target domain name and click Manage in the Actions column.
In the domain's navigation pane, click HTTPS. Confirm that HTTPS Certificate shows Enabled.
CDN synchronization may take a few minutes to complete.
Install on NGINX
This section provides a quick overview. For detailed step-by-step instructions with code examples, see Install an SSL certificate on an Nginx server (Linux).
Download the certificate.
Upload certificate files to your server's configuration directory.
Configure your
nginx.conf.Restart the Nginx service.
# Recommended: Test the configuration for syntax errors.
sudo nginx -t
# If NGINX is not running, start the service.
sudo nginx
# If NGINX is already running, reload the configuration to apply changes.
sudo nginx -s reload
5. Visit https://<yourdomain> in your browser to verify the installation.
If the
 icon appears in the address bar of your browser, the certificate is installed.
 Starting in Google Chrome 117, the
icon is changed to the  icon. If the
  icon appears after you click the icon, the certificate is installed.
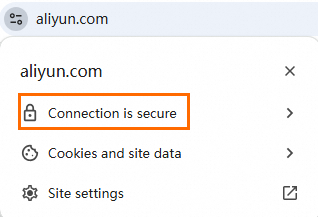
Renewal
Certificates expire after 1 year. To ensure service continuity, we recommend setting a renewal reminder and completing the renewal at least 30 days before expiration. For instructions, see Configure notifications for SSL certificates and Handling of certificates that are about to expire.
References
Purchase, apply for, and issue DV certificates in a single workflow: CreateCertificateRequest
Purchase options and pricing: SSL certificate selection guide