Simple application servers run in Virtual Private Cloud (VPC), an isolated network environment. By default, they cannot communicate with other Alibaba Cloud services in VPCs. Service interconnection allows simple application servers to interconnect with other Alibaba Cloud services. This topic describes how to enable and disable this feature.
Scenarios
Service interconnection is useful when you need a simple application server to privately access:
ECS instances over VPCs within the same account and region
ApsaraDB databases over VPCs within the same account and region
The figure shows a sample: An enterprise has multiple simple application servers and ECS instances in Region A. The enterprise wants to establish a private connection between its simple application servers and the ECS instances in VPC 1.

Caution
When you enable the feature in a region for the first time, all simple application servers in that region will be stopped for about one minute. This downtime may interrupt your services. We recommend you do this during off-peak hours.
Enable service interconnection
Service interconnection is implemented using a VPC peering connection. If you have not enabled it in the region before, the latest version is used by default. For how this works, see VPC peering connection.
Limits
Service interconnection is only supported between services within the same Alibaba Could account and region, and it is for free.
This feature is only available in regions where you have active simple application server instances.
A maximum of 10 VPC peering connections can be initiated by simple application servers.
Procedure
Go to the Service Interconnection page in the Simple Application Server console.
In the top navigation bar, select the region in which the simple application server resides.

In the Service Interconnection page, click Service Interconnection.
You need to authorize service interconnection when using for the first time. After clicking OK in the pop up message, the system creates a service-linked role. For more information, see Service-linked Role.
In the Configure Service Interconnection dialog box, configure parameters and click Confirm.

Parameter
Description
Region
The region of your server. You cannot change it.
Acceptor VPC
All VPCs in the region are displayed by default. Select a VPC for the service interconnection.
NoteYou can select only one VPC at a time. If you need to select multiple VPCs, repeat the configuration.
An acceptor VPC supports a maximum of 10 VPC peering connections. If the quota (vpc_quota_intra_region_peer_num_per_vpc) is insufficient, go to Quota Center to increase. For more information, see Submit an application to increase a quota.
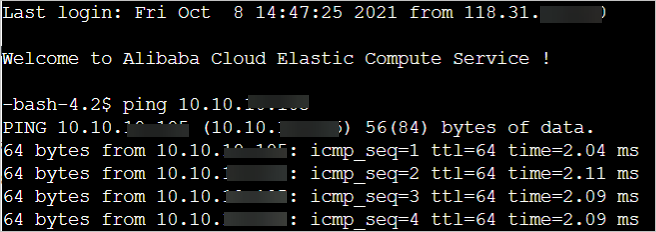
Test interconnectivity.
Connect to the simple application server, and ping the private IP address of the ECS instance in VPC1. This is to check the connectivity between the server and the ECS instance. If you see the following information, the interconnection is functioning normally.
Delete a VPC peering connection
You can delete a VPC peering connection that is no longer needed. After the deletion, the simple application servers will no longer be able to interconnect with cloud services in the acceptor VPC. Delete with caution to avoid damaging your service.
Go to the Service Interconnection page in the Simple Application Server console.
In the top navigation bar, select the region in which the simple application server resides.
In the Actions column, click Delete.

In the pop up dialog box, click Confirm.
FAQ
Q1: I received a message "Network conflict with vpc-bp1shw9ozernphle exists, please plan your network properly." How to solve this?

A1: The CIDR blocks of simple application servers conflict with the CIDR blocks of resources in the VPC. This may prevent interconnection. We recommend that you first validate whether interconnection is possible. If not, re-plan your network plan and deploy services to VPCs with non-overlapping CIDR blocks to avoid network conflicts.
Q2: Is it only one selected simple application server can be interconnected with cloud services in the acceptor VPC?
Q3: Why does the service interconnection fail to take effect? I have enabled the feature for servers, and VPCs that ApsaraDB for Redis instances reside?
References
By default, simple application servers and Object Storage Service (OSS) buckets within the same region are interconnected. No additional configuration is required. For more information, see Implement service interconnection over the internal endpoint of an OSS resource.