The agentless detection feature lets you assess security risks on your cloud servers without installing the Security Center agent. This feature scans server images in an isolated environment to detect vulnerabilities, malware, baseline configuration risks, and sensitive files. This process has a negligible impact on your server's performance.
Scope
Supported asset types:
Chinese Mainland region: You can scan Alibaba Cloud Elastic Compute Service (ECS) instances, cloud disk snapshots, or custom images.
Outside Chinese Mainland regions: You can scan Alibaba Cloud Elastic Compute Service (ECS) instances, cloud disk snapshots, and custom images, along with AWS EC2 instances and Azure virtual machines.
Supported regions for Alibaba Cloud servers:
China (Qingdao), China (Beijing), China (Zhangjiakou)
China (Hangzhou) and China (Shanghai)
China (Shenzhen)
China (Chengdu)
China (Hong Kong), Singapore, US (Virginia), Indonesia (Jakarta)
Operating system compatibility: For a detailed list of operating systems that support vulnerability scanning, see Supported operating systems for vulnerability scanning.
NoteFreeBSD operating systems do not support baseline checks, malicious sample detection, or sensitive file detection.
How it works
Agentless detection uses offline analysis of images. This process has a negligible impact on the target server's performance.
Create a image (for host scan tasks only): Based on the task configuration, the system creates a an image of the target ECS instance's disks.
Share and mount: The system shares the created snapshot or image with a dedicated Security Center analysis cluster.
Scan in isolation: In an isolated environment, the analysis engine mounts the snapshot or image and performs a security scan. This process does not consume the target server's compute resources.
Generate a report and clean up: After the scan is complete, the system generates a risk report and automatically deletes the temporary image based on the configured policy to reduce storage costs.
Common use cases
"Zero-impact" risk assessment for business services: You can perform non-intrusive security risk assessments for core production systems that cannot have agents installed or have zero tolerance for performance impact. This process consumes no resources on the target system and ensures business continuity.
Unified security scanning for all assets across platforms: You can scan all asset types, including legacy and proprietary systems. A unified view lets you quickly assess the overall security posture of your multi-platform environment.
Comprehensive and visual risk detection: You can perform a single scan to detect a wide range of risks, such as vulnerabilities, malicious files, baseline configuration issues, and sensitive information. This provides a visual overview of your global security posture.
Asset compliance and security audits: You can conduct security audits on custom images and host snapshots before you create instances or launch services. This ensures that the production environment meets security and compliance standards.
Procedure
Enable the service
Enable the service
Log on to the Security Center console. In the top navigation bar, select the region where your assets are located: Chinese Mainland or Outside Chinese Mainland.
In the navigation pane on the left, choose . On the page that appears, click Activate Now and review the related agreements.
ImportantAgentless detection uses a pay-as-you-go billing method.
Complete service authorization (for first-time users)
The first time you use this feature, you are prompted to authorize a service role. Click Authorize Now.
NoteAfter you grant the authorization, Security Center automatically creates the service-linked role AliyunServiceRoleForSas. For more information about AliyunServiceRoleForSas, see Security Center service-linked role.
Create and run a detection task
Create a detection task
Agentless detection supports two types of detection tasks: on-demand detection tasks and scheduled detection tasks.
Immediate detection task
You can use these tasks for one-time security scans of specific assets.
Host security scan
On the tab, in the Risk Detection section, click Detect Now.
In the Detect Now panel, configure the settings as described in the following table and click OK.
Scan Scope: We recommend that you scan the data disk. A more complete data source provides better detection results for vulnerabilities and alerts.
Image Retention Duration:
The value can range from 1 to 365 days.
You are charged for creating images. The longer you retain the images, the higher the fees.
ImportantIf you select Retain Only At-risk Image, the system automatically deletes threat-free images after the scan is complete.
After you create the task, Security Center automatically creates the image and performs the scan and subsequent operations. For more information, see Automatic creation of images.
NoteThe more data a server has, the longer the scan task takes. Wait for the task to complete.
Custom image security scan
On the tab, in the Risk Detection section, click Detect Now.
In the Detect Now panel, select the target image and click OK.
NoteIf the image that you want to scan does not appear in the Scan Task panel, navigate to the page and click Synchronize Assets. After the synchronization is complete, perform this step again.
Scheduled detection tasks
You can use these tasks for regular, automated security inspections of asset groups.
Go to the configuration page
In the upper-right corner of the Agentless Detection page, click Scan Configuration.
Configure the detection scope
On the Security Check Scope tab, configure the settings as described in the following table and click Save.
Baseline Check Scope: You can click Manage to go to the Baseline Check Configuration page to view and configure the supported baseline check scope.
Sensitive File: Click Manage to go to the Sensitive File Scan Settings page to view and configure check items.
ImportantIf you select Default Scan for New Check Items, the system automatically scans for new check items in the future.
Configure the detection policy
On the Automatic Detection Policy tab, configure the settings as described in the following table and click Save.
Check Host: Configure the assets for scanning as described below. For other configuration instructions, see Server Check.
Configure Scan Cycle:
Set the execution cycle for the detection task, such as daily or weekly.
If you select Do Not Scan, the Check Host task is paused.
After you configure the cycle, the system immediately runs a scan task on the same day.
Configure Scan Assets:
In the Scan Assets section, click Manage.
Default Scan for New Assets: We recommend that you select this option. The system will then automatically include new servers in the next scan cycle without requiring you to add them manually.
Adjust the detection scope: You can set the asset scope for the detection task by selecting or deselecting specific servers in the asset list.
Custom Image Check: If you enable the Incremental Check switch, an incremental automated check is performed on unchecked custom images.
ImportantIncremental detection requires you to enable Data Delivery of ActionTrail. On the tab, turn on the Data Delivery of ActionTrail switch. For more information, see Feature Settings.
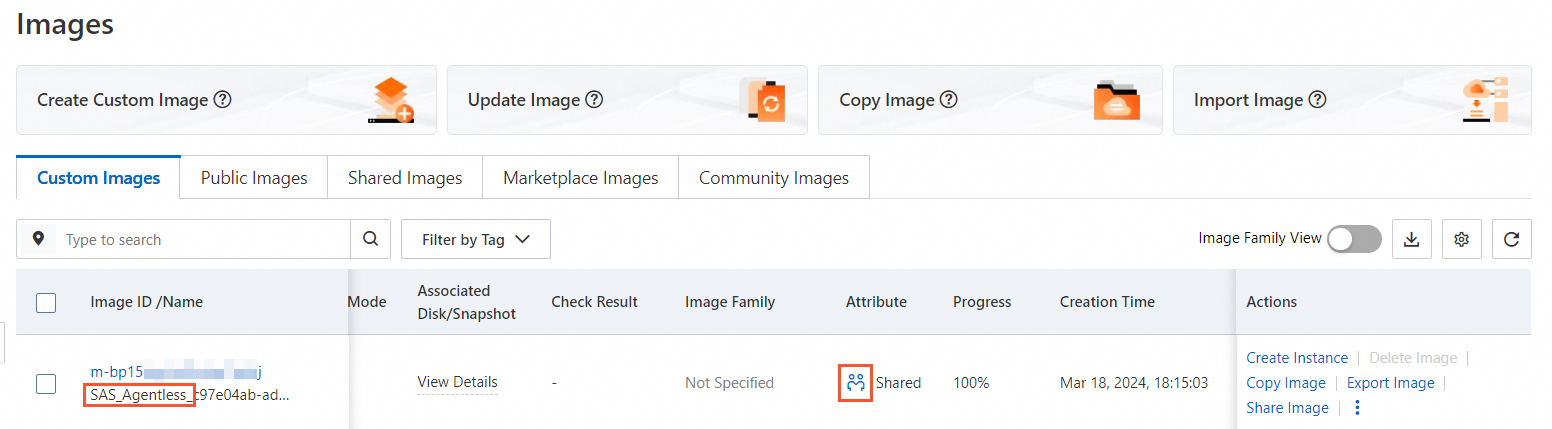
Automatic creation of images
When you execute a Server Check task, the system uses the service-linked role AliyunServiceRoleForSas to perform the following automated operations:
Create a image: The system automatically creates a temporary server snapshot with a name that starts with
SAS_Agentless.Share securely: The system shares the image with the official Security Center service account for scanning and analysis.
Automatic cleanup: After the scan is complete and the expires, the image is automatically deleted and sharing is canceled.
The image is used only for security scanning, and no fees are incurred for sharing.
You can find a record of a image created by aliyunserviceroleforsas in the Event Query section of the ActionTrail console.
Manage detection tasks
View task progress
The more data a server has, the longer the scan task takes. You can view the task progress in the console.
In the upper-right corner of the Agentless Detection page, click Task Management.
In the Task Management panel, select the tab that corresponds to the detection type.
You can view the Execution Progress and Status of the task in the list.
To view the details of a task, such as to confirm whether a server has been scanned, click Details in the Actions column of the target task.
Troubleshoot failed tasks
If a task has an abnormal status, you can view the failure reason on the Task Details page and refer to the following table for solutions.
Failure message | Cause of failure | Solution |
The current region is not supported | The specified region is not supported. | Confirm that the region of the ECS instance is supported. For more information, see Scope. |
Failed to connect to the disk | A temporary error occurred when the system was mounting the snapshot disk. | In the Actions column of the task, click Retry. |
Failed to create the image | The number of ECS images has reached the quota limit. | Increase the image quota in the ECS console or delete old images that are no longer in use. |
Task processing timed out | The task did not complete within the specified time because the amount of data to be scanned was too large or the system was busy. | Split the task into multiple subtasks based on the scan scope, and then run them again. |
Download detection reports (Optional)
In the Task Management panel, select the tab that corresponds to the detection type.
Download the report for the entire task:
Click Download Report in the Actions column of the target task.
Download the report for a single server:
Click Details or View in the Actions column of the target task.
In the Task Details panel, click Download Report in the Actions column.
Analyze and handle risks
After a task is successfully completed, you can view and handle the detected security risks on the Agentless Detection page.
If the same server is scanned multiple times, the page displays only the results of the most recent scan. Older results are overwritten.
View risk details
On the Agentless Detection page, go to the tab for the detection policy, such as Server Check, and then the tab for the risk type, such as Vul Risk. In the list, find the risk item and click View or Details in the Actions column to view its details.
Handle risk alerts
Vulnerabilities
Operation: Locate the target vulnerability and click Add to Whitelist in the Actions column.
WarningAgentless detection does not support vulnerability fixing.
Supported actions: Add to whitelist.
ImportantAdding a specific vulnerability to the whitelist prevents future alerts for it. Use this feature with caution.
After you add an entry to the whitelist, the system automatically syncs the entry to the tab, where you can view it.
Baseline checks
Operation: In the check item list, locate the check item that requires handling and click Add to Whitelist in the Actions column.
Supported actions: Add to whitelist.
ImportantAfter you add a check item to the whitelist, new servers will no longer be scanned for this item. Use this feature with caution.
After you add an item to the whitelist, the system automatically syncs the configuration to the tab, where you can view the added whitelist items.
Malicious samples
Operation: In the alert list, locate the alert item that you want to handle and click Change Status or Handle in the Actions column.
Supported actions:
Add to Whitelist: If you confirm that an alert does not involve malicious behavior, you can add the alert to the whitelist based on the whitelist rule and its application scope.
ImportantIf you add an alert to the whitelist, any future occurrences of the same alert are automatically moved to the handled list, and you will not receive notifications. Use this feature with caution.
You can handle identical alerts in batches. The supported actions vary based on the alert type. For more information, see the console page.
After you add an entry to the whitelist, the system automatically syncs it to the tab, where you can view the added whitelist entries.
Manually Handled: If you have handled the risk offline, you can mark the alert as Manually Handled.
Mark as False Positive: You can mark this alert as a false positive. Security Center uses your feedback to continuously optimize its scanning capabilities.
Ignore: Ignores only the current alert. If the system detects the issue again, it will generate another alert.
Sensitive files
Operation:
In the sensitive file alert list, locate the alert that you want to process and click Details in the Actions column to view the detailed description and reinforcement suggestions.
In the Actions column of the threat list on the Details panel, click Handle, select a method to handle the alert in the dialog box, and click OK.
Supported actions:
Add to Whitelist: If you confirm that an alert is not malicious, you can add it to the whitelist based on whitelist rules. The following rules apply:
ImportantIf you add an alert to the whitelist, any future occurrences of the same alert are automatically moved to the handled list, and you will not receive notifications. Use this feature with caution.
You can configure multiple rules. All rules are combined with a logical AND. This means an alert is added to the whitelist only if it meets all rule conditions.
After an entry is added to the whitelist, it is automatically synced to the tab, where you can view the added entries.
MD5: The wildcard character supports only equals. Then, enter the file's MD5 hash.
Path: The wildcard character supports contains, starts with, and ends with. Then, enter the specific path.
Manually Handled: If you have handled the risk offline that caused this alert, you can mark this alert as Manually Handled.
Mark as False Positive: You can mark this alert as a false positive. Security Center uses your feedback to continuously optimize its scanning capabilities.
Ignore: Ignores only the current alert. If the issue is detected again and hits the detection policy, an alert is still generated.
Advanced configuration
Configure whitelists
Whitelist rules set when you analyze and handle risks are also automatically synced to Whitelist Management, where you can modify, delete, or otherwise manage them.
On the Agentless Detection page, click Scan Settings, and go to the Manage Whitelist tab.
Based on the threat type, click Create Rule under the corresponding tab.
Configure the whitelist rule as described below.
ImportantThe following whitelist configurations are effective for all assets.
Vulnerability Whitelist
Vulnerability Type: Linux Software Vulnerability, Windows System Vulnerability, or Application Vulnerability.
Vulnerability Name: Retrieves the latest vulnerability data based on the selected Vulnerability Type.
Malicious Sample Whitelist
Alert Name: is set to ALL by default, which indicates that the whitelist rule applies to all alert types and cannot be modified.
Whitelist Field: The default value is fileMd5, which allowlists the MD5 hash of the file. This field cannot be modified.
Wildcard Character: Only Equals is supported.
Rule Content: The MD5 hash of the file.
Baseline Whitelist
Check Item Type: Specifies the baseline check items to ignore.
Check Item: Retrieves the specific check items based on the selected Check Item Type.
Sensitive File Whitelist
Check Item for Sensitive Files: Specify the items that do not need to be scanned.
Configure Whitelist Conditions:
NoteYou can configure multiple rules. All rules are combined with a logical AND. This means an alert is added to the whitelist only if it meets all rule conditions.
MD5: The wildcard character supports only equals. Then, enter the file's MD5 hash.
Path: The wildcard character supports contains, starts with, and ends with. Then, enter the specific path.
Connect and scan multicloud assets
You can use the agentless detection feature to connect to Amazon Web Services (AWS) and Azure in regions Outside Chinese Mainland. The steps are as follows:
Connect to AWS
Prepare AWS access credentials
In your AWS account, create an IAM user with programmatic access and obtain their Access Key ID and Secret Access Key. Ensure that this user has permissions to access and create EC2 snapshots.
ImportantTo use the Agentless Detection feature, you need to create a custom IAM policy with specific permissions for Security Center in your AWS account. For more information, see Create a custom policy for agentless detection.
Configure the connection method
In the top-left corner of the console, select a region Outside Chinese Mainland.
Navigate to the Agentless Detection page. On the Server Check tab, in the Add Multi-cloud Asset section, click Add below the
 icon.
icon.On the Add Assets Outside Cloud page, complete the configuration on the Create Sub-account page as described below and click Next.
Solution Selection: Manual Configuration.
Permission Description: Select Agentless Detection.
Submit credential information
On the Submit AccessKey Pair tab, accurately enter the credentials that you created in AWS and click Next.
Sub-account SecretID and Sub-account SecretKey: Enter the AWS sub-account API key information that you obtained in Step 1.
Connection Region: Select an available region. The system uses the selected region to verify asset accessibility and retrieve corresponding cloud resource data.
Domain: Configure this parameter based on the selected connection region. For AWS China regions, select China. For all other regions, select International.
Configure policy
On the Policy Configuration tab, complete the configuration as described below.
Select region: Select the regions that contain the AWS assets that you want to provision.
NoteThe asset data is automatically stored in the data center that corresponds to the region selected in the upper-left corner of the Security Center console.
Chinese Mainland: Data centers located in the Chinese mainland.
Outside Chinese Mainland: The data center is in Singapore.
Region Management: This option is selected by default. When this option is selected, assets in new regions that are added to this AWS account are automatically synchronized, and you do not need to add them manually.
AK Service Status Check: Set the interval at which Security Center automatically checks the validity of the AccessKey pair for the AWS account. You can select Off to disable this check.
Click OK.
After you complete the permission verification and policy configuration, you can create agentless detection tasks for your AWS EC2 instances.
Connect to Azure
Prepare Azure access credentials
In the Azure portal, create an application registration and grant the application credential subscription access permissions. Obtain the following access credentials: Application (client) ID, Directory (tenant) ID, and the Value of the client secret.
ImportantTo use the Agentless Detection feature, you need to grant the Reader and Disk Snapshot Contributor roles to Security Center in your Azure account. For more information, see Add Azure assets.
Configure the connection method
In the top-left corner of the console, select a region Outside Chinese Mainland.
Go to the Agentless Detection page. On the Server Check tab, in the Add Multi-cloud Asset area, click Add below the
 icon.
icon.Go to the Add Assets Outside Cloud page. In the Create Sub-account step, select Agentless Detection in the Permission Description section and click Next.
Submit credential information
In the Submit AccessKey Pair tab, accurately enter the credentials that you created in Azure, and then click Next.
Enter an AppID: The Application (client) ID that you obtain from your Azure application registration.
Enter a password: the client secret obtained from Azure app registration.
tenant: The Directory (tenant) ID from your Azure application registration.
Domain (Select Chinese Edition for China and International Edition for others): For 21Vianet users, select the Chinese Edition.
Configure policy
On the Policy Configuration tab, complete the configuration by referring to the following instructions.
Select region: Choose the Azure region where your assets reside.
NoteAsset data will automatically be stored in the data center corresponding to the region selected in the upper-left corner of the Security Center console.
Chinese Mainland: Data center in the Chinese mainland.
Outside Chinese Mainland: Singapore data center.
Region Management: We recommend selecting this option. Selecting this option automatically synchronizes assets in new regions that are added to this AWS account.
AK Service Status Check: Set how often Security Center checks the validity of your Azure credentials. Select "Off" to disable this check.
After you complete the permission verification and policy configuration, you can create agentless detection tasks for your Azure virtual machines.
Going live
Performance impact: The agentless detection scanning process does not consume resources on the target server.
Cost control: Fees for the agentless detection feature consist of scanning fees and image storage fees. To control costs, when you create a task and configure the Image Retention Duration setting, select the Retain Only At-risk Image option. You can also periodically delete snapshots that are no longer needed.
Quotas and limits
Disk specifications: A single cloud disk supports a maximum of 1 TiB. A maximum of 20,000,000 files can be scanned on a single disk. Any files beyond this limit will not be scanned.
Server limits: Each server supports scanning a maximum of 15 cloud disks. Any disks beyond this limit will not be scanned.
Result retention: The results of a detection task are retained for only 30 days and are automatically cleared upon expiration. For multiple scans of the same asset, the system retains only the results of the most recent scan.
Remediation capability: This feature supports only detection and alerting. It does not provide automatic remediation. You must handle risk items based on the instructions on the risk details page.
Compressed file limits: For compressed files, only JAR files are supported for detection. Only the first layer is decompressed for scanning.
File system limits: ext2, ext3, ext4, XFS, and NTFS are supported. For NTFS, check items that rely on file permission information are not supported.
Storage and disk limits:
For Alibaba Cloud ECS, scanning encrypted system disks or data disks is not supported.
For all hosts, including Alibaba Cloud and non-Alibaba Cloud hosts, scanning data disks that use Logical Volume Management (LVM), RAID arrays, or the ReFS file system is not supported.
Billing
The fees generated using the agentless detection feature are as follows:
Agentless detection scan fee
Billing method: Pay-as-you-go.
Billing cycle: Daily.
Unit price: USD 0.03/GB.
Billable usage: Calculated based on the actual data volume of the scanned images, not the total disk capacity.
ECS resource usage fees
ImportantWe recommend that when you configure host detection tasks, you select Retain Only At-risk Image. The system then automatically deletes risk-free images after the scan to reduce storage costs. For more information, see Retention period configuration.
Image fees: The detection task creates an image for the server. You are charged for the image based on its usage capacity and duration. These fees are charged by ECS. For more information, see Image billing.
FAQ
What is the difference between agentless detection and virus scanning?
Comparison Item
Agentless Detection
Virus Scan
Working mode
Scans offline snapshots, static analysis
Online real-time monitoring and scanning, dynamic + static analysis
Server status
Servers with startup and shutdown detection
Can only scan running servers with an online agent
Detection scope
Vulnerabilities, baselines, malicious samples, sensitive files.
Viruses, webshells, intrusive behaviors, vulnerabilities, etc.
Response capability
Supports detection, alerting, and whitelisting. Does not provide remediation.
Provides one-click isolation, quarantine, and remediation capabilities.
Performance impact
None.
Slight (agent consumes a small amount of system resources).
Billing model
Pay-as-you-go (per GB scanned)
Subscription (Anti-virus Edition and higher) or pay-as-you-go.
Scan mode
Supports full disk scans.
Supports quick scans and custom directory scans.
Can agentless detection automatically fix all risks?
No, it cannot. It supports only operations such as detection, alerting, whitelisting, and ignoring. It does not provide automatic remediation. You must handle risk items based on the instructions on the risk details page.
NoteWe recommend that you prioritize the handling of high-risk vulnerabilities and malware. Baseline optimizations can be implemented as needed.
How can I use advanced detection features for non-Alibaba Cloud servers?
Currently, agentless detection supports connecting to Alibaba Cloud ECS, AWS EC2, and Azure servers.
ImportantAWS and Azure are supported for detection only in regions Outside Chinese Mainland. For more information, see Access and detect multicloud assets.
For servers from other cloud providers or in on-premises data centers, we recommend that you install the Security Center agent and purchase the Anti-virus Edition or a higher edition to obtain comprehensive security protection. For specific steps, see Purchase Security Center and Install the agent.
Why do some agentless detection alerts not display the asset IP address?
When you use agentless detection, if the asset IP address is empty, the possible reasons are as follows:
The instance has been released
When the instance that corresponds to an alert is released, Security Center can no longer retrieve the instance's IP information because the instance no longer exists.
Data cleanup mechanism
Security Center may clean up records of released instances, which makes the related information unavailable.
Appendix
Detailed detection capabilities
The following table lists the main detection items supported by agentless detection.
Detection Category | Detection Scope | Details |
Vulnerabilities | Linux software vulnerabilities, Windows system vulnerabilities, application vulnerabilities | For supported operating system versions, see Supported operating systems for vulnerability scanning. |
Baseline Check | Configuration compliance for operating systems, applications, and databases | Supports scanning hundreds of configuration items, including but not limited to:
For more information, go to the Scan Configuration page in the console. For details about the operations, see Baseline Check Scope. |
Malicious Sample | Malicious scripts, webshells, malware |
For more information, see Malicious samples. |
Sensitive File | Credential information, key files, configuration files | Supports detection of common sensitive files, including but not limited to:
For more information, go to Scan Configuration in the console. For specific steps, see sensitive file check item. |
Supported operating systems for vulnerability scanning
Operating System Type | Version |
Windows Server |
|
Red Hat |
|
CentOS |
|
Ubuntu |
|
Debian |
|
Alpine |
|
Amazon Linux |
|
Oracle Linux |
|
SUSE Linux Enterprise Server |
|
Fedora Linux |
|
openSUSE |
|
Malicious samples
Malicious Sample Category | Description | Supported Check Items |
Malicious script | Detects whether system functions on an asset have been attacked or tampered with by malicious scripts. Possible malicious script attacks are shown in the detection results. Malicious scripts are divided into file-based and fileless scripts. After gaining server permissions, attackers use scripts as a vehicle for further attacks. These attacks can include implanting mining programs, adding system backdoors, or adding system accounts. | Supported languages include Shell, Python, Perl, PowerShell, VBScript, BAT, etc. |
Webshell | Checks whether web script files on an asset are malicious and contain backdoor communication or management functions. After implanting a webshell, an attacker can control the server and use it as a backdoor for further attacks. | Supported languages include PHP, JSP, ASP, ASPX, etc. |
Malware | Checks whether binary files on an asset are malicious and have the ability to damage the asset or maintain persistent control. After implanting a malicious binary file, an attacker can control the server for mining, DDoS attacks, or encrypting asset files. Malicious binaries are mainly classified by function, including mining programs, Trojans, backdoors, hacking tools, ransomware, and worms. | Infected basic software |
Suspicious program | ||
Spyware | ||
Trojan | ||
Infectious virus | ||
Worm | ||
Exploit program | ||
Metamorphic Trojan | ||
Hacking tool | ||
DDoS Trojan | ||
Reverse shell backdoor | ||
Malicious program | ||
Rootkit | ||
Downloader Trojan | ||
Scanner | ||
Riskware | ||
Proxy tool | ||
Ransomware | ||
Backdoor program | ||
Mining program |