This topic describes how to use the Application Management module to perform specific operations in the SchedulerX console. For example, you can use the module to create an application or a job group, check whether workers are connected to an application, and grant Resource Access Management (RAM) users the permissions to access an application.
Create an application
Before you create a job in the SchedulerX console, you must create an application.
Step 1: Configure the parameters in the Basic Configuration step
general app: Select this option if you do not want to deploy the application in a Kubernetes cluster or do not require Kubernetes jobs.
k8s App: Select this option if you want to deploy the application in a Kubernetes cluster and require Kubernetes jobs.
If you create a general application of the Basic Edition, this parameter is unavailable.
This feature is automatically disabled if no write operation is performed within a year. In this case, you can enable this feature only manually.
A financial day refers to a trading day for financial business.
A workday refers to a day of normal work or operations for a society, organization, or individual.
Log on to the SchedulerX console.
In the top navigation bar, select a region.
In the left-side navigation pane, click Application Management.
On the Application Management page, select a namespace. Then, click Create application.
In the Basic Configuration step of the Create application wizard, configure the Application Name, Application ID, and app type parameters, and the parameters in the Advanced Configuration section based on your business requirements, and click Next Step.
Category | Parameter | Description | Default value |
Basic information | Application Name | Specify a name for the application. | N/A |
Application ID | Specify an ID for the application. The Application ID is also the ID of a job group after the application is connected to SchedulerX. Make sure that the application ID is unique in a namespace. Otherwise, the application fails to be created. You can use the value of the Application Name parameter as the application ID. | N/A | |
Description | Specify a description for the application. | N/A | |
app type | general app | ||
Release | Select a version based on your business requirements. | Professional Edition | |
Remote Log Server | If you enable this feature, you must configure Log4j or Logback. Then, you can view the scheduling logs of every job (including distributed jobs) in the SchedulerX console for troubleshooting. Note | Enabled | |
Machine Instance busy configuration | load5 | If the number of vCPUs used within the previous 5 minutes exceeds the threshold that is specified by this parameter, the worker is considered busy. The default value 0 indicates that the worker is not considered busy no matter how many vCPUs are used within the previous 5 minutes. | 0 |
Memory usage | If the average memory usage within the previous 5 minutes exceeds the threshold that is specified by this parameter, the worker is considered busy. | 90% | |
Disk Usage | If the disk usage exceeds the threshold that is specified by this parameter, the worker is considered busy. | 95% | |
Whether to trigger a busy machine | Specify whether to continue to trigger jobs when the worker is busy. | Enabled | |
Advanced Configuration | Maximum number of tasks | Specify the maximum number of jobs that are supported by an instance group. | 1000 |
Automatic expansion | Select whether to enable automatic expansion. If you enable this feature, you must configure the Number of global tasks parameter. | Disabled | |
Flow Control | Select whether to enable traffic throttling. If you enable this feature, you must configure the Number of concurrent task instances parameter. | Disabled | |
Number of concurrent task instances | Specify the maximum number of job instances that can run for the application at the same time. Job instances that exceed the upper limit wait in a queue for execution. | 0 | |
Calendar | If you set this parameter to Specify calendar, you can select Financial day or Workday from the drop-down list. | 0 |
Step 2: Configure the parameters in the Notification configuration step
In the Notification configuration step of the Create application wizard, configure the Notification channel and Notify contact parameters.
Valid values of the Notification channel parameter: SMS, Mail, webhook, and Telephone.
For more information about how to configure a webhook, see the Configure a webhook section of this topic.
You can specify the Contact group or Contact that can receive notifications.
Contact group
All contacts in the contact group can receive notifications. For more information about how to create a contact group, see the Create a notification contact and a notification contact group section of the Notification contacts and notification contact groups topic.
Contact
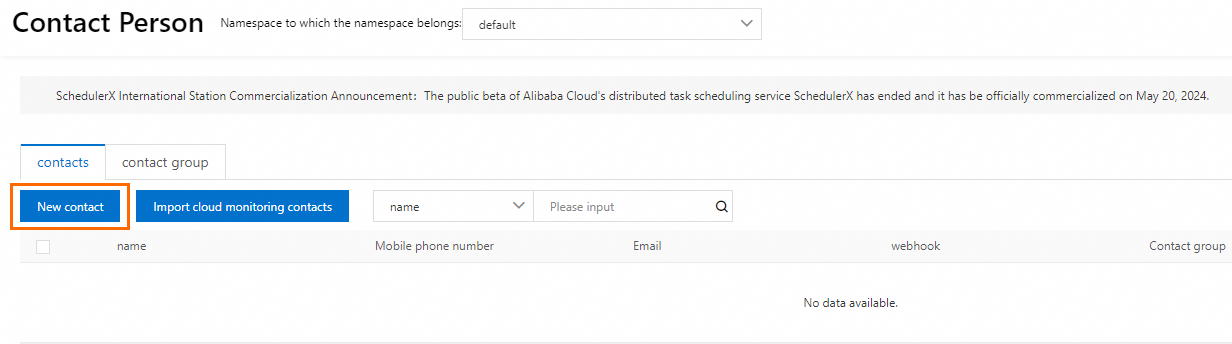
1. Add contacts to receive notifications. You can add multiple contacts at a time. If you have not created any contact, click Add contact and then click Go to create a contact from the drop-down list.
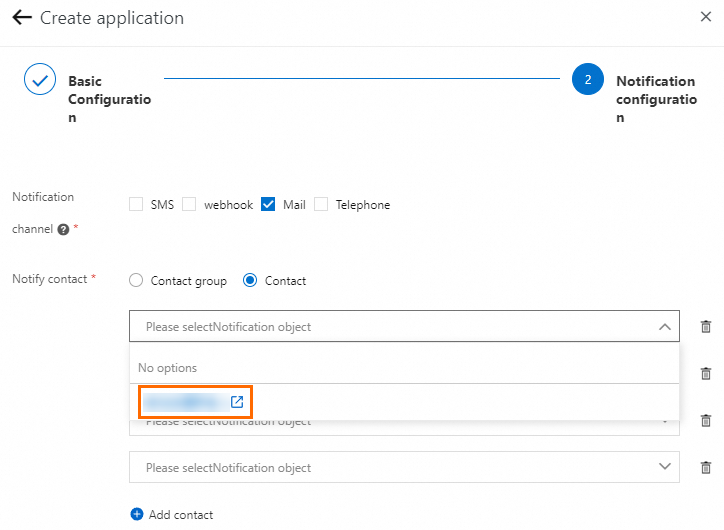
2. On the page that appears, click New contact and enter the contact information.

Click Complete.
After the application is created, the application list is automatically refreshed.
 Important
Application ID: This parameter must be specified for agent initialization. The ID of an application is also the unique identifier of a job group.
Application key: This parameter must be specified for SDK requests. The key of an application is used to verify the requests. Do not share your application key with other users.
Configure a webhook
For more information about how to obtain a webhook, see DingTalk development document, WeCom development documentation, and Lark development documentation.
WeCom, Lark, and DingTalk webhooks are supported. You can configure multiple webhook bots at the same time. Separate multiple bot URLs with commas (,).
If you configure a webhook for a DingTalk chatbot, you must specify the keyword
SchedulerX. The keyword is case-sensitive. Otherwise, the alerts cannot be received.If you create a webhook for a contact, make sure that the webhook can accurately parse and process requests in the following format. The following code provides an example on how to use a curl command to send a message to the webhook for a contact:
  curl 'https://oapi.xxxxxxx \
     -H 'Content-Type: application/json' \
     -d '
     {
      	"msgtype": "text",
      	"text": {
          	"content": "Details of the alert triggered in SchedulerX"
       },
       "at": {
          "isAtAll": false
      }
     }'
View instances
After you connect an application to SchedulerX, you can view the instances that run for the application to check whether the job for the application is connected to SchedulerX. To view instances, perform the following operations:
On the Application Management page, check the number in the Total number of instances column.
NoteIf the value in the Total number of instances column is 0, you failed to connect the job for the application to SchedulerX.
In the Operation column of the application, click View instances.
In the Connect to an instance panel, view the workers that run for the application and the status of the workers.
The IP address of a worker is followed by a number that is enclosed in a pair of parentheses ( ). The number indicates the number of SchedulerX agents that run on the worker. In most cases, only one agent runs on a worker. You can connect a worker to multiple SchedulerX agents.
Workers are in the Health or Busy state. By default, SchedulerX does not schedule jobs to busy workers. If all workers are busy, SchedulerX does not schedule jobs. If you want SchedulerX to forcefully schedule jobs to busy workers, click Edit in the Operation column of the application. In the panel that appears, turn off the Whether to trigger a busy machine switch in the Machine Instance busy configuration section.


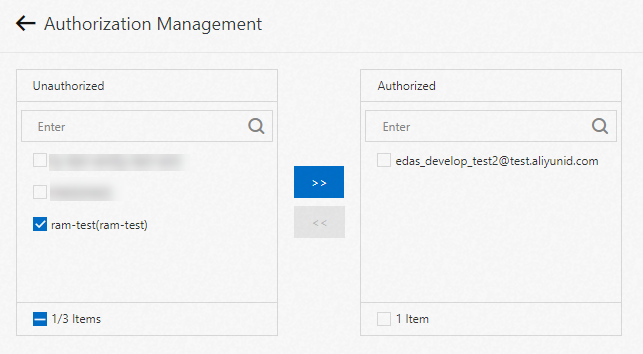
Grant RAM users the permissions to access an application
You can grant RAM users the permissions to access an application by using an Alibaba Cloud account or a RAM user.
If the system prompts that you do not have the required permissions after you click Authorization, you must use your Alibaba Cloud account to attach a custom policy to the RAM user. The following code shows the content of the custom policy:
{
    "Version": "1",
    "Statement": [
        {
            "Action": "ram:ListUsers",
            "Resource": "*",
            "Effect": "Allow"
        }
    ]
}
Delete an application
If you no longer want to create jobs for an application, you can delete the application. After you delete an application, the jobs that belong to the application cannot be triggered.
On the Application Management page, find the application that you want to delete and click Delete in the Operation column.
In the Delete application dialog box, confirm the application information, enter the application name, and then click OK.
After you delete an application, the jobs that are associated with the application cannot be triggered, and the application is removed from the Application Management page.
If you want to restore an application that is accidentally deleted, join the DingTalk group (23103656) for technical support.