This topic provides an example on how to enable Internet access for an application that is deployed on SAE.
Prerequisites
SAE is activated. For more information, see Activate SAE.
A virtual private cloud (VPC) and a vSwitch are created. For more information, see Create a VPC and a vSwitch.
A namespace is created. For more information, see Create a namespace.
Background information
For example, Enterprise A wants to create an application in the China (Beijing) region in SAE, deploy a WordPress service on the application, and use an ApsaraDB RDS database that resides in the China (Hangzhou) region.
Create and deploy a WordPress application
Log on to the SAE console.
In the left-side navigation pane, click Applications. In the top navigation bar, select a region. Then, click Create Application.
In the Basic Information step, configure the parameters and click Next: Application Deployment Configurations.
Parameter
Description
Application Name
Enter a custom application name.
VPC
Select a configuration method for the VPC. Valid values:
Custom Configuration: If you select this option, you must manually specify the namespace, VPC, vSwitch, and security group for the application that you want to create.
Automatic Configuration: If you select this option, SAE automatically specifies the namespace, VPC, vSwitch, and security group for the application.
Namespace
This parameter is required if you set the VPC parameter to Custom Configuration.
Select an existing namespace from the drop-down list. Namespaces and VPCs are in one-to-one mapping relationships. For information about how to modify a VPC, see Create and manage a VPC.
vSwitch
This parameter is required if you set the VPC parameter to Custom Configuration.
Click Select vSwitch. In the Select vSwitch dialog box, select the required vSwitches.
You must specify at least one vSwitch. We recommend that you specify no more than three vSwitches. Each vSwitch must match at least one application instance.
Security Group
This parameter is required if you set the VPC parameter to Custom Configuration.
Select a security group from the drop-down list. If you have not created a security group in your VPC, click Create Security Group to create a security group as prompted. For more information, see Create a security group.
Application Instances
Select the number of instances that you want to create.
VCPU
Select a CPU specification for the instances that you want to create.
Memory
Select a memory specification for the instances that you want to create.
Application Description
Enter a description for the application.
In the Deployment Configurations step, set the Application Deployment Method parameter to Image and configure the parameters. Then, click Next: Confirm Specifications.
In the Specification Confirmation step, view the details of the application and the fee for the selected specifications. Then, click Confirm.
The Creation Completed step appears. You can click Application Details to go to the Basic Information page of the application.
Check the deployment result of the application.
On the Basic Information page, view the basic information and instance deployment information of the application. If Running is displayed in the Status column on the Instance Deployment Information tab, the application is deployed.
Bind a Server Load Balancer (SLB) instance to the application.
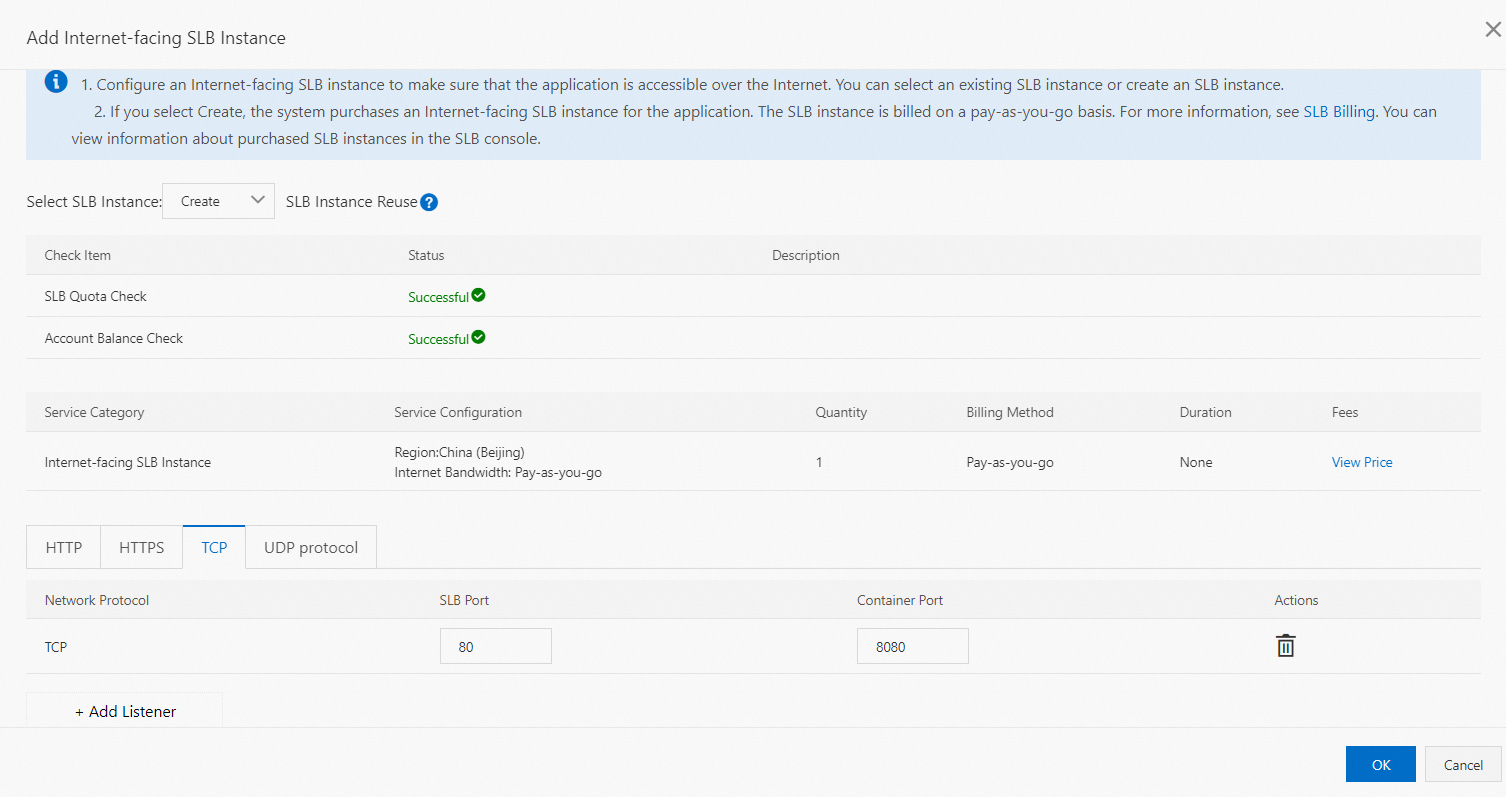
On the Basic Information tab of the Basic Information page, click Add Internet-facing SLB Instance on the SLB-based Access tab in the Application Access Settings section.
In the Add Internet-facing SLB Instance dialog box, configure an SLB listener and click OK.
A listener defines how SLB routes requests to backend servers. Add at least one listener to an SLB instance.

Use the Internet-facing SLB instance to access the WordPress application.
Configure Internet access for the WordPress application
For more information, see Configure a NAT gateway for an SAE application to enable Internet access.
Configure an ApsaraDB RDS database that resides in another region for the WordPress application
Purchase an ApsaraDB RDS instance.
Configure basic information for the ApsaraDB RDS instance.
When you purchase an ApsaraDB RDS instance, set the Region parameter to China (Hangzhou), the Zone parameter to Hangzhou Zone K, and the Network Type parameter to VPC.
Configure a whitelist.
Log on to the ApsaraDB RDS console. In the left-side navigation pane, click Instances. On the Instances page, click the name of the ApsaraDB RDS instance that you purchased in Step 1 to go to the Basic Information page.
In the left-side navigation pane, click Database Connection. In the top navigation bar of the Database Connection page, click Apply for Public Endpoint. In the Reminder dialog box, click OK.

After the public endpoint is obtained, the public endpoint is displayed in the Public Endpoint field.
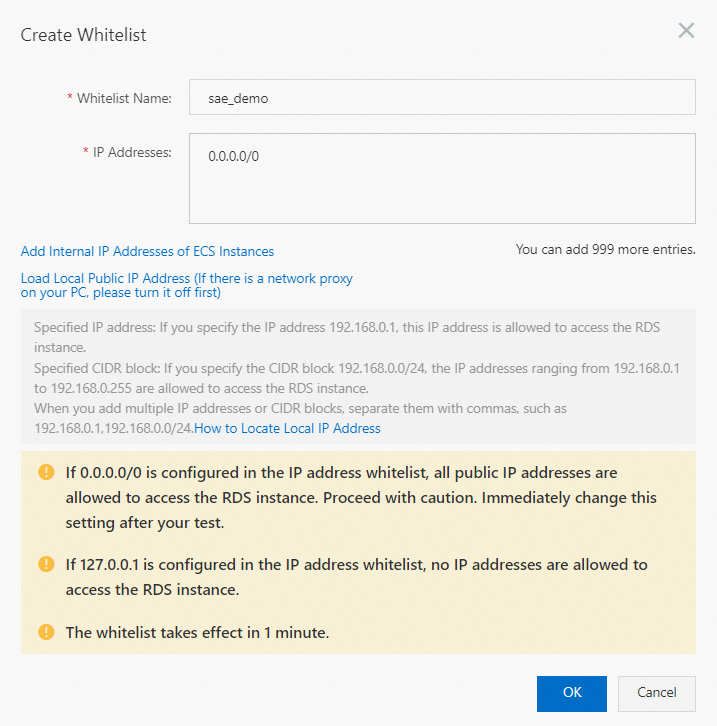
Click Configure Whitelist in the Public Endpoint field to go to the Whitelist and SecGroup page. On the Whitelist Settings tab, click Create Whitelist.
In the Create Whitelist dialog box, configure the Whitelist Name and IP Addresses parameters, and then click OK.
NoteIn this example, the IP Addresses parameter is set to 0.0.0.0/0. This value indicates that all access from the Internet is allowed.

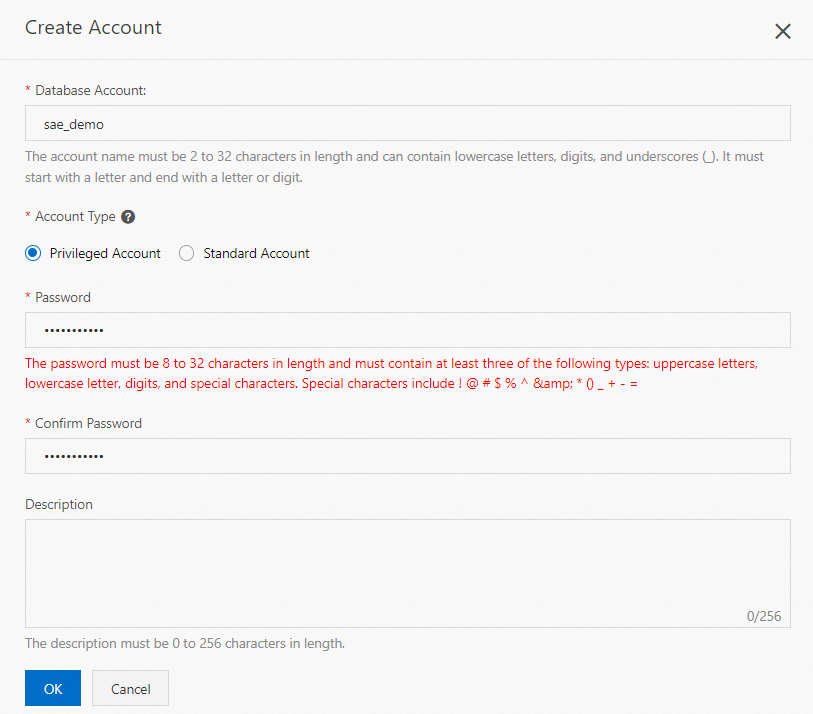
In the left-side navigation pane, click Accounts. On the Accounts tab, click Create Account. In the Create Account panel, configure the parameters and click OK.
Create an account and a database for the ApsaraDB RDS instance based on your business requirements. For more information, see Create accounts and databases.

Check whether the ApsaraDB RDS database that is created for the WordPress application can be accessed over the Internet.