This topic describes how to develop RESTful applications in High-Speed Service Framework (HSF) and implement service registration and discovery. Serverless App Engine (SAE) supports native Spring Cloud applications. Therefore, we recommend that you do not use HSF to develop RESTful applications.
Background information
For more information about how to develop applications in the native Spring Cloud framework, see Host Spring Cloud applications in SAE.
Service registration and discovery
This topic provides a simple example on how to develop RESTful applications and implement service registration and discovery in a local environment.
- Create a service provider.
The service provider provides a simple echo service and registers itself with the service registry.
- Create a RESTful application project that is named sc-vip-server.
- Add the required dependencies to the pom.xml file.
    <parent>
        <groupId>org.springframework.boot</groupId>
        <artifactId>spring-boot-starter-parent</artifactId>
        <version>1.5.8.RELEASE</version>
        <relativePath/>
    </parent>

    <dependencies>
        <dependency>
            <groupId>org.springframework.cloud</groupId>
            <artifactId>spring-cloud-starter-vipclient</artifactId>
            <version>1.3</version>
        </dependency>
        <dependency>
            <groupId>org.springframework.cloud</groupId>
            <artifactId>spring-cloud-starter-pandora</artifactId>
            <version>1.3</version>
        </dependency>
    </dependencies>

    <dependencyManagement>
        <dependencies>
            <dependency>
                <groupId>org.springframework.cloud</groupId>
                <artifactId>spring-cloud-dependencies</artifactId>
                <version>Dalston.SR4</version>
                <type>pom</type>
                <scope>import</scope>
            </dependency>
        </dependencies>
    </dependencyManagement>
If you do not want to set the parent of the project to spring-boot-starter-parent, you can add dependencyManagement and set scope=import to manage dependencies.
<dependencyManagement>
            <dependencies>
                <dependency>
                    <groupId>org.springframework.boot</groupId>
                    <artifactId>spring-boot-dependencies</artifactId>
                    <version>1.5.8.RELEASE</version>
                    <type>pom</type>
                    <scope>import</scope>
                </dependency>
            </dependencies>
</dependencyManagement>
- Create a service provider application, in which the @EnableDiscoveryClient annotation enables service registration and discovery for the application.
@SpringBootApplication
    @EnableDiscoveryClient
    public class ServerApplication {

        public static void main(String[] args) {
            PandoraBootstrap.run(args);
            SpringApplication.run(ServerApplication.class, args);
            PandoraBootstrap.markStartupAndWait();
        }
    }
- Create EchoController to provide a simple echo service.
@RestController
    public class EchoController {
        @RequestMapping(value = "/echo/{string}", method = RequestMethod.GET)
        public String echo(@PathVariable String string) {
            return string;
        }
    }
- Configure the application name and the listener port number in the application.properties file in the resources directory.
spring.application.name=service-provider
server.port=18081
- Create a service consumer.
In this example, a service consumer is created to call the service provider by using RestTemplate, AsyncRestTemplate, and FeignClient.
- Create a RESTful application project that is named sc-vip-client.
- Add the required dependencies to the pom.xml file.
<parent>
        <groupId>org.springframework.boot</groupId>
        <artifactId>spring-boot-starter-parent</artifactId>
        <version>1.5.8.RELEASE</version>
        <relativePath/>
    </parent>

    <dependencies>
        <dependency>
            <groupId>org.springframework.cloud</groupId>
            <artifactId>spring-cloud-starter-vipclient</artifactId>
            <version>1.3</version>
        </dependency>
        <dependency>
            <groupId>org.springframework.cloud</groupId>
            <artifactId>spring-cloud-starter-pandora</artifactId>
            <version>1.3</version>
        </dependency>
        <dependency>
            <groupId>org.springframework.cloud</groupId>
            <artifactId>spring-cloud-starter-feign</artifactId>
        </dependency>
    </dependencies>

    <dependencyManagement>
        <dependencies>
            <dependency>
                <groupId>org.springframework.cloud</groupId>
                <artifactId>spring-cloud-dependencies</artifactId>
                <version>Dalston.SR4</version>
                <type>pom</type>
                <scope>import</scope>
            </dependency>
        </dependencies>
    </dependencyManagement>
FeignClient is used in this example for demonstration. Compared with the service provider sc-vip-server, the pom.xml file contains the spring-cloud-starter-feign dependency.
- Enable service registration and discovery for sc-vip-client. This is the same as sc-vip-server. Compared with sc-vip-server, you must also add the following two annotations to use RestTemplate, AsyncRestTemplate, and FeignClient:
- Add the @LoadBalanced annotation to combine RestTemplate and AsyncRestTemplate with the service discovery.
- Use the @EnableFeignClients annotation to activate FeignClient.
@SpringBootApplication
    @EnableDiscoveryClient
    @EnableFeignClients
    public class ConsumerApplication {

        @LoadBalanced
        @Bean
        public RestTemplate restTemplate() {
            return new RestTemplate();
        }

        @LoadBalanced
        @Bean
        public AsyncRestTemplate asyncRestTemplate(){
            return new AsyncRestTemplate();
        }

        public static void main(String[] args) {
            PandoraBootstrap.run(args);
            SpringApplication.run(ConsumerApplication.class, args);
            PandoraBootstrap.markStartupAndWait();
        }

    }
- Configure the service name and the HTTP request of the HTTP method before you use FeignClient of EchoService. In the sc-vip-server project, set the service name to service-provider.
@FeignClient(name = "service-provider")
    public interface EchoService {
        @RequestMapping(value = "/echo/{str}", method = RequestMethod.GET)
        String echo(@PathVariable("str") String str);
    }
- Create a controller for call testing.
@RestController
public class Controller {
   @Autowired
   private RestTemplate restTemplate;
   @Autowired
   private AsyncRestTemplate asyncRestTemplate;
   @Autowired
   private  EchoService echoService;
   @RequestMapping(value = "/echo-rest/{str}", method = RequestMethod.GET)
   public String rest(@PathVariable String str) {
       return restTemplate.getForObject("http://service-provider/echo/" + str, String.class);
   }
   @RequestMapping(value = "/echo-async-rest/{str}", method = RequestMethod.GET)
   public String asyncRest(@PathVariable String str) throws Exception{
       ListenableFuture<ResponseEntity<String>> future = asyncRestTemplate.
               getForEntity("http://service-provider/echo/"+str, String.class);
       return future.get().getBody();
   }
   @RequestMapping(value = "/echo-feign/{str}", method = RequestMethod.GET)
   public String feign(@PathVariable String str) {
       return echoService.echo(str);
   }
}
Code description:
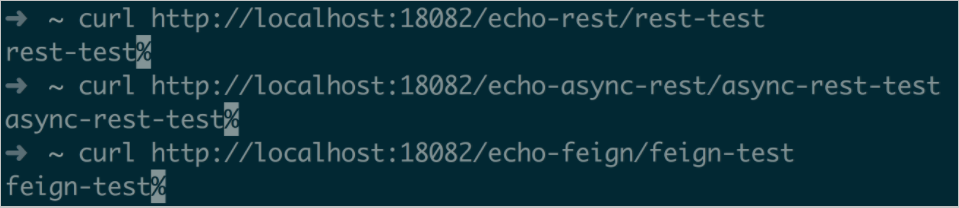
/echo-rest/ calls the service from the service provider by using RestTemplate. /echo-async-rest/ calls the service from the service provider by using AsyncRestTemplate. /echo-feign/ calls the service from the service provider by using FeignClient.
- Configure the application name and the listener port number.
spring.application.name=service-consumer
server.port=18082
- Perform local code development and debugging.
- Start the light-weight configuration center.
The light-weight configuration center must be started for local code development and debugging, which includes a light-weight
SAE service registry for service providers. For more information about the light-weight configuration center, see
Start the lightweight configuration center.
- Start the application.
- Start the application in an integrated development environment (IDE)
To start the application in an IDE, set the -Dvipserver.server.port=8080 startup parameter in VM options and start the application by calling the main method. This parameter is added only when the application is deployed in a local environment and the light-weight configuration center is used. When the application is deployed in SAE, remove this parameter. Otherwise, the application cannot be released or subscribed to as expected.
The light-weight configuration center and the application are deployed on different instances and their configurations must be added to the hosts file. For more information, see Start the lightweight configuration center.
- Start the application by using FatJar
- Add a FatJar packaging plug-in.
To package the pandora-boot project into a FatJar package by using Maven, add the following plug-in to pom.xml. To prevent conflicts with other packaging plug-ins, do not add configurations of other FatJar plug-ins to the plugin field in build.
<build>
    <plugin>
        <groupId>com.taobao.pandora</groupId>
            <artifactId>pandora-boot-maven-plugin</artifactId>
            <version>2.1.9.1</version>
            <executions>
               <execution>
                  <phase>package</phase>
                  <goals>
                      <goal>repackage</goal>
                  </goals>
               </execution>
             </executions>
    </plugin>
</build>
- After you add the plug-in, in the home directory of the project, run the Maven command
mvn clean package for packaging. Then, you can view the FatJar package in the target directory. - Start the application by running the following Java command:
java -Dvipserver.server.port=8080 -Dpandora.location=/Users/{$username}/.m2/repository/com/taobao/pandora/taobao-hsf.sar/dev-SNAPSHOT/taobao-hsf.sar-dev-SNAPSHOT.jar -jar sc-vip-server-0.0.1-SNAPSHOT.jar
Note The path specified in -Dpandora.location must be a full path that is placed before sc-vip-server-0.0.1-SNAPSHOT.jar.
Start the service consumer and call the service provider. The calls are successful.
- Troubleshoot FAQ.
- Why am I unable to enable service discovery by using AsyncRestTemplate?
You can enable service discovery by using AsyncRestTemplate only in Spring Cloud Dalston and later versions. For more information, see Pull requests.
- What can I do when FatJar packaging plug-ins conflict with other plug-ins?
To prevent conflicts with other packaging plug-ins, do not add configurations of other FatJar plug-ins to the plugin field in build.
- Can taobao-hsf.sar be included during packaging?
Yes, you can add taobao-hsf.sar to a package. However, we recommend that you do not add it to a package.
You can modify pandora-boot-maven-plugin by setting excludeSar to false so that taobao-hsf.sar is automatically added to the package during packaging.
<plugin>
    <groupId>com.taobao.pandora</groupId>
    <artifactId>pandora-boot-maven-plugin</artifactId>
    <version>2.1.9.1</version>
    <configuration>
    <excludeSar>false</excludeSar>
    </configuration>
       <executions>
           <execution>
              <phase>package</phase>
              <goals>
                  <goal>repackage</goal>
              </goals>
            </execution>
    </executions>
</plugin>
This way, the package can be started without configuring the address of pandora-boot-maven-plugin.
java -jar -Dvipserver.server.port=8080 sc-vip-server-0.0.1-SNAPSHOT.jar
Restore the configuration to exclude taobao-hsf.sar before you deploy the application in SAE.