This topic uses a simple example to demonstrate how to create, deploy, and start a Flink SQL job. You will learn the basic workflow for developing Flink SQL jobs.
Prerequisites
-
If you use a Resource Access Management (RAM) user or a RAM role to access Realtime Compute for Apache Flink, ensure that the RAM user or RAM role has the required permissions. For more information, see Permission management.
-
A Flink workspace has been created. For more information, see Activate Realtime Compute for Apache Flink.
Step 1: Create a job
-
Navigate to the SQL job creation page.
-
Log on to the Realtime Compute for Apache Flink console.
-
Click Console in the Actions column for the target workspace.
-
In the navigation pane on the left, choose .
-
-
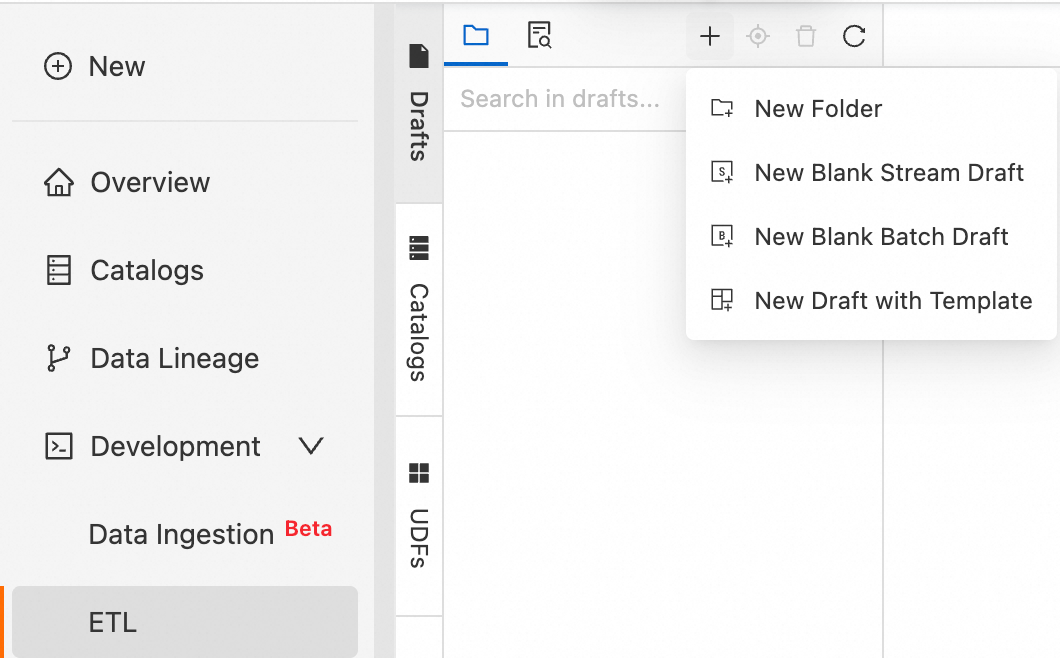
Click the
 icon, and then select New Stream Job. Enter a File Name and select an Engine Version.
Realtime Compute for Apache Flink provides various code and data synchronization templates. Each template includes a specific scenario, code examples, and instructions. You can use these templates to quickly learn about Flink features and syntax to implement your business logic. For more information, see Code Template and Data synchronization templates.
Job parameters
Description
Example
File Name
The name of the job.
NoteThe job name must be unique within the current project.
flink-test
Engine Version
The Flink engine version for the current job.
Use a version with the Recommended or Stable tag. These versions provide higher reliability and performance. For more information about engine versions, see Release notes and Engine versions.
vvr-8.0.8-flink-1.17
-
Click Create.
Step 2: Write the SQL job and view configuration information
-
Write the SQL job.
Copy the following SQL code to the SQL editor. This example uses the Datagen connector to generate a random data stream and the Print connector to print the results to the development console. For more information about supported connectors, see Supported connectors.
-- Create a temporary source table named datagen_source. CREATE TEMPORARY TABLE datagen_source( randstr VARCHAR ) WITH ( 'connector' = 'datagen' -- Datagen connector ); -- Create a temporary sink table named print_table. CREATE TEMPORARY TABLE print_table( randstr VARCHAR ) WITH ( 'connector' = 'print', -- Print connector 'logger' = 'true' -- Display the results in the console. ); -- Truncate the randstr field and print the result. INSERT INTO print_table SELECT SUBSTRING(randstr,0,8) from datagen_source;Note-
This SQL example shows how to use
INSERT INTOto write data to a single sink. You can also useINSERT INTOto write data to multiple sinks. For more information, see INSERT INTO statement. -
For production jobs, minimize the use of temporary tables. Instead, use tables that are registered in Data Management. For more information, see Data Management.
-
-
View the configuration information.
On the tabs to the right of the SQL editor, you can view or upload configurations.
Tab name
Description
More Configurations
-
Engine Version: For more information about engine versions, see Engine versions and Lifecycle policy. We recommend that you use a recommended or stable version. The following list describes the tags for engine versions:
-
Recommend: the latest minor version of the latest major version.
-
Stable: the latest minor version of a major version that is still in service. Bugs in previous versions are fixed.
-
Normal: other minor versions that are still in service.
-
Deprecated: a version that is out of service.
-
-
Additional Dependencies: additional dependencies for the job, such as temporary functions.
-
Kerberos authentication: Enable Kerberos authentication. Configure the registered Kerberos cluster and principal information. If you have not registered a Kerberos cluster, see Register a Hive Kerberos cluster.
Code Structure
-
Data Flow: View the data flow.
-
Tree Structure: View the data sources in a tree structure.
Version Information
You can view the job version information here. For more information about the functions in the Actions column, see Manage job versions.
-
Step 3 (Optional): Perform a deep check and debug the job
-
Perform a deep check on the job.
A deep check verifies the job's SQL semantics, network connectivity, and the metadata of the tables used by the job. You can also click SQL Optimization in the results area to view SQL risk alerts and optimization suggestions.
-
In the upper-right corner of the SQL editor, click Deep Check.
-
In the Deep Check dialog box, click Confirm.
NoteA timeout error may occur during the deep check of a job. The following error message is returned:
The RPC times out maybe because the SQL parsing is too complicated. Please consider enlarging the `flink.sqlserver.rpc.execution.timeout` option in flink-configuration, which by default is `120 s`.
Solution: Add the following parameter configuration to the top of the job editing page.
SET 'flink.sqlserver.rpc.execution.timeout' = '600s'; -
-
Debug the job.
You can use the debugging feature to simulate a job run, check the output, and verify the logic of your SELECT or INSERT statements. This improves development efficiency and reduces data quality risks.
NoteThe debugging feature does not write data to the downstream sink table.
-
In the upper-right corner of the SQL editor, click Debug.
-
In the Debug dialog box, select a debug cluster and click Next.
If no cluster is available, you must create a session cluster. The session cluster must use the same engine version as the SQL job and be in the Running state. For more information, see Step 1: Create a session cluster.
-
Configure the debugging data and click OK.
For more information about the configuration, see Step 2: Debug a job.
-
Step 4: Deploy the job
In the upper-right corner of the SQL editor, click Deploy. In the Deploy New Version dialog box, configure the parameters as needed and click OK.
When you deploy a job, you can set Deployment Target to Resource Queue or Session Cluster. The details of each option are as follows:
|
Deployment Target |
Applicable Environment |
Core Features |
|
Resource Queue |
Production environment |
|
|
Session Cluster |
Development and testing environment |
Important
You cannot view the logs of jobs that run on a session cluster. |
Step 5: Start the job and view the results
-
In the navigation pane on the left, choose .
-
For the target job, click Start in the Actions column.
Select Stateless Start and click Start. The job is running as expected when its status changes to Running. For more information about job startup parameters, see Start a job.
-
On the Job O&M details page, you can view the Flink computation results.
-
Go to the page and click the target job.
-
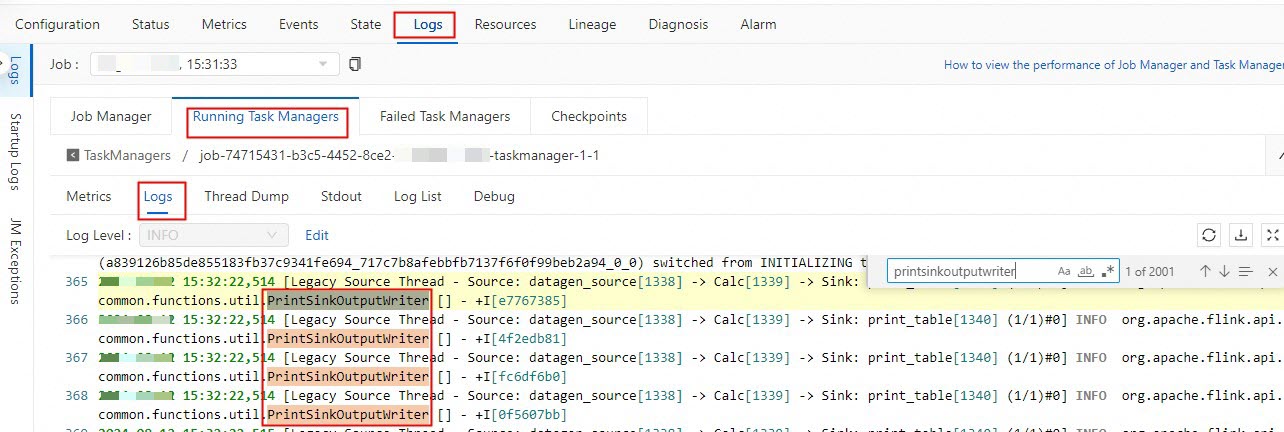
On the Job Logs tab, click the Running Task Managers tab, and then click a task in the Path, ID column.
-
Click Logs and search for logs related to PrintSinkOutputWriter.
-
Step 6 (Optional): Stop the job
If you modify a job and want the changes to take effect, you must redeploy the job, and then stop and restart it. Examples of modifications include changing the code, adding or removing WITH parameters, or changing the job version. You also need to stop and restart a job if the job cannot reuse a state, if you want to start a new job, or if you update parameters that do not take effect dynamically. For more information about how to stop a job, see Stop a job.
-
On the page, click Stop in the Actions column for the target job.
-
Click OK.
References
-
FAQ for job development and O&M
-
Configure job information
-
You can configure job resources before you start the job or modify job resources after the job is online. You can use basic mode (coarse-grained) or expert mode (fine-grained) to allocate resources. For more information, see Configure job resources.
-
You can configure the log level for a job and configure outputs for logs of different levels. For more information, see Configure job log outputs.
-
-
Development workflows for other job types
-
Flink best practices