This topic describes how to create, deploy, and start Flink JAR stream and batch jobs. This helps you understand the workflow for JAR jobs in Realtime Compute for Apache Flink.
Prerequisites
-
If you use a Resource Access Management (RAM) user or a RAM role to access the Flink console, make sure that you have the required permissions. For more information, see Permission management.
-
A Flink workspace is created. For more information, see Activate Realtime Compute for Apache Flink.
Step 1: Develop a JAR package
The Realtime Compute for Apache Flink console does not provide a development environment for JAR packages. You must develop, compile, and package your code in your local environment. For more information about how to configure environment dependencies, use connectors, and read additional dependency files from Object Storage Service (OSS), see Develop a JAR job.
Make sure that the Flink version used for local development is the same as the engine version that you select in Step 3: Deploy a JAR job. Also, take note of the scope of the dependency packages.
To help you quickly get started with Flink JAR jobs, this topic provides a test JAR package and a data file that counts word frequency. You can download them to use in the following steps.
-
Click FlinkQuickStart-1.0-SNAPSHOT.jar to download the test JAR package.
If you want to view the source code, click FlinkQuickStart.zip to download and compile it.
-
Click Shakespeare to download the Shakespeare data file.
Step 2: Upload the test JAR package and data file
-
Log on to the Realtime Compute for Apache Flink console.
-
Click Console in the Actions column for the target workspace.
-
In the navigation pane on the left, click File Management.
-
Click Upload Resource to upload the JAR package and data file for the deployment.
This topic uses the FlinkQuickStart-1.0-SNAPSHOT.jar and Shakespeare files that you downloaded in Step 1. For more information about file storage paths, see File management.
Step 3: Deploy a JAR job
Stream job
-
On the , click Deploy Job and select JAR Job.
-
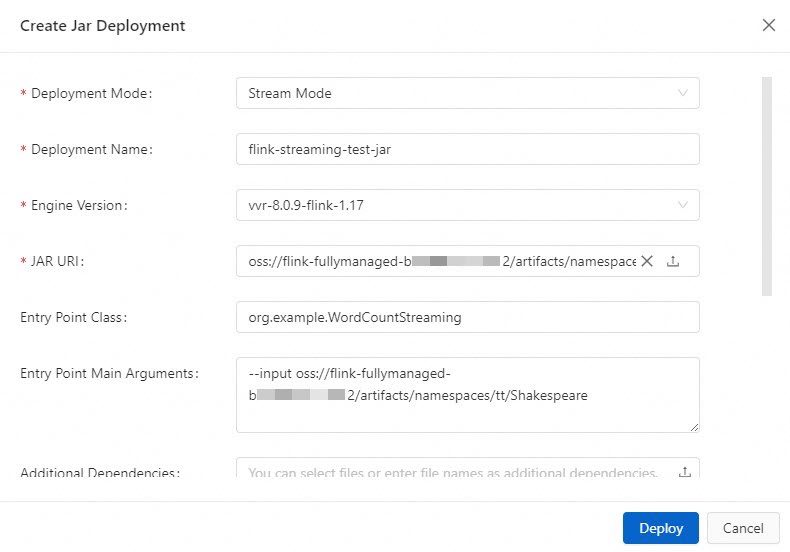
Enter the deployment information.
Parameter
Description
Example
Deployment Mode
Select Stream.
Stream
Deployment Name
Enter a name for the JAR job.
flink-streaming-test-jar
Engine Version
The Flink engine version for the job.
Use versions with the Recommended or Stable tag. These versions offer higher reliability and performance. For more information, see Release notes and Engine versions.
vvr-8.0.9-flink-1.17
JAR URI
Select the FlinkQuickStart-1.0-SNAPSHOT.jar file that you uploaded to Resource Management in Step 2. You can also click the
 icon on the right to select and upload your own JAR package.
If the file already exists in File Management, you do not need to upload it again. Simply select the target file.
NoteVerverica Runtime (VVR) 8.0.6 and later support access only to the bucket that was attached when you activated the Flink workspace. Access to other buckets is not supported.
-
Entry Point Class
The entry point class of the program. If your JAR package does not specify a main class, enter the full path of your entry point class.
The test JAR package provided in this topic contains code for both stream and batch jobs. Therefore, you must specify the entry point for the stream job here.
org.example.WordCountStreaming
Entry Point Main Arguments
Enter the input parameters. These parameters are called in the main method.
For this example, enter the storage path of the input data file, Shakespeare.
--input oss://<your-attached-OSS-Bucket-name>/artifacts/namespaces/<project-name>/ShakespeareYou can copy the full path of the Shakespeare file from File Management.
Deployment Target
From the drop-down list, select a target resource queue or session cluster (not for production use). For more information, see Manage resource queues and Step 1: Create a session cluster.
ImportantJobs deployed to a session cluster do not support displaying or configuring monitoring and alerts, or enabling auto-tuning. Do not use session clusters in a production environment. Session clusters can be used as a development and testing environment. For more information, see Debug jobs.
default-queue
For more information about the other parameters, see Deploy a job.
-
Click Deploy.
Batch job
-
On the , click Deploy Job and select JAR Job.
-
Enter the deployment information.

Parameter
Description
Example
Deployment Mode
Select Batch.
Batch
Deployment Name
Enter a name for the JAR job.
flink-batch-test-jar
Engine Version
The Flink engine version for the job.
Use versions with the Recommended or Stable tag. These versions offer higher reliability and performance. For more information, see Release notes and Engine versions.
vvr-8.0.9-flink-1.17
JAR URI
Select the FlinkQuickStart-1.0-SNAPSHOT.jar file that you uploaded to Resource Management in Step 2. You can also click the
icon on the right to select and upload your own JAR package.-
Entry Point Class
The entry point class of the program. If your JAR package does not specify a main class, enter the full path of your entry point class.
The test JAR package provided in this topic contains code for both stream and batch jobs. Therefore, you must specify the entry point for the batch job here.
org.example.WordCountBatch
Entry Point Main Arguments
Enter the input parameters. These parameters are called in the main method.
For this example, enter the storage paths for the input data file, Shakespeare, and the output data file, batch-quickstart-test-output.txt.
NoteYou only need to specify the full path and name of the output file. You do not need to create the output file in the storage service beforehand. The directory path of the output file should be the same as the input file.
--input oss://<your attached OSS bucket name>/artifacts/namespaces/<project name>/Shakespeare--output oss://<your attached OSS bucket name>/artifacts/namespaces/<project name>/batch-quickstart-test-output.txtYou can copy the full path of the Shakespeare file directly in File Management.
Deployment Target
From the drop-down list, select a target resource queue or session cluster (not for production use). For more information, see Manage resource queues and Step 1: Create a session cluster.
ImportantJobs deployed to a session cluster do not support displaying or configuring monitoring and alerts, or enabling auto-tuning. Do not use session clusters in a production environment. Session clusters can be used as a development and testing environment. For more information, see Debug jobs.
default-queue
For more information about the other parameters, see Deploy a job.
-
Click Deploy.
Step 4: Start the job and view the results
Stream job
-
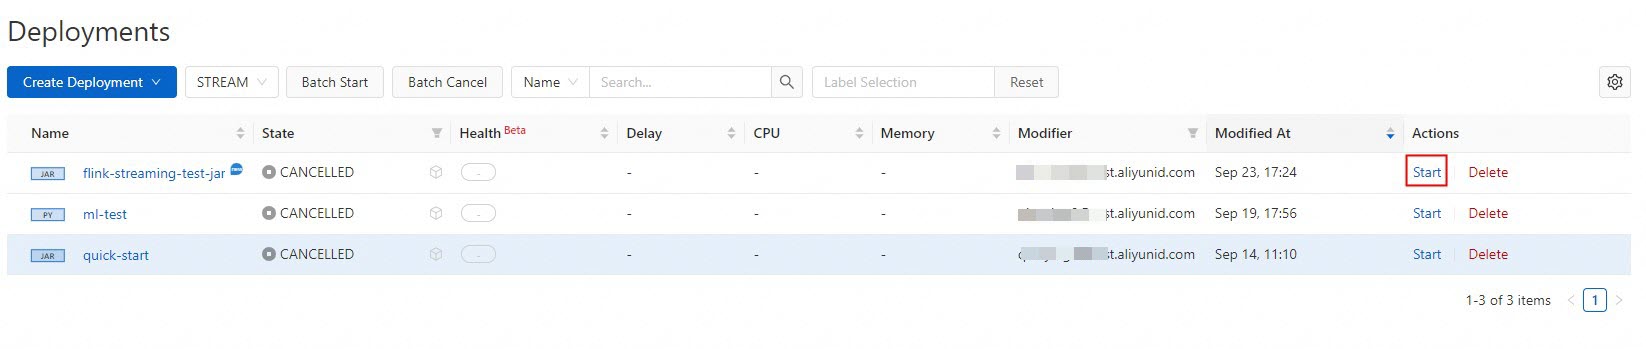
On the , find the target job and click Start in the Actions column.
-
Select Stateless Start and click Start. For more information about how to start a job, see Start a job.
-
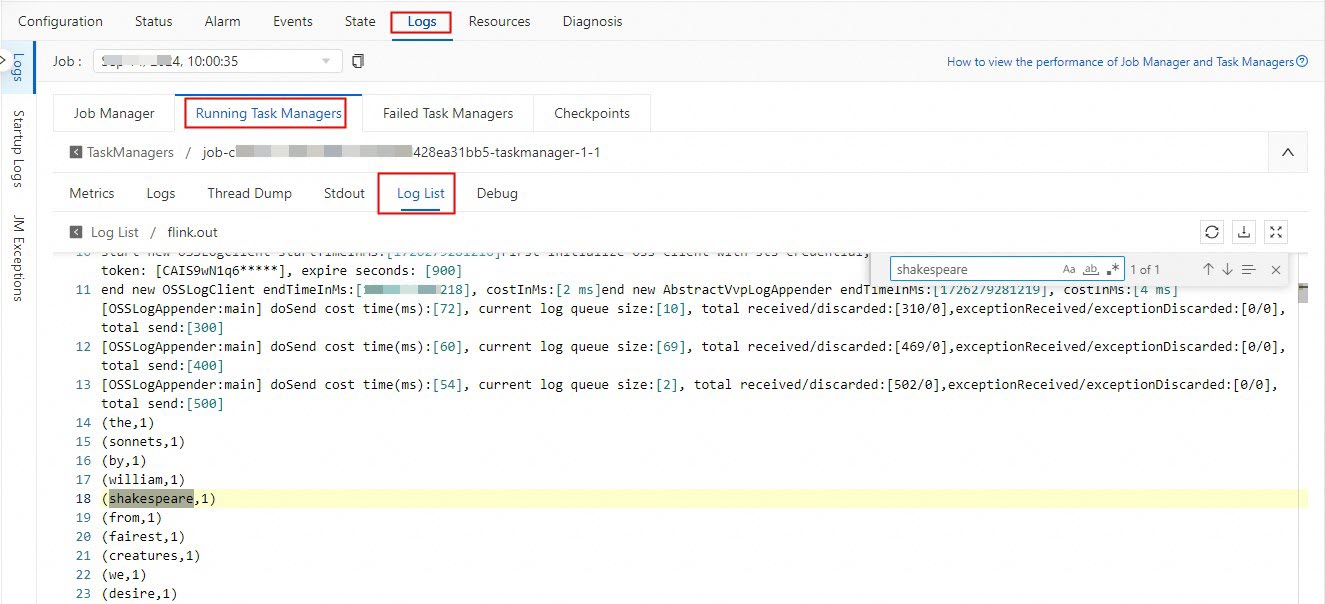
After the job status changes to Running, you can view the results of the stream job.
In the TaskManager log file that ends with .out, you can search for "shakespeare" to view the Flink computation results.
Batch job
-
On the , click Start for the target job.

-
In the Start Job dialog box, click Start. For more information about how to start a job, see Start a job.
-
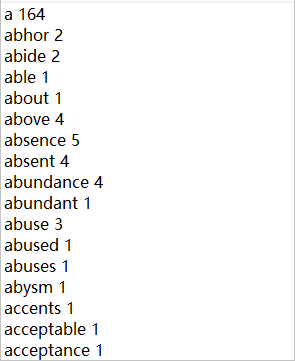
After the job status changes to Finished, you can view the results of the batch job.
Log on to the OSS console. You can view the file in the oss://<Your attached OSS Bucket name>/artifacts/namespaces/<Project name>/batch-quickstart-test-output.txt path.
The TaskManager.out log can display a maximum of 2,000 records. Due to this limit, the number of result records for the stream job and the batch job is different. For more information about this limit, see Print.
(Optional) Step 5: Stop the job
If you modify a job and want the changes to take effect, you must redeploy the job, and then stop and restart it. Examples of modifications include changing the code, adding or removing WITH parameters, or changing the job version. You also need to stop and restart a job if the job cannot reuse a state, if you want to start a new job, or if you update parameters that do not take effect dynamically. For more information about how to stop a job, see Stop a job.
References
-
You can configure job resources before you start a job or modify them after the job is online. Two resource allocation modes are supported: Basic (coarse-grained) and Expert (fine-grained). For more information, see Configure job resources.
-
You can dynamically update Flink job parameters. This allows configuration changes to take effect more quickly and reduces business interruptions that are caused by stopping and restarting jobs. For more information, see Dynamic scaling and parameter updates.
-
You can configure job log levels and specify separate outputs for different log levels. For more information, see Configure job log outputs.
-
You can follow a simple example to quickly learn the complete development flow for SQL jobs. For more information, see Quick Start for Flink SQL jobs.
-
For information about how to build a real-time data warehouse with Hologres, see Build a real-time data warehouse with Hologres.
-
For information about how to build a streaming data lakehouse with Paimon and StarRocks, see Build a streaming data lakehouse with Paimon and StarRocks.