If you want to share files on a Windows Elastic Compute Service (ECS) instance, you can mount a Server Message Block (SMB) file system on the instance. This topic describes how to mount an SMB file system on a Windows ECS instance.
Prerequisites
A Windows ECS instance is available in the region where you create an SMB file system. For more information, see Create instances.
An SMB file system is created and the mount target of the file system is obtained. For more information, see Create a General-purpose NAS file system in the NAS console.
The network is available.
If the ECS instance and the File Storage NAS (NAS) file system reside in the classic network, make sure that they belong to the same Alibaba Cloud account.
The IP address of the Windows ECS instance is in the whitelist of the SMB file system, and the ECS instance can access the SMB file system.
TCP port 445 is enabled for the Windows ECS instance to access the SMB file system.
If port 445 is disabled, you must add a rule to a security group of the ECS instance for the port. For more information, see Add a security group rule.
Step 1: Prepare the environment
Make sure that you perform the following steps only once when you mount the file system on each Windows ECS instance.
Connect to the ECS instance. For more information, see Connection methods.
For Windows Server 2016 or later, run the following command to allow anonymous access from clients:
REG ADD HKEY_LOCAL_MACHINE\SYSTEM\CurrentControlSet\services\LanmanWorkstation\Parameters /f /v AllowInsecureGuestAuth /t REG_DWORD /d 1Enable the Workstation service.
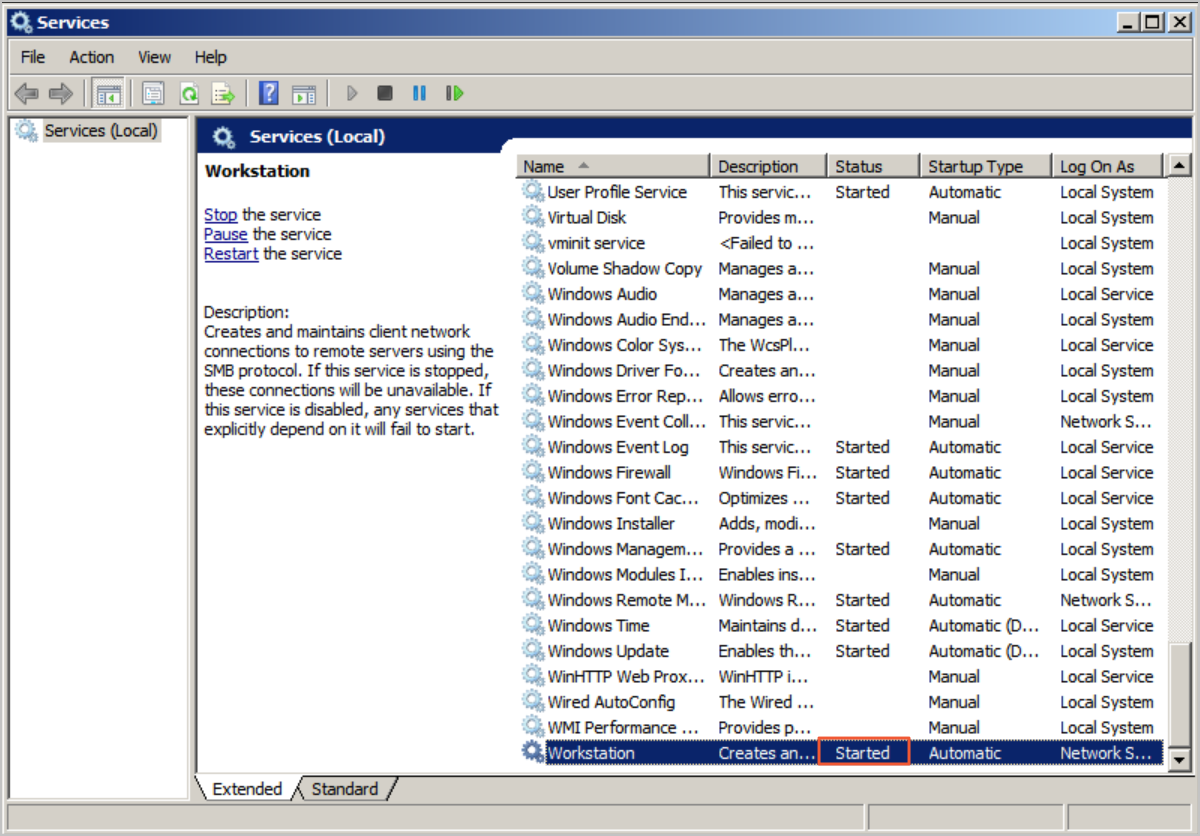
Open the Windows Start menu. Choose or press
Win+R. Then, enterservices.mscto open the Services window.Make sure that the Workstation service is in the Started state and the startup type is Automatic.
By default, the Workstation service is in the Started state.

Enable the TCP/IP NetBIOS Helper service.
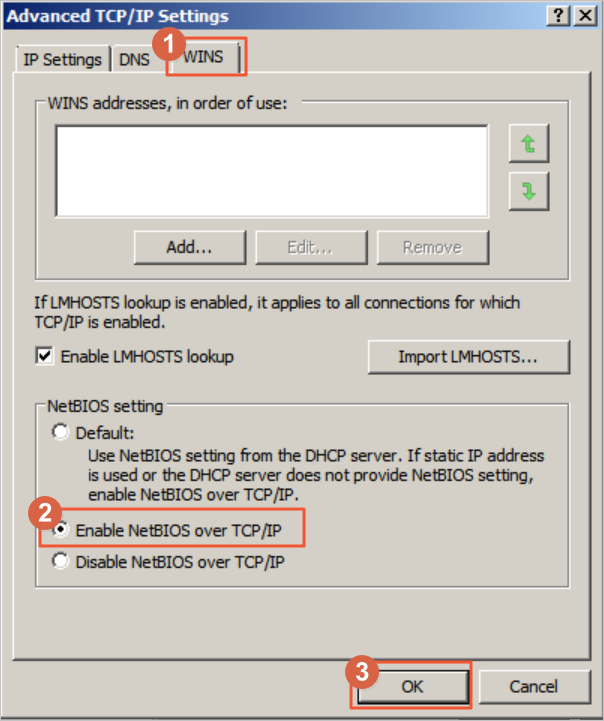
On the Network and Sharing Center page, click the active network connection.
Select Properties. In the Connection Properties dialog box, double-click Internet Protocol Version 4 (TCP/IPv4). In the Internet Protocol Version 4 (TCP/IPv4) Properties dialog box, click Advanced.
In the Advanced TCP/IP Settings dialog box, choose .

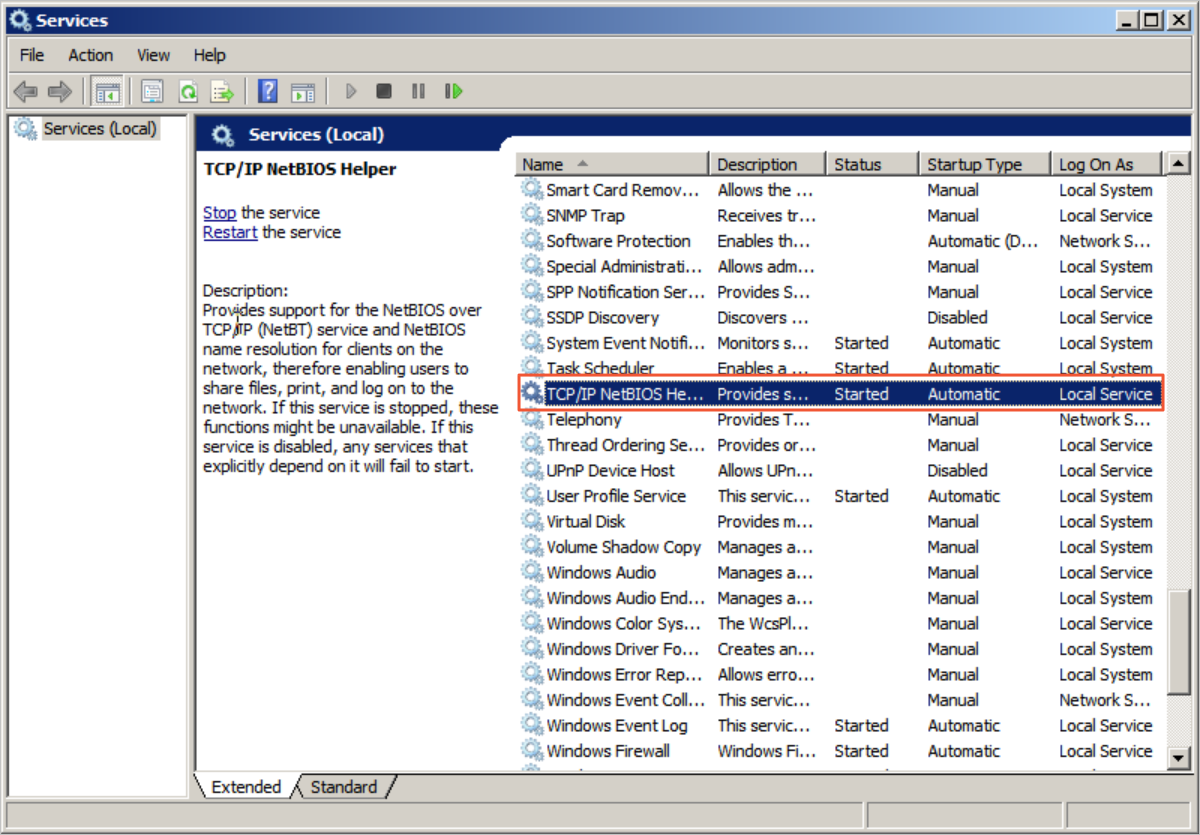
Open the Windows Start menu. Choose or press
Win+R. Then, enterservices.mscto open the Services window.Make sure that the TCP/IP NetBIOS Helper service is in the Started state and the startup type is Automatic.
By default, the TCP/IP NetBIOS Helper service is in the Started state.

Step 2: Mount the SMB file system
SMB file systems can be mounted manually or automatically. Manual mounting is suitable for temporary mounting. If you manually mount a NAS file system on an ECS instance, you must remount the file system every time the ECS instance is started or restarted. Automatic mounting is suitable for persistent mounting. If you enable automatic mounting for a NAS file system, you do not need to remount the file system every time the ECS instance is started or restarted. To prevent the mount information from being lost after the ECS instance is restarted, we recommend that you enable automatic mounting for a NAS file system after you manually mount the file system.
Manually mount the file system
You must use the mount target of the SMB file system to mount the SMB file system on a Windows ECS instance.
Connect to the ECS instance. For more information, see Connection methods.
Open the Command Prompt and run the following command to mount the SMB file system:
net use Z: \\file-system-id.region.nas.aliyuncs.com\myshareParameter
Description
Z
The drive letter. If a conflict occurs in drive Z, or if multiple NAS file systems are mounted to drive Z, the NAS file system is mounted to the next drive in reverse alphabetic order.
file-system-id.region.nas.aliyuncs.com
The domain name of the mount target. The domain name is automatically generated when you create the SMB file system. Replace the domain name with the actual value.
To obtain the domain name of the mount target, perform the following steps: Log on to the NAS console. On the File System List page, click the file system ID. Click the Mount Targets tab. Then, move the pointer over the
 icon in the Mount Target column.
 myshare
The name of the shared SMB directory. You cannot change the name.
For Windows Server 2019 or later, we recommend that you run the New-SmbGlobalMapping command in PowerShell to mount the SMB file system. Run the following command to mount the SMB file system.
If you are prompted to enter an identity when you run the preceding command, you can enter a valid identity in a workgroup, for example, workgroup\administrator. The password is the password of the ECS administrator.
Mount command
New-SmbGlobalMapping -LocalPath z: -RemotePath \\file-system-id.region.nas.aliyuncs.com\myshare -Persistent $trueUnmount command
Remove-SmbGlobalMapping -LocalPath z:Command to check the mount result
Get-SmbGlobalMapping
Check whether the SMB file system is mounted.
Command
net useSample command output
If a command output similar to the following example appears, the SMB file system is mounted. Then, you can access the SMB file system on the ECS instance and perform read and write operations on the file system.

If the SMB file system fails to be mounted, you can use a script to automatically locate the issue or troubleshoot the issue based on error codes. For more information, see Run the auto-check script to troubleshoot the failure of mounting an SMB file system on Windows and FAQ about mounting.
(Optional) Automatically mount the file system
You can configure the c:\ProgramData\Microsoft\Windows\Start Menu\Programs\StartUp\auto_mount.bat file of a Windows ECS instance to automatically mount an SMB file system when the ECS instance is restarted.
Open the Command Prompt and run the following command to configure the auto_mount.bat script:
echo %HOMEPATH%\mount.bat > auto_mount.batRun the following commands to enable the auto_mount.bat script to automatically run after user logon, and then grant the read and execute permissions to everyone:
MOVE auto_mount.bat "c:\ProgramData\Microsoft\Windows\Start Menu\Programs\StartUp"icacls "c:\ProgramData\Microsoft\Windows\Start Menu\Programs\StartUp\auto_mount.bat" /grant everyone:rxREG ADD HKEY_LOCAL_MACHINE\Software\Microsoft\Windows\CurrentVersion\Run /f /v MyMount /t REG_SZ /d "c:\ProgramData\Microsoft\Windows\Start Menu\Programs\StartUp\auto_mount.bat"Run the following command to configure the mount.bat script:
echo net use z: \\file-system-id.region.nas.aliyuncs.com\myshare > "%HOMEPATH%\mount.bat"Replace
zwith the actual drive letter andfile-system-id.region.nas.aliyuncs.comwith the actual domain name of the mount target.NoteIf the SMB file system supports AD and access control lists (ACLs), you can run the following command to configure the script. Then, you can mount the SMB file system as a domain user rather than a Windows logon user.
echo net use z: \\file-system-id.region.nas.aliyuncs.com\myshare /user:user@domain password > "%HOMEPATH%\mount.bat"Replace
zwith the actual drive letter,file-system-id.region.nas.aliyuncs.comwith the actual domain name of the mount target,user@domainwith the actual domain username, andpasswordwith the actual domain user password.Restart the ECS instance.
Run the
net usecommand to check the mount result.ImportantIf you restart the ECS instance, services are interrupted. We recommend that you perform the operation during off-peak hours.
References
For information about how to build Windows applications on NAS, see Windows applications.
For information about how to use NAS in various content management systems and web applications to provide efficient storage services for websites and applications, see Web service and content management.
For more information about the best practices for using NAS, see Best Practices.