Large language models (LLMs) cannot directly access proprietary knowledge bases or retrieve real-time dynamic information. To address this bottleneck, Alibaba Cloud Model Studio provides agent applications. An agent lets you integrate an LLM with external tools without writing any code, which extends the model's capabilities.
Console restrictions: Only International Edition users who created applications before April 21, 2025 can access the Application Development tab, as shown in the following figure.
This tab contains the following features: Applications (agent application and workflow application), Components (prompt engineering and plug-in), and Data (knowledge base and application data). These are all preview features. Use them with caution in production environments.

API call limits: Only International Edition users who created applications before April 21, 2025, can call the application data, knowledge base, and prompt engineering APIs.
Basic principles
An agent is driven by a prompt and completes complex tasks by coordinating multiple external capabilities. After receiving a request, the LLM performs intention recognition and task planning. It then makes autonomous decisions and calls one or more external capabilities to execute the task. Finally, it integrates the information to generate a response.
Model Studio agents support the following core capabilities:
Knowledge base: Connects to external knowledge bases. This allows the application to answer questions based on private data and solves the problem of LLMs being unable to access specific information.
Plug-in: Calls pre-built efficiency tools on the platform, such as tools for code execution, image generation, and weather queries.
Quick start
Create a basic agent
Go to the My Applications page in the Model Studio console. Click + Create Application. On the Agent Application tab, click Create Now.

On the application configuration page, select a model from the model selection drop-down menu, such as
Qwen-Plus. You can keep the default settings for other parameters if you have no specific requirements.
After the application is created, enter
Helloin the dialog box on the left to test it.
Agent capabilities
Alibaba Cloud Model Studio agent applications can be extended by selecting models, optimizing system prompts, adding RAG, and calling plug-ins.
Model
The model is the core that drives the agent to think, infer, and make decisions. Model Studio agents support Qwen models.
Select a model
From the model selection drop-down menu, select a model, such as
Qwen-Plus.
Click More Models to select other models.

Configure parameters
Click
 to the right of the model drop-down list to select and configure parameters. The supported parameters are as follows:
Maximum Response Length: The length limit for the model's generation, excluding the prompt. The maximum allowed length varies by model.
Context Turns: Sets the maximum number of historical conversation turns to input to the model. The more turns you include, the stronger the conversational relevance.
temperature: Controls the randomness and diversity of the generation. A higher value leads to more diversity, while a lower value leads to more consistency. The value ranges from [0, 2).
enable_thinking: Specifies whether to enable the thinking mode. Some models that do not support thinking mode do not allow you to configure the enable_thinking parameter.
After you enable the thinking mode, the model performs more internal reasoning and context processing when generating a response, which increases token consumption.
System prompt
A system prompt is a meta-instruction preset for the agent. It defines the agent's role, code of conduct, and capability boundaries to ensure consistency, controllability, and task compliance during interactions.

Configure a prompt
Set the system prompt to
Please answer my question in the style of "One Hundred Years of Solitude". The following is a comparison of the results:Without a system prompt:

Configuring the system prompt

Knowledge base
Retrieval-augmented generation (RAG) allows an agent to query external knowledge bases and use the most relevant retrieved information as the direct basis for generating answers. When dealing with private knowledge or vertical domain Q&A, RAG can significantly improve the accuracy of the agent's answers and reduce hallucinations. For more information, see Knowledge base (RAG).
The text retrieved by RAG also occupies the large language model's context window. Therefore, you need to adjust the retrieval strategy and text length as needed to make full use of the context window and avoid exceeding its limits.
Plug-in
By calling plug-ins, agent applications can perform specific tasks, such as code execution, web search, and text-to-image generation. Model Studio provides a variety of official plugins and supports adding custom plugins. For more information, see Plug-in overview.

Agent interaction
Text conversation
Text conversation is the core interaction method of agent applications, providing an intelligent and personalized multi-turn conversation experience.
Text conversation supports two main input methods:
Text input: Enter text to converse with the agent.
File upload: Upload files as attachments for the agent. Various formats, such as documents, images, videos, and audio, are supported.

Publish and call an agent
Model Studio agents support external calls through an API. They also support one-click publishing to third-party platforms and integration into other business processes through components.
Publish an application
Publishing an application is a prerequisite for all subsequent agent application calls and integrations.
Click the Publish button in the upper-right corner of the agent application management page, then click Confirm Publish to complete the application publishing.
If the application is not being published for the first time, a pop-up window will show the changes since the last publication.
If the application was created by a RAM account, confirm that you have the service-linked role permission ram:CreateServiceLinkedRole before publishing. For more information, see Service-linked Role.
Call through an API
On the Publish Channels tab of the agent application, click View API to the right of API Call to see the methods for calling the agent application through an API.
Replace YOUR_API_KEY with your Model Studio API key to invoke the API.

Agent management
Delete and copy
You can find the published application card in Application Management. In the menu, you can delete or copy the agent, or modify the application name.

Version management
Through the version management feature, you can edit historical version descriptions, or select and use previously published historical versions.
On the Application Configuration tab of the agent application, click Version Management in the upper-right corner of the top navigation bar.

In the list of historical versions, select the target version:
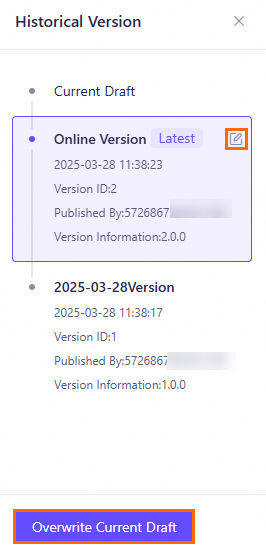
To modify the version information, hover your mouse over the
 icon and click it. In the Edit Version Description dialog box, make changes as needed, and then click OK.
To use this historical version, click Overwrite Current Draft, and then click Confirm in the confirmation dialog box.
The content of this historical version will overwrite the current draft content.
Billing
The billing for agent features mainly includes the following aspects:
Model calls
Agents incur model call fees. The specific fees depend on the model type and the number of input and output tokens.
For specific model types and corresponding billing rules, see Models.
Knowledge base
The knowledge base feature is free for a limited time.
Text segments retrieved from the knowledge base increase the number of model input tokens, which may lead to an increase in model inference (call) fees. For more information, see Knowledge base billing.
Supported models
Data updates may be delayed. The list of supported models is subject to what is displayed within the agent application.