This topic provides instructions for installing developer tools and describes related post-installation operations, such as loading and reinstalling the mPaaS plug-in.
End of life announcement of mPaaS plug-in
Apple security updates introduce an extensive mechanism for verifying application signatures in macOS 10.15.1 and later versions. Due to this mechanism, the removal of signing certificates may result in unavailability of Xcode and even a response failure of the system.When Xcode 11.3.1 or later is used in macOS 10.15.3 or later, if you install the mPaaS plug-in with the signing certificate removed, the response failure probability is high. This issue is resolved when Xcode signing certificates are restored.Therefore, we will no longer update the iOS mPaaS plug-in with the signing certificate removed. In addition, related maintenance service has been unavailable since September 2020.
Prerequisites
You have installed and opened Xcode and also completed the installation of basic tools according to the Xcode installation wizard.
You have used Ruby 2.3.0 or a later version.
You have sudo privileges.
Procedures
Install mPaaS plug-in
Exit Xcode and run the following installation command on the terminal:
sh <(curl -s http://mpaas-ios.oss-cn-hangzhou.aliyuncs.com/mpaaskit/install.sh)Enter a password as prompted.
Remove signing certificates from Xcode.
Note: Xcode 8 and later versions have restrictions on the installation of the mPaaS plug-in. Xcode signing certificates must be removed to ensure the successful installation of the mPaaS plug-in.
Enter
Yat the prompt to remove Xcode signing certificates.Select an Xcode whose signature is to be removed and press Enter to continue. If multiple Xcodes are installed, select an Xcode by moving the arrow upwards or downwards. The operation also removes the signature of xcodebuild.
Load the mPaaS plug-in
Perform the following steps to load the mPaaS plug-in:
After installing the developer tool, restart Xcode.
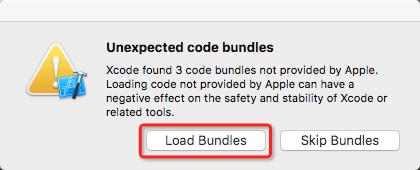
Click Load Bundles when you are prompted whether to load the plug-in:
 Note
NoteTip: If you accidentally click Skip Bundles, you need to run the restore command first, restart Xcode, and then click Load Bundles. The following is an example of the restore command. You need to replace 8.2.1 with your actual Xcode version: defaults delete com.apple.dt.Xcode DVTPlugInManagerNonApplePlugIns-Xcode-8.2.1
Open an Xcode project and choose Edit > mPaaS > Main. After the mPaaS plug-in is successfully loaded, the main interface is displayed as follows:
NoteYou are required to open an Xcode project first before choosing Edit > mPaaS > Main. Otherwise, the plug-in fails to read any project information and reports an error.
you can also choose File > New > New mPaaS Project to check if the mPaaS plug-in is successfully loaded.
Update Xcode and reinstall the mPaaS plug-in.
If you have installed the developer tool, perform the following steps to reinstall the Xcode plug-in for mPaaS after updating the Xcode:Run mpaas --version to view the version of developer tools. If the command fails, try the command mpaas version.If the version is 5.0.0 or later, run mpaas xcode plugins install to reinstall the mPaaS plug-in. Otherwise, reinstall the developer tools according to the preceding procedure.