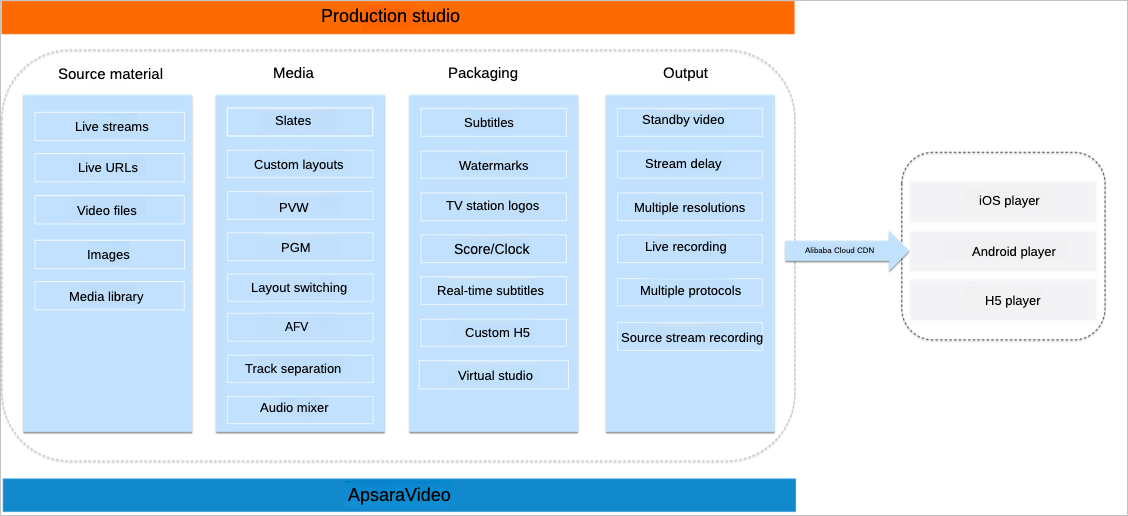
ApsaraVideo Live leverages the capabilities of ApsaraVideo Media Processing (MPS) to provide the production studio feature, which is a modern, cloud-based tool for video production. A production studio supports innovative capabilities such as dynamic tagging based on AI-powered video recognition, real-time bilingual subtitles, and advertisement replacement. A production studio also supports auto scaling, which eliminates the need for hardware purchases and enables access anytime, anywhere. This topic describes the architecture, benefits, and features of a production studio.
Architecture

Scenarios
ApsaraVideo Live provides production studios in general mode, playlist mode, and virtual studios. Their usage scenarios differ from each other.
General mode
Leveraging the capabilities such as stream mixing, graphic packaging, and live subtitles, production studio in general mode is applicable to various live streaming scenarios.
You can use live and VOD sources as inputs and mix multiple sources into a single stream. You can also insert materials, such as watermarks, logos, banner text, and live subtitles, into live streams to create content-rich live programs.
A production studio in general mode takes all video sources as live streams. From the moment they are added, video sources are automatically parsed and played in the background. When you switch a video source to PVW or PGM, the video source continues to play from its current position rather than starting from the beginning. If you want the video source to play from the first frame upon switching, we recommend that you use a production studio in playlist mode.
Scenario | Description |
Live sports | A production studio in general mode allows you to mix streams from multiple cameras, add components such as scoreboards, and insert event intros, commercials, and sponsor overlays. |
E-commerce live streaming | Co-streaming is supported. Image, text, and subtitle components can be overlaid. You can insert materials, such as watermarks, logos, banner text, and live subtitles, into live streams to enrich the live streaming effect. |
Live business events | The PVW and PGM modes are supported. You can switch between the two modes at low latency. You can also play warm-up videos before live streaming or play standby resources in case of emergencies. You can delay the playback of live streams for up to 5 minutes. These capabilities ensure the continuity of live streaming. |
Live streaming solutions | A production studio in general mode provides capabilities that can meet diversified live streaming requirements, such as real-time graphic packaging and multilingual subtitles. Live streaming service providers can integrate Web SDKs to reduce development costs. |
Playlist mode
You can use a production studio in playlist mode to create a live channel and assemble programs in the channel for sequential playback. This helps diversify live streaming scenarios and content forms. You can add, remove, modify, and query programs in the playlist and edit video content to meet your business requirements flexibly and efficiently.
Production studios in playlist mode do not support real-time graphic packaging. Therefore, you cannot insert watermarks, logos, banner text, or live subtitles in this mode. You can only sort, edit, and delete video sources.
Scenario | Description |
New media | You can create a live channel and assemble various media sources as programs in the channel. You can add, remove, modify, and query programs in the playlist and edit video content to meet your business requirements flexibly and efficiently. |
Newscast | You can create a production studio in playlist mode to play news programs 24/7. Commercials can be automatically inserted every 30 minutes to facilitate the monetization of content. |
Pseudo-live streaming | The playlist mode supports assembling various content, including live sources, VOD sources, and images, to create a simulated live stream. This helps resolve issues such as inconsistent scheduling, insufficient content, and unstable viewership. Ads can be inserted in real time or at the scheduled time for monetization. |
Entertainment live streaming | On live streaming platforms, streamers can host watch-along streams to watch VOD content together with viewers. The VOD sources can be added to the playlist of the production studio. After live streams end, the recordings and highlights can also be added. Such diversified content can attract more viewers and keep them engaged for a longer period. |
Virtual studio
Virtual studio is a mode of production studio that provides automatic and professional chroma keying for blue or green screen and real-scene background. It enables live streaming from multiple camera angles and devices and supports remote broadcasting. You can use the cloud-based chroma keying capability to achieve various live streaming scenes, such as dual screens, split-screens, and picture-in-picture, creating an immersive live streaming experience.
Scenario | Description |
Broadcasting of global sports events | A virtual studio supports a variety of devices and multiple camera angles, enabling remote broadcasting of domestic and international sports events. Additionally, it supports remote commentary of live content and allows you to assign multiple hosts for an event. You can also add event intros, ads, and sponsor overlays to the live stream. |
Live streaming of e-commerce promotions | You can add text and multimedia resources as supplementary materials for live streaming. In addition, co-streaming, Q&A, online interaction, and live commentary are supported to make the live streaming more appealing. You can also change the background to provide an immersive viewing experience for the audience. |
Program production | You can change the angle and position of subjects in the scene by switching between multiple camera angles. Automatic cloud-based chroma keying for blue or green screen and real-scene background is supported, enabling various live streaming scenes, such as dual screens, split-screens, and picture-in-picture. |
Functional areas
The functional areas for different types of production studios vary.
The Studio Settings dialog box is displayed the first time you enter a production studio. You can also click Live Stream Settings in the upper-right corner to open the Studio Settings dialog box.
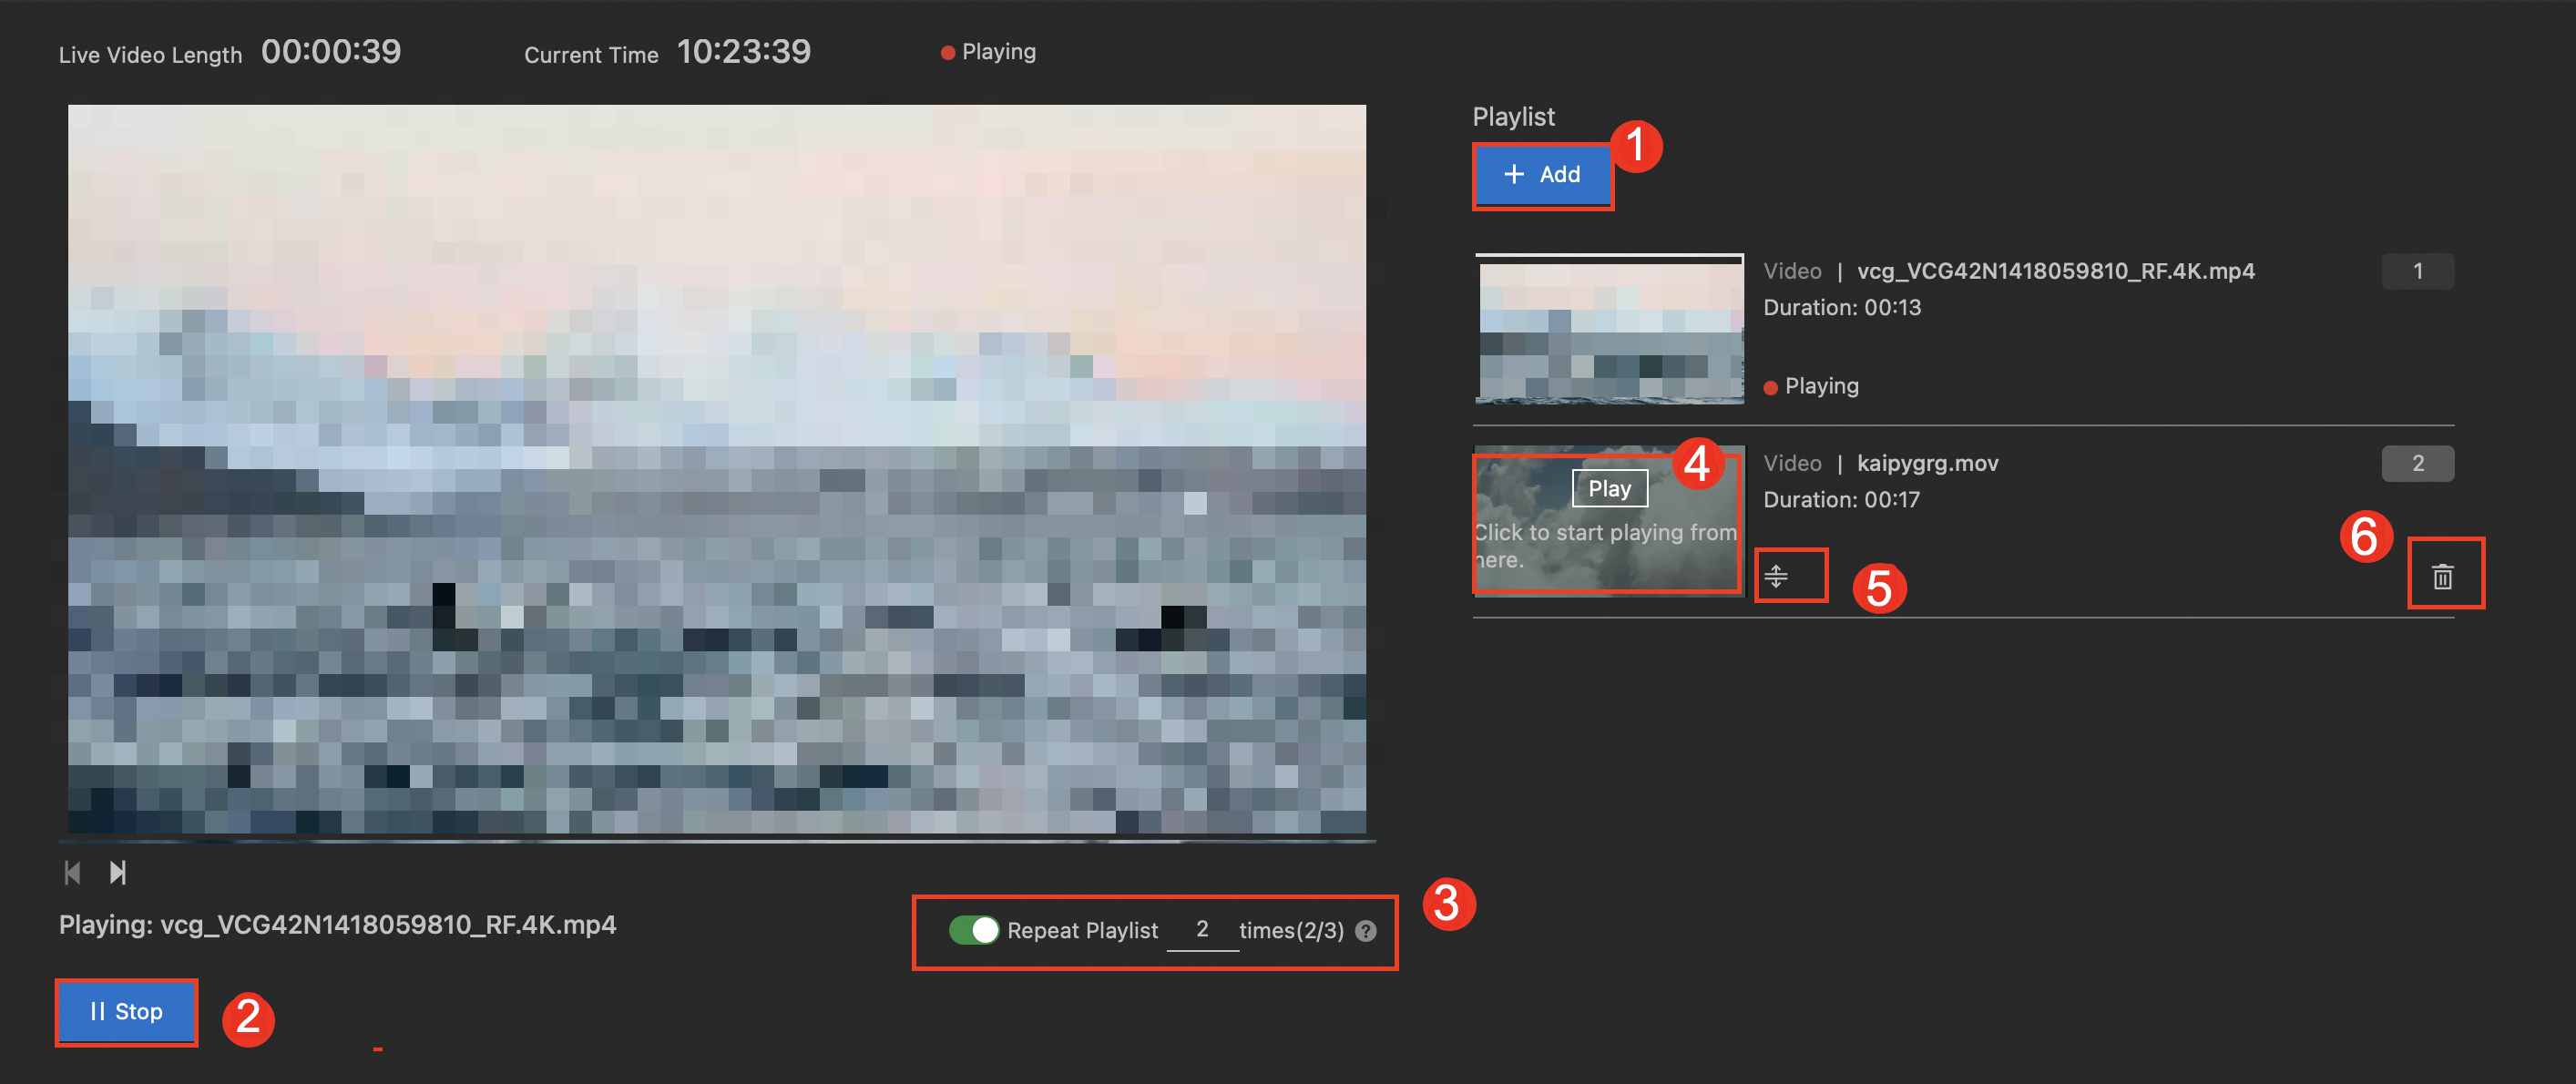
Playlist mode

No. | Description |
① | Adds a program. |
② | Starts or stops live streaming. |
③ | Specifies the number of loops for the playlist. |
④ | Switches to a specific program. |
⑤ | Adjusts the sequence of programs in the playlist. |
⑥ | Removes the program from the playlist. |
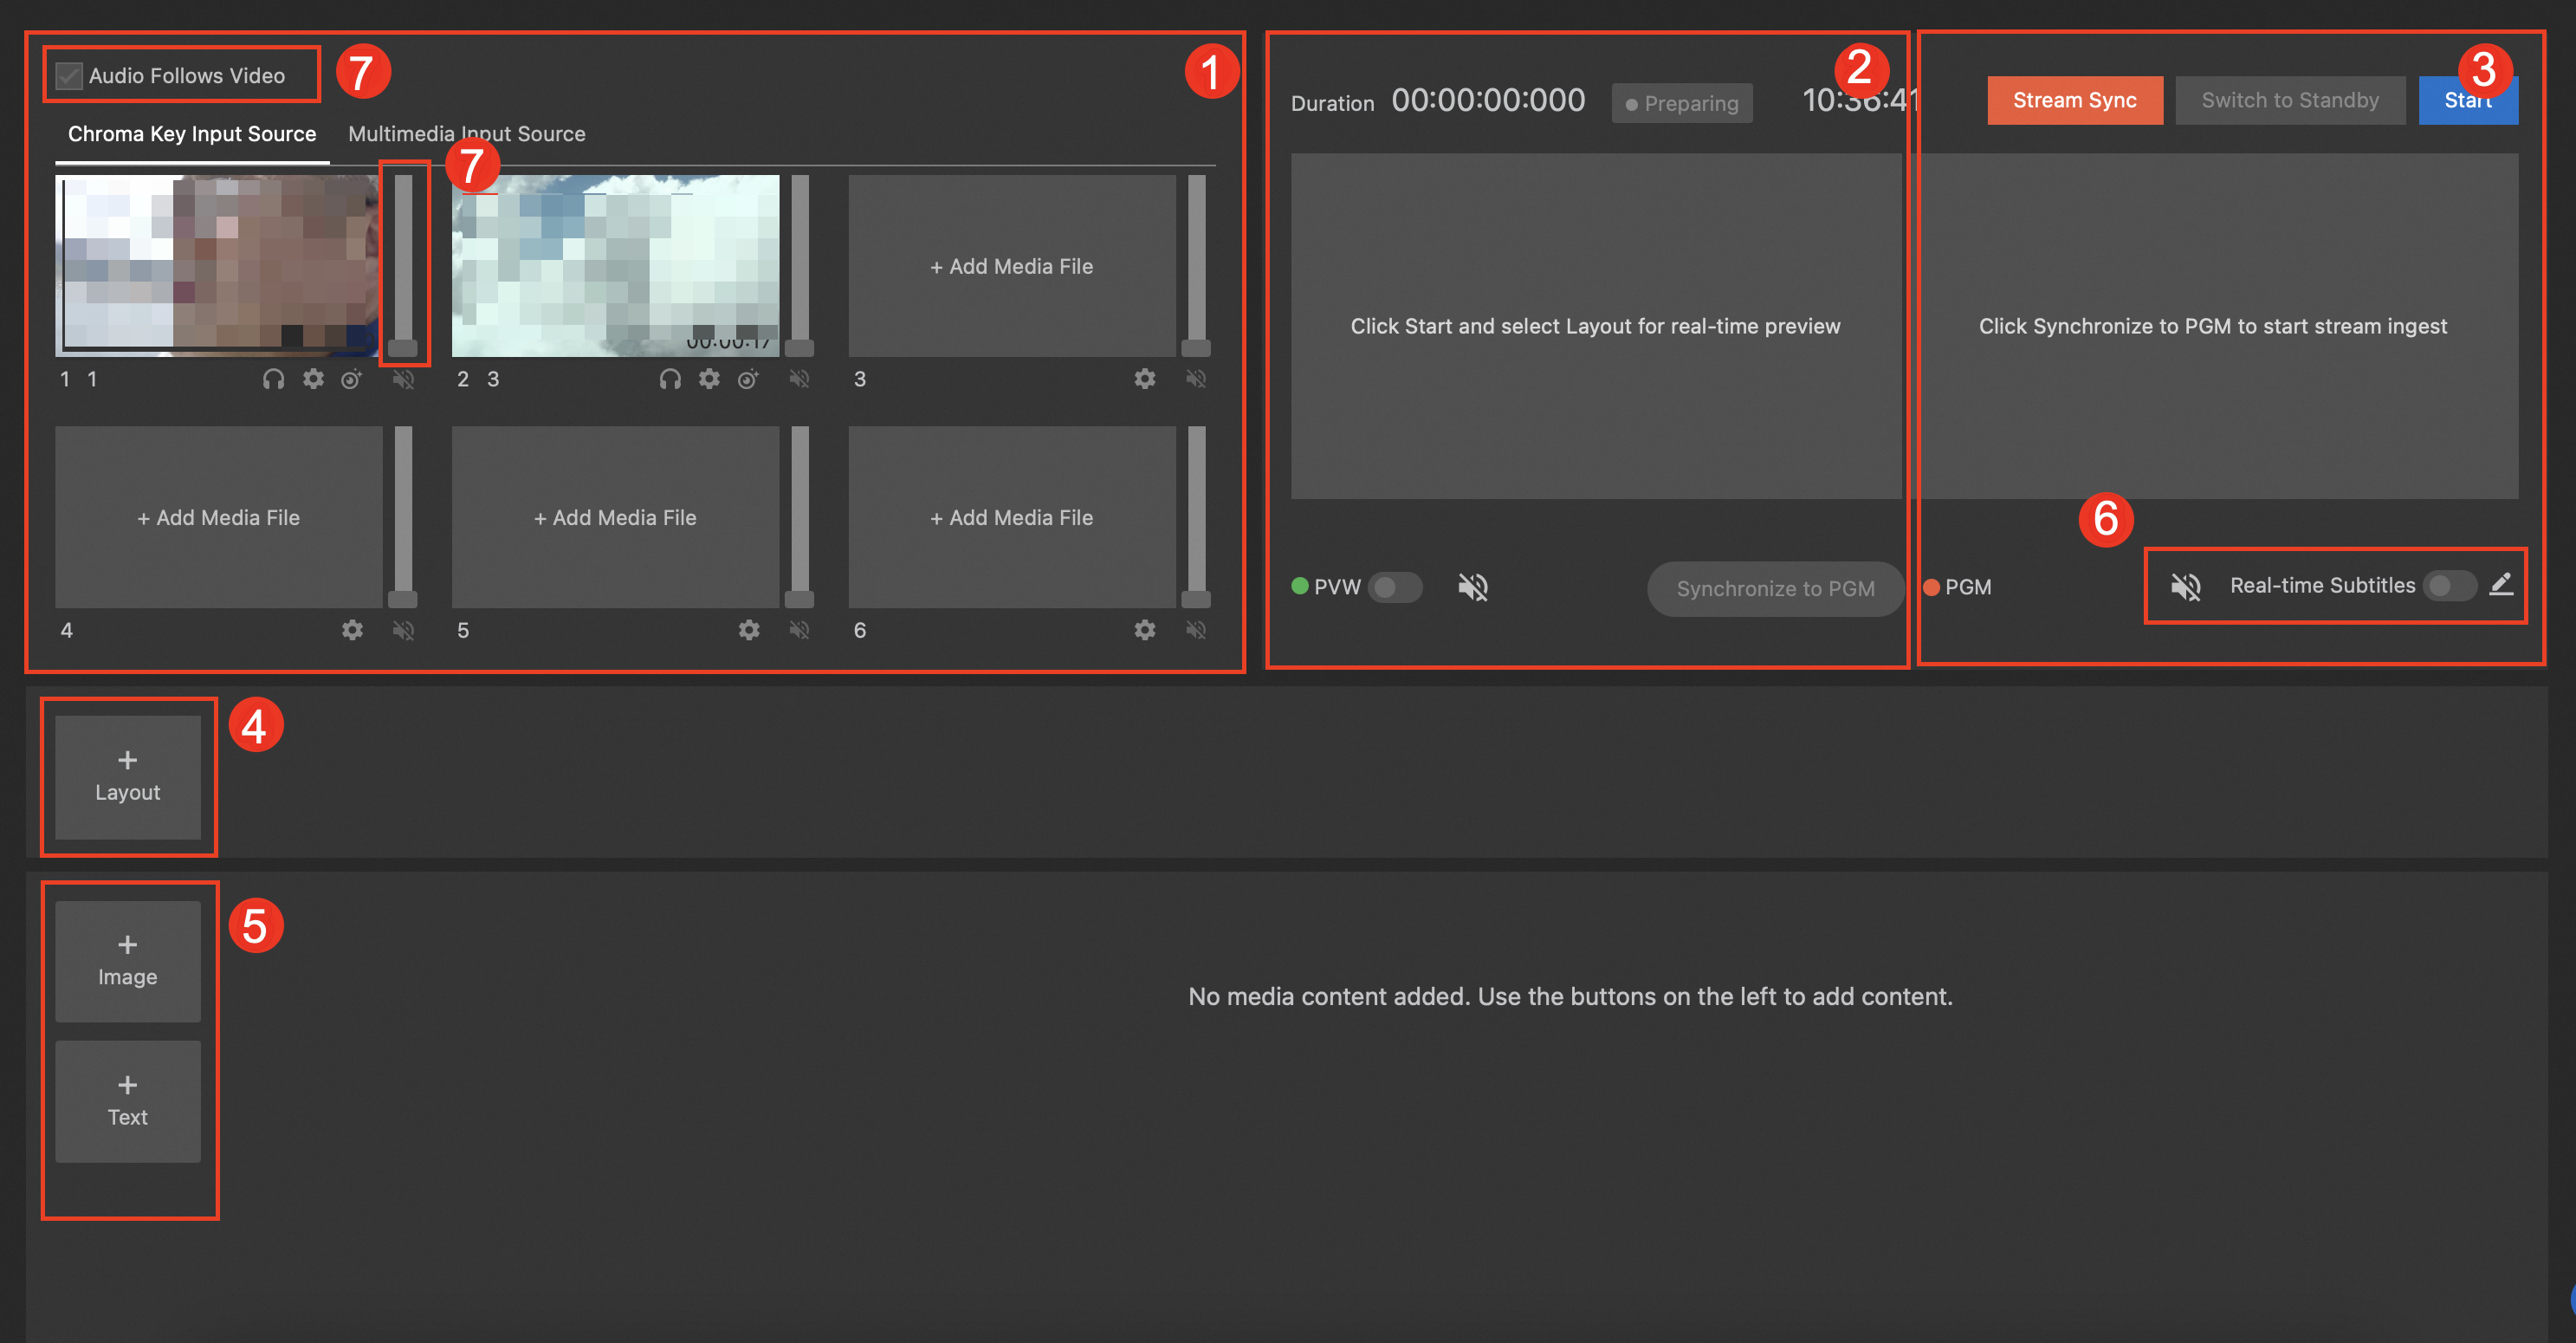
General mode & virtual studio

No. | Area | Description |
① | Input sources |
|
② | PVW | Previews a live stream and adjusts its effects. Viewers cannot watch the live stream in PVW mode. After you finish the adjustment, click Synchronize to PGM to synchronize the live stream to the PGM area. |
③ | PGM | Displays the video feed that is being broadcast to the audience. |
④ | Layouts | Creates multiple layouts for live streams. |
⑤ | Components | Manages components such as images and text that are displayed on a live stream in real time. |
⑥ | Subtitles | Manage subtitles that are added to a live stream in real time. |
⑦ | Audio mixer | Manages the output audio of a live stream. For example, you can monitor and adjust the gain and volume of the output audio. Note You cannot adjust the gain of the audio in a virtual studio. |
Core benefits
Benefit | Description |
Low latency | A production studio can reduce the latency of video switching to a minimum of 600 milliseconds by enhancing data transfer across multiple paths and stages. |
Low costs | The cloud-based end-to-end processing solution eliminates the need for you to purchase hardware or install software. You can use a production studio anytime, anywhere on a pay-as-you-go basis. |
Support for multiple content types | A production studio supports live streams, video-on-demand (VOD) resources, images, files, and web pages. You can mix videos from up to 12 sources at the same time. |
Robust cloud infrastructure | A production studio leverages the cloud infrastructure of Alibaba Cloud to incorporate capabilities such as video AI, translation, and live interaction. |
Flexibility and ease of use | You can directly configure and manage production studios in the console, or build your own cloud production projects by calling API operations or using the SDK. |
Elasticity | You can purchase or release production studio instances as needed. |
Key features
Feature | Description |
Switching among live streams and media files | You can add videos from up to 12 sources and switch between the videos almost instantly. |
PVW and PGM modes | You can quickly switch between the preview (PVW) and program (PGM) modes. |
Custom layouts | You can create a custom layout to mix live streams in landscape or portrait mode. |
Standby resources and stream delay | You can play warm-up videos before live streaming or display standby resources in case of emergencies. You can also delay the playback of live streams for up to 5 minutes. |
Audio mixer | You can adjust the volume of output audio, adjust audio gain, and enable or disable audio follows video (AFV) for multiple sources. |
Component overlay | You can overlay image, text, and subtitle components to insert watermarks, logo images, banner text, and real-time subtitles into live streams. |
Real-time subtitles | A production studio integrates the speech recognition technology to automatically generate bilingual subtitles for live streams in real time. |
Automatic cloud-based recording | The output live streams are automatically recorded as video files in multiple formats. |
Wide range of definitions | You can choose from a wide range of definitions to accommodate various screen sizes across different devices. |
Production studio in playlist mode | You can use a production studio in playlist mode to create live rooms for carousel playback of multiple video programs. This can significantly enhance user experience with diversified content. You can add, remove, modify, and query episodes in an episode list and modify episode content. You can perform the following operations to manage the video programs in a flexible, efficient, and easy manner:
|
Feature specifications
Category | Feature | Specification |
Input content | Live streams | You can pull a live stream from a live center or directly enter a streaming URL.
|
Media files | The following video formats are supported:
Important You must upload all media files to the media library of ApsaraVideo VOD. For more information, see Media asset management. | |
Output content | Live streams | The following protocols are supported:
|
Live stream recordings | You can specify the recording length. The following recording formats are supported:
| |
Media processing | Video layouts | You can create a custom multi-pane layout and add live streams or media files to the panes. |
Live stream switching | You can switch among live streams. | |
Media file switching | You can switch among media files. | |
Component overlay | You can overlay text watermarks and image watermarks on videos. | |
Multi-view merging | You can merge multiple input streams from different viewpoints into a multi-view stream. | |
Cloud production | PVW and PGM modes | You can create a custom multi-pane layout and add live streams or media files to the panes. |
Standby resources | You can prepare a standby resource to which you can switch in the event of a problem during live streaming. Only media files can be used as standby resources. | |
Stream relay | You can relay a live stream to third-party platforms to facilitate content distribution. | |
Stream delay | You can delay the playback of a live stream. |