You can use microservices namespaces to isolate the runtime environments for your applications. For example, you can create different microservices namespaces to isolate development, testing, and production environments. You can also use microservices namespaces to isolate resources and services to prevent unexpected issues. This topic describes how to create and manage a microservices namespace in the Enterprise Distributed Application Service (EDAS) console.
Scenario
For example, you have three environments in a virtual private cloud (VPC) that are separately used for application development, testing, and production. You can create the Dev, Test, or Prod microservices namespace for the relevant environment. If you create clusters and deploy applications in the namespaces, the resources, applications, and services in one namespace are isolated from those in another. You cannot call services or push configurations across namespaces.
Usage notes
You cannot create two microservices namespaces that have the same name in the same region.
After you create a microservices namespace, you cannot modify the AccessKey ID and AccessKey secret that are automatically generated for the microservices namespace.
Default microservices namespace
When you create an application in the EDAS console, you can create the application in the default microservices namespace. This indicates that the resources and services of the application are not isolated by microservices namespace.
If you select Default Microservices Namespace in a region on the Applications page, the displayed applications do not belong to any microservices namespace.
Create a microservices namespace
Log on to the EDAS console.
In the left-side navigation pane, choose .
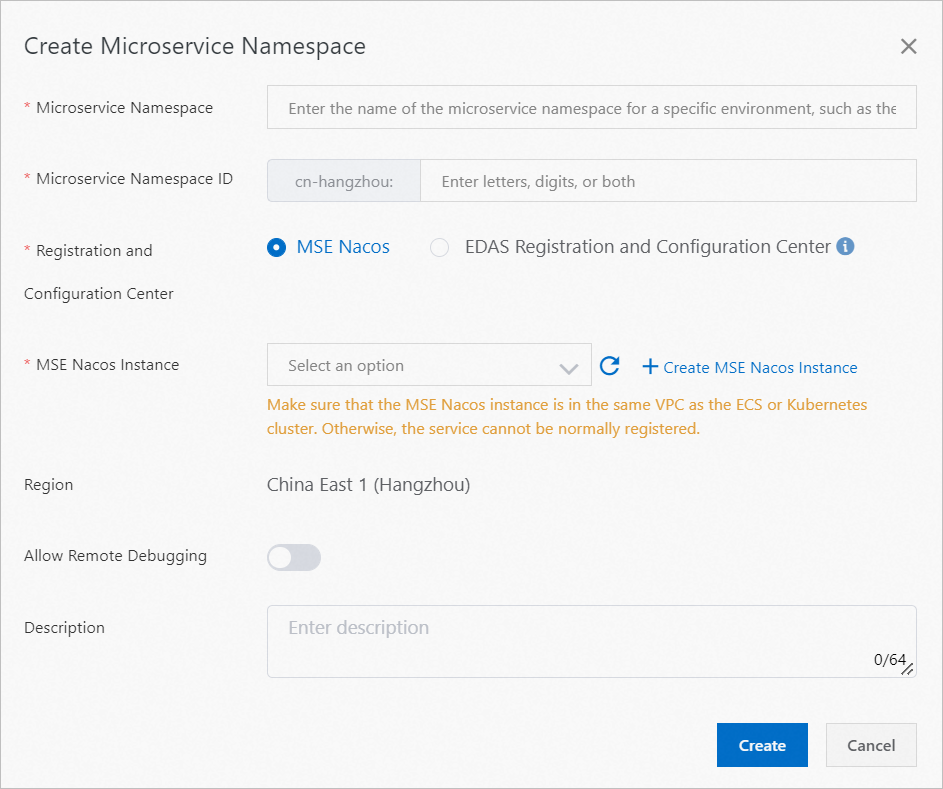
In the upper-right corner of the Microservices Namespace page, click Create Microservices Namespace.
In the Create Microservices Namespace dialog box, configure parameters based on your business requirements and click Create. The following table describes the parameters.

Parameter
Description
Microservices Namespace
The name of the microservices namespace that you want to create.
Microservices Namespace ID
The custom ID of the microservices namespace that you want to create. Only letters and digits are allowed.
Registration and Configuration Center
MSE Nacos: the Microservice Engine (MSE) Nacos engine that you purchased. MSE Nacos can be seamlessly integrated with EDAS to implement service registration and configuration management.
EDAS Registration and Configuration Center: a free service registration and configuration center that is provided by EDAS. If your application requires high performance and stability, we recommend that you use MSE Nacos as the service registration and configuration center.
MSE Nacos Instance
The Nacos instance that is created by using MSE. For more information, see Create a Nacos engine.
Region
The region to which the microservices namespace that you want to create belongs. You cannot change the default value.
Allow Remote Debugging
If you want to connect to a cloud application from your on-premises computer, you can turn on the Allow Remote Debugging switch on the editing page of the microservices namespace to which the application belongs.
Description
The description of the microservices namespace.
Modify a microservices namespace
On the Microservices Namespace page, click Edit in the Actions column of the microservices namespace that you want to modify.
In the Edit Microservices Namespace dialog box, modify the name and description of the microservices namespace and enable or disable the Allow Remote Debugging feature based on your business requirements. Click OK.
Delete a microservices namespace
Before you delete a microservices namespace, make sure that the following requirements are met:
The microservices namespace contains no cluster.
The microservices namespace contains no microservices application.
The microservices namespace contains no Elastic Compute Service (ECS) instance.
On the Microservices Namespace page, click Delete in the Actions column of the microservices namespace that you want to delete. In the message that appears, click Delete.