To enhance security, you must complete identity authentication when you connect to an Elastic Compute Service (ECS) instance. This ensures that only authorized users can access and manage ECS instance resources. When you create an instance, select a preset user as the initial logon user. Then, you can use the preset user to log on to the instance that you create. This topic describes the characteristics of and differences between logon users, as well as how to manage and add logon users.
Initial logon user of a Linux instance
Initial logon user
The initial logon user of a Linux instance refers to the logon user whom you specify when you create a Linux instance. For a Linux instance, you can set the initial logon user to root or ecs-user.
root
A superuser in Linux who is automatically created during system installation and has all permissions on the operating system. It is not allowed to delete the root user. If you want to use other users to log on to an instance, see Add logon users.
ecs-user (recommended)
A regular user in Linux. The ecs-user user does not have system-level permissions and can perform only operations to which permissions are granted. However, you can run
sudocommands to grant temporary root permissions to the ecs-user user. Specific operating systems allow you to specify ecs-user as the initial logon user.
The root user is automatically created during system installation. If you select ecs-user as the logon user when you create an instance, the ecs-user user is automatically created in the operating system of your instance. In this case, root and ecs-user users coexist, but the root user is not used to log on to the instance.
Logon by using the root user may cause security risks. To ensure security, we recommend that you specify ecs-user as the initial logon user of an instance whose operating system supports ecs-user.
To check whether an operating system image supports ecs-user, go to the ECS instance buy page in the ECS console or query the image information by calling the DescribeImages operation. If the
LoginAsNonRootSupportedparameter in the response istrue, you can select ecs-user as the initial logon user.
Logon credentials
When you create an instance, you can specify logon credentials for the initial logon user by selecting Key Pair, Custom Password, or Set Later. The following section describes the options:
Key Pair (recommended)
The key pair used to connect to a Linux instance over SSH. A key pair consists of a public key and a private key. The public key is stored on the instance, and the private key is saved by yourself. In the authentication process, the key pair is not explicitly transmitted, which is more secure than the password-based authentication.
ImportantIf you select a key pair as logon credentials when you create an instance, the password-based logon is disabled. In this case, you cannot log on to the instance by using a username and a password. If you want to log on to the instance by using Virtual Network Computing (VNC), you must specify a logon password. For information about how to specify a logon password, see the Reset the password of the initial logon user of a Linux or Windows instance section of this topic.
Custom Password (not recommended)
The password used to connect to a Linux instance.
Set Later
If you select Set Later, the root user is automatically used as the initial logon user when you create an instance. However, the system does not allow root user logon to ensure security. To connect to the instance, you can use one of the following methods:
Method 1: Specify the instance logon password or bind a key pair to the instance, and then use the password or key pair to log on to the instance. For information about how to specify the logon password of an instance or bind a key pair to the instance, see the Reset the key pair of the initial logon user of a Linux instance or Reset the password of the initial logon user of a Linux or Windows instance section of this topic.
Method 2: Enable Cloud Assistant for the instance. You can use Session Manager of Cloud Assistant to log on to the instance without the need to set a password.
When you log on to the instance by using Session Manager, the logon username is ecs-assist-user. For more information, see Connect to an instance by using Session Manager.
Initial logon user of a Windows instance
Initial logon user
The initial logon user of a Windows instance refers to the logon user whom you specify when you create a Windows instance. For a Windows instance, the initial logon user is Administrator. Administrator is the super administrator of the Windows operating system and has all permissions on the Windows operating system. For information about how to manage the initial logon user, including how to change the password of the user, see the Reset the password of the initial logon user of a Linux or Windows instance section of this topic.
Logon credentials
When you create an instance, you can specify logon credentials for the initial logon user by selecting Custom Password or Set Later.
Custom Password
The password used to connect to a Windows instance.
Set Later
If you select Set Later, you do not set a password for the Administrator user when you create an instance. To connect to an instance, you can use one of the following methods:
Method 1: Specify the instance logon password, and then use the Administrator username and password to connect to the instance. For information about how to specify the logon password of an instance, see the Reset the password of the initial logon user of a Linux or Windows instance section of this topic.
Method 2: Enable Cloud Assistant for the instance. You can use Session Manager of Cloud Assistant to log on to the instance without the need to set a password.
When you log on to the instance by using Session Manager, the logon username is system. For more information, see Connect to an instance by using Session Manager.
Manage the logon credentials of the initial logon user of an instance
After you create an instance, you can manage the password or key pair of the initial logon user in the ECS console.
Reset the key pair of the initial logon user of a Linux instance
You can change the key pair of the initial logon user in the ECS console. Perform the following steps:
Create a key pair.
Log on to the ECS console.
In the left-side navigation pane, choose .
In the upper-left part of the page, select the resource group and region in which the key pair resides.
On the Key Pairs page, click Create SSH Key Pair.
In the Create SSH Key Pair dialog box, configure the key pair as prompted.
If you want to automatically create a key pair, select Auto-create. If you want to import a key pair that you created, select Import and specify Public Key to import the public key of the created key pair. For more information, see Import an SSH key pair.
Click OK.
ImportantIf you set Creation Type to Auto-create, a private key file (.pem file) is automatically created and downloaded. Alibaba Cloud does not store your private key. Store the private key file in a secure location.
Bind the key pair to a Linux instance.
On the Key Pairs page, find the key pair that you created in Step 1 and click Bind in the Actions column. The Bind dialog box appears.
In the Confirm Operation step, select the ECS instance to which you want to bind the key pair and click Next.
In the Restart Instance step, set Restart Mode to Restart or Force Restart and click OK. The key pair takes effect after the instance is restarted.
Reset the password of the initial logon user of a Linux or Windows instance
You can change the password of the initial logon user in the ECS console. Perform the following steps:
Log on to the ECS console, find the instance whose password you want to change, and go to the Reset Instance Password dialog box.
Log on to the ECS console.
In the left-side navigation pane, choose .
In the upper-left part of the page, select the resource group and region in which the instance whose password you want to change resides.
On the Instance page, find the instance whose password you want to change and choose in the Actions column.

In the Reset Instance Password dialog box, change the logon password of the instance.
Take note of the following parameters:
Logon Username: By default, this parameter is the username of the initial logon user of your ECS instance. You do not need to change this parameter.
New Password and Confirm Password: Specify a new password as prompted.
Password Reset Method:
Online Reset (recommended): You can change the password without the need to restart the instance. Before you change the password online, take note that you must install Cloud Assistant Agent for the instance. Online Reset also supports resetting passwords for other users of the instance.
By default, ECS instances that are created from public images after December 1, 2017 are pre-installed with Cloud Assistant Agent. For more information, see Install Cloud Assistant Agent.
Offline Reset: After you change the logon password, you must restart the instance for the new password to take effect. This method does not require the installation of Cloud Assistant Agent. The offline password reset method is suitable only for the scenario in which you reset the password of the initial logon user of an instance.
SSH Password Authentication. This parameter applies only to Linux instances.
Enable (recommended): Select Enable if you want to use SSH password-based authentication to connect to the instance.
After you select Enable, the SSH configurations of your account are modified, and SSH password-based logon is enabled. The
PasswordAuthenticationparameter in the/etc/ssh/sshd_configfile is automatically set totrue.Retain Original Settings: Select this option if you do not require SSH password-based authentication to connect to the instance, such as in VNC logon scenarios. This option allows you to change only the password of the logon user in the operating system of the instance.
After you select Retain Original Settings, the original SSH configurations remain unchanged. If the
PasswordAuthenticationparameter in the SSH configuration file is set to false, you may be unable to use SSH password-based authentication to connect to the Linux instance.
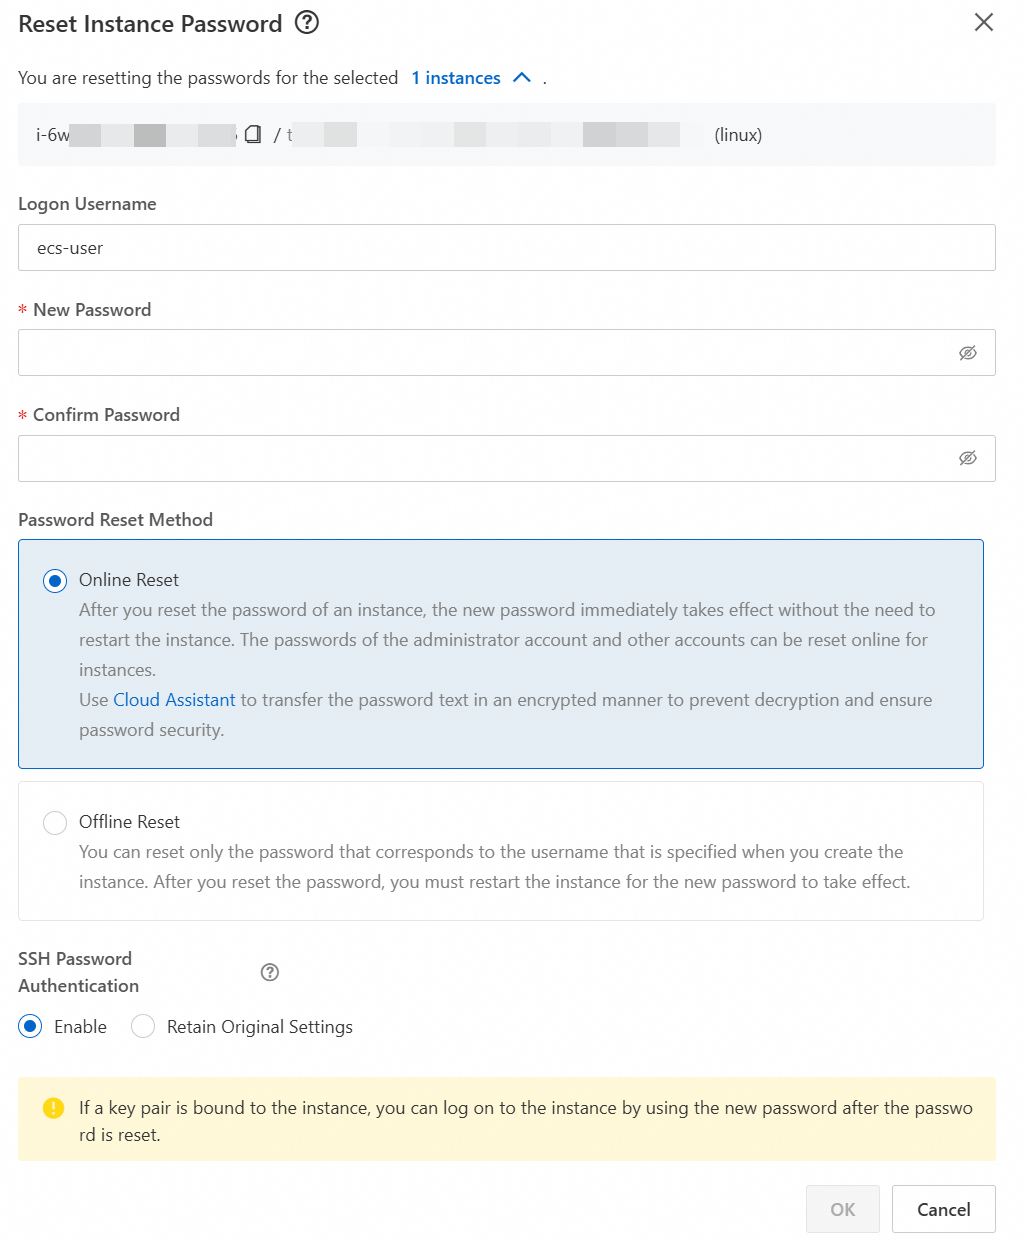
Confirm the preceding parameters and click OK to complete the password reset operation.
Add logon users
You can create multiple users to connect to instances. To create a regular user in the operating system and enable remote connection, perform the following operations.
Linux instance
On a Linux instance, check the SSH configuration file named /etc/ssh/sshd_config after you add a user:
If you use a key pair (SSH) for logon to the instance, you must enable SSH key pair-based authentication. Make sure that the
PubkeyAuthenticationparameter in the SSH configuration file is set to yes, as described in the following procedure.If you use a password (SSH) for logon to the instance, you must enable SSH password-based authentication. Make sure that the
PasswordAuthenticationparameter in the SSH configuration file is set to yes, as described in the following procedure.If you use VNC or Session Manager for logon to the instance, you do not need to modify the SSH configuration file.
In this example, a user named exampleuser is created.
Connect to a Linux ECS instance.
Select an appropriate method to connect to the ECS instance. For more information, see the Methods for connecting to an ECS instance or Methods for connecting to an ECS instance section of the "Methods for connecting to an ECS instance" topic.
Create a user.
Run the following command to create a user:
sudo useradd -m <username>Replace
<username>with the username that you want to use. For example, run the following command to create a user namedexampleuser:sudo useradd -m exampleuserConfigure a password or a key pair.
Configure a key pair
A key pair consists of a public key and a private key. The public key is stored on your instance, and the private key is saved by yourself. The private key is required for logon.
Prepare a key pair
You can use an existing key pair or create a key pair. To create a key pair, run the ssh-keygen command.
Specify the public key in the
authorized_keysconfiguration file.Copy the content of the public key to the
.ssh/authorized_keysfile in the root directory of the user that you created.Create the .ssh folder in the root directory of the user that you created. Sample command:
sudo mkdir /home/<username>/.sshReplace
<username>with the name of the user created in Step 2. For example, if you createdexampleuser, run the following command to modify the configuration file of exampleuser.sudo mkdir /home/exampleuser/.sshCreate the
.ssh/authorized_keysconfiguration file in the root directory of the new user and copy the content of the public key file (id_rsa.pub) generated in Substep a to the configuration file. Run the following command to open the configuration file by specifying the file name with the absolute path:/home/<username>/.ssh/authorized_keysReplace
<username>with the name of the user created in Step 2. For example, if you createdexampleuser, the following absolute path and name of the configuration file are used:/home/exampleuser/.ssh/authorized_keysYou can use the Vim editor to modify the configuration file. For information about how to use the Vim editor, see Vim editor.
Modify the permissions on the
.sshdirectory andauthorized_keysfile.sudo chmod 700 /home/<username>/.ssh sudo chmod 600 /home/<username>/.ssh/authorized_keysReplace
<username>with the name of the user created in Step 2. For example, you createdexampleuser. Run the following commands:sudo chmod 700 /home/exampleuser/.ssh sudo chmod 600 /home/exampleuser/.ssh/authorized_keys
Check and modify the SSH configuration file named
/etc/ssh/sshd_config.After you configure the key pair, enable SSH key pair-based authentication by changing the
PubkeyAuthenticationparameter toyesin the/etc/ssh/sshd_configconfiguration file.You can use the Vim editor to perform this operation. For information about how to use the Vim editor, see Vim editor.
Run the following command to restart the
sshdservice for the configurations to take effect:sudo systemctl restart sshd
Specify a password
ImportantTo ensure security, do not specify a weak password for logon to instances.
Run the following command on the instance to specify a password:
sudo passwd <username>Replace
<username>with the name of the user created in Step 2. For example, you createdexampleuserin Step 2. Run the following command to specify a password for the user:sudo passwd exampleuserFollow the on-screen instructions to enter and confirm the new password.

Check and modify the SSH configuration file named
/etc/ssh/sshd_config.To enable SSH password-based authentication, set the
PasswordAuthenticationparameter toyesin the/etc/ssh/sshd_configconfiguration file.You can use the Vim editor to perform this operation. For information about how to use the Vim editor, see Vim editor.
Run the following command to restart the
sshdservice for the configurations to take effect:sudo systemctl restart sshd
Check whether you can use the created user to log on to the ECS instance.
Windows instance
To add a user to a Windows instance, you must create the user and add the user to the Remote Desktop Users user group.
If you want to allow more than two users to log on to a Windows instance at the same time, you must use Microsoft Remote Desktop Services (RDS). For information about RDS, see Remote Desktop Services overview in Windows Server.
In this example, a user named exampleuser is created on the instance that runs Windows Server 2022. The GUI varies based on the operating system version.
Connect to a Windows ECS instance.
Select an appropriate method to connect to the ECS instance. For more information, see Methods for connecting to an ECS instance of the "Methods for connecting to an ECS instance" topic.
Create a user.
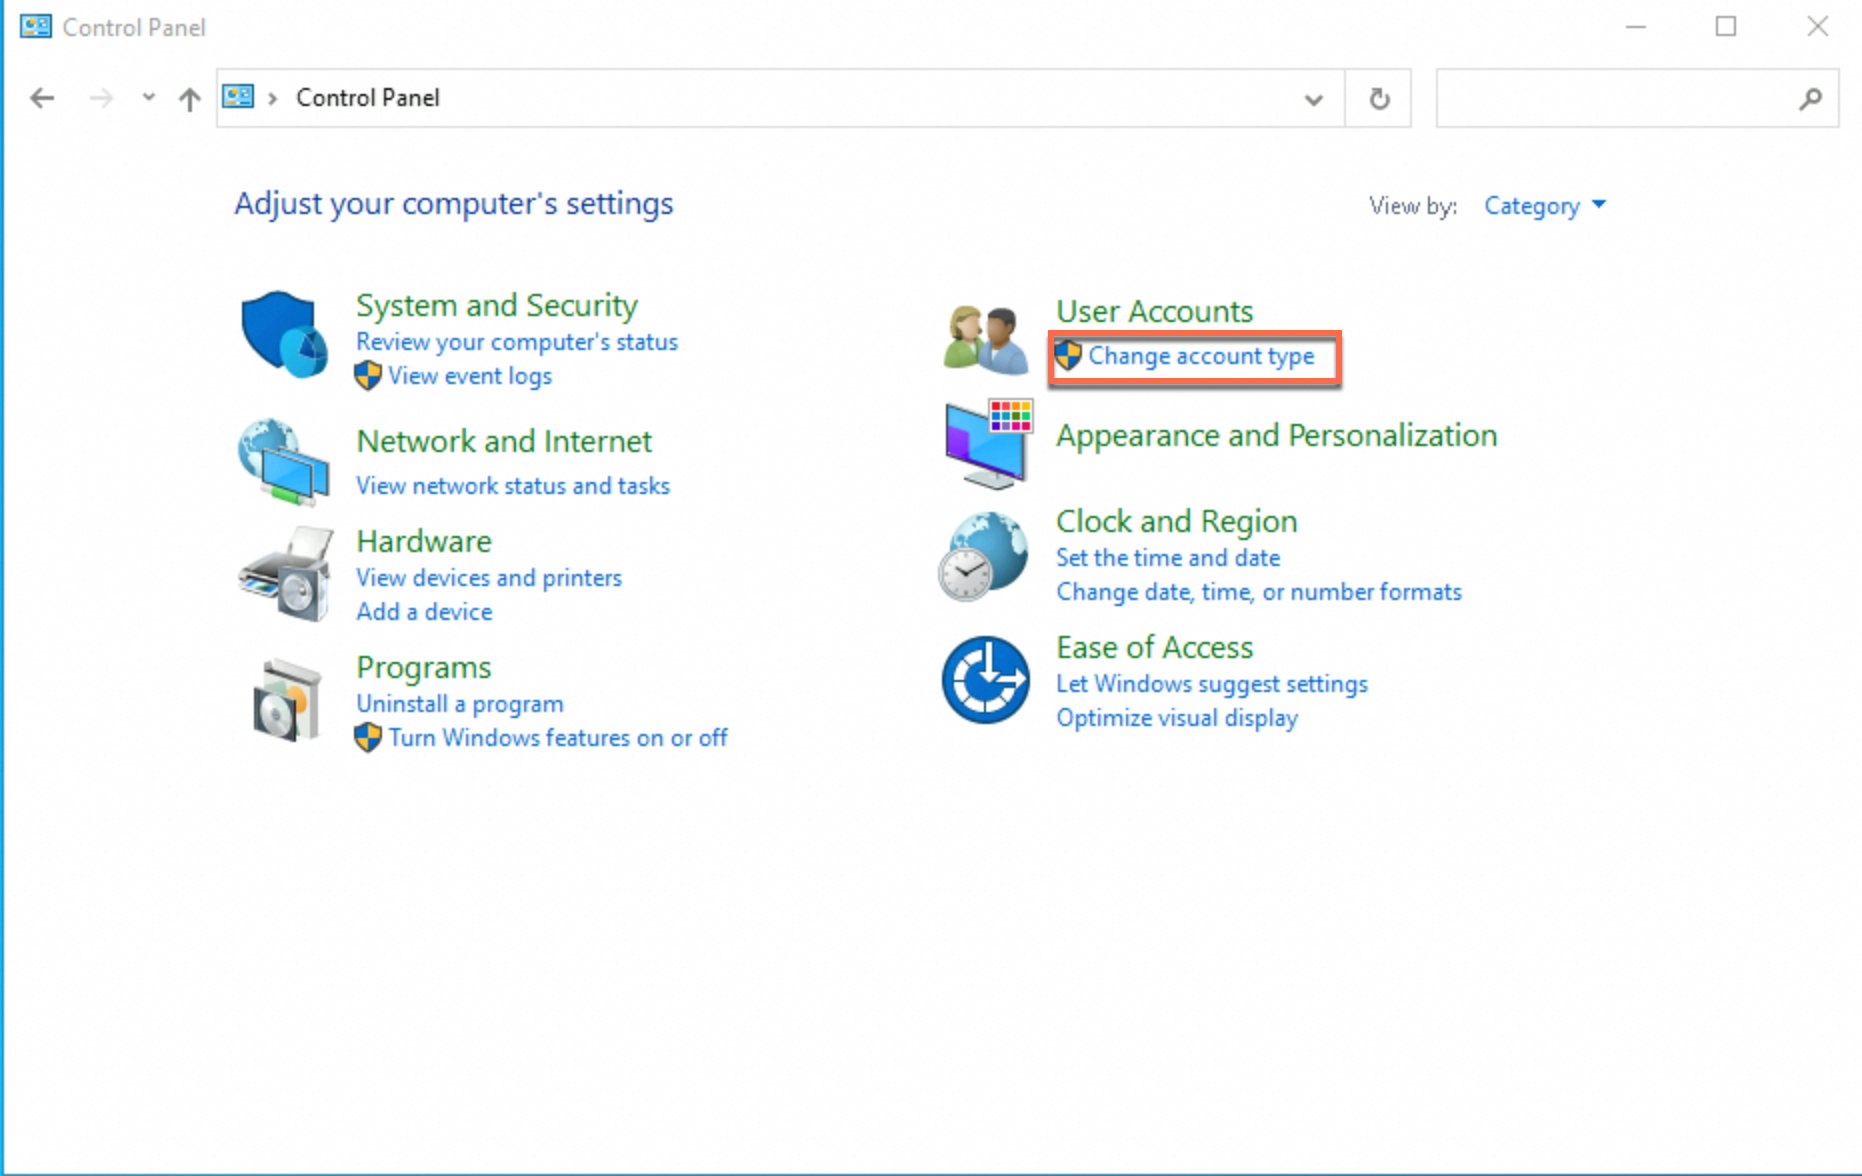
Open Control Panel and click Change account type under User Accounts.
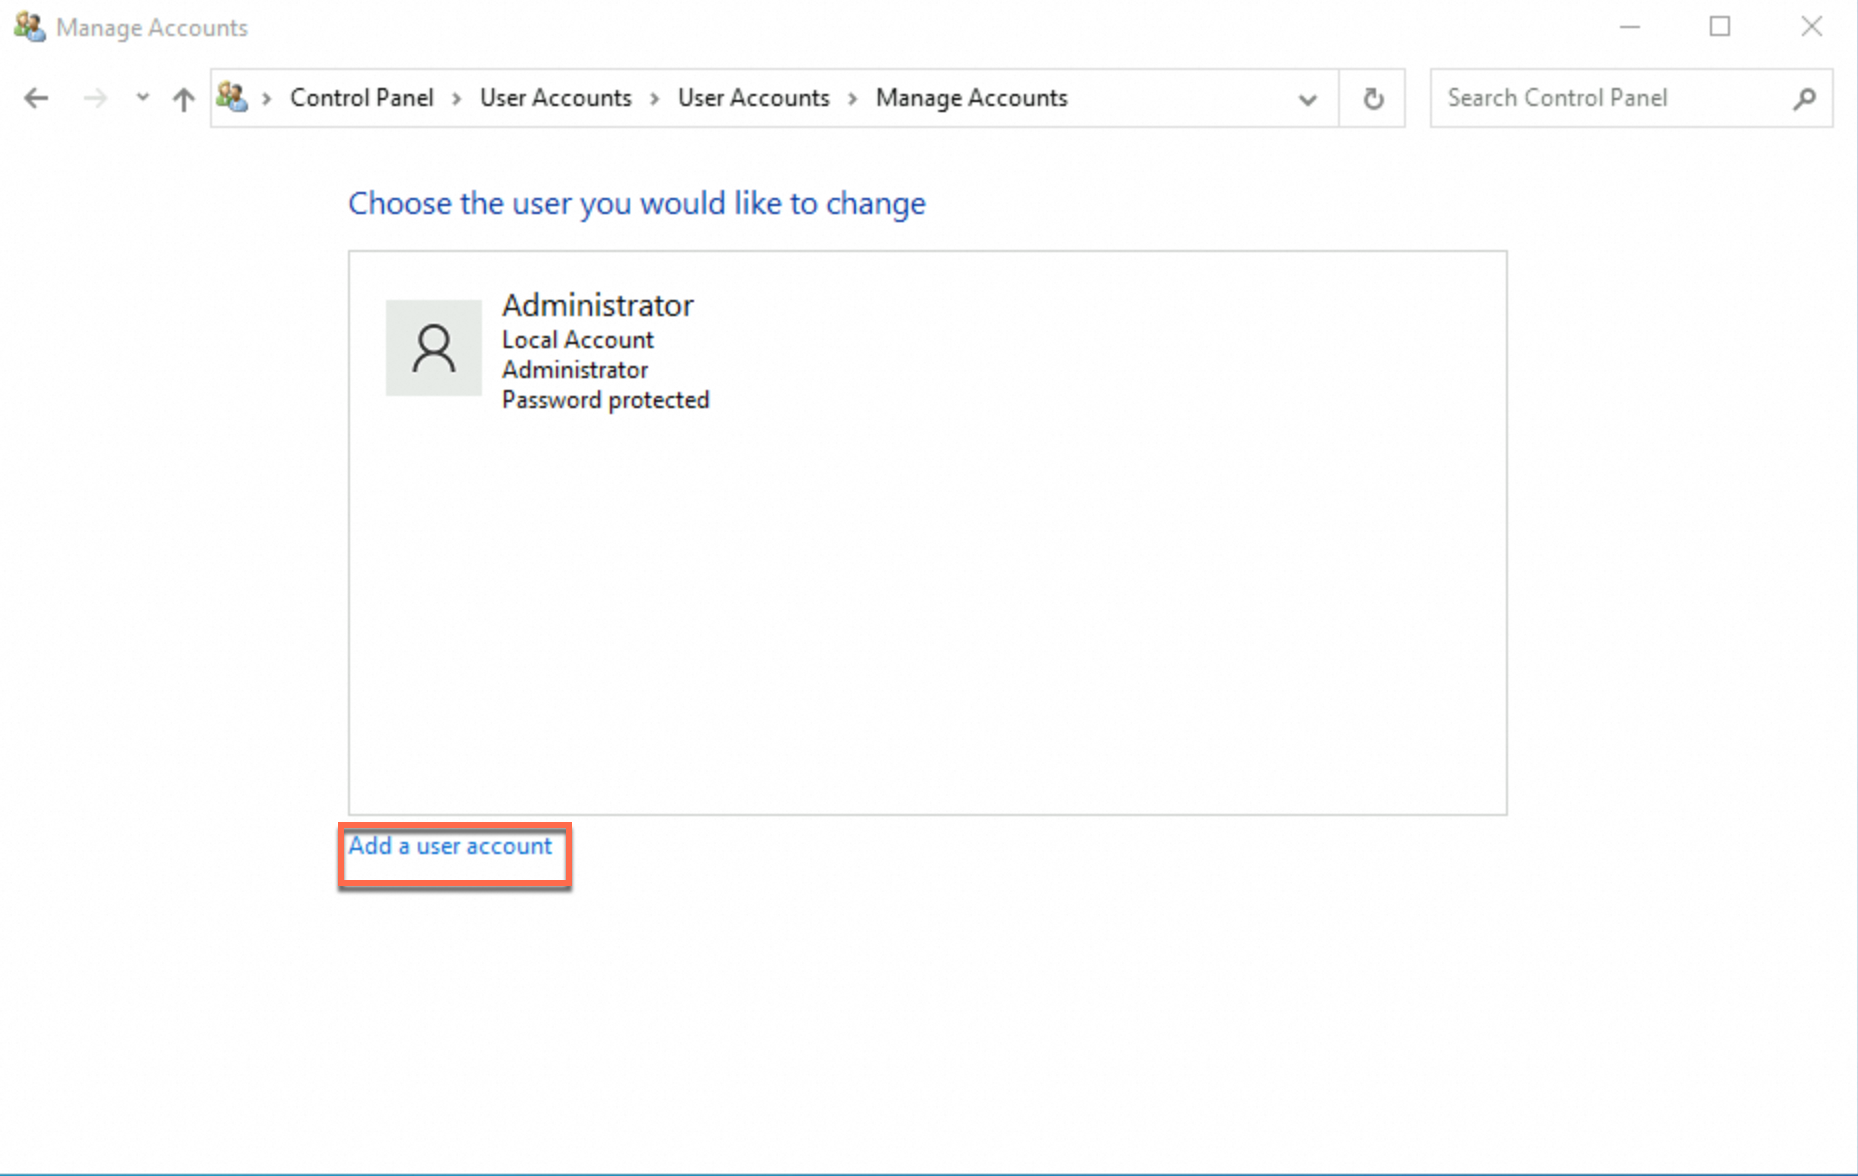
On the Manage Accounts page, click Add a user account. The Add a user page appears.
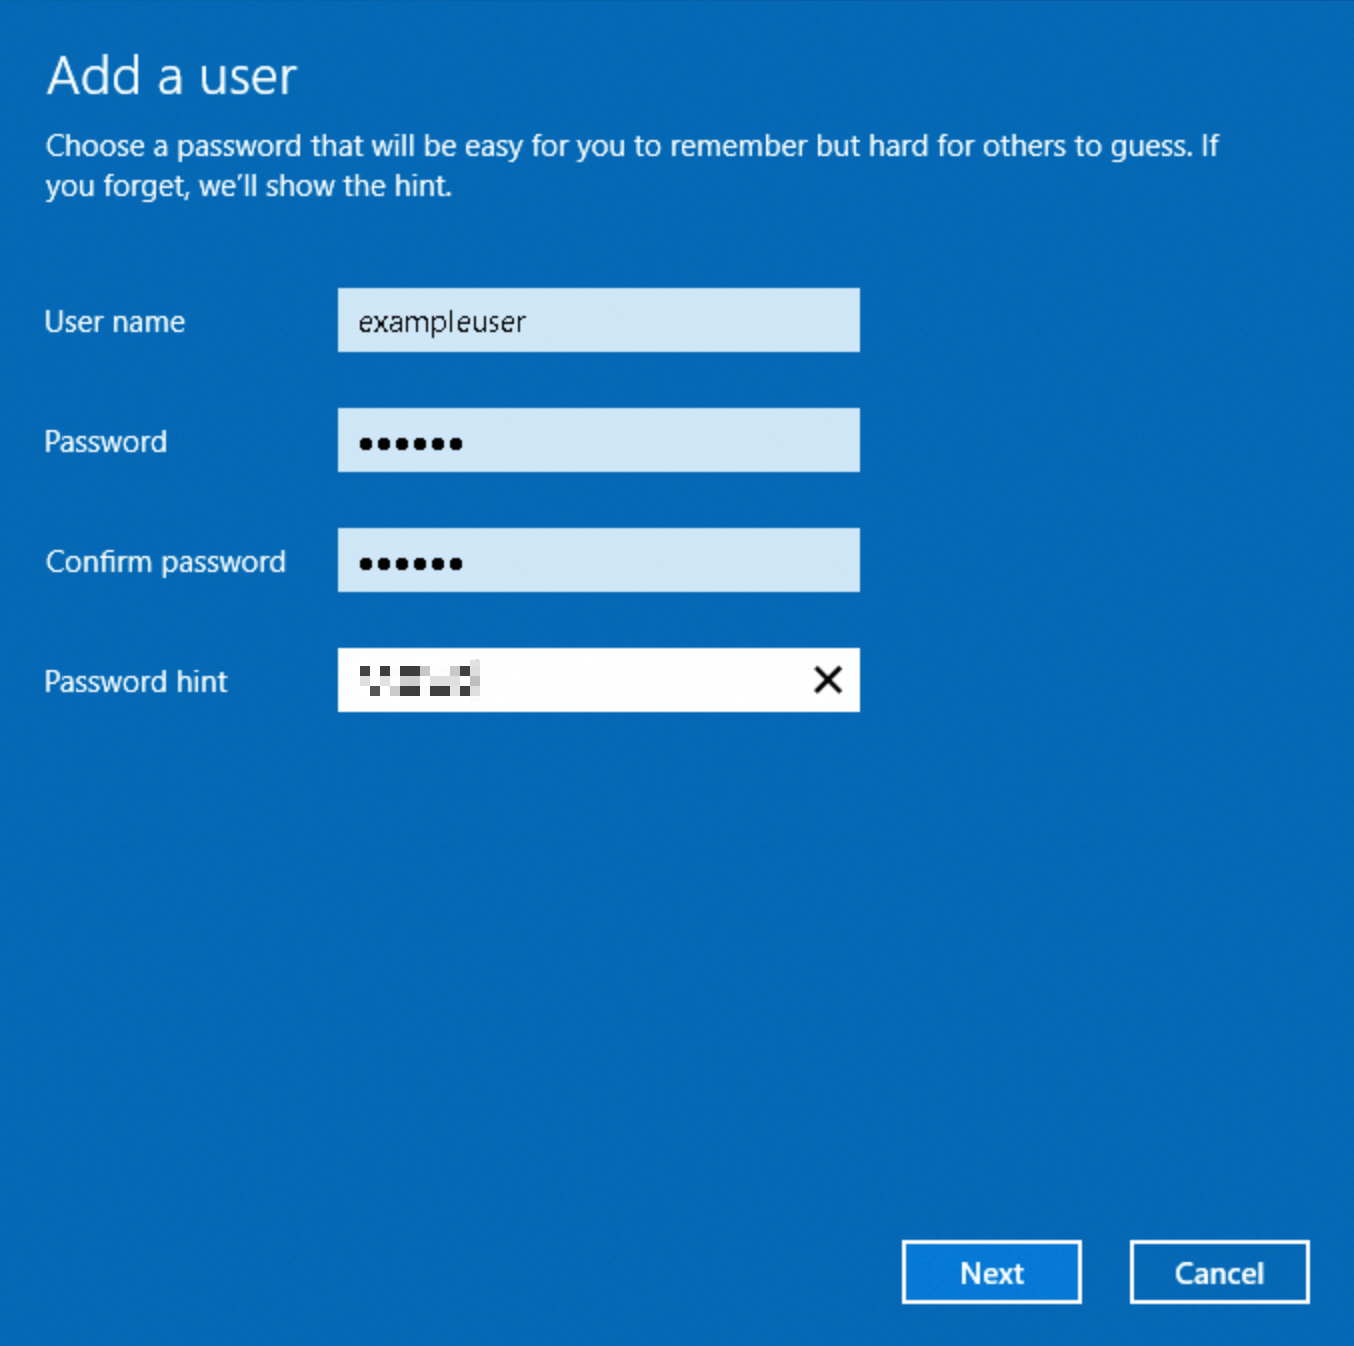
On the Add a user page, configure the User name and Password parameters of the new user as prompted.
In this example, a user named exampleuser is created. Replace the value of the User name parameter based on your business requirements.
Click Next and then click Finish. The new user is created.
Add the new user to the
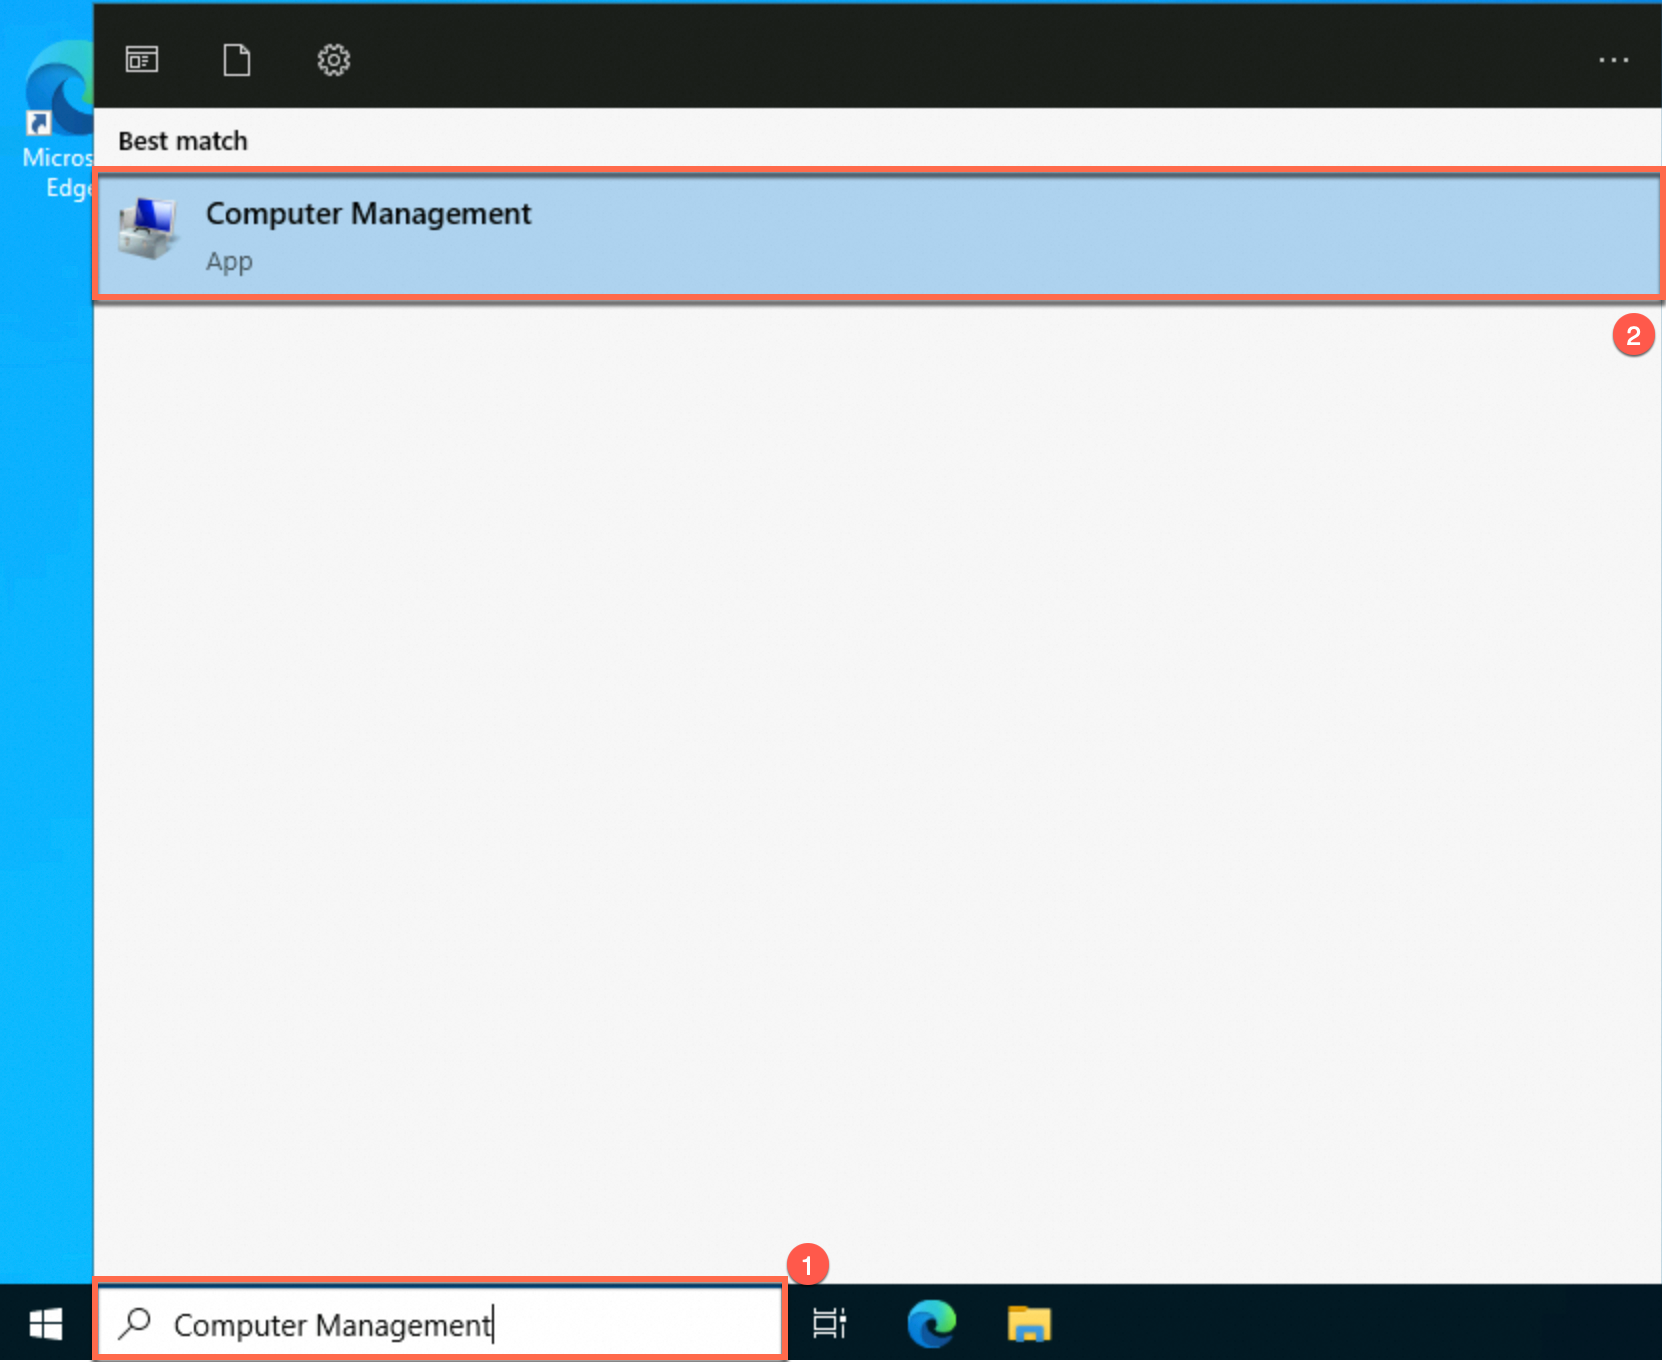
Remote Desktop Usersuser group.In the search box on the taskbar, search for Computer Management. Click Computer Management to go to the Computer Management page.
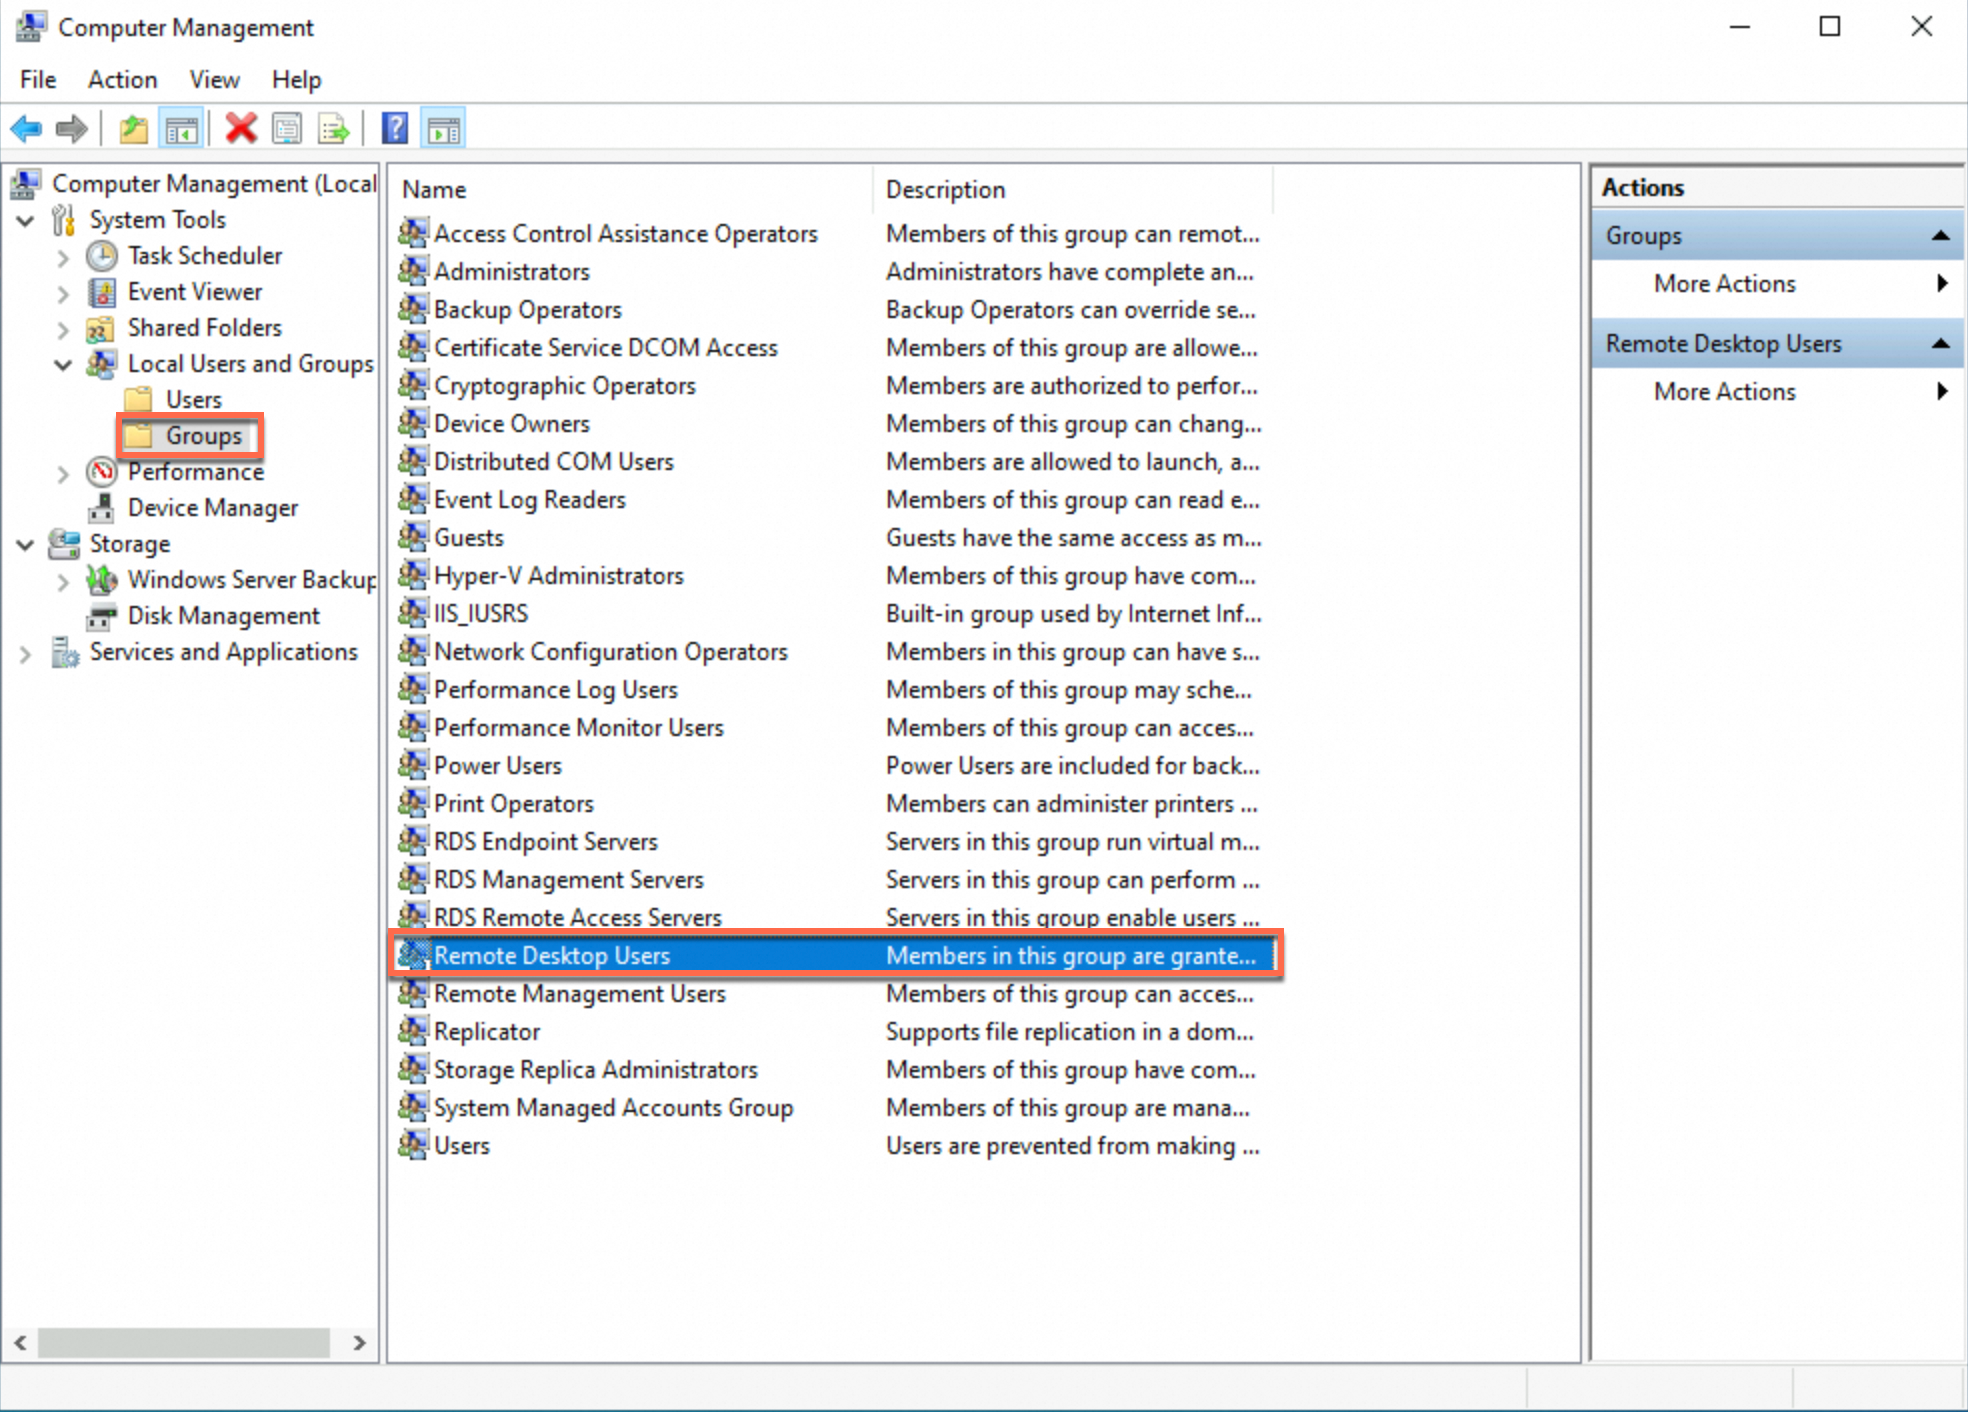
In the left-side navigation pane, choose , and find Remote Desktop Users. Double-click Remote Desktop Users to go to the Remote Desktop Users Properties dialog box.
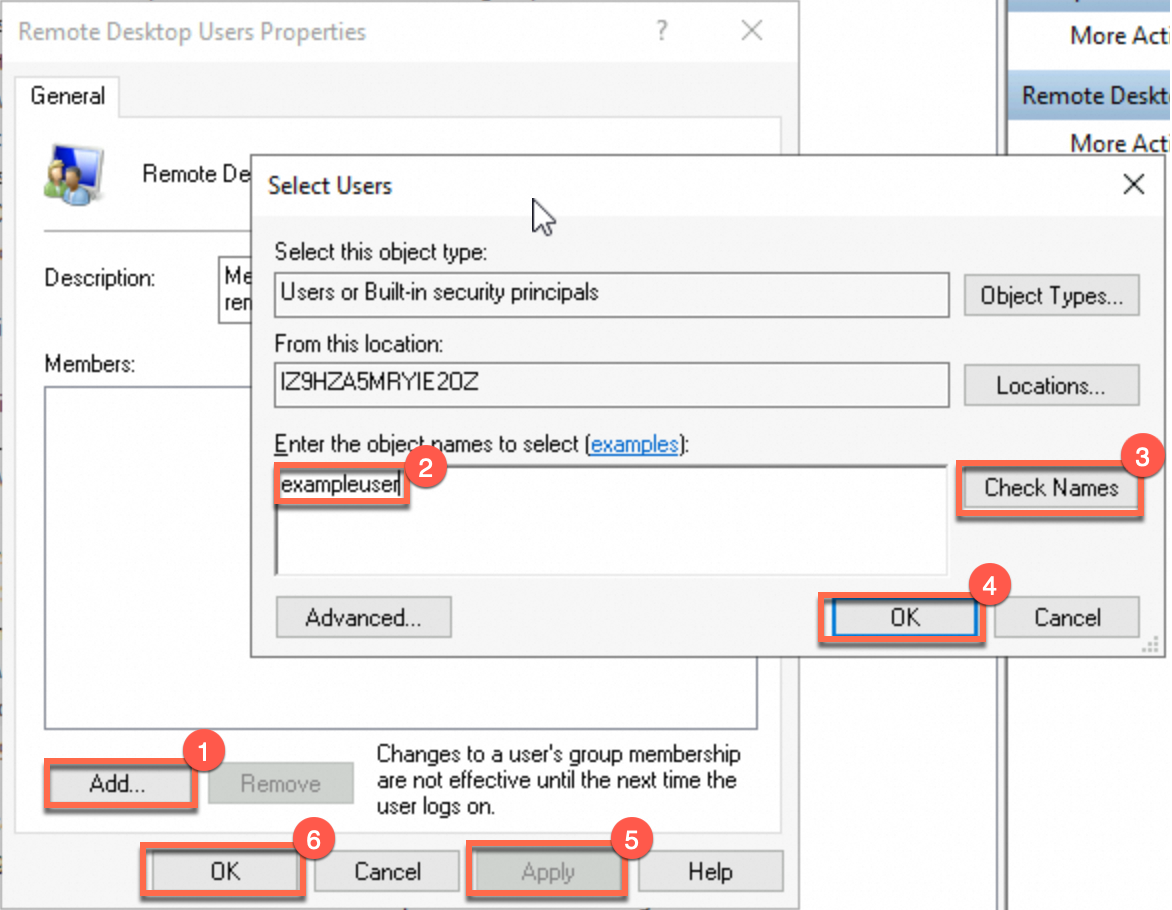
Perform the following operations, as shown in the right figure:
In the Remote Desktop Users Properties dialog box, click Add.
Enter the name of the user created in Step 2 and click Check Names.
Click OK. In the Remote Desktop Users Properties dialog box, click Apply and then click OK. The exampleuser user is added to the user group.
Check whether you can use the new user to log on to the ECS instance.