Register a non-Alibaba Cloud server as an Alibaba Cloud managed instance to use a variety of Alibaba Cloud services, such as Cloud Assistant, CloudOps Orchestration Service (OOS), and Apsara DevOps, to manage the server. For example, you can use Cloud Assistant to manage it without logging in.
Limitations
Third-party server requirements
Supported operating systems:
Alibaba Cloud Linux 2/3
CentOS 6 and later
CoreOS and OpenSUSE
Debian 8/9/10 and later
Red Hat 5/6/7 and later
SUSE Linux Enterprise Server (SLES) 11/12/15 and later
Ubuntu 12/14/16/18 and later
Windows Server 2012/2016/2019 and later
The server must be able to access the Internet.
Region availability
The managed instance feature is available only in the following regions:
China (Qingdao), China (Beijing), China (Zhangjiakou), China (Hohhot), China (Ulanqab), China (Hangzhou), China (Shanghai), China (Shenzhen), China (Heyuan), China (Guangzhou), China (Chengdu), China (Hong Kong), Japan (Tokyo), South Korea (Seoul), Singapore, Malaysia (Kuala Lumpur), Indonesia (Jakarta), Philippines (Manila), Thailand (Bangkok), Germany (Frankfurt), UK (London), US (Silicon Valley), US (Virginia), UAE (Dubai), and SAU (Riyadh - Partner Region)
Billing
The managed instance feature is free.
After you register a third-party server as an Alibaba Cloud managed instance, you may incur fees when using other Alibaba Cloud services. For specific billing rules, refer to the documentation for the services you use.
Step 1: Create a registration code
To register a third-party server as an Alibaba Cloud managed instance, you must create an registration code and apply it to the server. The registration code verifies the server's identity to ensure that only authorized servers can be registered.
One registration code can be used to register up to 1,000 managed instances.
You can maintain a maximum of 5,000 registration codes at a time in a single Alibaba Cloud region.
If you have more than 1,000 registration codes, you can create new ones only if the usage rate of your existing codes is greater than 50%.
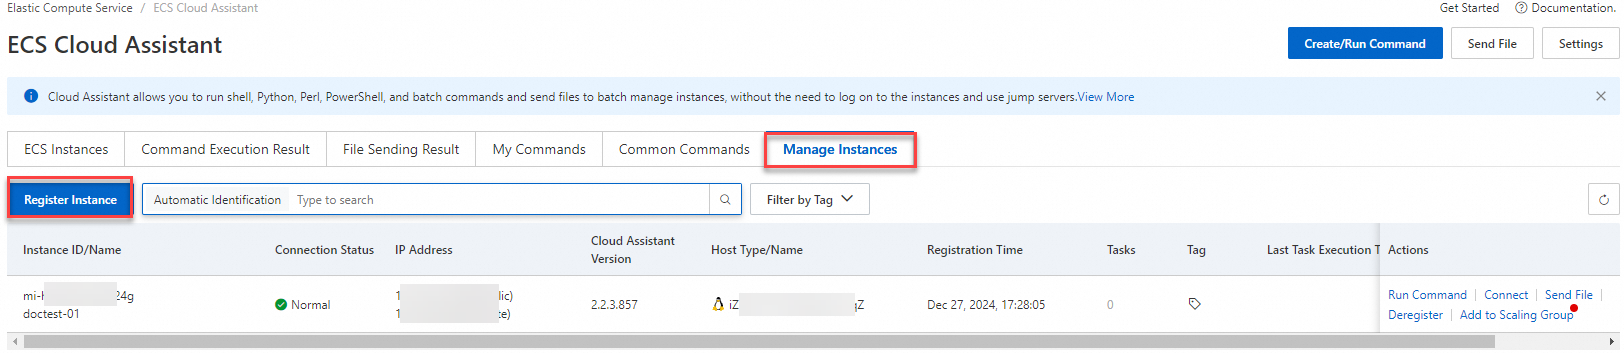
On the ECS Cloud Assistant page, click the Manage Instances tab and then click Register Instance. You can view the usage data in the Registered Instances/Registration Quota column.
In the top navigation bar, select the region and resource group of the resource that you want to manage.
 Important
The registration code you create and the managed instances you register will belong to this region.
We recommend selecting the region with the fastest network connection. You can use the
pingcommand on your third-party server to test the connection speed and identify the fastest region. You can find the<region_id>in Regions and zones.ping -c 4 <Region ID>.axt.aliyuncs.comOn the Manage Instances tab, create a registration code.
Scenario 1: If no instances are registered in the current region, click Create Registration Code and proceed to Step 4.

Scenario 2: If instances have already been registered in the current region, click Register Instance. In the Register Instance panel, click Create Registration Code.
In the Create Registration Code panel, configure the parameters for the managed instance.
Parameter
Description
Instance Name Prefix
Set a prefix for the managed instance name to simplify management.
Source IP Address
Specify the IP address or CIDR block of the managed instance.
Enter the public IP address or CIDR block of the server. Only servers with an IP address in the specified range can be registered.
Leave this parameter empty to allow registration from any server IP address.
Instance Quota
Set the number of managed instances that can be registered with this code.
Valid values: 1 to 1000. Default value: 10.
Validity Period
Set the validity period for the registration code. If the code expires before use, you must create a new one to register hosts.
Default: 4 hours.
Description
Provide a description for this registration code, such as its purpose, for easier management.
Tag
Set a Tag key and Tag value for the registration code to help with classification and maintenance.
ImportantManaged instances registered with this registration code will automatically inherit the Tag key and Tag value set here.
Resource Group
Select a Resource Group to manage the instance based on purpose, permissions, and other criteria.
ImportantManaged instances registered with this registration code are automatically added to the corresponding Resource Group.
If no Resource Group is specified, instances are added to your default Resource Group.
For information on RAM policies and Resource Group authorization for managed instances, see Grant a RAM user permissions to use Cloud Assistant and Classify resources into resource groups and grant permissions on the resource groups.
Click Generate Registration Code.
After the operation is complete, the system generates an installation script for you to run on your third-party server.

Get the installation script.
Select the operating system type of your server and click Download or Copy to save the installation script locally.
rpm: For operating systems such as Alibaba Cloud Linux, CentOS, RHEL, and SUSE Linux.
deb: For operating systems such as Debian and Ubuntu.
exe: For Windows Server operating systems.
ImportantThe installation script is displayed only once after you generate the registration code. You must save it locally. For example, save it as
installAssistant.shfor later use.If you have multiple operating systems, you need to download the corresponding installation script for each one.
Step 2: Install Cloud Assistant Agent and register the instance on the server
Use the installation script generated when you created the registration code to register the server as a managed instance.
Linux servers
The server has directly access to the Internet
Log on to your third-party server.
Create the installation script on the server.
Run the following command to create a script file, and then paste the installation script you obtained in Step 6 into the file.
vim installAssistant.shPress
Escand enter:wqto save the file.
Run the following command to grant execute permissions to the installation script.
sudo chmod 755 installAssistant.shRun the following command to install Cloud Assistant Agent on the server.
sudo ./installAssistant.shThe installation is successful if the following message appears.
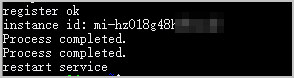
The server accesses the Internet through a proxy server
This section shows how to install Cloud Assistant Agent and register a managed instance through a proxy server, using CentOS 7.8 as an example.
Log on to the server by using a method such as SSH.
For more information, see Choose an ECS remote connection method.
Run the following command to download Cloud Assistant Agent through the proxy server.
x86 architecture:
sudo https_proxy=<http://your_proxy_address> && wget https://aliyun-client-assist.oss-accelerate.aliyuncs.com/linux/aliyun_assist_latest.rpmArm architecture:
sudo https_proxy=<http://your_proxy_address> && wget https://aliyun-client-assist.oss-accelerate.aliyuncs.com/arm/aliyun-assist-latest-1.aarch64.rpmImportantReplace
<http://your_proxy_address>with your proxy server address.Run the following commands to install Cloud Assistant Agent.
x86 architecture:
sudo rpm -ivh aliyun_assist_latest.rpm --forceArm architecture:
sudo rpm -ivh aliyun-assist-latest-1.aarch64.rpm --forceConfigure the proxy for the Cloud Assistant Agent.
Modify the Cloud Assistant Agent configuration file.
Modify the file to configure the
ALIYUN_ASSIST_PROXYenvironment variable. Follow these steps:Use
vimto create the/etc/sysconfig/aliyunfile.sudo vim /etc/sysconfig/aliyunEnter the following content and save the file.
ALIYUN_ASSIST_PROXY=<http://your_proxy_address>ImportantReplace
<http://your_proxy_address>with your proxy server address.
Run the following command to reload the systemd configuration.
sudo systemctl daemon-reloadRun the following command to restart Cloud Assistant Agent.
sudo systemctl restart aliyun.serviceAfter the Cloud Assistant Agent starts, check the service log (default path:
/usr/local/share/aliyun-assist/{version}/log/aliyun_assist_main.log). If the service log contains a message with...ALIYUN_ASSIST_PROXY..., the proxy is configured successfully.
Run the following command to register the Cloud Assistant managed instance through the proxy server.
Run the following command to configure the proxy server.
sudo export ALIYUN_ASSIST_PROXY=<http://your_proxy_address>ImportantReplace
<http://your_proxy_address>with your proxy server address.Run the following command to register the server as a Cloud Assistant managed instance.
ImportantThis is an example. You must copy the exact command generated on the console in Step 5.
sudo aliyun-service --register --RegionId "cn-hangzhou" \ --ActivationCode "a-hz0f5KlGmF/TsM5uBuq7Eqor+****" \ --ActivationId "045CE381-0404-4F42-A44B-CC232B3E****"
The server connects to a virtual private cloud (VPC) through Express Connect
This section uses CentOS as an example to show how to install Cloud Assistant Agent via Express Connect, and then register the managed instance over the VPC internal network.
Log on to the server by using a method such as SSH.
For more information, see Choose an ECS remote connection method.
Run the following script to register the managed instance over the VPC internal network.
The following is an example. Replace the values of
RegionId,ActivationCode, andActivationIdwith the ones from the script automatically generated in Step 5.CentOS
#/bin/bash
## Specify a region.
regionId="cn-hangzhou"
if [[ -n $regionId ]]; then
    bucket="aliyun-client-assist-${regionId}.oss-${regionId}-internal.aliyuncs.com"
    ## Download Cloud Assistant Agent.
    wget -q https://${bucket}/linux/aliyun_assist_latest.rpm
    ## Install Cloud Assistant Agent.
    sudo rpm -ivh aliyun_assist_latest.rpm --force
fi
## Register the server as a managed instance in a VPC. **Enter the following setting to set the network type to VPC: NetworkMode "vpc"**.
## Copy the values of RegionId, ActivationCode, and ActivationId from the place where the registration code was created in the ECS console.
sudo aliyun-service --register \
  --NetworkMode "vpc" \
  --RegionId "${regionId}" \
  --ActivationCode "a-hz0f5KlGmF/TsM5uBuq7Eqor+****" \
  --ActivationId "2C217D35-FE6C-5636-BC3C-CC480D3*****"
Debian and other Linux operating systems
#/bin/bash

## Specify a region.
regionId="cn-hangzhou"

if [[ -n $regionId ]]; then
    bucket="aliyun-client-assist-${regionId}.oss-${regionId}-internal.aliyuncs.com"
    ## Download Cloud Assistant Agent.
    wget -q https://${bucket}/linux/aliyun_assist_latest.deb
    ## Install Cloud Assistant Agent.
    sudo dpkg -i aliyun_assist_latest.deb
fi


## Register the server as a managed instance in a VPC. **Enter the following setting to set the network type to VPC: NetworkMode "vpc"**.
## Copy the values of RegionId, ActivationCode, and ActivationId from the place where the registration code was created in the ECS console.
sudo aliyun-service --register \
  --NetworkMode "vpc" \
  --RegionId "${regionId}" \
  --ActivationCode "a-hz0f5KlGmF/TsM5uBuq7Eqor+****" \
  --ActivationId "2C217D35-FE6C-5636-BC3C-CC480D3*****"
Windows servers
The server has directly access to the Internet
Log on to the server by using Remote Desktop Connection.
For more information, see Choose an ECS remote connection method.
Upload the installation script to the server.
This is the installation script generated in Step 5.
NoteRemote Desktop Connection allows you to copy and paste the script file directly to the server. If your network environment has other restrictions that prevent direct copying, you can use FTP or other software to upload the script.
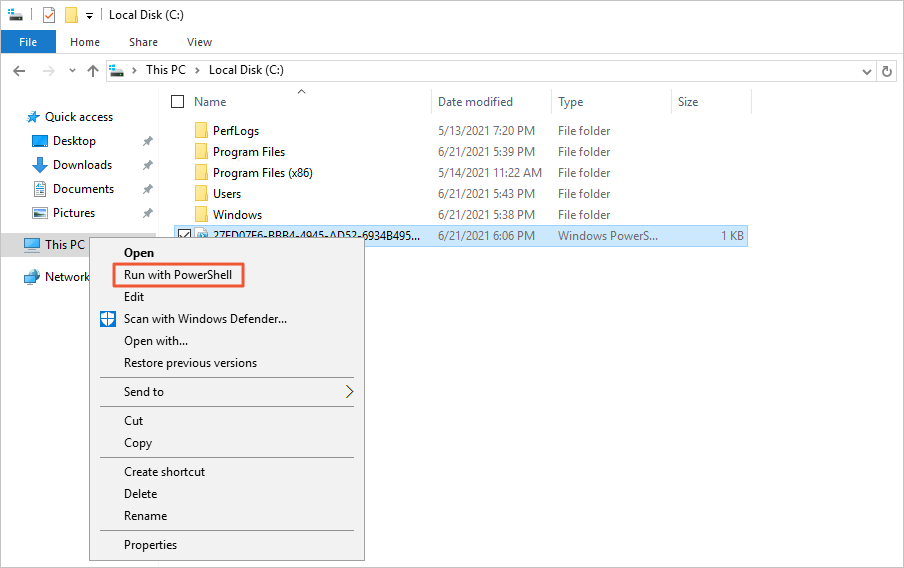
Right-click the installation script and click Run with PowerShell to start the installation of Cloud Assistant Agent.
The server accesses the Internet through a proxy server
This section uses Windows Server 2016 Datacenter Edition as an example to show how to install Cloud Assistant Agent and register a managed instance through a proxy server.
Log on to the server by using Remote Desktop Connection.
For more information, see Choose an ECS remote connection method.
Configure the proxy settings for your browser.
Choose .
Click Network and Internet.
Click Network and Sharing Center.
In the lower-left corner, click Internet Options.
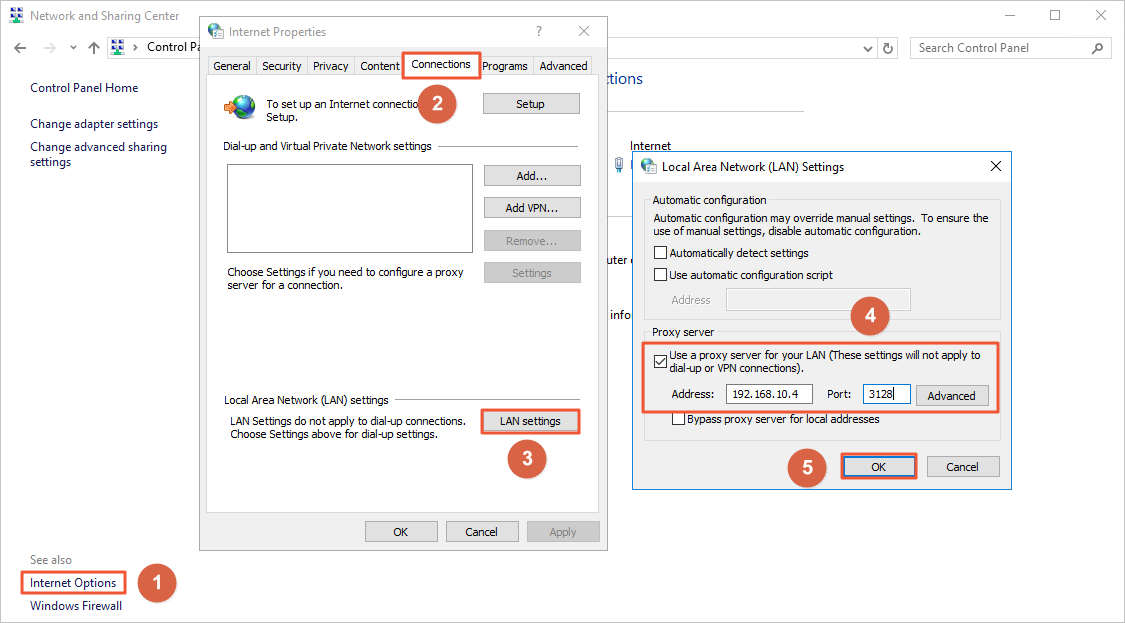
Click the Connections tab and click LAN settings.
In the Proxy server section of the Local Area Network (LAN) Settings dialog box, enter the address and port of your proxy server, and then click OK.
Download the Cloud Assistant Agent installation package.
Click Start and choose .
Right-click Windows PowerShell and select Run as administrator.
In the Windows PowerShell window, run the following command to download the Cloud Assistant Agent installation package:
Invoke-WebRequest -Uri 'https://aliyun-client-assist.oss-accelerate.aliyuncs.com/windows/aliyun_agent_latest_setup.exe' -OutFile 'C:\\aliyun_agent_latest_setup.exe'
After the download is complete, install Cloud Assistant Agent.
Open the C:\ drive.
Double-click aliyun_agent_latest_setup.exe and follow the installation wizard to install Cloud Assistant Agent.
Configure the proxy server for the Cloud Assistant Agent.
Choose .
Click System and Security.
Click System.
On the left, click Advanced system settings.
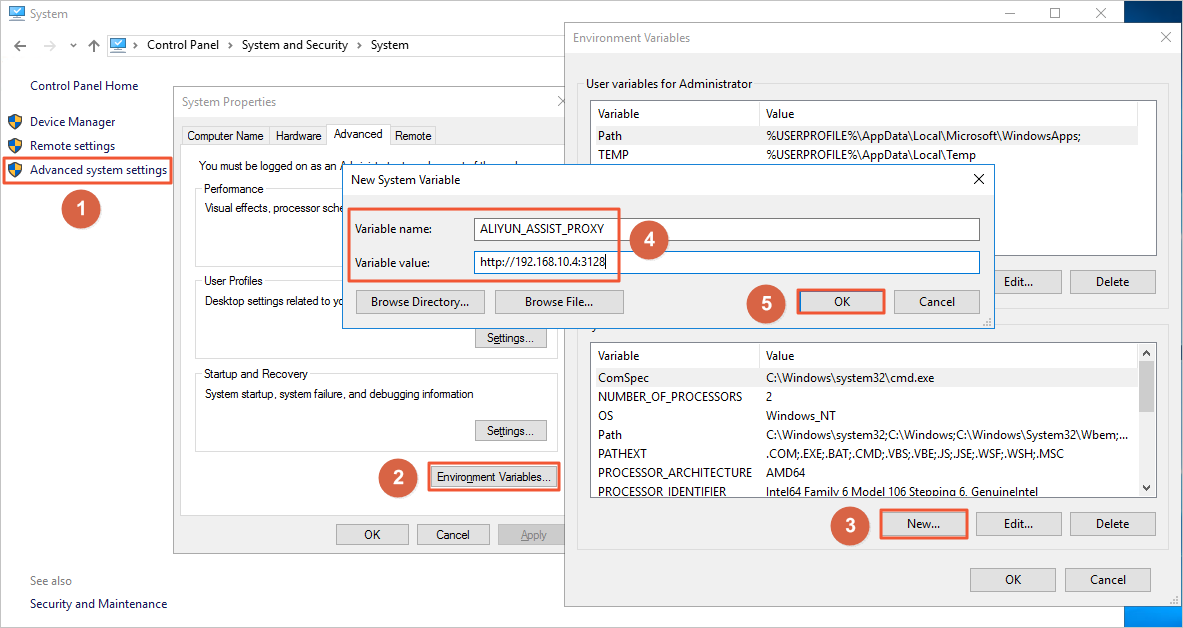
Go to the Advanced tab and click Environment Variables.
In the System variables section, click New.
Configure Variable name and Variable value and click OK.
Variable name: Set to ALIYUN_ASSIST_PROXY.
Variable value: Set to the IP address of your proxy server.
Restart Cloud Assistant Agent in Windows PowerShell.
Run the following command to stop Cloud Assistant Agent:
net stop AliyunServiceRun the following command to restart Cloud Assistant Agent:
net start AliyunService
In Windows PowerShell, register the Cloud Assistant managed instance through the proxy server.
Run the following command to navigate to the Cloud Assistant installation directory.
cd C:\ProgramData\aliyun\assist\{version}ImportantReplace
{version}with the specific version number of Cloud Assistant that you installed.Run the following command to register the server as a Cloud Assistant managed instance.
The following is an example. Replace the values of
RegionId,ActivationCode, andActivationIdwith the ones from the script automatically generated in Step 5..\aliyun_assist_service.exe --register --RegionId="cn-hangzhou" --ActivationCode="a-hz0f6dB8Fg6hhtK0A5n9xqqdH****" --ActivationId="0A2E5ECE-5C71-4FA3-807B-05962C25****"
The server connects to a VPC through Express Connect
This section uses Windows Server 2016 Datacenter Edition as an example to show how to install Cloud Assistant Agent via Express Connect, and then register the managed instance.
Log on to the server by using Remote Desktop Connection.
For more information, see Choose an ECS remote connection method.
Click Start and choose .
Right-click Windows PowerShell and select Run as administrator.
In the Windows PowerShell window, run the following command.
The following is an example. Replace the values of
RegionId,ActivationCode, andActivationIdwith the ones from the script automatically generated in Step 5.$RegionId = "cn-hangzhou"$Bucket = "aliyun-client-assist-${RegionId}.oss-${RegionId}-internal.aliyuncs.com"Invoke-WebRequest -Uri "https://${Bucket}/windows/aliyun_agent_latest_setup.exe" `-OutFile 'C:\\aliyun_agent_latest_setup.exe'&"C:\\aliyun_agent_latest_setup.exe" '/S' '--register' `'--NetworkMode="vpc"' '--RegionId="cn-hangzhou"' `'--ActivationCode="a-hz0f6dB8Fg6hhtK0A5n9xqqdH****"' `'--ActivationId="0A2E5ECE-5C71-4FA3-807B-05962C25****"'type C:\ProgramData\aliyun\assist\hybrid\instance-idStart-Sleep -s 30net stop AliyunServicenet start AliyunService
Step 3: Verify the registration of the third-party server
To verify that the managed instance is connected correctly, return to the ECS console after you install Cloud Assistant Agent and register the instance on your server. A successful connection indicates that the server was registered successfully.
In the top navigation bar, select the region and resource group of the resource that you want to manage.
Click the Manage Instances tab to view the list of managed instances.
By default, all resources under the current Alibaba Cloud account are displayed. You can select a Resource Group from the All Resources list in the upper-left corner of the Cloud Assistant console to view the managed instances and registration codes within that group.
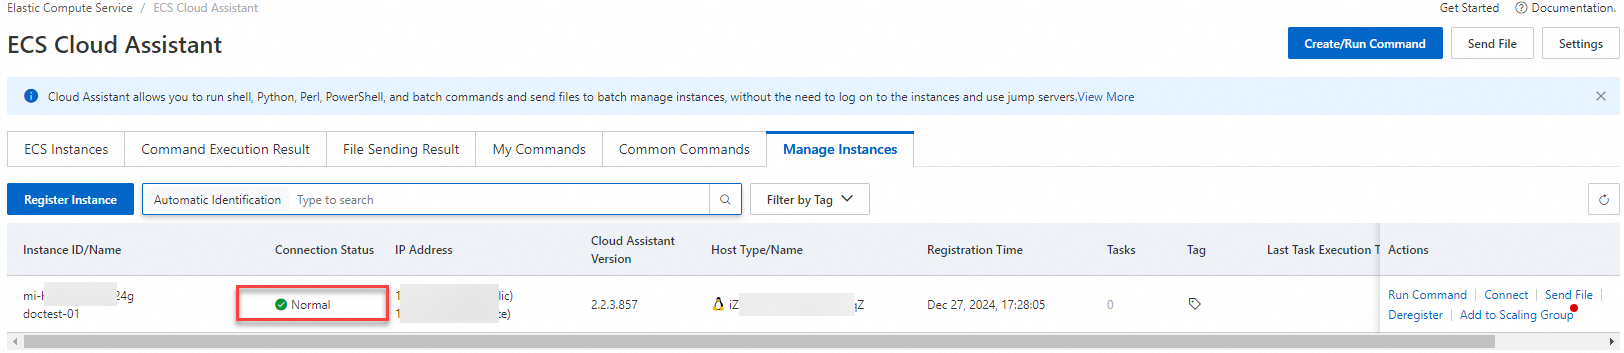
As shown in the figure, if the Connection Status of the managed instance is Normal, the registration was successful.
After your third-party server is successfully registered as a managed instance, you can use Cloud Assistant to manage it without logging in. For more information on how to use Cloud Assistant, see Create and run a command and Use Cloud Assistant to upload a file to ECS instances.
(Optional) Unregister a third-party server
If you no longer need to manage your third-party server with Alibaba Cloud, you can unregister the managed instance, then stop and uninstall the Cloud Assistant Agent.
Linux servers
Log on to the server by using a method such as SSH.
For more information, see Choose an ECS remote connection method.
Run the following command to unregister the managed instance.
sudo aliyun-service --deregisterStop and uninstall the Cloud Assistant daemon.
Run the following command to stop the Cloud Assistant daemon.
sudo /usr/local/share/assist-daemon/assist_daemon --stopNote/usr/local/share/assist-daemon/assist_daemonis the default path for the Cloud Assistant daemon.Run the following command to uninstall the Cloud Assistant daemon.
sudo /usr/local/share/assist-daemon/assist_daemon --delete
Run the following command to stop Cloud Assistant Agent.
NoteDifferent Linux kernel versions use different init services. Linux distributions with newer kernels, such as Ubuntu 18.04, typically use systemd. This example uses systemd. For other init services, see Stop and uninstall Cloud Assistant Agent.
sudo systemctl stop aliyun.serviceRun the following command to uninstall Cloud Assistant Agent.
For RPM-based systems:
sudo rpm -qa | grep aliyun_assist | xargs sudo rpm -eFor DEB-based systems:
sudo dpkg -r aliyun-assist
Delete the Cloud Assistant daemon and Cloud Assistant Agent directories.
Run the following command to delete the Cloud Assistant daemon directory.
sudo rm -rf /usr/local/share/assist-daemonRun the following command to delete the Cloud Assistant Agent directory.
sudo rm -rf /usr/local/share/aliyun-assist
Windows servers
This example uses Windows Server 2019. The paths for Windows PowerShell and services may differ in other Windows versions. Adjust the steps accordingly.
Log on to the server by using Remote Desktop Connection.
For more information, see Choose an ECS remote connection method.
Run Windows PowerShell.

Click Start.
Choose .
Right-click Windows PowerShell and select Run as Administrator.
Run the following command in Windows PowerShell to unregister the managed instance:
aliyun-service --deregisterOpen the service management window.
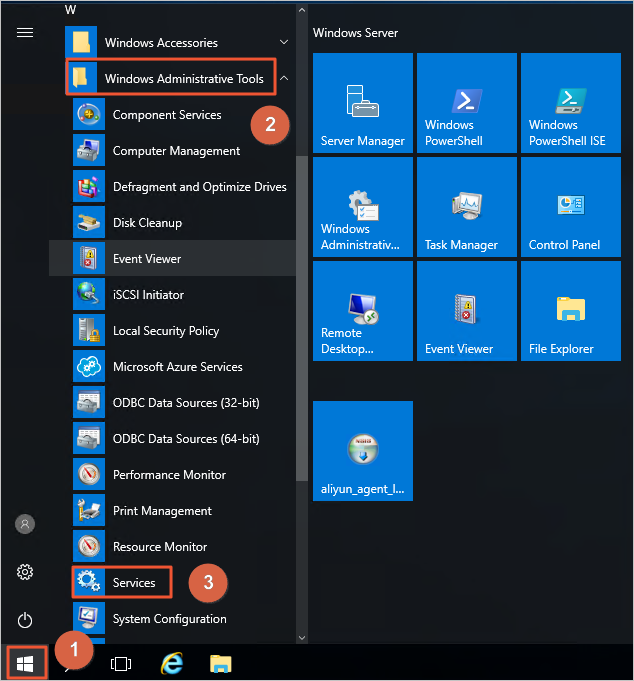
Click Start.
Choose .
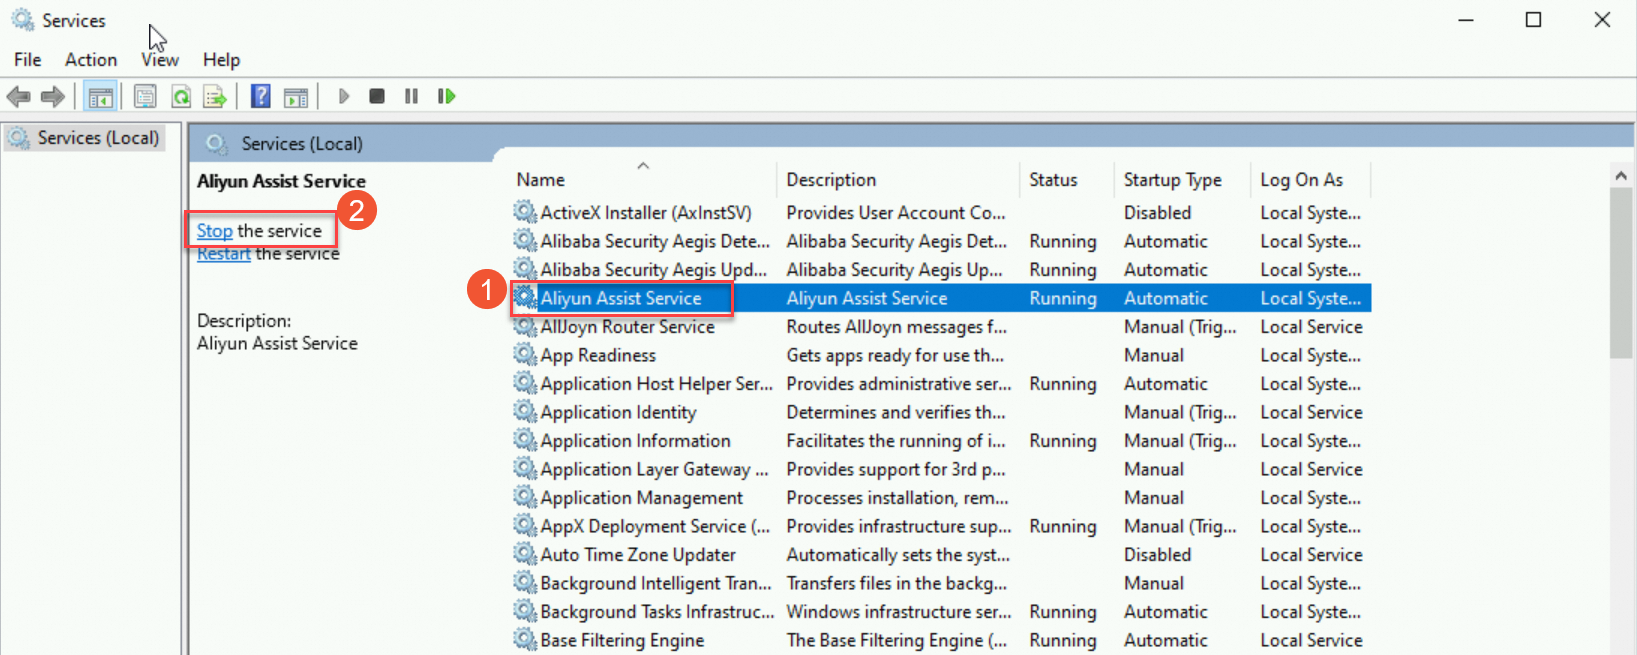
Find Aliyun Assist Service and click Stop the service.
FAQ
Why is the connection status of my managed instance 'Disconnected'?
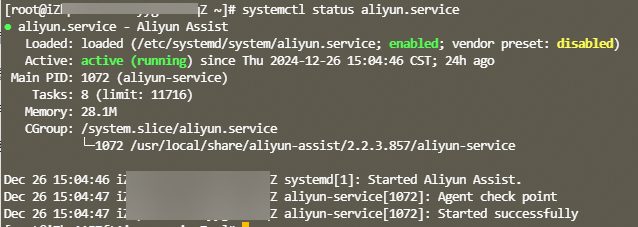
A Disconnected or other abnormal status is often related to the running state of the Cloud Assistant Agent. Log on to the managed server and run systemctl status aliyun.service to check the agent's status.
runningindicates that the Cloud Assistant Agent is running normally.If the status is not
running, runsystemctl restart aliyun.serviceto restart the Cloud Assistant Agent. For more troubleshooting information, see View the status of Cloud Assistant and handle anomalies.For other issues, collect the log files from
/usr/local/share/aliyun-assist/<version>/logand contact Alibaba Cloud technical support.
How do I view existing registration codes?
On Managed Instances tab of the ECS Cloud Assistant page, click Register Instance. In the Register Instance panel, you can view existing registration codes and create new registration codes.

What does the "Activation time exceeds limit" error mean?
The error
ActivationTTL.ExceedLimit("Activation time exceeds limit") occurs if the Validity Period you set is outside the allowed range. Reduce the duration and try again. The default Validity Period for an registration code is 4 hours.The error
activation_has_expiredindicates the code has expired. Create a new one to complete the registration.
References
Once a managed instance is registered, you can use various Alibaba Cloud services to manage it. Examples include Cloud Assistant, CloudOps Orchestration Service, and Apsara DevOps.
Cloud Assistant: You can automate O&M tasks like running scripts, polling processes, installing software, stopping services, or applying security updates. For more information, see Use Cloud Assistant.
CloudOps Orchestration Service: Automate the management and execution of O&M tasks. For more information, see Use OOS to manage ECS.
You can also call the following Cloud Assistant API operations to manage registration codes and managed instances: