Windows Firewall is a built-in security tool in Windows operating systems that helps you control inbound and outbound network traffic to prevent unauthorized access and intrusions. If you enable the system firewall (Windows Firewall) on a Windows Elastic Compute Service (ECS) instance and configure firewall rules to block external access, you may be unable to connect to the instance. This topic describes how to view the status of the system firewall, enable or disable the system firewall, and configure firewall rules on a Windows ECS instance.
Check the status of the system firewall
You can check whether the system firewall is enabled based on the status of the system firewall.
Connect to a Windows ECS instance by using Virtual Network Computing (VNC). For more information, see Connect to an instance by using VNC.
In the menu bar, choose .
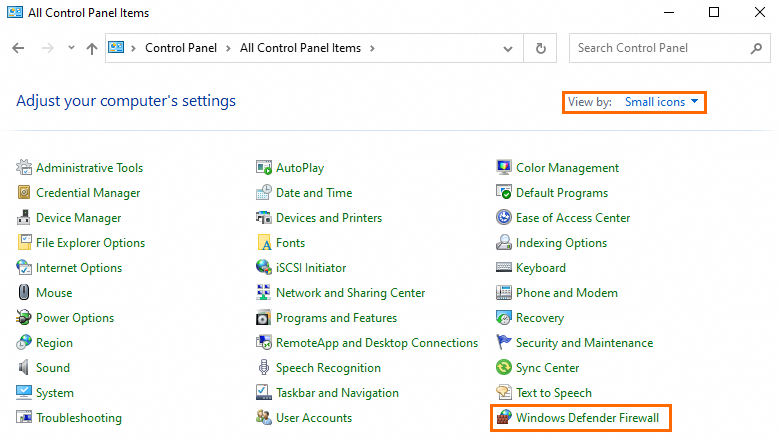
In the upper-right corner of the All Control Panel Items window, set View by to Small icons. Then, click Windows Defender Firewall.
NoteThe display name of the system firewall may vary based on the Windows operating system version. If Windows Defender Firewall is unavailable, select Windows Firewall.
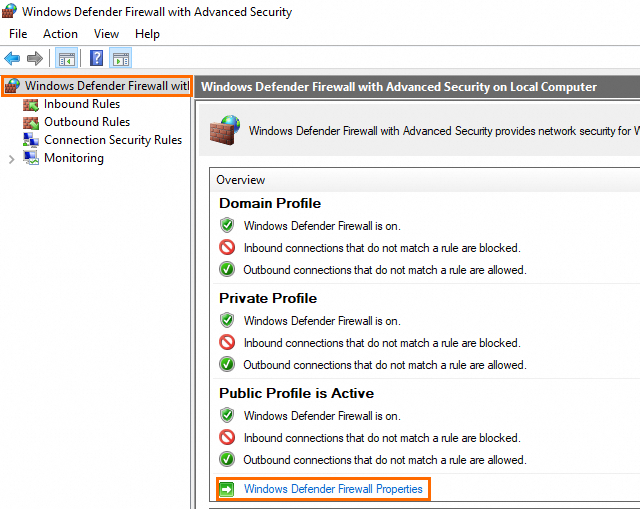
In the Windows Defender Firewall window, click Advanced settings.
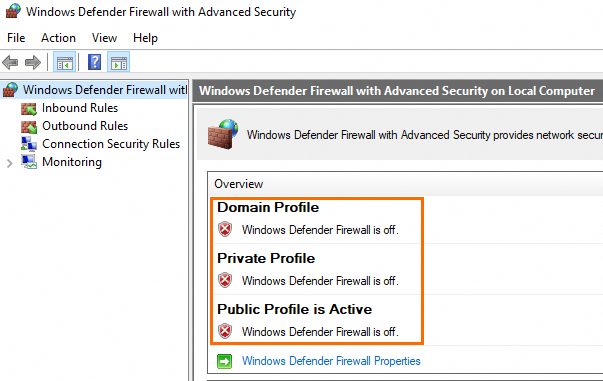
In the Windows Defender Firewall with Advanced Security window, you can view the status of the system firewall in the Overview section in the middle pane.
NoteWhen you enable or disable the system firewall, we recommend that you enable or disable the firewall across all profiles: domain profile, private profile, and public profile. When you check the status of the system firewall, we recommend that you check whether the firewall status of the domain profile, private profile, and public profile is the same. If the firewall status of a profile is different from the firewall status of the other profiles, enable or disable the system firewall for the profile.
Enable or disable the system firewall
Enable or disable the system firewall based on your business requirements. After you enable the system firewall, you need to configure firewall rules.
Enable the system firewall
After you enable the system firewall on a Windows ECS instance, the system firewall monitors and controls the inbound and outbound network traffic of the instance based on the configured firewall rules.
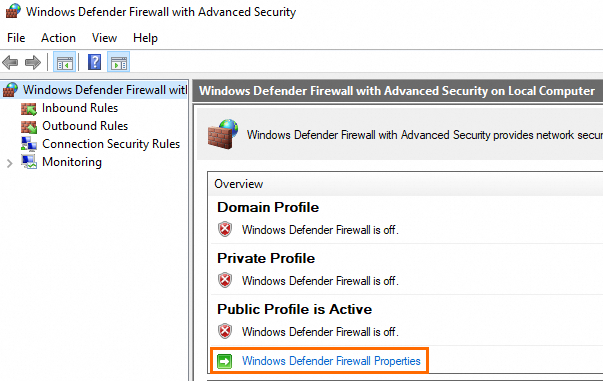
In the Windows Defender Firewall with Advanced Security window, click Windows Defender Firewall Properties.
NoteFor information about how to open the Windows Defender Firewall with Advanced Security window, see the Check the status of the system firewall section of this topic.
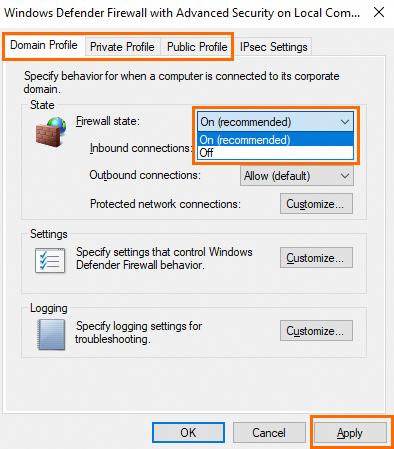
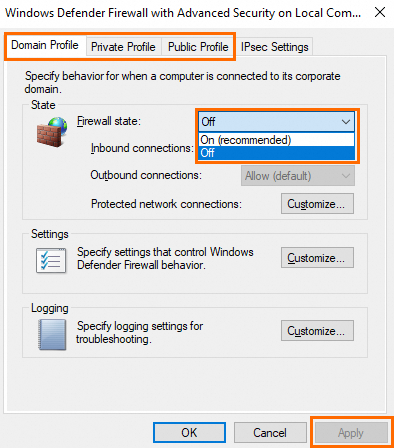
Select On (recommended) from the Windows state drop-down list and click Apply to enable the system firewall.
NoteWe recommend that you enable the system firewall on the Domain Profile, Private Profile, and Public Profile tabs.
Disable the system firewall
After you disable the system firewall on a Windows ECS instance, the firewall no longer controls the inbound and outbound network traffic of the instance.
In the Windows Defender Firewall with Advanced Security window, click Windows Defender Firewall Properties.
NoteFor information about how to open the Windows Defender Firewall with Advanced Security window, see the Check the status of the system firewall section of this topic.
Select Off from the Windows state drop-down list and click Apply to disable the system firewall.
NoteWe recommend that you disable the system firewall on the Domain Profile, Private Profile, and Public Profile tabs.
Configure firewall rules
After you enable the system firewall, you need to configure firewall rules to control specific access. This section describes how to add a port rule and a predefined rule in the system firewall on a Windows ECS instance to allow access to the instance. You can configure firewall rules in the system firewall based on your business requirements. For more information about configuring firewall policies, see Configure firewall rules for an ECS instance that runs Windows Server.
Method 1: Add a port rule
Configure an inbound firewall rule to open the Remote Desktop Services (RDS) port to allow access to the Windows ECS instance. The default RDS port is TCP port 3389.
If you changed the RDS port number, use the actual RDS number to configure an inbound firewall rule in the system firewall.
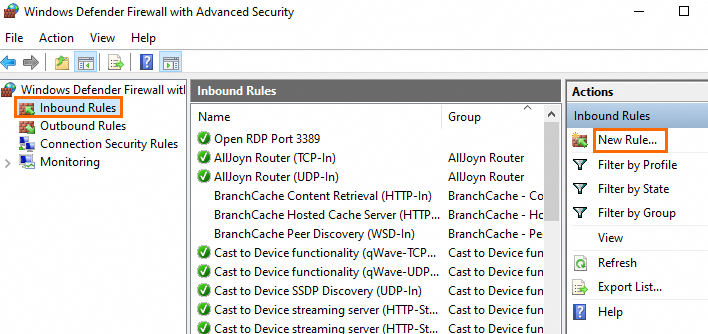
In the left-side navigation pane of the Windows Defender Firewall with Advanced Security window, click Inbound Rules. Then, click New Rule... in the Actions pane.
NoteFor information about how to open the Windows Defender Firewall with Advanced Security window, see the Check the status of the system firewall section of this topic.
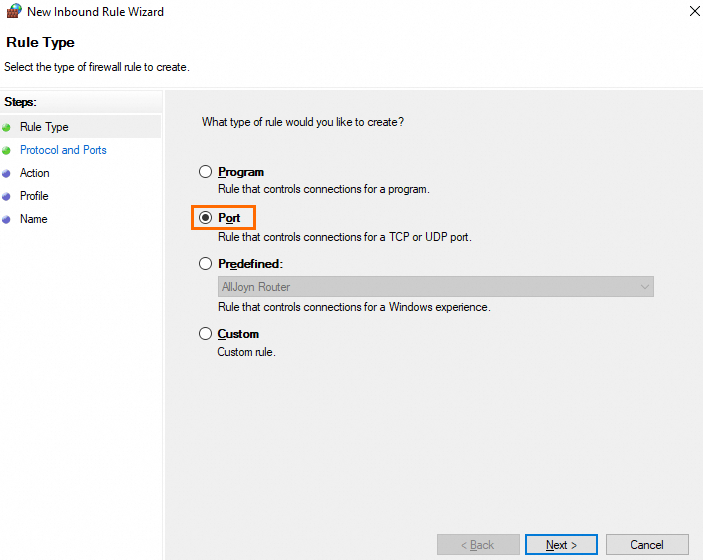
On the Rule Type page of the New Inbound Rule Wizard window, select Port and click Next.
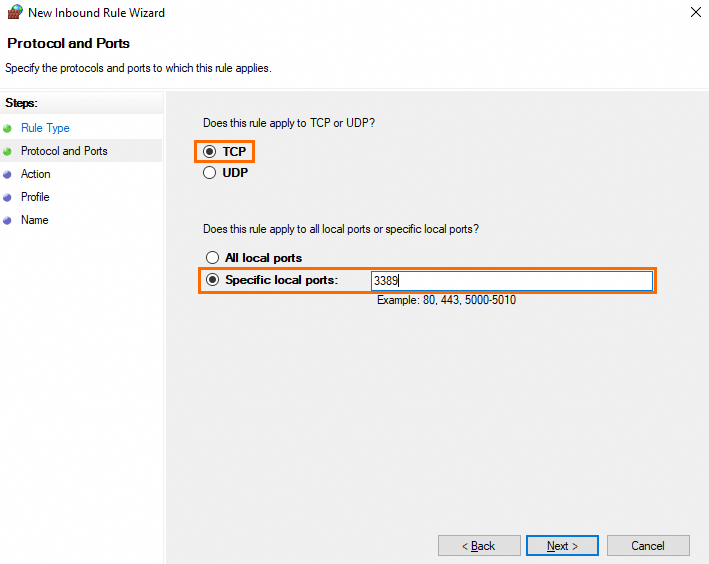
On the Protocol and Ports page, select TCP, enter a port number in the Specific local ports field, and then click Next.
NoteSpecify the actual RDS port number. The default RDS port number is 3389.
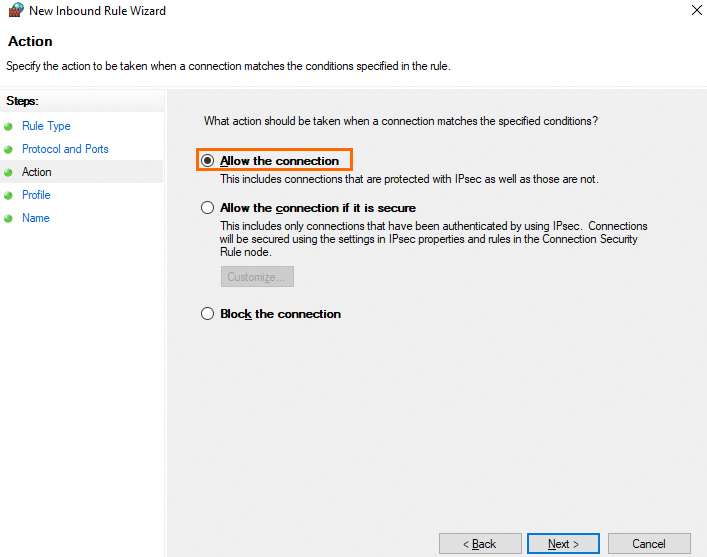
On the Action page, select Allow the connection and click Next.
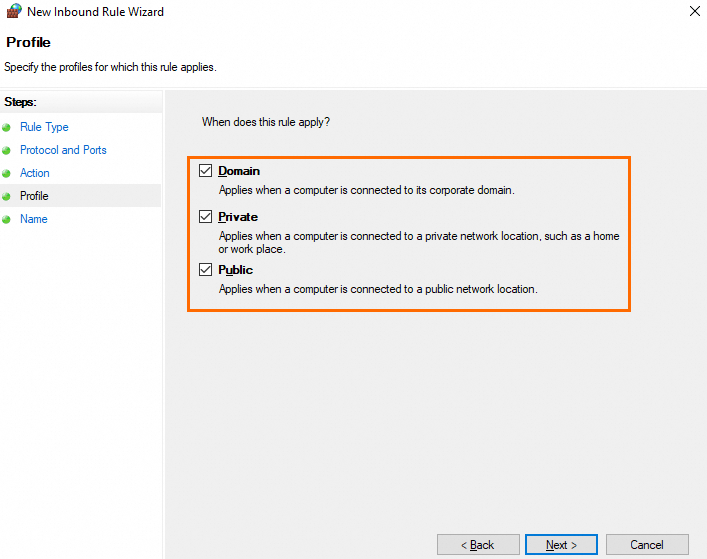
On the Profile page, use the default settings and click Next.
On the Name page, specify a name for the rule, such as
RemoteDesktop, and click Finish.Configure the scope.
Configure the scope of the firewall rule to apply the rule to network traffic only from specific IP addresses. After you configure the scope of the firewall rule, only the IP addresses specified in the scope can connect to the Windows ECS instance.
In the Windows Firewall with Advanced Security window, right-click the
RemoteDesktopinbound firewall rule that you created in the middle pane and select Properties.
On the Scope tab, select These IP addresses: in the Remote IP address section, click Add... to add one or more IP addresses or CIDR blocks, such as the public IP address of your computer, and then click OK.
ImportantIf you want to use Workbench to connect to the Windows ECS instance, add
47.96.60.0/24and118.31.243.0/24to the scope.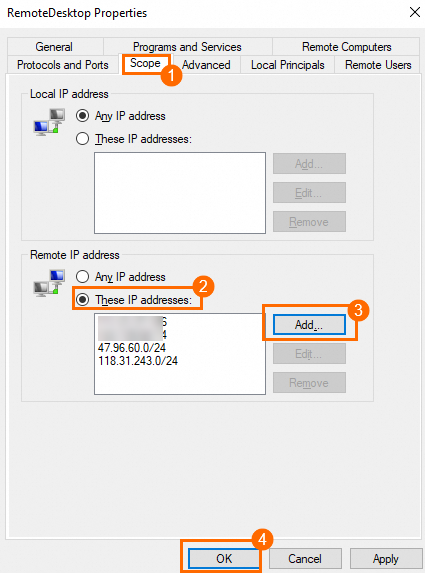
Connect to the Windows ECS instance. In the Computer field, enter the IP address and the RDS port number of the Windows ECS instance in the <IP address>:<RDS port number> format. Click Show options, and then enter a username of the Windows ECS instance in the User name field. In this example,
192.168.1.2:3389is entered in the Computer field andAdministratoris entered in the User name field.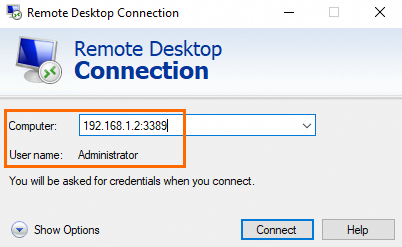
Method 2: Configure a predefined rule
Add an RDS-related inbound firewall rule from the predefined rule list to allow RDS connections to the Windows ECS instance.
You can use this method if you use the default RDS port. The default RDS port is TCP port 3389.
In the left-side navigation pane of the Windows Defender Firewall with Advanced Security window, click Inbound Rules. Then, click New Rule... in the Actions pane.
NoteFor information about how to open the Windows Defender Firewall with Advanced Security window, see the Check the status of the system firewall section of this topic.

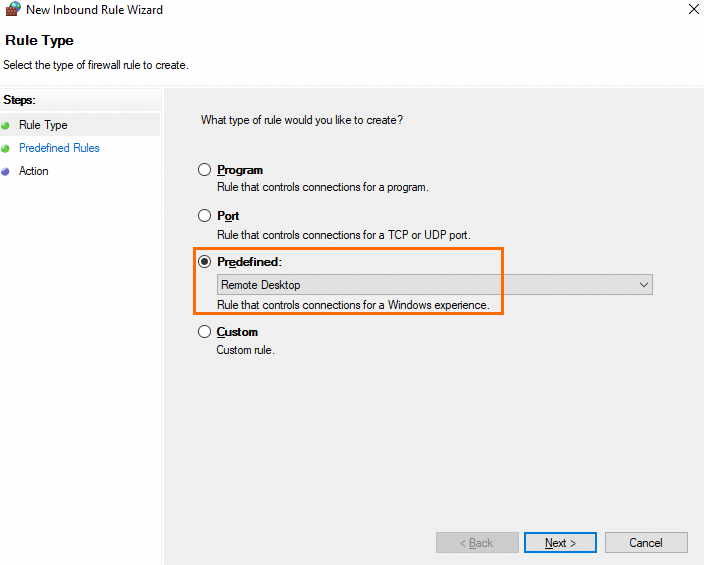
On the Rule Type page of the New Inbound Rule Wizard window, select Predefined, select Remote Desktop from the Predefined drop-down list, and then click Next.
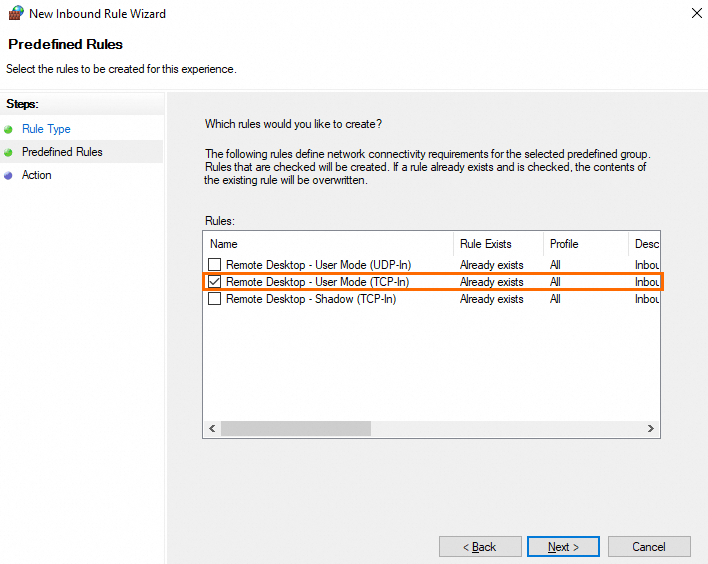
On the Predefined Rules page, select Remote Desktop - User Mode (TCP-In) and click Next.
NoteIf you use an earlier version of Windows and Remote Desktop - User Mode (TCP-In) is unavailable, select Remote Desktop (TCP-In).
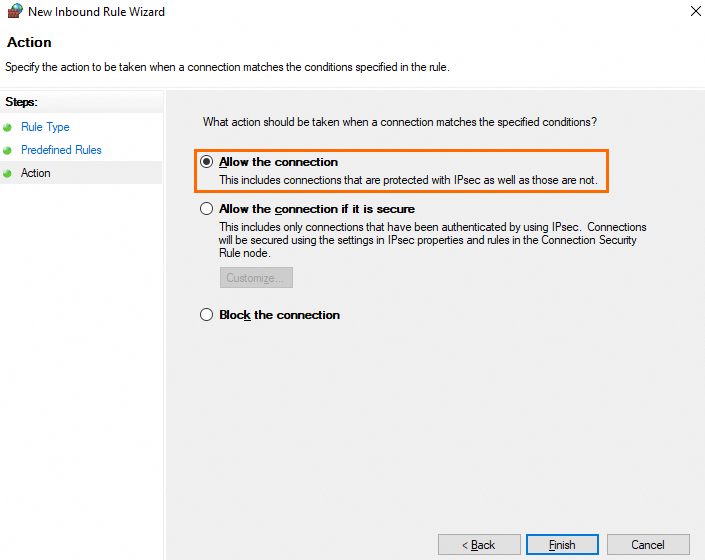
On the Action page, select Allow the connection and click Finish.
Configure the scope.
Configure the scope of the firewall rule to apply the rule to network traffic only from specific IP addresses. After you configure the scope of the firewall rule, only the IP addresses specified in the scope can connect to the Windows ECS instance.
In left-side navigation pane of the Windows Firewall with Advanced Security window, click Inbound Rules. In the middle pane, right-click the inbound firewall rule that you created and select Properties.

On the Scope tab, select These IP addresses: in the Remote IP address section, click Add... to add one or more IP addresses or CIDR blocks, such as the public IP address of your computer, and then click OK.
ImportantIf you want to use Workbench to connect to the Windows ECS instance, add
47.96.60.0/24and118.31.243.0/24to the scope.
Connect to the Windows ECS instance. In the Computer field, enter the IP address and the RDS port number of the Windows ECS instance in the <IP address>:<RDS port number> format. Click Show options, and then enter the username of the Windows ECS instance in the User name field. In this example,
192.168.1.2:3389is entered in the Computer field andAdministratoris entered in the User name field.