This topic describes how to configure a connection between a PPTP VPN server and a PPTP VPN client on a CentOS 7 instance.
Background information
Point to Point Tunneling Protocol (PPTP) is a network tunneling technology developed based on the Point to Point Protocol (PPP) to use in virtual private networks (VPNs). You can connect to a VPN over PPTP. To connect to a VPN over PPTP, dial up to the PPTP server to establish a PPP connection, perform PPTP negotiation to create a tunnel between your client and the server, and then perform PPP Network Control Protocol (NCP) negotiation to assign an IP address from the IP address range of the VPN to your client. You can use this assigned IP address to communicate within the VPN. This way, you can establish a secure tunnel or connection to a VPN over the Internet.
This topic provides examples and instructions on the preceding procedure. Operations may vary based on actual conditions. PPTP has many well-known security issues. We recommend that you evaluate these issues and their impacts on your business before you use it. For more information, see PPTP Client.
Prerequisites
An Elastic Compute Service (ECS) instance is created. For more information, see Create an instance by using the wizard.
The example in this topic uses an ECS instance that has the following configurations. To prevent command errors caused by operating system version issues, we recommend that you use the same operating system that is used in the example.
Instance type: ecs.c6.large
Operating system: CentOS 7.2 public image
Network type: Virtual Private Cloud (VPC)
IP address: a public IP address
A rule is configured in a security group of the instance to allow traffic on TCP port 1723. This port is required to configure PPTP VPNs. For more information, see Add a security group rule.
Configure a PPTP VPN server
Perform the following steps to configure a PPTP VPN server:
Connect to the instance.
For more information, see Connection methods.
Run the following command to install a PPTP VPN server:
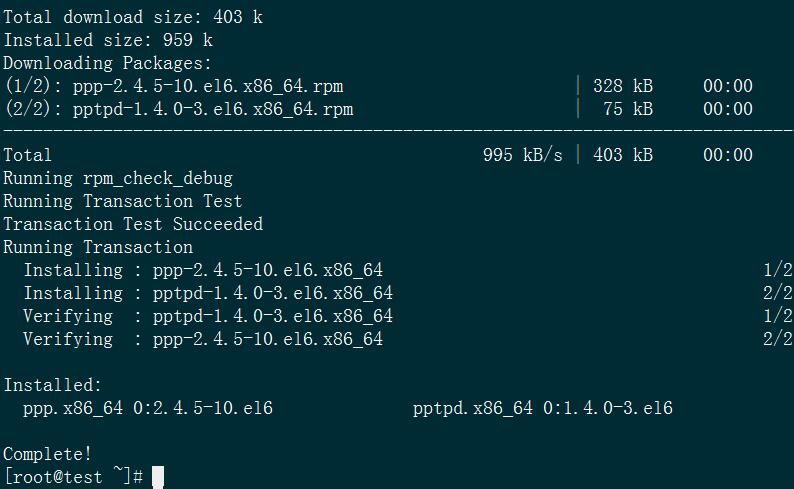
yum install -y ppp pptpdIf a command output similar to the one in the following figure is returned, it indicates that the PPTP server is installed.
Edit the pptpd configuration file.
Run the
vi /etc/pptpd.confcommand to edit the pptpd configuration file. Then, delete the number sign (#) from the following commands to allow them to run. Run the:wqcommand to save and close the file.#localip 192.168.0.1 #remoteip 192.168.0.234-238,192.168.0.245If a command output similar to the one in the following figure is returned, it indicates that the pptpd configuration file is edited.
 Note
Notelocalip specifies the IP address of the VPN gateway, and remoteip specifies the IP address range that is obtained after a dial-up to a VPN. You can set these parameters based on your needs.
Run the
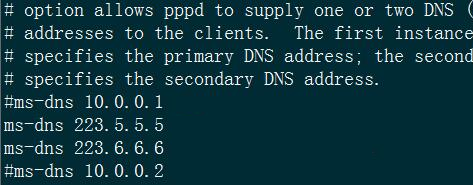
vi /etc/ppp/options.pptpdcommand and then set ms-dns to223.5.5.5and223.6.6.6. Run the:wqcommand to save the modification and exit.#ms-dns 10.0.0.1 #ms-dns 10.0.0.2 ms-dns 223.5.5.5 ms-dns 223.6.6.6Note223.5.5.5 and 223.6.6.6 are the IP addresses of Alibaba Cloud public DNS servers. You can set ms-dns to the IP addresses of other DNS servers based on your needs.
If a command output similar to the one in the following figure is returned, it indicates that ms-dns is set.
Run the
vi /etc/ppp/chap-secretscommand to configure usernames and passwords for the PPTP daemon (pptpd). Add accounts based on your needs. Separate each account with a line break. Add account information in the<Username> pptpd <Password> <IP address>format, and separate the variables with spaces. Run the:wqcommand to save the modification and exit.NoteExample: test pptpd 123456 *. The asterisk (*) indicates all IP addresses.
# Secrets for authentication using CHAP
# client server secret IP addresses
test pptpd 123456 *
If a command output similar to the one in the following figure is returned, it indicates that a username and password are configured for pptpd.

Run the
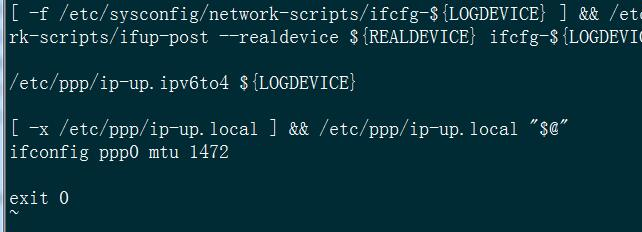
vi /etc/ppp/ip-upcommand to set the maximum transmission unit (MTU). Below the[ -x /etc/ppp/ip-up.local ] && /etc/ppp/ip-up.local "$@"line, addifconfig ppp0 mtu 1472./etc/ppp/ip-up. ipv6to4 ${LOGDEVICE} [ -x /etc/ppp/ip-up.local ] && /etc/ppp/ip-up.local "$@" ifconfig ppp0 mtu 1472If a command output similar to the one in the following figure is returned, it indicates that the MTU is set.

Configure kernel parameters.
Run the
vi /etc/sysctl.confcommand to edit the sysctl configuration file. Add thenet.ipv4.ip_forwardparameter, set it to 1, and then run the:wqcommand to save and close the file.If a command output similar to the one in the following figure is returned, it indicates that the parameter is added and set.

Run the
sysctl -pcommand to make the parameter take effect.
Add firewall rules.
Run the following command to add an iptables forwarding rule:
iptables -t nat -A POSTROUTING -s 192.168.0.0/24 -j MASQUERADERun the following command to add a NAT forwarding rule. Replace
XXX.XXX.XXX.XXXwith the public IP address of your instance.iptables -t nat -A POSTROUTING -s 192.168.0.0/255.255.255.0 -j SNAT --to-source XXX.XXX.XXX.XXXRun the following command to save the rules:
service iptables saveIf a command output similar to the one in the following figure is returned, it indicates that the rules are saved.
iptables: Saving firewall rules to /etc/sysconfig/iptables:[ OK ]If a command output similar to the one in the following figure is returned, it indicates that the command failed to run.
The service command supports only basic LSB actions (start, stop, restart, try-restart, reload, force-reload, status). For other actions, please try to use systemctl.NoteThis issue occurs because the iptables service is not installed on the ECS instance. You must install the iptables service before you run the
service iptables savecommand. Perform the following operations.
(Optional) Install and configure the iptables service.
Run the following commands in sequence to disable the firewall:
systemctl stop firewalld
systemctl mask firewalld
Run the following command to install the iptables service:
yum install iptables-servicesRun the following command to configure the iptables service to start on instance startup:
systemctl enable iptablesRun the following command to restart the iptables service:
systemctl restart iptablesRun the
service iptables savecommand to check whether the rules are saved.
Configure PPTP
Run the following command to restart PPTP.
NoteSince PPTP is not running, you are prompted with the
Shutting down pptpd [FAILED]message and an alert when you try to restart PPTP. You can ignore the message and alert and run this command again to restart PPTP. No messages or alerts appear this time.systemctl restart pptpdRun the following command to restart iptables:
systemctl start iptablesRun the following commands in sequence to configure pptpd and iptables to start on instance startup:
systemctl enable pptpd.service
systemctl enable iptables.service
After you complete the preceding steps, the PPTP VPN server is installed. You can configure new connections or networks in the Network and Sharing Center of your Windows client and then use the VPN to access the networks.
Configure a PPTP VPN client
Run the following command to install PPTP:
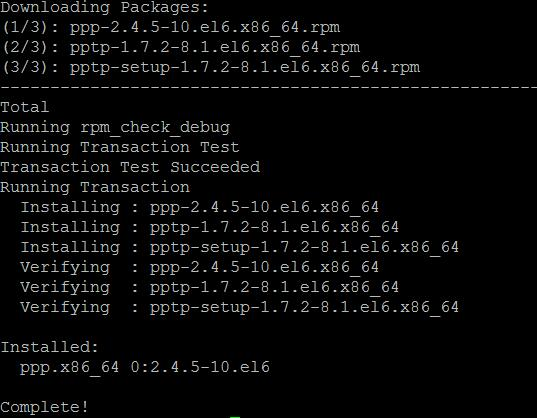
yum install -y ppp pptp pptp-setupIf a command output similar to the one in the following figure is returned, it indicates that PPTP is installed.
Run the following command to connect to the PPTP VPN server:
pptpsetup --create test --server [$IP] --username [$User] --password [$Password] --encrypt --startNoteSet [$IP], [$User], and [$Password] to the IP address, username, and password of the PPTP VPN server.
If a command output similar to the one in the following figure is returned, it indicates that you are connected to the PPTP VPN server.

When you are prompted that
192.168.0.234is assigned to your client, run the following command. You can find the ppp0 network interface controller (NIC) in the command output.ifconfig | grep -A 10 pppIf a command output similar to the one in the following figure is returned, it indicates that the command is run.

Run the following command to add a default route:
ip route replace default dev ppp0If a command output similar to the one in the following figure is returned, it indicates that the command is run.
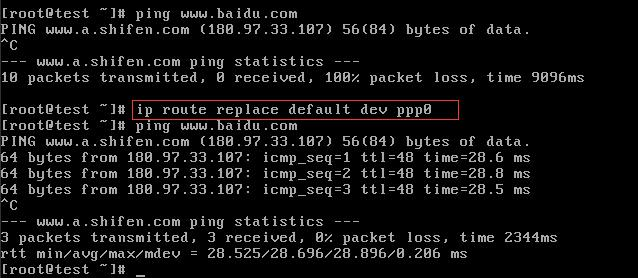
After the default route is added, you can access the PPTP VPN server.
FAQ
What do I do if I cannot open a website in a browser?
After you set up a PPTP VPN, establish a connection, and successfully ping the domain name of the website, but still cannot open the website in your browser, your MTU settings may be invalid. You can use one of the following methods to resolve this issue.
Method 1
Connect to the CentOS server on which the VPN is configured.
Run the
ifconfig ppp0 mtu 1472command.Check whether the website can be opened in your browser.
NoteMethod 1 can only resolve the issue temporarily. To resolve the issue permanently, use method 2.
Method 2
Connect to the CentOS server on which the VPN is configured.
Run the
vi /etc/ppp/ip-upcommand to open the/etc/ppp/ip-upfile.Add the
ifconfig ppp0 mtu 1472command to the/etc/ppp/ip-upfile.If a webpage in the following figure is displayed, it indicates that the issue is resolved.
Check whether the website can be opened in your browser.
What do I do if an incorrect IP address is obtained?
After you connect to a VPN from a client, you obtain the internal NIC IP address of your instance, instead of an IP address assigned by the VPN server. Assume that your VPN client is named testvpn. Perform the following operations to resolve this issue.
Procedure
Connect to the CentOS server on which the VPN is configured.
Run the
vi /etc/ppp/peers/testvpncommand to open the/etc/ppp/peers/testvpnconfiguration file of the PPP client. Add thenoipdefaultparameter, as shown in the following figure.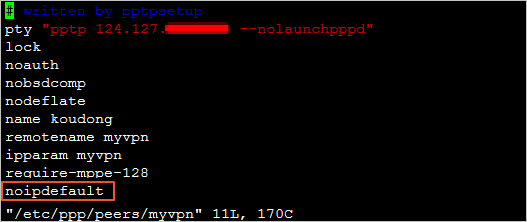
Run the following commands to restart the client. After you reconnect to the VPN, you can obtain the correct IP address.
poff testvpn pon testvpnNoteWhen you restart the client, the
noipdefaultparameter may be overwritten by a parameter that is passed in from the server. If thenoipdefaultparameter is overwritten, you must check the configurations of the server.