The DataWorks Open Platform provides open capabilities, such as OpenEvent and OpenAPI. You can use the Open Platform to integrate a third-party scheduling system with DataWorks and embed tasks from the third-party system into a DataWorks workflow. This topic uses an example to describe the key configurations for integrating a third-party scheduling system.
Background information
If your primary data processing flow is in DataWorks but you need to integrate a scheduling task from another scheduling system, you can use the DataWorks Open Platform and an HTTP trigger node. The following figure shows the process.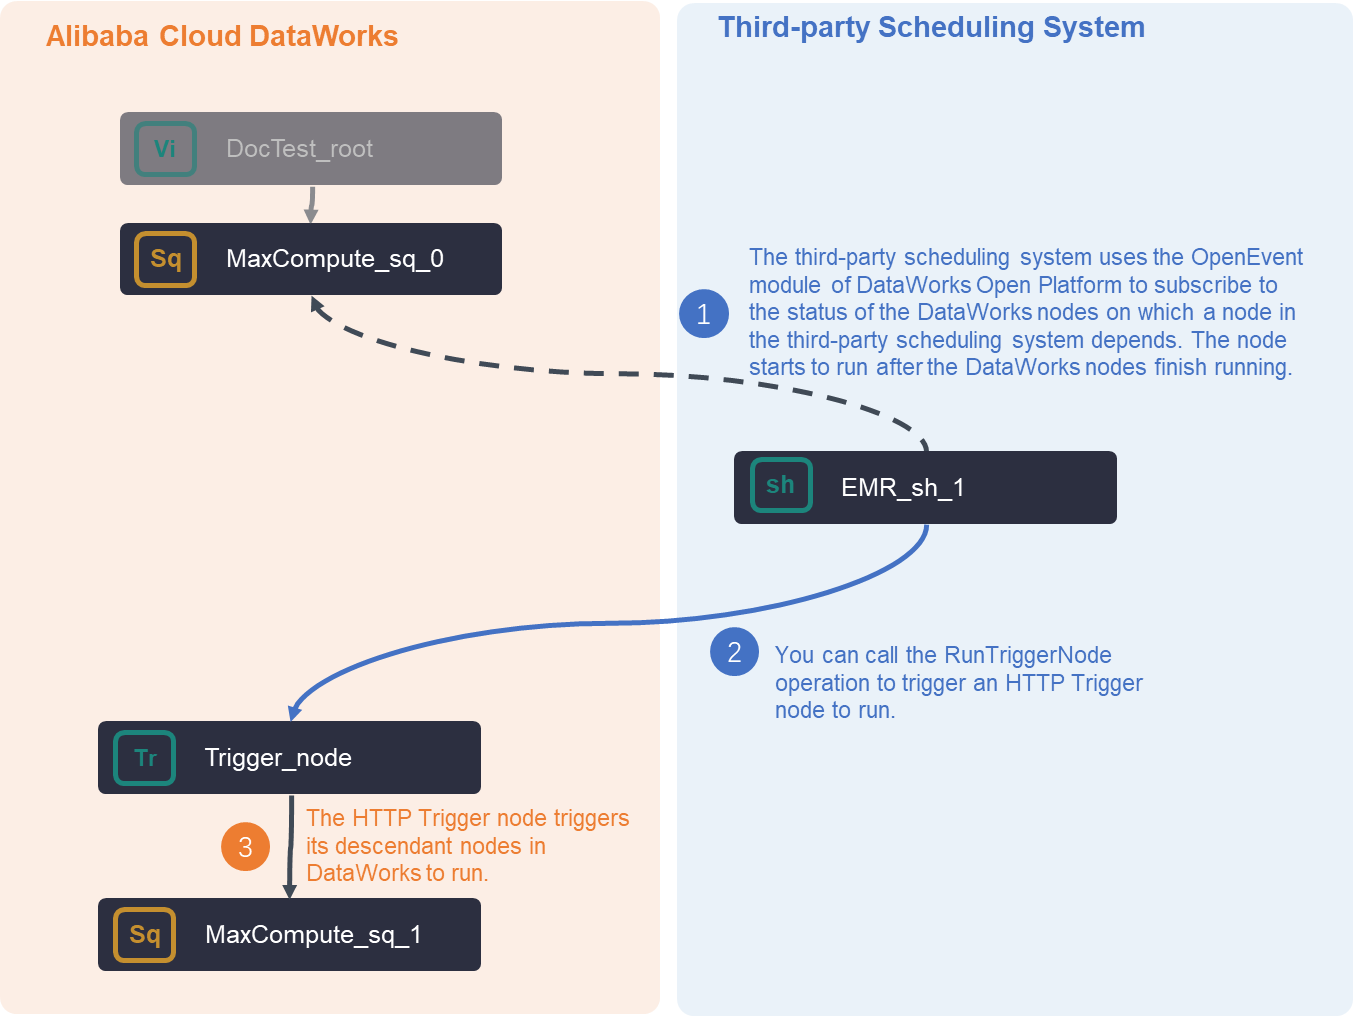 After you integrate the third-party scheduling system, the overall task execution flow is as follows.
The third-party scheduling system can use the OpenEvent feature of DataWorks to subscribe to the status of dependent DataWorks nodes. When the dependent nodes finish running, the tasks in the third-party scheduling system can start.
When the tasks in the third-party system finish running, you can call the DataWorks RunTriggerNode API to trigger an HTTP trigger node. The HTTP trigger node then triggers its descendant nodes in DataWorks to run.
The key DataWorks features and concepts used include the following:
The following sections use an example to describe the main workflow for this integration.
DataWorks configuration: Enable and configure message subscription (OpenEvent)
For detailed instructions on how to enable and configure message subscription, see Enable message subscription. This section describes the core configuration process and important considerations for this best practice.
Step 1: Configure a custom bus
This section describes the core configuration steps and precautions for configuring a custom bus. For more information about how to enable and configure event message subscription, see Enable event message subscription.
Log on to the EventBridge console. In the left-side navigation pane, click Event Buses.
In the upper-right corner of the Event Buses page, click Quickly Create to create a custom bus.
In the left-side navigation pane, click Event Buses. On the Event Buses page, find the custom bus that you created and click its name. The Overview page of the custom bus appears.
In the left-side navigation pane, click Event Rules. On the page that appears, click Create Rule to create an event rule.
In this example, the custom bus is configured to receive node committing event messages and node deployment event messages. The following content provides an example on how to configure a demo and the core parameters for the event rule:
Configure Basic Info: In this step, you must configure the Name parameter.
Configure Event Pattern:
Event Source Type: Set it to Custom Event Source.
Event Source: Leave this parameter empty.
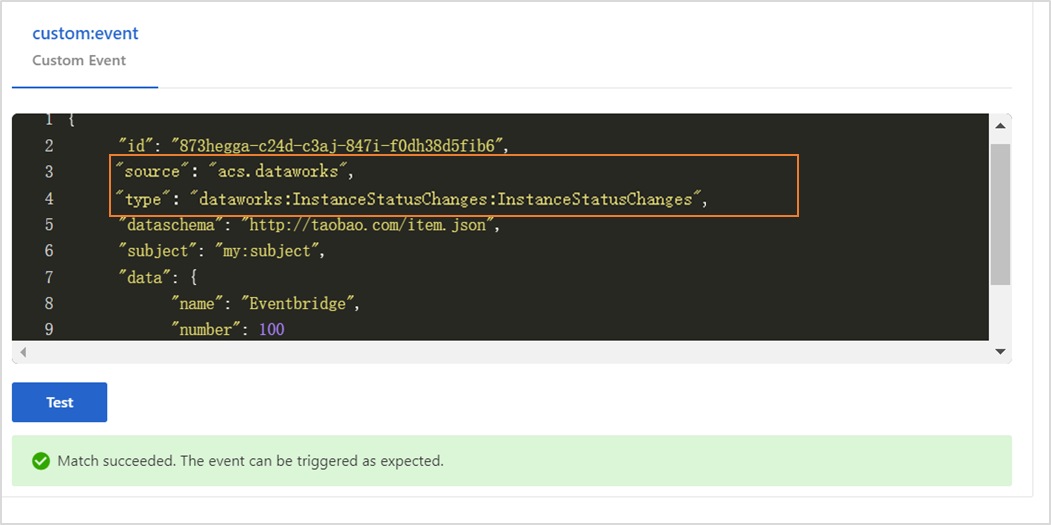
Pattern Content: Configure this parameter in the JSON format. Enter the following content.
{ "source": [ "acs.dataworks" ], "type": [ "dataworks:InstanceStatusChanges:InstanceStatusChanges" ] }source: the identifier of the service in which an event occurs. Set this parameter to acs.dataworks.
type: the type of the event that occurs in the service. Set this parameter to dataworks:InstanceStatusChanges:InstanceStatusChanges.
Event Pattern Debugging: You can change the values of the source and type parameters in this section and then click Test. If the test is successful, click Next Step.
Configure Targets:
Service Type: Set it to HTTPS or HTTP. For more information about service types, see Manage event rules.
URL: Enter the URL for receiving messages pushed by the custom bus, such as
https://Server address:Port number/event/consumer.Body: Set it to Complete Event.
Network Type: Set it to Internet.

Step 2: Configure an event distribution channel
Go to the Developer Backend tab.
Log on to the DataWorks console. In the top navigation bar, select the desired region. In the left-side navigation pane, choose . On the page that appears, click Go to Open Platform. The Developer Backend tab appears.
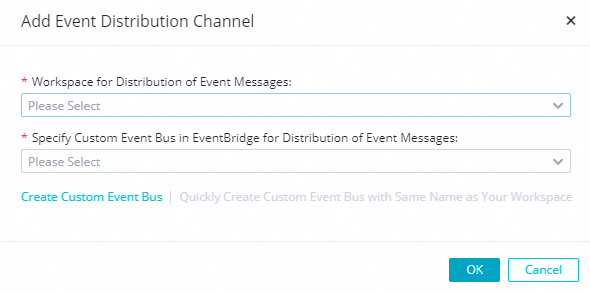
In the left-side navigation pane of the Developer Backend page, click OpenEvent. On the page that appears, click Add Event Distribution Channel. In the Add Event Distribution Channel dialog box, configure the parameters.
Workspace for Distribution of Event Messages: Select a workspace.
Specify Custom Event Bus in EventBridge for Distribution of Event Messages: Select the event bus that you created in Step 1.
After you save the event distribution channel, find the event distribution channel on the OpenEvent page and click Enable in the Actions column.
Third-party system configuration: Develop logic to trigger third-party tasks
After you subscribe to the dependent DataWorks nodes, you must configure the third-party scheduling system to trigger tasks based on the DataWorks instance status. When the system receives a notification that the dependent DataWorks nodes have run successfully, it starts the tasks in the third-party system. The following sample code shows an example configuration.
package com.aliyun.dataworks.demo;

import com.alibaba.fastjson.JSON;
import com.alibaba.fastjson.JSONObject;
import com.aliyun.dataworks.services.LocalScheduleEventService;
import com.aliyun.dataworks.utils.Constants;
import org.springframework.beans.factory.annotation.Autowired;
import org.springframework.web.bind.annotation.PostMapping;
import org.springframework.web.bind.annotation.RequestBody;
import org.springframework.web.bind.annotation.RequestMapping;
import org.springframework.web.bind.annotation.RestController;

/**
 * @author dataworks demo
 */
@RestController
@RequestMapping("/event")
public class EventController {
  @Autowired
  private LocalScheduleEventService localScheduleEventService;

  /**
   * Receive messages pushed from EventBridge.
   *
   * @param jsonParam
   */
  @PostMapping("/consumer")
  public void consumerEventBridge(@RequestBody String jsonParam) {
    JSONObject jsonObj = JSON.parseObject(jsonParam);
    String eventCode = jsonObj.getString(Constants.EVENT_CODE_FILED);
    if (Constants.INSTANCE_STATUS_EVENT_CODE.equals(eventCode)) {
      JSONObject dataParam = JSON.parseObject(jsonObj.getString("data"));
      // The specific time when the scheduled task instance started to wait.
      System.out.println("beginWaitTimeTime: " + dataParam.getString("beginWaitTimeTime"));
      // DagId
      System.out.println("dagId: " + dataParam.getString("dagId"));
      // The type of the DAG. Valid values:
      // 0: Recurringly scheduled task
      // 1: One-time task
      // 2: Smoke testing
      // 3: Data backfill
      // 4: Manually triggered workflow
      // 5: Temporary workflow
      System.out.println("dagType: " + dataParam.getString("dagType"));
      // The scheduling type of the task instance. Valid values:
      // NORMAL(0): A normally scheduled task. This task is scheduled daily.
      // MANUAL(1): A one-time task. This task is not scheduled daily.
      // PAUSE(2): A frozen task. This task is scheduled daily, but its status is directly set to failed when the scheduling starts.
      // SKIP(3): A dry-run task. This task is scheduled daily, but its status is directly set to successful when the scheduling starts.
      // SKIP_UNCHOOSE(4): A task that is not selected in a temporary workflow. This type of task exists only in temporary workflows. Its status is directly set to successful when the scheduling starts.
      // SKIP_CYCLE(5): A weekly or monthly task whose scheduling cycle has not yet arrived. This task is scheduled daily, but its status is directly set to successful when the scheduling starts.
      // CONDITION_UNCHOOSE(6): An upstream instance has a branch (IF) node, but this descendant node is not selected by the branch node. The task is directly set as a dry-run task.
      // REALTIME_DEPRECATED(7): A recurring instance that is generated in real time but has expired. The status of this type of task is directly set to successful.
      System.out.println("taskType: " + dataParam.getString("taskType"));
      // The time when the task instance was modified.
      System.out.println("modifyTime: " + dataParam.getString("modifyTime"));
      // The time when the task instance was created.
      System.out.println("createTime: " + dataParam.getString("createTime"));
      // The ID of the workspace. You can call ListProjects to view the workspace ID.
      System.out.println("appId: " + dataParam.getString("appId"));
      // The ID of the tenant for the workspace where the scheduled task instance resides.
      System.out.println("tenantId: " + dataParam.getString("tenantId"));
      // The operation code of the scheduled task instance. This field can be ignored.
      System.out.println("opCode: " + dataParam.getString("opCode"));
      // The ID of the workflow. The workflow ID for a recurring task instance is 1 by default. For a manually triggered workflow or an internal workflow task instance, this is the actual workflow ID.
      System.out.println("flowId: " + dataParam.getString("flowId"));
      // The ID of the node corresponding to the scheduled task instance.
      System.out.println("nodeId:" + dataParam.getString("nodeId"));
          // The specific time when the scheduled task instance started to wait for resources.
          System.out.println("beginWaitResTime: " + dataParam.getString("beginWaitResTime"));
          // The scheduled task instance ID.
          System.out.println("taskId: " + dataParam.getString("taskId"));
          // The status of the task. Valid values:
          // 0 (Not Running)
          // 2 (Waiting for the scheduled time specified by dueTime or cycleTime)
          // 3 (Waiting for Resources)
          // 4 (Running)
          // 7 (Sent to Data Quality for data validation)
          // 8 (Checking branch conditions)
          // 5 (Failed)
          // 6 (Successful)
          System.out.println("status: " + dataParam.getString("status"));

          // After subscribing to the node completion event from DataWorks, trigger the local scheduling node to run.
          localScheduleEventService.triggerLocalNode(dataParam);
      } else {
          System.out.println("Failed to filter other events. Check the configuration steps.");
      }
  }
}
DataWorks configuration: Create an HTTP trigger node
After the task in the third-party system runs successfully, you must call the DataWorks RunTriggerNode API to trigger an HTTP trigger node. The HTTP trigger node then triggers its descendant nodes. Therefore, you must create an HTTP trigger node as needed.
For more information about HTTP trigger nodes and how to create them, see HTTP trigger node.
Third-party system configuration: Develop logic to trigger the HTTP trigger node
The following sample code shows how a third-party system calls the RunTriggerNode API to trigger an HTTP trigger node.
Sample implementation of the
HttpTriggerNodeServiceclass.package com.aliyun.dataworks.services; import com.aliyun.dataworks_public20200518.models.RunTriggerNodeRequest; import com.aliyun.dataworks_public20200518.models.RunTriggerNodeResponse; import org.springframework.beans.factory.annotation.Autowired; import org.springframework.stereotype.Service; /** * @author dataworks demo */ @Service public class HttpTriggerNodeService { @Autowired private DataWorksOpenApiClient dataWorksOpenApiClient; /** * @return */ public boolean triggerNode(Long appId, Long nodeId, Long bizDate, Long cycleTime) { try { RunTriggerNodeRequest runTriggerNodeRequest = new RunTriggerNodeRequest(); // Set NodeId, which is the ID of the trigger node. You can obtain the node ID by calling the ListNodes API. runTriggerNodeRequest.setNodeId(nodeId); // Set CycleTime, which is the UNIX timestamp for the runtime of the trigger node's task. You must convert the runtime specified for the node in the scheduling configuration of the HTTP trigger node into a timestamp. // If the HTTP trigger node and the scheduling system are in different time zones, configure the time based on the time zone of the trigger node. // For example, if the HTTP trigger node is in the China (Beijing) region and its Cyctime is 18:00 (UTC+8), but the scheduling system is in the US (West) region, you must configure the timestamp corresponding to 18:00 (UTC+8). runTriggerNodeRequest.setCycleTime(cycleTime); // Set BizDate, which is the data timestamp of the trigger node instance. You must convert the data timestamp into a UNIX timestamp. // The data timestamp is for the day before the runtime and is accurate to the day (the time part is 00:00:00). For example, if the runtime is November 25, 2020, the business time is 2020112400000000. Convert this time into a UNIX timestamp. // If the HTTP trigger node and the scheduling system are in different time zones, configure the time based on the time zone of the trigger node. runTriggerNodeRequest.setBizDate(bizDate); // Set AppId (appId=projectId), which is the ID of the DataWorks workspace to which the trigger node belongs. You can find the projectId corresponding to the node by calling GetNode. runTriggerNodeRequest.setAppId(appId); RunTriggerNodeResponse runTriggerNodeResponse = dataWorksOpenApiClient.createClient().runTriggerNode(runTriggerNodeRequest); System.out.println(runTriggerNodeResponse.getBody().getRequestId()); return runTriggerNodeResponse.getBody().getSuccess(); } catch (Exception e) { e.printStackTrace(); } return false; } }Sample run of the third-party scheduling state machine.
    @Scheduled(cron = "0 0/30 * * * ? ")
    public void schedule() {
        //TODO: Simulate local scheduling to call the recurring node of DataWorks through the HTTP trigger node.
        triggerDwScheduleNode();
    }
Sample implementation of the
triggerDwScheduleNodemethod/** * This example uses a trigger node with a daily scheduling frequency to show how to obtain the parameter information required to call the trigger node. */ public void triggerDwScheduleNode() { Date gmtDate = getTimeByZeroEnd(new Date()); GregorianCalendar gc = (GregorianCalendar) GregorianCalendar.getInstance(); gc.setTime(gmtDate); gc.add(Calendar.DATE, -1); Long bizDate = gc.getTimeInMillis(); GetNodeResponseBody.GetNodeResponseBodyData node = nodeService.getNode(nodeId); if (node != null) { String bizDateStr = getTimeInExpress(gc.getTime(), "yyyy-MM-dd HH:mm:ss"); ListInstancesResponseBody.ListInstancesResponseBodyData instances = nodeService.getInstance(nodeId, node.getProjectId(), bizDateStr); if (!CollectionUtils.isEmpty(instances.getInstances())) { ListInstancesResponseBody.ListInstancesResponseBodyDataInstances instance = instances.getInstances().get(0); httpTriggerNodeService.triggerNode(node.getProjectId(), node.getNodeId(), bizDate, instance.getCycTime()); } } }
Deploy and run locally
Download the project:
Prerequisites: Java 8 or later and the Maven build tool.
Project download link: schedule-integration-demo.zip.
After you download the project, go to the root directory of the project and run the following command:
mvn clean package -Dmaven.test.skip=true spring-boot:repackageAfter you obtain the runnable JAR package, run the following command:
java -jar target/schedule-integration-demo-1.0.jarAfter the command runs, enter http://localhost:8080/index in your browser. If "hello world!" is returned, the application has been deployed successfully.