This topic describes how to add a Data Lake Analytics (DLA) data source.
Background information
Workspaces in standard mode support the data source isolation feature. You can add data sources separately for the development and production environments to isolate the data sources. This helps keep your data secure. For more information, see Isolate a data source in the development and production environments.Procedure
- Go to the Data Source page.
- Log on to the DataWorks console.
- In the left-side navigation pane, click Workspaces.
- In the top navigation bar, select the region in which the workspace you want to manage resides. On the Workspaces page, find the workspace, move the pointer over the
 icon in the Actions column, and then select Workspace Settings.
 - In the left-side navigation pane of the page that appears, click Data Source to go to the Data Source page.
Note You can also go to the Data Sources page in Data Integration to add a data source. However, you can add a data source on the Data Sources page in Data Integration only to the production environment. - On the Data Source page, click Add data source in the upper-right corner.
- In the Add data source dialog box, click Data Lake Analytics(DLA) in the Big Data Storage section.
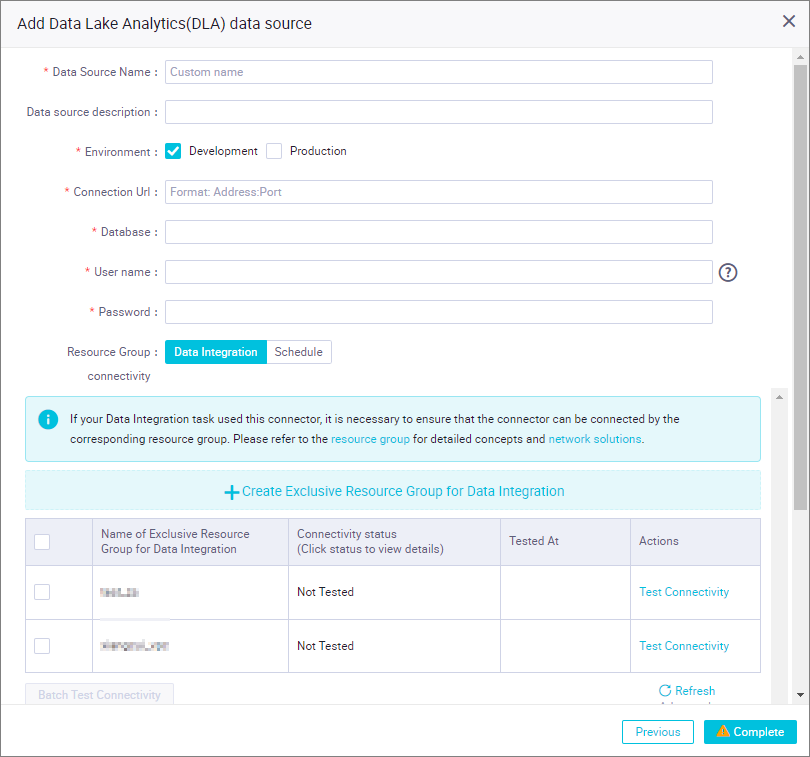
- In the Add Data Lake Analytics(DLA) data source dialog box, configure the parameters.

Parameter Description Data Source Name The name of the data source. The name can contain letters, digits, and underscores (_) and must start with a letter. Data source description The description of the data source. The description can be a maximum of 80 characters in length. Environment The environment in which the data source is used. Valid values: Development and Production. Note This parameter is displayed only when the workspace is in standard mode.Connection Url The URL of the DLA database. Specify this parameter in the format of Address:Port number.Database The name of the DLA database. User name The username that is used to connect to the database. Password The password that is used to connect to the database. - Set Resource Group connectivity to Data Integration.
- Find the desired resource group in the resource group list in the lower part of the dialog box and click Test connectivity in the Actions column. A synchronization node can use only one type of resource group. To ensure that your synchronization nodes can be normally run, you must test the connectivity of all the resource groups for Data Integration on which your synchronization nodes will be run. If you want to test the connectivity of multiple resource groups for Data Integration at a time, select the resource groups and click Batch test connectivity. For more information, see Establish a network connection between a resource group and a data source.Note
- By default, the resource group list displays only exclusive resource groups for Data Integration. To ensure the stability and performance of data synchronization, we recommend that you use exclusive resource groups for Data Integration.
- If you want to test the network connectivity between the shared resource group or a custom resource group and the data source, click Advanced below the resource group list. In the Warning message, click Confirm. Then, all available shared and custom resource groups appear in the resource group list.
- If the data source passes the network connectivity test, click Complete.