This topic describes how to migrate data of an Internet-based application from a non-Alibaba
Cloud storage service to Alibaba Cloud Object Storage Service (OSS).
Background information
Enterprise A provides an Internet-based application that can be used to edit media
files such as images and videos. The main components of the application are deployed
in a cloud-based architecture that is provided by Enterprise B. Enterprise A uses
a cloud-based storage service that is provided by Enterprise B to store data. The
media file editing application contains approximately 100,000,000 existing files and
the total size of data is approximately 320 TB. The size of data increases by 20 GB
per day. The business scenario of the application requires a maximum bandwidth of
50 Mbit/s. OSS provides a bandwidth of 250 Mbit/s for data writes and data reads.
To grow their business, Enterprise A wants to migrate data to OSS. The existing data
and the incremental data must be migrated to OSS. To ensure that the data migration
does not interrupt the business of the application, the following requirements must
be met by the migration job:
- During the migration, customers of Enterprise A can read data.
- After the migration is complete, all data of the application is migrated to OSS and
the application can run as expected without interruptions.
Migration solution
The following migration solution is created based on the requirements and the background
information of Enterprise A:
- Use Data Online Migration to migrate the existing data to OSS. Before the migration
job is complete, the storage configuration of the application cannot be changed.
- Create pull-from-origin rules in OSS. After the existing data is migrated to OSS,
the pull-from-origin feature must be enabled. This way, customers of Enterprise A
can access incremental data that is not migrated to OSS.
- Change the data store of the application to OSS.
- After the data store of the application is changed to OSS, use Data Online Migration
to migrate the incremental data to OSS.
- After the migration is complete, you must check and make sure that all data is migrated
to OSS, and then delete the data from the source.
Step 1: Migrate the existing data
- Create an OSS bucket that is used to store the migrated data. For more information,
see Create buckets.
- Obtain the AccessKey pairs that are used to migrate the data:
- Obtain the AccessKey pair that is used to access the data source. You can log on to
the service console that is provided by Enterprise B and view the AccessKey pair.
- Obtain the AccessKey pair of the RAM user that you use to access the destination OSS
bucket. For more information, see Create a RAM user and grant permissions to the RAM user.
- In Data Online Migration console, create a migration job. For more information, see
Implement migration.
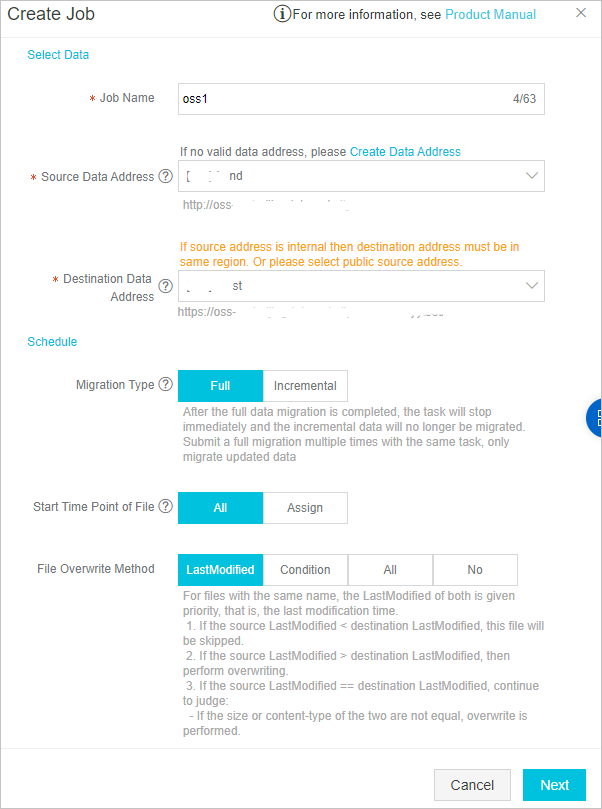
In the
Job Config step, configure the migration job. The following figure shows a sample configuration.
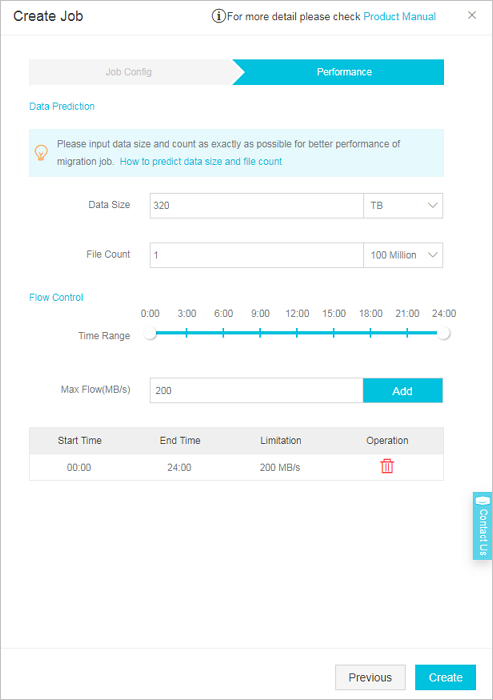
In the
Performance step, configure the parameters to control the migration performance. The following
figure shows a sample configuration.
- After the migration is complete, you can export and view the result report to check
whether all data is migrated. For information about how to obtain the result report,
see View a migration report.
Step 2: Create pull-from-origin rules
The job takes approximately 25 days to migrate the existing data. During the migration,
incremental data is generated and stored in the source bucket. To ensure business
continuity and a seamless business switchover, you must create pull-from-origin rules to enable the pull-from-origin feature. After a pull-from-origin rule is created,
OSS can fetch incremental data from the source bucket when incremental data that is
not migrated to the OSS bucket is queried.
- Log on to the OSS console.
- In the left-side navigation pane, click Buckets.
- On the Buckets page, click the name of the bucket for which you want to create a pull-from-origin
rule.
- In the left-side navigation pane, choose . In the Back-to-Origin section, click Configure.
- On the page that appears, click Create Rule. In the Create Rule panel, configure the parameters.
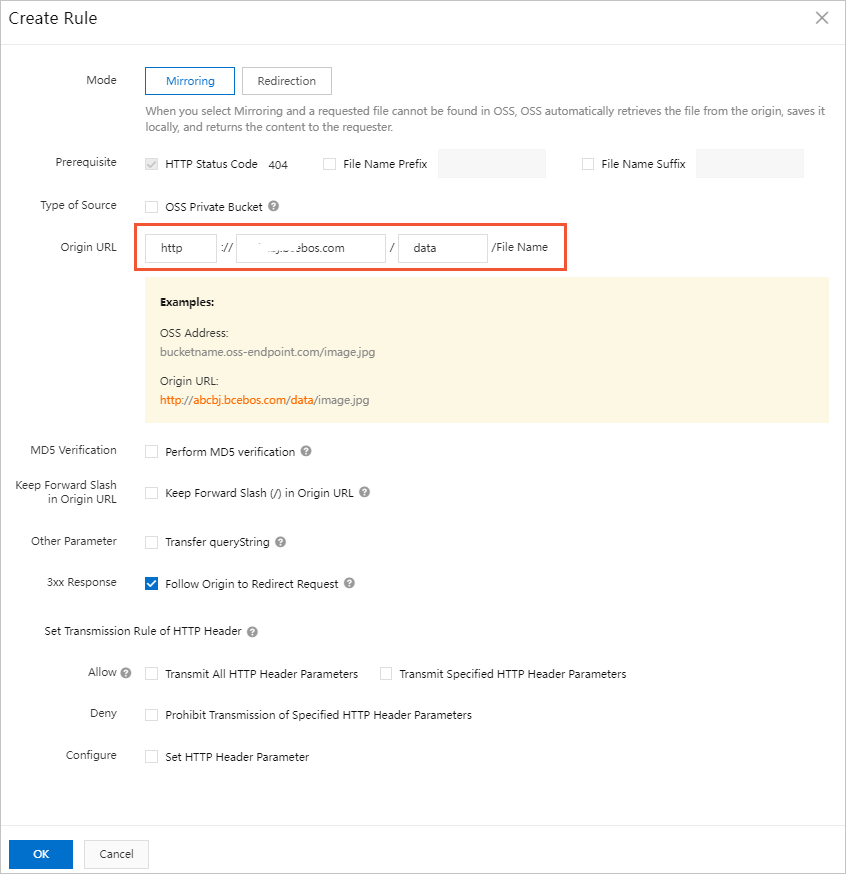
- Mode: Select Mirroring.
- Prerequisite: By default, HTTP Status Code 404 is selected. You can specify a prefix and a suffix for the names of files.
- Origin URL: Enter the URL of the source bucket.
- For more information about how to configure the parameters, see Create pull-from-origin rules.
Note You can create a maximum of five pull-from-origin rules for an OSS bucket. The created
rules take effect at the same time. If the data is migrated from multiple source buckets,
you can create multiple pull-from-origin rules and specify different prefixes for the names of files from different source buckets.
- Click OK.
Step 3: Change the data store of the application to OSS
Modify the configurations of the servers to change the URL to which the servers connect
to write and read data to the URL of the OSS bucket.
Step 4: Migrate the incremental data
During data migration, the application generates approximately 100,000 files that
contain approximately 500 GB of data. These files must be migrated to the OSS bucket.
- Create a migration job to migrate the incremental data. For more information, see
Step 1: Migrate the existing data.
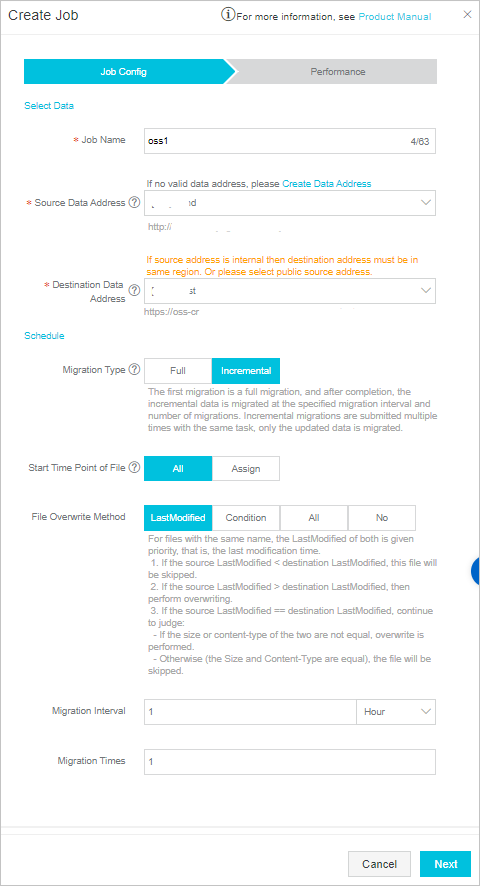
In the Job Config step, configure the migration job. The following figure shows a sample configuration.
In the
Performance step, configure the parameters to control the migration performance. The following
figure shows a sample configuration.
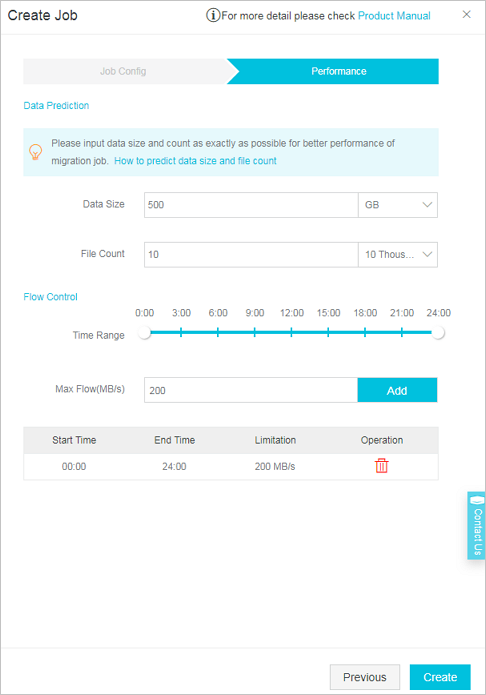
- Click Create. After the migration job is created, the system starts to migrate data.
- After the migration is complete, you can export and view the result report to check
whether all data is migrated. For information about how to obtain the result report,
see View a migration report.
Step 5: Delete the data from the source bucket
To avoid extra storage costs, you can set the lifecycle of the objects that are stored
in the source bucket to one day after all data is migrated to OSS. This way, all data
in the source bucket is deleted the next day.


 In the