Before you use Cloud Backup to back up or restore files from an on-premises NAS file system, you must install a Cloud Backup client.
Usage notes
For optimal backup performance, run the Cloud Backup client on a machine with a 64-bit CPU that has two or more cores and more than 8 GB of available memory.
The amount of data that you can back up depends on the available memory resources. For example, with 4 GB of available system memory, you can back up a maximum of 1 million files that total up to 8 TB. If a folder contains tens of millions of files or more, at least 16 GB of available memory is required.
The installation package of the 64-bit Cloud Backup client does not support the ARM64 architecture.
Before you install or uninstall the client, check the installation path for the following:
If a NAS folder is mounted on the installation path, run the umount command to unmount the NAS folder. This prevents the accidental deletion of NAS files.
If the installation path contains other important folders or files, move them to another location to prevent accidental deletion.
Before you use Cloud Backup, review its limits, default backup rate, and features available by region. For more information, see Limits, Backup and recovery speeds, Features, and Features available in each region.
Download and activate a Cloud Backup client for Windows
Log on to the Cloud Backup console.
In the navigation pane on the left, choose . In the top navigation bar, select the region where the instance is deployed. On the NAS Backup page, click Local NAS, and then click Add Client.
NoteAlibaba Cloud continuously updates Cloud Backup to support more regions. Log on to the Cloud Backup console to view the regions in which Cloud Backup is supported.

Download the Cloud Backup client for Windows.
On the Add Client panel, click the
 icon to download the installation package of the Cloud Backup client for Windows (64bit) to your local PC. Record the activation code, which is used to install and activate the Cloud Backup client.
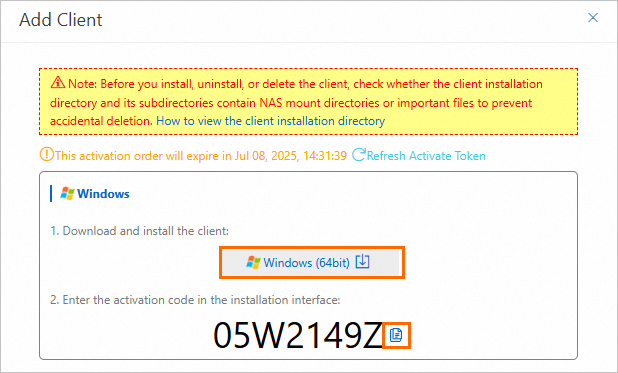
Install and activate the Cloud Backup client for Windows.
Double-click the installation package of the Cloud Backup client and select the language that you want to use.
Select the path in which you want to install the Cloud Backup client, and click Next.
Select Local client connecting to Alibaba Cloud, and click Next.
For more information, see How do I select a component and account when I install a Cloud Backup client?.
Configure the logon identity.
Files in an on-premises NAS file system are shared over a network. To back up or archive files in an on-premises NAS file system, select This User. The user must meet the following requirements:
The user has the permissions of the local administrator.
The user has the permissions to log on as a service.
To configure the logon user, perform the following steps:
Open Control Panel. In the window that appears, click Administrative Tools.
Open Local Security Policy and choose .
Turn on Log on as a service. In the dialog box that appears, add a user.
The user has the permissions to access files that are shared over a network.
For more information, see How do I select a component and account when I install a Cloud Backup client?.
If you want to use a proxy server, enter the IP address of the proxy server. Click Next.
Enter the activation code that you recorded in the Activation Token field. Then, click Next.
Click Install.
After the client is installed, view the NAS file system on the NAS File System tab of the Local NAS page.
Optional. Configure the configclustertaskfetchernum parameter of the Cloud Backup client to accelerate the execution of backup tasks. Perform the following steps:
Log on to the ECS instance.
Change the maximum number of concurrent tasks on the Cloud Backup client to 2. We recommend that you set the value to 8 or smaller. The larger the value, the more resources are consumed. We recommend that you set a reasonable value.
A backup job may be divided into multiple tasks. Use the configclustertaskfetchernum parameter to specify the maximum number of tasks that are concurrently executed on the Cloud Backup client.
The default value of the configclustertaskfetchernum parameter is 1.
Set the value of the hbrclient.yaml file's configclustertaskfetchernum parameter to 2. We recommend that you do not set the parameter to a value greater than 8.
configclustertaskfetchernum: 2NoteIn Linux, the path of hbrclient.yaml is /opt/alibabacloud/hbrclient/conf.
Restart the Cloud Backup service. Note that running tasks are affected if you restart the Cloud Backup service. We recommend that you restart the Cloud Backup service during off-peak hours.
Open the Command Prompt, enter services.msc, and then press Enter. In the Services dialog box, find and restart the Cloud Backup service.
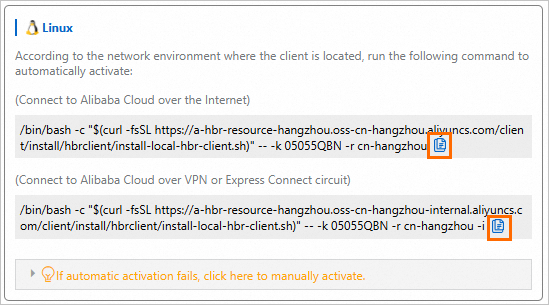
Download and activate a Cloud Backup client for Linux
Log on to the Cloud Backup console.
In the navigation pane on the left, choose . In the top navigation bar, select the region where the instance is deployed. On the NAS Backup page, click Local NAS, and then click Add Client.
NoteAlibaba Cloud continuously updates Cloud Backup to support more regions. Log on to the Cloud Backup console to view the regions in which Cloud Backup is supported.
Automatically activate the Cloud Backup client for Linux.
Copy one of the commands based on your network (Internet, VPN, or leased line). Then, paste and run the command on the Cloud Backup client for Linux to activate the client.
Run one of the following commands to install the tool that is required to back up and restore on-premises NAS file systems.
The Network File System (NFS) and Server Message Block (SMB) protocols are supported. Select a tool based on the protocol of your NAS file system.
NFS tool
CentOS
sudo yum install nfs-utilsUbuntu
sudo apt-get install nfs-common
SMB tool
CentOS
sudo yum install cifs-utilsUbuntu
sudo apt-get install cifs-utilsopenSUSE
sudo zypper install cifs-utils
Optional. Configure the configclustertaskfetchernum parameter of the Cloud Backup client to accelerate the execution of backup tasks. Perform the following steps:
Log on to the ECS instance.
Change the maximum number of concurrent tasks on the Cloud Backup client to 2. We recommend that you set the value to 8 or smaller. The larger the value, the more resources are consumed. We recommend that you set a reasonable value.
A backup job may be divided into multiple tasks. You can use the configclustertaskfetchernum parameter to specify the maximum number of tasks that are concurrently executed on the Cloud Backup client.
The default value of the configclustertaskfetchernum parameter is 1.
Set the value of the configclustertaskfetchernum parameter in the hbrclient.yaml file to 2. We recommend that you do not set the parameter to a value greater than 8.
configclustertaskfetchernum: 2NoteOn Linux, the hbrclient.yaml file is located at the following path: /opt/alibabacloud/hbrclient/conf.
Restart the Cloud Backup service. Note that running tasks are affected if you restart the Cloud Backup service.
Run the
systemctl restart hbrclientcommand to restart the Cloud Backup service.
Related operations
After the backup client is installed, click ⋮ in the Actions column on the NAS Instance tab to perform related operations.
Operation | Description |
Edit | Edit a NAS file system. |
Delete | Delete a NAS file system. Warning If the NAS file system is associated with a backup plan or contains backup data, you cannot delete the file system. After a NAS file system is deleted, it cannot be recovered. Proceed with caution. |
Edit Backup Client Group |
|