To monitor Go applications deployed in Container Service for Kubernetes (ACK) or Container Compute Service (ACS), you must install the ack-onepilot component and compile your Go binary file. You can then view monitoring data, such as application topology, interface calls, and database analysis, in the Application Real-Time Monitoring Service (ARMS) console. This topic describes how to install an agent for a Go application in Container Service for Kubernetes (ACK) or Container Compute Service (ACS).
Prerequisites
An ACK or ACS cluster is created.
ACK cluster: You can create an ACK managed cluster, ACK dedicated cluster, or ACK Serverless cluster, or a registered cluster, based on your business requirements.
ACS cluster: For information about how to create an ACS cluster, see Create an ACS cluster.
Create a namespace. This topic uses default as the namespace name. For more information, see Manage namespaces and quotas.
Check your compile-time operating system, architecture, Go version, and framework version. For more information, see Go libraries supported by Application Monitoring.
Step 1: Grant ARMS resource access permissions
ACK managed cluster
If an ARMS Addon Token does not exist in your ACK managed cluster, you must manually grant the cluster access permissions to ARMS resources. If the token exists, you can skip to Step 4.
If a cluster has ARMS Addon Token, ARMS performs password-free authorization on the cluster. ARMS Addon Token may not exist in some ACK managed clusters. We recommend that you check whether an ACK managed cluster has ARMS Addon Token before you use ARMS to monitor applications in the cluster. If the cluster has no ARMS Addon Token, you must authorize the cluster to access ARMS.
ACK dedicated cluster/registered cluster
To monitor an application deployed in an ACK dedicated cluster or registered cluster, make sure that the AliyunARMSFullAccess and AliyunSTSAssumeRoleAccess permissions are granted to your Resouce Access Management (RAM) user.
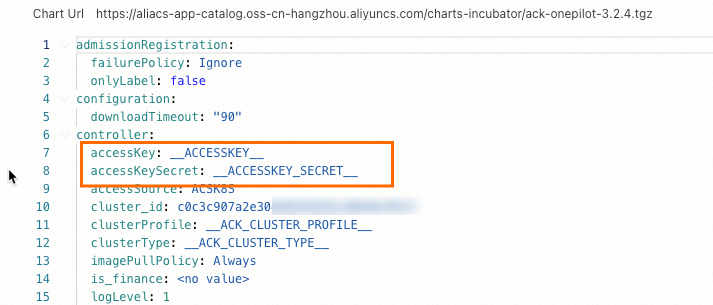
After installing the ack-onepilot component, enter the AccessKey ID and AccessKey Secret of the account in the configuration file of ack-onepilot.
Method 1: Input in Hem
Log on to the ACK console. In the left navigation pane, click Clusters.
On the Clusters page, click the cluster you want to manage. In the left-side navigation pane of the page that appears, choose . Then, click Update next to ack-onepilot.
Replace
accessKeyandaccessKeySecretwith the AccessKey ID and AccessKey secret of the account and click OK.NoteThe AccessKey Secret is only visible during initial creation of an Alibaba Cloud AccessKey pair and cannot be retrieved afterward. This design mitigates leakage risks. Securely store the Secret immediately.
Restart the Deployment.
Method 2: Import through Kubernetes Secrets
Log on to the ACK console. In the left-side navigation pane, click Clusters.
On the Clusters page, click the cluster you want to manage. In the left-side navigation pane of the page that appears, choose .
Click Create. In the panel that appears, click Add and add the AccessKey ID and AccessKey Secret for ack-onepilot.
NoteThe AccessKey Secret is only visible during initial creation of an Alibaba Cloud AccessKey pair and cannot be retrieved afterward. This design mitigates leakage risks. Securely store the Secret immediately.

In the left-side navigation pane, choose . On the page that appears, click the ack-onepilot component. Generally, it is named ack-onepilot-ack-onepilot in the ack-onepilot namespace.
In the upper-right corner of the page that appears, click Edit.
Scroll down until you see the Environments section. Click Add, add the environment variables
ONE_PILOT_ACCESSKEYandONE_PILOT_ACCESSKEY_SECRET, reference the Secrets in Kubernetes Secrets, and click OK.
ASK/ECI cluster
To monitor applications in an ACK Serverless (ASK) cluster or applications in a Kubernetes cluster connected to Elastic Container Instance, you must first authorize the cluster to access ARMS on the Cloud Resource Access Authorization page. Then, restart all pods on which the ack-onepilot component is deployed.
Step 2: Install the ARMS agent helper (ack-onepilot)
Log on to the ACK console. On the Clusters page, click the name of the cluster.
In the navigation pane on the left, click Add-ons. Then, search for ack-onepilot.
ImportantMake sure that the version of ack-onepilot is 3.2.0 or later.
Click Install on the ack-onepilot card.
NoteBy default, the ack-onepilot component supports 1,000 pods. For every additional 1,000 pods in the cluster, you must add 0.5 CPU cores and 512 MB memory for the component.
In the dialog box that appears, configure the parameters and click OK. We recommend that you use the default values.
NoteAfter you install ack-onepilot, you can upgrade, configure, or uninstall it on the Add-ons page.
Step 3: Compile the Golang application image
(Optional) If your project uses vendor mode for compilation or the compile-time parameters include
-mod=vendor, check the following:Check if the go.mod file contains the `google.golang.org/protobuf` dependency, either directly or indirectly. If not, see the following instructions:
Check if the compile-time parameters include
-mod=vendor. If not, add-mod=vendoraftergo build.
Use the
wgetcommand to download the compile-time tool instgo. Select the download address based on your compile-time environment and machine region.Note that instgo automatically updates at compile-time. Save instgo in a folder where you have modification permissions.
NoteInstgo is a compile-time tool provided by ARMS for Go applications. After you compile your Go project with instgo, ARMS can monitor your application.
The compile-time tool is the same for all regions. If your environment can access Object Storage Service (OSS) over the internet, you can use the internet download address for China (Hangzhou) for your operating system and architecture.
Grant executable permissions to the compile-time tool.
Linux/Mac
# Grant executable permissions
chmod +x instgo
Windows
No executable permissions are required for Windows.
Obtain the LicenseKey and configure compile-time parameters.
ImportantIf you skip this step, instgo enters dev mode and installs the latest version of the ARMS agent by default. To deploy your application in a production environment, you must configure the following parameters.
Obtain the LicenseKey by calling the DescribeTraceLicenseKey OpenAPI operation.
On the DescribeTraceLicenseKey page, click Debug. Select a region and click Initiate Call to obtain the LicenseKey.

After you obtain the LicenseKey, use the
setcommand to configure the compile-time parameters.instgo set --licenseKey=${YourLicenseKey}
Add `instgo` as a prefix to your original compile command and run the command.
instgo go build {arg1} {arg2} {arg3}If you use `go install` to compile the project, you can also add `instgo` as a prefix to the command.
Build the image using the binary file compiled in the previous step.
Step 4: Enable Application Monitoring for the Go application
The following YAML template shows how to create a stateless (Deployment) application and enable Application Monitoring for it:
Log on to the ACK console. In the left navigation pane, click Clusters.
At the top of the Clusters page, select the region and resource group where the target cluster is located, and click the name of the target cluster. In the navigation pane on the left, click Workloads. Then, select Deployments, StatefulSets, or DaemonSets.
Find the target application and choose
 > Edit YAML.
To create a new application, click Create From YAML.
Add the following
labelsunder spec.template.metadata in the YAML file.labels: aliyun.com/app-language: golang # Required for Go applications. Specifies that this is a Go application. armsPilotAutoEnable: 'on' armsPilotCreateAppName: "<your-deployment-name>" # Replace <your-deployment-name> with your application name.
Click Update.
Execution result
After about one minute, check whether the Go application appears on the page in the ARMS console and whether data is reported. If so, the agent is successfully installed.
